Would you like to save this?
No Bake Mini Cheesecakes Recipe
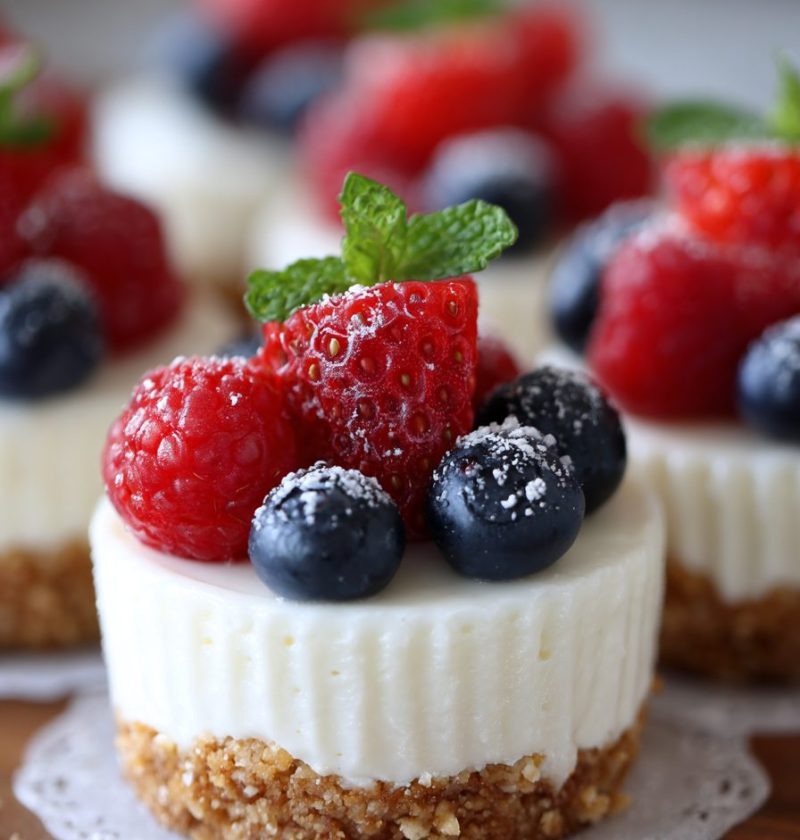
If you need a dessert that feels special without turning on the oven, this No Bake Mini Cheesecakes Recipe is a real keeper. These creamy little cheesecake cups are cool, silky, easy to make ahead, and perfect for parties, potlucks, showers, or those evenings when you simply want a sweet bite waiting in the fridge.
A simple little dessert that always feels fancy
There’s something so charming about no bake mini cheesecakes. They look polished and bakery-worthy, but they’re honestly one of the easiest desserts you can make at home. You get that classic cheesecake flavor—rich cream cheese filling, buttery graham cracker crust, and a smooth, chilled finish—without the water bath, cracking, or oven drama.
I’ve made some version of this mini cheesecakes recipe for years, especially in spring and summer when the kitchen already feels warm enough. These are also a favorite around the holidays because they can be dressed up in so many ways: fresh berries for Easter and Mother’s Day, caramel and chopped pecans in the fall, crushed peppermint at Christmas. That’s the beauty of individual cheesecakes—they’re easy to customize and even easier to serve.
And from a practical standpoint, this no bake cheesecake checks a lot of boxes. It’s portion-friendly, make-ahead friendly, and beginner-friendly. If you’ve ever wanted an easy cheesecake recipe that still gets those “Oh my goodness, you made these?” compliments, this is it. You know what? Sometimes the simplest desserts are the ones people remember most.
Why you’ll love this recipe
- No oven needed, which is a blessing in warm weather.
- Easy to portion for parties, showers, and family gatherings.
- Creamy, rich texture with less fuss than baked cheesecake.
- Great make-ahead dessert for busy weekends.
- Easy to dress up with fruit, chocolate, caramel, or cookie crumbs.
- Perfect bite size desserts for dessert tables and holiday trays.
- Uses simple grocery-store ingredients you may already have.
- A reliable simple no bake dessert for beginners.
- Chills beautifully and travels better than a full cheesecake.
- Feels fancy, but the method is very straightforward.
Ingredients you’ll need
For the crust:
- 1 1/2 cups graham cracker crumbs (about 10 full graham cracker sheets)
- 1/4 cup granulated sugar
- 6 tablespoons unsalted butter, melted
For the filling:
- 16 ounces cream cheese, softened
- 3/4 cup powdered sugar
- 1 teaspoon pure vanilla extract
- 1 tablespoon fresh lemon juice
- 1 cup heavy whipping cream, cold
Optional toppings:
- Fresh strawberries, blueberries, or raspberries
- Cherry pie filling
- Lemon curd
- Chocolate ganache
- Salted caramel sauce
- Crushed cookies or toasted nuts
A few helpful ingredient notes:
- Cream cheese: Use full-fat block cream cheese for the best structure and flavor. Tub-style cream cheese tends to be softer and can make the filling too loose.
- Graham cracker crumbs: Store-bought crumbs work fine, but crushing whole crackers yourself often gives a fresher flavor.
- Butter: Unsalted lets you control the flavor better, though salted butter works in a pinch.
- Powdered sugar: This sweetens the filling and helps keep it silky. Don’t swap in granulated sugar here unless you want a grainier texture.
- Heavy whipping cream: Cold cream whips up faster and creates that light mousse-like texture that makes these homemade cheesecake cups so lovely.
- Lemon juice: It doesn’t make the cheesecake taste lemony; it simply brightens the flavor and cuts the richness a bit.

Directions
-
Prepare your pan or liners.
Line a 12-cup muffin pan with paper liners, or use small dessert cups if you want a prettier, crustless presentation on the sides. Liners make these easy to lift and serve, especially for parties. -
Make the graham cracker crust.
In a medium bowl, stir together the graham cracker crumbs, granulated sugar, and melted butter until the texture looks like damp sand. If it seems too dry, add 1 more tablespoon of melted butter. -
Press the crust into the pan.
Spoon about 1 1/2 tablespoons of crust mixture into each muffin cup. Press it down firmly with the bottom of a small glass, a spice jar, or even a measuring cup. A firm press helps the crust hold together when chilled. -
Chill the crust briefly.
Place the pan in the refrigerator for 15 to 20 minutes while you make the filling. This quick chill helps the butter set and keeps the layers neat. -
Beat the cream cheese mixture.
In a large bowl, beat the softened cream cheese with the powdered sugar, vanilla extract, and lemon juice until smooth and fluffy. Scrape down the bowl once or twice so you don’t end up with little lumps hiding near the bottom. -
Whip the cream separately.
In another bowl, whip the cold heavy cream until stiff peaks form. A hand mixer works beautifully here, though a stand mixer makes quick work of it. You want the cream thick enough to hold shape but not curdled. -
Fold the whipped cream into the cheesecake base.
Gently fold the whipped cream into the cream cheese mixture in two or three additions. Take your time. This is what gives the filling that light, airy texture instead of something dense and heavy. -
Fill each cup.
Spoon or pipe the filling over the chilled crusts, dividing it evenly among the 12 cups. If you want a neater bakery-style look, use a piping bag or a large zip-top bag with the corner snipped off. -
Chill until set.
Refrigerate the mini cheesecakes for at least 4 hours, though overnight is even better. That longer chill gives you a firmer, cleaner bite and better flavor too—kind of like soup the next day, only sweeter. -
Top and serve.
Just before serving, add your favorite toppings. Fresh berries are bright and classic, cherry topping feels old-school in the best way, and caramel with chopped pecans turns these into a holiday dessert tray favorite.
Servings & timing
- Yield: 12 mini cheesecakes
- Prep Time: 25 minutes
- Chill Time: 4 hours
- Total Time: 4 hours 25 minutes
If you’re making these for a party, I recommend preparing them the night before. The texture improves, and your next-day self will be very grateful.
Variations to keep things interesting
- Berry swirl: Spoon a little raspberry or strawberry jam on top and swirl gently before chilling.
- Chocolate version: Add 2 tablespoons cocoa powder to the filling and top with chocolate shavings.
- Lemon cheesecake cups: Add 1 teaspoon lemon zest and top with lemon curd for a bright chilled cheesecake dessert.
- Oreo crust: Replace the graham crackers with finely crushed Oreos for a cookies-and-cream spin.
- Pumpkin spice twist: Blend 1/3 cup pumpkin puree and a pinch of pumpkin pie spice into the filling for fall.
- Lighter version: Use reduced-fat cream cheese and a light whipped topping, though the texture will be a little softer.
Storage & reheating
These homemade cheesecake cups should be stored in the refrigerator, covered tightly, for up to 4 days. They hold their shape best when kept cold, so don’t leave them sitting out too long at room temperature, especially in warm weather.
For longer storage, freeze them without fresh fruit toppings for up to 2 months. Place them on a tray until frozen solid, then transfer to a freezer-safe container. Thaw overnight in the refrigerator before serving.
No reheating is needed, of course—this is cheesecake without baking, and it’s meant to be served chilled. If you’re making them ahead, wait to add fruit, sauces, or crunchy toppings until just before serving so everything stays fresh and pretty.
Notes from my kitchen
A few things I’ve learned after making this mini dessert recipe more times than I can count:
First, room-temperature cream cheese matters. Really matters. If it’s too cold, you’ll fight lumps, and no one enjoys that. I usually set mine out for 30 to 45 minutes.
Second, don’t rush the chill time. The filling may look set after a couple of hours, but a longer chill gives you that proper cheesecake texture—firm enough to hold, soft enough to melt on the tongue.
Third, piping the filling makes a difference if you care about presentation. Is it necessary? Not one bit. But if you’re serving these at a baby shower, brunch, or church supper, that extra tidy swirl looks awfully nice.
And finally, balance the toppings. Since the filling is rich, something tart or fruity really wakes it up. Blueberries, strawberries, even a spoonful of passionfruit topping if you’re feeling adventurous—it all works.
FAQs
Can I make this No Bake Mini Cheesecakes Recipe ahead of time?
Yes, and it’s actually better that way. Make them up to 24 hours ahead, then add toppings right before serving.
Why didn’t my filling set properly?
Usually it means the whipped cream wasn’t beaten enough, the cream cheese was too soft, or the cheesecakes didn’t chill long enough.
Can I use whipped topping instead of heavy cream?
Yes, you can use an 8-ounce tub of whipped topping for convenience. The texture will be slightly different, but it still works well in a pinch.
Can I make these in jars or dessert cups?
Absolutely. That’s a lovely way to serve individual cheesecakes, especially for picnics or outdoor parties where liners might be fussy.
What’s the best crust besides graham crackers?
Vanilla wafers, digestive biscuits, Biscoff cookies, and Oreos all make excellent crusts depending on the flavor profile you want.
Can I freeze no bake mini cheesecakes?
Yes. Freeze them without delicate toppings, then thaw in the refrigerator overnight for the best texture.
How do I keep the cheesecake filling smooth?
Start with softened cream cheese and beat it well before folding in the whipped cream. Scraping the bowl helps more than people think.
Are these good for parties and holidays?
They’re excellent for both. Because they’re compact, tidy, and easy to decorate, they’re one of my favorite party dessert ideas and a smart addition to any dessert board.
A sweet little finish
This No Bake Mini Cheesecakes Recipe is everything a good dessert should be: easy, creamy, make-ahead friendly, and pretty enough for company. Whether you top them with berries, caramel, or a simple spoonful of cherry filling, these little cheesecakes always bring a bit of joy to the table.
If you try them, I’d love to hear how you dressed them up. Leave a comment with your favorite topping, and if you’re in the mood for more cream cheese dessert ideas, this would pair beautifully with fruit parfaits, lemon bars, or a simple iced coffee on the side.