Would you like to save this?
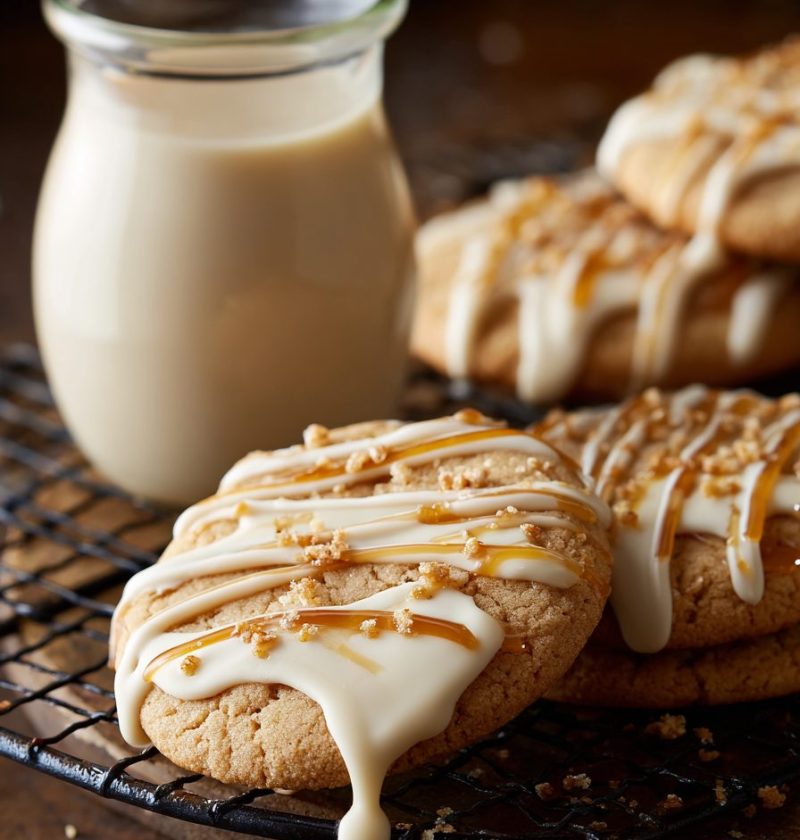
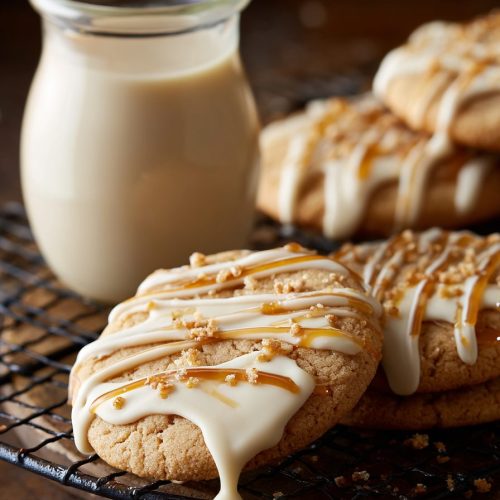
Maple Cookies with Maple Icing Recipe
If you love cozy fall flavors and the taste of real maple syrup, this Maple Cookies with Maple Icing Recipe is going to be your new favorite cookie—soft, chewy, and drenched in a glossy maple icing that tastes like a hug in dessert form.
These maple cookies are my answer to those chilly afternoons when the leaves start turning and I want something homemade, but still simple enough to pull together between work emails and feeding the dog. This is a classic maple Cookies Recipe made with real maple syrup and warm spices, topped with an easy maple icing recipe you can whisk up in a bowl. Everything about them says “fall cookie recipe,” but honestly, we bake them year-round.
About These Maple Cookies with Maple Icing
Let me explain what makes these maple flavored cookies so special.
These are soft maple cookies (think maple sugar cookies, but cozier) with slightly crisp edges and a tender, chewy center. They’re flavored with pure maple syrup, a touch of brown sugar, and vanilla, which gives them that deep, almost caramel-like sweetness. Then we finish them with a silky maple frosting that sets into a thin, crackly glaze on top—like your favorite bakery cookie, but homemade.
I first started baking these maple glazed cookies when my kids were in middle school. We had a “cookie of the month” ritual, and when September rolled around, everyone wanted something “that tastes like pancakes.” Maple syrup cookies were the obvious answer. Over the years I’ve tinkered with the texture, adjusted the spices, and fussed with the icing until we landed on this exact version. Now this Maple Cookies with Maple Icing Recipe shows up for:
- Fall bake sales
- Thanksgiving dessert platters
- Holiday cookie tins
- And random Tuesday nights when the house feels a little too quiet
They’re also surprisingly “better for you” than some bakery cookies. We use real butter and real maple syrup—no weird flavors—and you can easily make them with whole wheat pastry flour or reduce the sugar a bit if that’s your style.
If you love maple dessert recipes, or you’re just looking for an easy maple Cookies Recipe that always works, you’re in the right place.
Why You’ll Love This Maple Cookies with Maple Icing Recipe
- Big maple flavor, no fake extracts – These homemade maple cookies use real maple syrup for deep, authentic flavor.
- Soft and chewy texture – The balance of butter, brown sugar, and maple creates tender, chewy maple cookies with slightly crisp edges.
- Simple pantry ingredients – Everything is easy to find and you probably have most of it already.
- Quick to make – About 15 minutes of mixing, a short chill, and they’re ready to bake.
- Perfect for gifting – The maple icing sets nicely, so they stack well in cookie boxes and tins.
- Freezer-friendly – The dough and the finished cookies both freeze beautifully for future cravings.
- Easy to customize – Add nuts, spices, or even a maple cream filling for your own twist.
- Crowd-pleasing flavor – Maple syrup cookies feel special but still familiar, like fancy pancake vibes in cookie form.
Ingredients for Soft, Chewy Maple Cookies
You don’t need anything exotic for these maple sugar cookies—just a few smart choices and real maple syrup.

For the Maple Cookies
-
1 cup (2 sticks / 226 g) unsalted butter, softened
Room temperature butter creams better and helps create that soft-chewy texture. If using salted butter, reduce added salt slightly. -
1 cup (200 g) packed light brown sugar
Brown sugar adds moisture and a hint of molasses flavor that pairs beautifully with maple. -
1/2 cup (120 ml) pure maple syrup
Use real maple syrup, Grade A amber or dark for the best flavor—this is not the time for “pancake syrup” with corn syrup. -
1 large egg, room temperature
Room temp eggs mix more evenly and help the cookies bake more evenly. -
2 teaspoons pure vanilla extract
Vanilla supports the maple flavor and keeps it from tasting flat. -
2 3/4 cups (330 g) all-purpose flour
Spoon and level the flour so you don’t pack in too much.
Substitution: You can swap up to 1 cup with whole wheat pastry flour for a nuttier, heartier cookie. -
1 teaspoon baking soda
Gives the cookies a slight lift and helps them spread just the right amount. -
1/2 teaspoon baking powder
Works with the baking soda to keep the cookies soft and tender. -
3/4 teaspoon fine sea salt
Salt sharpens the maple flavor and keeps the sweetness from feeling heavy. -
1 teaspoon ground cinnamon
Optional but recommended—it adds a warm, cozy note without screaming “snickerdoodle.” -
1/4 teaspoon ground nutmeg (optional)
A little goes a long way; it makes these maple flavored cookies taste bakery-level.
For the Maple Icing
This is a quick maple frosting recipe that sets into a glossy, slightly firm glaze.
-
1 1/2 cups (180 g) powdered sugar, sifted
Sifting helps avoid lumps so your maple icing goes on smooth. -
3 tablespoons pure maple syrup
Again, real maple syrup makes all the difference here. -
1–3 tablespoons milk or heavy cream
Start with 1 tablespoon and add more as needed to reach a thick, pourable consistency. Milk keeps it light; cream makes it richer. -
1/2 teaspoon pure vanilla extract
For extra depth and a classic bakery icing flavor. -
Pinch of fine sea salt
Just a pinch balances the sweetness.
Step-by-Step Directions
Follow these directions and you’ll have homemade maple cookies that look (and taste) like they came from a bakery, not your Tuesday afternoon.
1. Cream the butter, sugar, and maple
- In a large mixing bowl (a stand mixer with the paddle works great), add the softened butter and brown sugar.
- Beat on medium speed for 2–3 minutes, until the mixture looks light, fluffy, and a bit lighter in color.
- Pour in the maple syrup and beat again for 1 minute. The mixture may look slightly curdled at first—that’s okay. It will smooth out when you add the egg and flour.
Tip: Scrape down the sides and bottom of the bowl so everything mixes evenly.
2. Add the egg and vanilla
- Add the egg and vanilla extract to the bowl.
- Beat on medium speed just until the egg is fully incorporated and the mixture is smooth and creamy.
You don’t want to overmix here; once everything looks combined, you’re done.
3. Combine dry ingredients
- In a separate medium bowl, whisk together the flour, baking soda, baking powder, salt, cinnamon, and nutmeg (if using).
This helps distribute the leavening and spices evenly so you don’t get weird pockets of baking soda.
4. Bring the dough together
- With the mixer on low, gradually add the dry ingredients to the wet mixture in 2–3 additions.
- Mix just until the flour disappears and the dough comes together in a soft, thick mass.
If the dough seems very sticky, don’t panic—chilling will firm it up.
5. Chill the cookie dough
- Cover the bowl with plastic wrap or a reusable lid and refrigerate the dough for at least 30–45 minutes, or up to 24 hours.
Chilling helps the flour hydrate and keeps your maple syrup cookies from over-spreading in the oven. For chewier maple cookies, aim for at least 1 hour of chill time.
6. Preheat and prep your pans
- When you’re ready to bake, preheat your oven to 350°F (175°C).
- Line two baking sheets with parchment paper or silicone baking mats.
Let the dough sit on the counter for 5–10 minutes if it’s very firm from the fridge; it should be scoopable but not sticky.
7. Scoop, shape, and bake
-
Use a medium cookie scoop (about 1 1/2 tablespoons of dough) and portion the dough onto the prepared baking sheets, spacing them about 2 inches apart.
-
If you’d like extra pretty tops, roll each scoop into a smooth ball with your hands.
-
Bake for 9–12 minutes, depending on your oven. The cookies should look set around the edges but still soft and slightly puffy in the centers.
Visual cue: The bottoms will be light golden, and the tops may have tiny cracks—that’s perfect for catching the maple icing.
- Let the cookies cool on the baking sheet for 5 minutes, then move them to a wire rack to cool completely before icing.
Make the Maple Icing
You can whisk this easy maple icing while the cookies cool.
8. Mix the icing base
- In a medium bowl, whisk together the powdered sugar and a pinch of salt.
- Add the maple syrup and vanilla, then whisk until thick and smooth—it will be very stiff at this point.
9. Adjust consistency
- Add the milk or cream 1 tablespoon at a time, whisking after each addition, until the icing is silky and pours in a thick ribbon from the whisk.
You want it thick enough that it clings to the cookies but thin enough to settle into a smooth, glossy surface. Think “slow lava,” not “water.”
If the icing gets too thin, add a little more powdered sugar; too thick, add a few drops more milk.
10. Ice the cookies
- Once the maple cookies are fully cool, spoon about 1–2 teaspoons of icing onto the center of each cookie.
- Use the back of the spoon to gently nudge the icing toward the edges; it will slowly spread and smooth out.
Let the iced cookies sit at room temperature for 20–30 minutes until the maple icing sets. Then they’re ready to eat—or pack into containers.
Servings & Timing
- Yield: About 24–28 cookies (using a medium cookie scoop)
- Prep Time: 15–20 minutes
- Chill Time: 30–60 minutes (longer is okay)
- Bake Time: 9–12 minutes per batch
- Total Time: About 1 hour 15 minutes, including chilling and cooling
If you’re baking for a party or gifting, I like to double this Maple Cookies with Maple Icing Recipe and freeze half for a “just in case” stash.
Easy Variations and Flavor Twists
You know what? Once you’ve nailed the base recipe, you can have fun with it.
- Maple pecan cookies – Stir 3/4 cup chopped toasted pecans into the dough before chilling.
- Maple cinnamon sugar cookies – Roll the dough balls in a mixture of sugar and cinnamon before baking, then skip or drizzle less icing.
- Brown butter maple cookies – Brown the butter first, cool until just softened, and proceed with the recipe for a deeper, nutty flavor.
- Whole grain maple cookies – Replace 1–1 1/2 cups of the all-purpose flour with white whole wheat or whole wheat pastry flour.
- Gluten-free maple cookies – Use a 1:1 gluten-free baking flour blend; chill the dough well and watch the bake time closely.
- Extra-spiced maple cookies – Add a pinch of cloves and extra cinnamon for a more “holiday” maple dessert recipe.
How to Store, Freeze, and Make Ahead
These maple syrup cookies are very forgiving when it comes to storage, which is part of why I make them for the holidays.
Storing
- Room temperature:
Store iced cookies in an airtight container at cool room temperature for 3–4 days. Place parchment between layers if you’re stacking them. - Refrigerator:
They’ll keep up to 1 week in the fridge, though the texture may firm up slightly. Let them come back to room temp before serving.
Freezing Baked Cookies
- Arrange cooled, iced cookies in a single layer on a baking sheet and freeze until firm.
- Transfer to an airtight container or freezer bag with parchment between layers.
- Freeze for up to 2–3 months.
To serve, thaw at room temperature for about 30–45 minutes. The maple icing might look slightly matte after freezing, but the flavor is still wonderful.
Freezing Cookie Dough
If you love the idea of fresh-baked maple cookies on a random weeknight, this part is for you.
- Scoop the dough into balls after chilling.
- Freeze the dough balls on a baking sheet until solid, then store in a freezer bag.
- Bake from frozen at 350°F, adding 1–2 extra minutes to the bake time.
Make-Ahead Tips
- You can mix the dough up to 24 hours ahead and keep it chilled.
- The maple icing is best made the same day you plan to serve, but you can whisk in a few drops of milk if it thickens while it sits.
Baker’s Notes & Helpful Tips
A few things I’ve learned over many batches of maple cookies (and a few duds along the way):
- Use real maple syrup. I know I keep saying it, but pancake syrup won’t give you the same rich flavor. Grade A amber or dark is my favorite.
- Don’t skip the chill. Warm dough spreads too much and you lose that soft, thick cookie center.
- Watch the bake time. Pull the cookies out when they still look a little soft in the middle. They continue to set as they cool, which is the secret to chewy maple cookies.
- Adjust sweetness to your taste. If you like cookies a little less sweet, reduce the brown sugar by 1–2 tablespoons; the maple icing will still give plenty of sweetness.
- Try different textures. For a slightly thicker, cake-like cookie, add 2 more tablespoons of flour. For thinner, chewier cookies, reduce flour by 2 tablespoons.
- Decorating idea: While the icing is still wet, sprinkle a few chopped toasted pecans or a tiny pinch of flaky sea salt on top—they look like bakery cookies.
- Altitude note: If you’re baking at high altitude, add 1–2 extra tablespoons of flour and reduce baking soda slightly to keep the cookies from over-spreading.
Frequently Asked Questions
Can I make these maple cookies without eggs?
Yes. Use a flax egg (1 tablespoon ground flax + 3 tablespoons water, rested 5–10 minutes) or your favorite egg replacer; the texture will be slightly denser but still tasty.
What’s the best maple syrup for baking?
Use pure maple syrup labeled Grade A amber or dark for the best flavor—these give you that rich, cozy maple taste without being bitter.
Can I skip the maple icing and serve the cookies plain?
You can, but they’ll taste more like simple maple sugar cookies. The icing adds a lot of maple punch and that shiny, bakery-style finish.
My cookies spread too much—what happened?
Most likely the dough was too warm or you didn’t chill it long enough. Next time, chill at least 1 hour, and check that your butter wasn’t melted going in.
My icing is too runny—how can I fix it?
Whisk in more powdered sugar, a tablespoon at a time, until it thickens up and clings to the spoon.
Can I use maple extract to boost the flavor?
If you love a strong maple taste, you can add 1/4–1/2 teaspoon of maple extract to the dough or icing, but still use real maple syrup as the main sweetener.
Are these maple cookies good for shipping?
Yes. Once the maple glaze is fully set, pack them snugly in a tin with parchment or wax paper between layers and ship within 1–2 days.
Can I make them smaller or bigger?
Absolutely. For mini cookies, use a small scoop and bake 7–9 minutes. For larger cookies, use about 2 tablespoons of dough and bake closer to 11–13 minutes.
Final Thoughts
These Maple Cookies with Maple Icing are the kind of recipe that quietly works its way into your yearly traditions—soft, chewy, full of real maple flavor, and just fancy enough to feel special without being fussy. They’re equally at home on a holiday cookie tray, next to a cup of coffee, or tucked into a lunchbox as a sweet surprise.
If you try this Maple Cookies with Maple Icing Recipe, I’d love to hear how it went—tell me in the comments what you changed, which variation you tried, or who you shared them with. And if cozy baking is your happy place, you might enjoy exploring more fall cookie recipes and maple dessert ideas from your own kitchen next.
Maple Cookies with Maple Icing
Ingredients
- 1 cup unsalted butter 2 sticks / 226 g, softened; reduce added salt slightly if using salted butter
- 1 cup light brown sugar 200 g, packed
- 1/2 cup pure maple syrup 120 ml; Grade A amber or dark for best flavor
- 1 large egg room temperature
- 2 teaspoons pure vanilla extract
- 2 3/4 cups all-purpose flour 330 g, spooned and leveled; you can swap up to 1 cup with whole wheat pastry flour
- 1 teaspoon baking soda
- 1/2 teaspoon baking powder
- 3/4 teaspoon fine sea salt
- 1 teaspoon ground cinnamon optional but recommended
- 1/4 teaspoon ground nutmeg optional
- 1 1/2 cups powdered sugar 180 g, sifted
- 3 tablespoons pure maple syrup
- 1-3 tablespoons milk or heavy cream start with 1 tablespoon, add more as needed
- 1/2 teaspoon pure vanilla extract
- fine sea salt pinch, for icing
Instructions
- In a large mixing bowl or stand mixer fitted with the paddle, add the softened butter and brown sugar. Beat on medium speed for 2–3 minutes, until light, fluffy, and slightly lighter in color. Pour in the maple syrup and beat again for 1 minute; the mixture may look slightly curdled, which is okay.1 cup unsalted butter, 1 cup light brown sugar, 1/2 cup pure maple syrup
- Add the egg and 2 teaspoons vanilla extract to the bowl. Beat on medium speed just until fully incorporated and the mixture is smooth and creamy. Do not overmix.1 large egg, 2 teaspoons pure vanilla extract
- In a separate medium bowl, whisk together the flour, baking soda, baking powder, 3/4 teaspoon fine sea salt, cinnamon, and nutmeg (if using) until evenly combined.2 3/4 cups all-purpose flour, 1 teaspoon baking soda, 1/2 teaspoon baking powder, 3/4 teaspoon fine sea salt, 1 teaspoon ground cinnamon, 1/4 teaspoon ground nutmeg
- With the mixer on low speed, gradually add the dry ingredients to the wet mixture in 2–3 additions. Mix just until the flour disappears and a soft, thick dough forms. If the dough seems sticky, it will firm up during chilling.
- Cover the bowl with plastic wrap or a reusable lid and refrigerate the dough for at least 30–45 minutes, or up to 24 hours. For chewier cookies, chill at least 1 hour.
- When ready to bake, preheat the oven to 350°F (175°C). Line two baking sheets with parchment paper or silicone baking mats. If the dough is very firm, let it sit at room temperature for 5–10 minutes until scoopable but not sticky.
- Use a medium cookie scoop (about 1 1/2 tablespoons of dough) to portion the dough onto the prepared baking sheets, spacing about 2 inches apart. For smoother tops, roll each scoop into a ball. Bake for 9–12 minutes, until the edges look set but the centers are still soft and slightly puffy. The bottoms should be light golden and the tops may have tiny cracks.
- Let the cookies cool on the baking sheet for 5 minutes, then transfer to a wire rack to cool completely before icing.
- In a medium bowl, whisk together the powdered sugar and a pinch of fine sea salt. Add 3 tablespoons maple syrup and 1/2 teaspoon vanilla extract, then whisk until thick and smooth. The mixture will be very stiff at this stage.1 1/2 cups powdered sugar, 3 tablespoons pure maple syrup, 1/2 teaspoon pure vanilla extract, fine sea salt
- Add the milk or heavy cream 1 tablespoon at a time, whisking after each addition, until the icing is silky and pours in a thick ribbon from the whisk. It should be thick enough to cling to the cookies but thin enough to settle into a smooth, glossy surface. If it becomes too thin, whisk in a little more powdered sugar; if too thick, add a few more drops of milk or cream.1-3 tablespoons milk or heavy cream
- Once the cookies are completely cool, spoon about 1–2 teaspoons of icing onto the center of each cookie. Use the back of the spoon to gently nudge the icing toward the edges; it will slowly spread and smooth out. Let the iced cookies sit at room temperature for 20–30 minutes, or until the icing is set.