Would you like to save this?
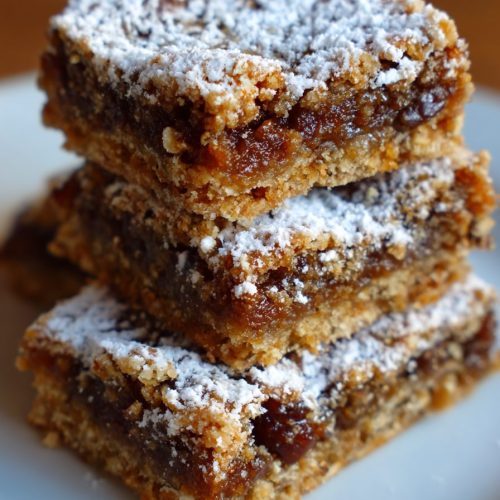
Date Bars Recipe (Old-Fashioned, Chewy & Perfectly Sweet)
If you’re craving a cozy, homemade treat, this Date Bars Recipe is everything: buttery oat crumble, thick jammy date filling, and a nostalgic flavor that feels like it came straight from Grandma’s recipe box.
A Cozy Date Bars Recipe Straight From My 1970s Memories
Let me tell you—this Date Bars Recipe tastes exactly like the kind of dessert that used to show up at church potlucks and holiday cookie trays when I was a kid in the Midwest. They’re sometimes called oatmeal date bars, date squares, or oat crumb date bars. Whatever you call them, they’re soft and chewy in the center, with a crisp, buttery oatmeal crumble top and bottom and a thick layer of sweet, sticky date filling in the middle.
These homemade date bars are the kind of dessert that works year-round:
- Lovely for Christmas cookie exchanges
- Perfect for lunchboxes and after-school snacks
- Elegant enough for brunch with coffee or tea
Compared to a lot of bar desserts, healthy date bars land in a nicer place on the “treat scale.” The sweetness comes mainly from dates, which bring fiber and minerals, and you get hearty whole-grain oats in every bite. They’re still a dessert, but a dessert that doesn’t make you feel like you just ate a candy bar for dinner.
I like to bake a pan of these old fashioned date bars on Sunday afternoons. The house smells warm and buttery, and then my family nibbles on them all week—tucked into lunch boxes, warmed up with a scoop of vanilla ice cream, or eaten cold straight from the fridge, which is my personal favorite.
Why You’ll Love This Date Bars Recipe
- Classic, nostalgic flavor – Tastes like a beloved old fashioned date bars recipe from your grandma’s kitchen.
- Chewy, jammy center – The thick date filling turns soft and luxurious, almost like caramel.
- Hearty oatmeal crumb – Oats add texture, fiber, and that cozy “baked from scratch” feel.
- Easy, no-fuss method – Simple pantry ingredients and straightforward steps; great for beginners.
- Naturally sweetened filling – The date filling bars layer relies mostly on dates, not a ton of refined sugar.
- Flexible and customizable – Turn them into healthy date bars by cutting back sugar or adding nuts and seeds.
- Perfect make-ahead dessert – They taste even better the next day and freeze really well.
- Travel-friendly – Sturdy enough to pack for road trips, picnics, or lunchboxes without falling apart.
- Great for sharing – One batch of these baked date bars makes plenty for potlucks and gatherings.
Ingredients for the Best Oatmeal Date Bars
Here’s what you’ll need to make this chewy date bar dessert. I’ll give you some easy substitutions too, because we all know the feeling of realizing you’re out of brown sugar halfway through mixing.
For the Date Filling:
- 2 cups (about 12–14 oz / 340–400 g) pitted dates, chopped
- Medjool dates are wonderful for extra softness and a caramel-like flavor, but regular Deglet Noor works too. Just make sure they’re pitted.
- 1 ¼ cups water
- This softens the dates and helps create that thick, spreadable date paste.
- 2–3 tablespoons granulated sugar or brown sugar (optional, to taste)
- If your dates are very sweet, you can reduce or skip this. Taste the filling and adjust.
- 1 teaspoon pure vanilla extract
- Rounds out the flavor and gives the filling a bakery-style aroma.
- Pinch of fine sea salt
- Enhances the natural sweetness, so don’t skip it.
For the Oat Crumb Base and Topping:
- 1 ½ cups old-fashioned rolled oats
- Use rolled oats, not quick oats, for the best chewy texture.
- 1 ¼ cups all-purpose flour
- You can swap up to half with whole wheat flour for healthier date bars.
- ¾ cup packed light brown sugar
- Adds caramel notes and moisture; dark brown sugar works if you like a deeper flavor.
- ½ teaspoon baking soda
- Helps keep the base from being too dense.
- ½ teaspoon fine sea salt
- ½ teaspoon ground cinnamon (optional but highly recommended)
- Cinnamon gives these oat crumb date bars that warm, cozy flavor.
- 1 cup (2 sticks / 226 g) unsalted butter, melted and slightly cooled
- Melted butter makes the crumb mixture easy to press into the pan. You can use salted butter and reduce the added salt slightly.
- 1 teaspoon vanilla extract
Optional Add-Ins:
- ½ cup chopped walnuts or pecans – Stir into the crumb mixture for crunch and extra richness.
- 2–3 tablespoons shredded unsweetened coconut – Adds a subtle tropical note; very good with dates.
- Zest of ½ orange or lemon – Stir into the filling for a brighter, more complex flavor.
Directions: How to Make Chewy Homemade Date Bars
-
Prep your pan and oven
- Preheat your oven to 350°F (175°C).
- Line a 9×9-inch square baking pan with parchment paper, leaving an overhang on two sides so you can lift the bars out easily. Lightly grease the parchment and exposed sides with butter or cooking spray.
-
Make the date filling
- Add the chopped dates and 1 ¼ cups water to a small or medium saucepan. Bring to a gentle simmer over medium heat, stirring occasionally.
- Reduce the heat to low and cook for 8–10 minutes, stirring and mashing the dates with a spoon or spatula as they soften. The mixture should thicken and look like a rough jam.
- Stir in 2–3 tablespoons sugar (if using), 1 teaspoon vanilla, a pinch of salt, and optional citrus zest. Taste carefully (it’s hot!) and adjust sweetness if needed.
- Set aside to cool slightly while you make the oat crumb mixture. It will continue to thicken as it cools.
-
Mix the oat crumb base and topping
- In a large bowl, whisk together rolled oats, flour, brown sugar, baking soda, salt, and cinnamon until no big lumps of sugar remain.
- Pour in the melted butter and 1 teaspoon vanilla. Stir until everything is moistened and clumpy. It should look like a crumbly cookie dough.
- If using nuts or coconut, fold them in now. You should be able to squeeze the mixture in your hand and have it hold together in clumps.
-
Press in the bottom crust
- Pour about 2/3 of the crumb mixture into the prepared pan.
- Use your fingers or the bottom of a measuring cup to press it firmly and evenly into the bottom. Make sure you get into the corners—this is your base, so you want it packed just enough so it holds together but not so hard that it turns rock solid.
-
Spread the date filling
- Gently spoon the warm date filling over the oat crust.
- Use an offset spatula or the back of a spoon to spread it out into an even layer, all the way to the edges. Try not to dig into the base while you spread.
-
Crumb topping layer
- Sprinkle the remaining 1/3 of the oat mixture over the date filling.
- Let it fall in little clumps; don’t press too hard. Lightly pat it down so it sticks, but keep that crumbly texture on top. That’s what gives these oatmeal date bars their pretty, rustic look.
-
Bake the date bars
- Bake in the preheated oven for 25–30 minutes, until the top is light golden brown and you can see the filling bubbling slightly around the edges.
- If your oven runs hot, start checking at 22–23 minutes so they don’t over-brown.
-
Cool completely (this part is important)
- Place the pan on a cooling rack and let the bars cool completely—at least 2 hours.
- The date filling firms up as it cools, which makes it much easier to cut clean squares. If you’re impatient (I usually am), you can pop the cooled pan into the fridge for 30–45 minutes before slicing.
-
Slice and serve
- Use the parchment overhang to lift the whole slab out of the pan onto a cutting board.
- With a sharp knife, cut into 16 bars (4×4) or 20 smaller squares. Wipe the knife clean between cuts for neat edges.
- Enjoy at room temperature, chilled, or slightly warmed with ice cream for an extra-special date bar dessert.
Servings & Timing
- Yield: About 16 larger bars or 20 smaller bars
- Prep Time: 20 minutes
- Cook Time: 25–30 minutes
- Cooling Time: 2 hours (hands-off, but worth it)
- Total Time: About 2 hours 45 minutes
Fun Variations on This Date Bars Recipe
You know what? Once you master the basic oatmeal date bars, it’s really easy to tweak them for different tastes or dietary needs.
- Nutty Crunch Date Bars – Fold ½–¾ cup toasted walnuts, pecans, or almonds into the crumb mixture.
- Coconut-Date Squares – Add ¼ cup shredded unsweetened coconut to the crust/topping and sprinkle a little more on top before baking.
- Citrus Spice Date Bars – Stir ½ teaspoon extra cinnamon and a pinch of nutmeg into the oat mixture, plus orange zest in the filling.
- Gluten-Free Date Bars – Use certified gluten-free oats and swap the all-purpose flour with a good 1:1 gluten-free baking blend.
- Lower-Sugar Healthy Date Bars – Reduce the brown sugar in the crust to ½ cup and skip the added sugar in the filling if your dates are sweet.
- Chocolate Drizzle Date Bars – Once cooled, drizzle melted dark chocolate over the top and let it set before slicing.
Storage, Freezing & Make-Ahead Tips
These old fashioned date bars are fantastic for making ahead, which is one reason I like them so much for holidays and busy weeks.
-
Room temperature:
- Store in an airtight container at room temp for 2–3 days. If your kitchen is very warm or humid, move them to the fridge.
-
Refrigerator:
- Keep in a sealed container for up to 1 week. The bars firm up and get extra chewy, which I personally love.
-
Freezer:
- Place cut bars in a single layer on a baking sheet and freeze until solid, then transfer to a freezer bag or airtight container.
- They keep well for up to 3 months.
-
Thawing & reheating:
- Thaw at room temperature for 30–60 minutes, or in the fridge overnight.
- To enjoy warm, heat a bar in the microwave for about 10–15 seconds or in a 300°F oven for 5–8 minutes.
-
Make-ahead for parties:
- Bake up to 2 days ahead and store in the fridge. Slice the day you plan to serve and let them sit out for 20–30 minutes before putting them on a dessert tray.
Notes From My Kitchen (And My Mistakes)
-
Don’t skimp on cooling time.
My first test batch, I sliced too early—huge mistake. The filling was still too warm and they slumped all over the place. Delicious, but messy. Letting them cool fully gives you nice, tidy squares. -
Chop the dates fairly small.
The smaller you chop them, the smoother your filling. Big chunks are fine if you like more texture, but smaller pieces melt down more easily into that jammy layer. -
Adjust sweetness based on your dates.
Some dates are incredibly sweet, especially Medjool. Taste your filling and only add as much sugar as you truly need. That’s how you keep these easy date bars from being cloying. -
Use parchment—it’s worth it.
Lining the pan helps you lift the whole slab out, which means cleaner cuts and less prying slices out of the corners. -
Play with spices.
Cinnamon is classic, but a tiny pinch of cardamom or allspice brings a lovely, slightly unexpected flavor to these baked date bars. -
Texture preference:
If you like a firmer crust, you can press the bottom layer a little more firmly and bake an extra 3–4 minutes. For softer, chewier bars, stick with the timing in the recipe and go easy on the pressing.
FAQs About Date Bars
1. Can I use quick oats instead of rolled oats?
Yes, quick oats will work, but the texture will be a little softer and less chewy. I still recommend rolled oats for the best classic oatmeal date bars texture.
2. My date filling seems too thick—what did I do wrong?
You probably cooked off a bit more liquid; it’s not a disaster. Just stir in a tablespoon or two of hot water at a time until it’s spreadable again.
3. Can I make these date bars dairy-free?
Yes—use a good-quality vegan butter or a neutral oil like refined coconut oil. Keep in mind, coconut oil will change the flavor slightly.
4. How do I keep the crust from crumbling too much?
Make sure the mixture is well-moistened with butter and press the bottom layer firmly into the pan. Letting the bars cool fully also helps them hold together better.
5. Can I reduce the sugar for a healthier date bars recipe?
You can reduce the brown sugar to ½ cup and skip the sugar in the filling if your dates are sweet. The bars will be less dessert-like but still tasty and quite snackable.
6. Is it okay to double the recipe?
Absolutely. Use a 9×13-inch pan and increase baking time to 30–35 minutes, watching for that golden top and bubbling edges.
7. Why are my bars dry or hard?
This usually means they were overbaked or the crust mixture was too dry. Next time, bake just until lightly golden and make sure your crumb mixture clumps easily in your hand.
8. Can I add other dried fruits with the dates?
Yes—try mixing in chopped dried apricots, figs, or raisins with the dates for a fun twist on traditional date squares.
A Sweet Little Wrap-Up
These chewy, buttery date bars are the kind of simple, homemade dessert that never goes out of style. This Date Bars Recipe gives you a tender oatmeal crust, a rich date filling, and a crumbly top that makes every bite feel like a warm hug—whether you’re serving them for a holiday dessert, a lunchbox treat, or a quiet afternoon coffee break.
If you make this recipe, I’d love to hear how it turns out for you—tell me in the comments what variations you tried, or whether you remember something similar from your childhood. And if you enjoy cozy bakes like this, you might also like exploring more bar desserts and oatmeal-based treats next.
Old-Fashioned Chewy Oatmeal Date Bars
Ingredients
- 2 cups pitted dates about 12–14 oz / 340–400 g, chopped
- 1 1/4 cups water
- 2-3 tablespoons granulated sugar or brown sugar optional, to taste for the filling
- 1 teaspoon pure vanilla extract for the filling
- fine sea salt pinch, for the filling
- 1 1/2 cups old-fashioned rolled oats
- 1 1/4 cups all-purpose flour
- 3/4 cup light brown sugar packed
- 1/2 teaspoon baking soda
- 1/2 teaspoon fine sea salt for the crumb mixture
- 1/2 teaspoon ground cinnamon optional but recommended
- 1 cup unsalted butter melted and slightly cooled (2 sticks / 226 g)
- 1 teaspoon vanilla extract for the crumb mixture
- 1/2 cup chopped walnuts or pecans optional add-in for the crumb mixture
- 2-3 tablespoons shredded unsweetened coconut optional add-in for the crumb mixture
- 1/2 orange or lemon zest only, optional for the filling
Instructions
- Preheat the oven to 350°F (175°C). Line a 9x9-inch square baking pan with parchment paper, leaving an overhang on two sides. Lightly grease the parchment and exposed sides with butter or cooking spray.
- Add the chopped dates and 1 1/4 cups water to a small or medium saucepan. Bring to a gentle simmer over medium heat, stirring occasionally. Reduce heat to low and cook for 8–10 minutes, stirring and mashing the dates as they soften, until thick and jammy. Stir in 2–3 tablespoons sugar (if using), 1 teaspoon vanilla, a pinch of salt, and optional citrus zest. Taste and adjust sweetness if needed. Set aside to cool slightly; it will thicken as it cools.2 cups pitted dates, 1 1/4 cups water, 2-3 tablespoons granulated sugar or brown sugar, 1 teaspoon pure vanilla extract, fine sea salt, 1/2 orange or lemon
- In a large bowl, whisk together the rolled oats, flour, brown sugar, baking soda, 1/2 teaspoon salt, and cinnamon until well combined and no big sugar lumps remain. Pour in the melted butter and 1 teaspoon vanilla. Stir until the mixture is evenly moistened and clumpy, like a crumbly cookie dough. If using nuts or coconut, fold them in now. The mixture should hold together in clumps when squeezed.1 1/2 cups old-fashioned rolled oats, 1 1/4 cups all-purpose flour, 3/4 cup light brown sugar, 1/2 teaspoon baking soda, 1/2 teaspoon fine sea salt, 1/2 teaspoon ground cinnamon, 1 cup unsalted butter, 1 teaspoon vanilla extract, 1/2 cup chopped walnuts or pecans, 2-3 tablespoons shredded unsweetened coconut
- Transfer about 2/3 of the crumb mixture to the prepared pan. Press it firmly and evenly into the bottom with your fingers or the bottom of a measuring cup, making sure to reach into the corners. Pack it just enough so it holds together but not so hard that it becomes dense.
- Gently spoon the warm date filling over the pressed oat crust. Use an offset spatula or the back of a spoon to spread it into an even layer all the way to the edges, taking care not to disturb the base.
- Sprinkle the remaining 1/3 of the crumb mixture evenly over the date filling. Let it fall in loose clumps and lightly pat it down so it adheres, keeping the top crumbly for a rustic texture.
- Bake in the preheated oven for 25–30 minutes, until the top is light golden brown and the filling is bubbling slightly around the edges. If your oven runs hot, begin checking at 22–23 minutes to avoid over-browning.
- Place the pan on a cooling rack and let the bars cool completely, at least 2 hours. For tidier slices, chill the cooled pan in the refrigerator for 30–45 minutes before cutting.
- Use the parchment overhang to lift the slab out of the pan onto a cutting board. With a sharp knife, cut into 16 larger bars (4x4) or up to 20 smaller squares, wiping the knife between cuts for clean edges. Serve at room temperature, chilled, or slightly warmed, optionally with a scoop of vanilla ice cream.
Notes
Variations: Add 1/2–3/4 cup toasted nuts for a nutty crunch, 1/4 cup shredded coconut for coconut-date squares, extra cinnamon and a pinch of nutmeg plus orange zest for citrus spice date bars, or drizzle cooled bars with melted dark chocolate. For gluten-free bars, use certified gluten-free oats and a 1:1 gluten-free baking blend. For lower sugar, reduce the brown sugar in the crust to 1/2 cup and omit the sugar in the filling if your dates are very sweet.
Tips: Let bars cool fully before slicing so the filling sets. Chop dates fairly small for a smoother, jammy filling. Adjust added sugar based on how sweet your dates are. Use parchment with overhang so you can lift the slab out easily. For a firmer crust, press the bottom layer a bit more firmly and bake a few minutes longer; for softer, chewier bars, follow the standard bake time and press more lightly.