Would you like to save this?
Red Velvet Brownie Bars Recipe
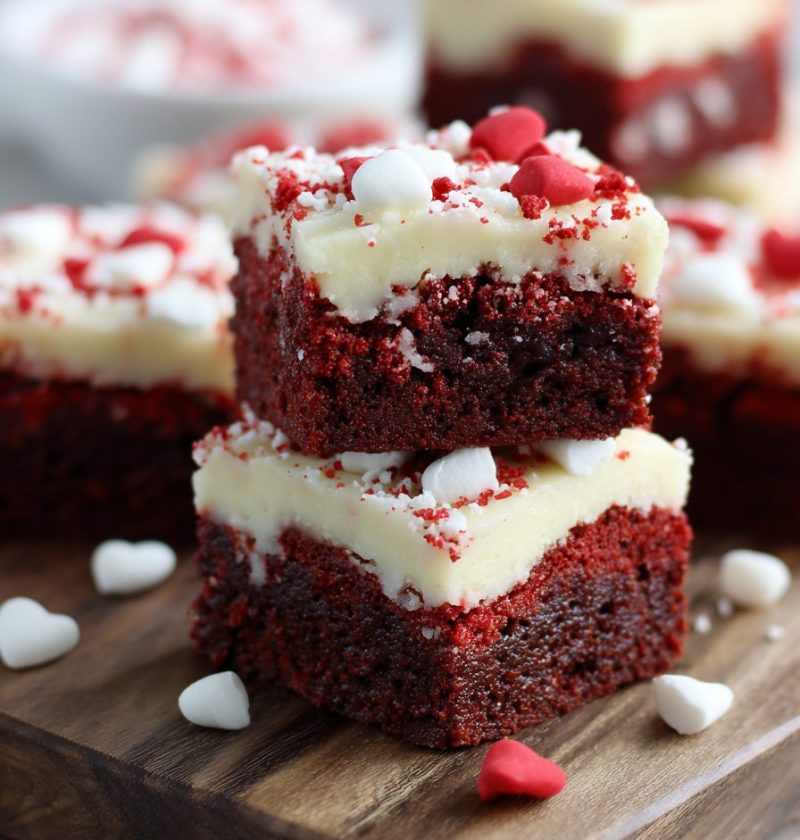
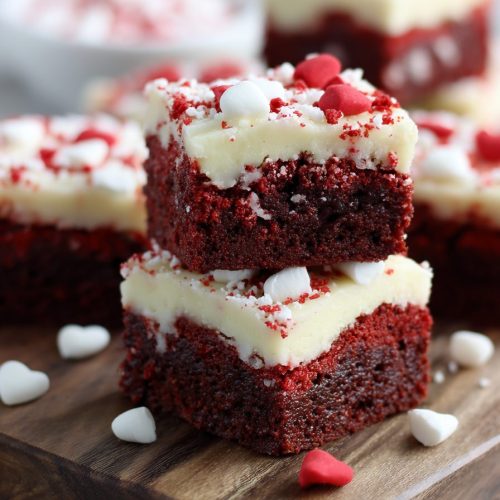
If you love the rich chew of brownies and the cozy flavor of red velvet cake, this Red Velvet Brownie Bars Recipe is about to become your go‑to dessert for holidays, potlucks, and “just because” baking days.
These red velvet brownie bars are thick, fudgy, and packed with chocolate flavor, with that classic red velvet tang and a pretty cream cheese swirl on top. They slice up neatly into bars, travel well, and look like they came straight from a bakery display. I’m a 50‑year‑old mom, grandma, and long‑time home baker, and let me tell you—this is the red velvet dessert bar recipe I reach for when I want something fast, pretty, and crowd‑pleasing without fussy layers or fancy frosting bags.
Whether you’re planning a Valentine’s tray, Christmas dessert board, or just craving chewy red velvet brownies with a cold glass of milk, this homemade red velvet Brownies Recipe checks all the boxes: easy, reliable, and very, very hard to stop eating.

What Makes These Red Velvet Brownie Bars So Special?
Let me explain what you’re getting here. These aren’t cake‑like red velvet squares that puff up and crumble. This is a fudgy red velvet brownies recipe with:
- A dense, chewy brownie texture
- Real cocoa for rich chocolate flavor
- A touch of tang from vinegar and cream cheese
- A gorgeous bright red color that screams “special occasion”
They’re basically the love child of classic brownies and red velvet cake bars. And the best part? Everything bakes in one pan. No stacking, no frosting layers, no cake leveling. Just mix, pour, swirl, bake, cool, slice.
I like to serve these red velvet brownie dessert bars:
- On Christmas cookie platters
- For Valentine’s Day with strawberries
- At baby showers or bridal showers (they look adorable on tiered stands)
- Wrapped in little bags for bake sales or teacher gifts
You can keep the recipe “plain” and simple, or add white chocolate chips for extra sweetness, or even fold in dark chocolate chunks if you love deeper chocolate flavor. This red velvet baking recipe is flexible, forgiving, and polished enough for any celebration.
And if you’re health‑curious: no, these aren’t exactly health food—but you can control the ingredients. Real butter, real cocoa, no weird aftertaste. You can also trim the sugar a bit or use less frosting‑style swirl if you want something a little lighter without losing that brownie bar satisfaction.
Why You’ll Love This Recipe
- Fudgy, not cakey – These chewy red velvet brownies have a dense, brownie‑style bite, not a fluffy cake texture.
- One‑bowl friendly – The base batter comes together in a single bowl, which means less cleanup.
- Perfect for holidays – The red color makes them ideal for Christmas, Valentine’s Day, and 4th of July dessert tables.
- Easy to slice and serve – They cut into clean, pretty squares that stack nicely for dessert trays or lunchbox treats.
- Beginner‑friendly baking – If you can stir and swirl, you can master this brownie bars recipe.
- Customizable add‑ins – Fold in white or dark chocolate chips, nuts, or a thicker cream cheese layer.
- Great make‑ahead dessert – They actually taste better after resting, so bake them the day before your event.
- Freezer‑friendly – You can keep a stash in the freezer for last‑minute guests or late‑night dessert cravings.
Ingredients for Red Velvet Brownie Bars
Here’s what you’ll need to make this Red Velvet Brownie Bars Recipe. I’ll add a few notes and simple swaps as we go.
For the Red Velvet Brownie Base
- 1 cup (2 sticks / 226 g) unsalted butter, melted and slightly cooled
- Use real butter for flavor. If you only have salted butter, reduce the added salt slightly.
- 1 ¾ cups (350 g) granulated sugar
- You can reduce to 1 ½ cups if you prefer slightly less sweet bars.
- ½ cup (100 g) packed light brown sugar
- Adds moisture and chewiness to the brownies.
- 4 large eggs, at room temperature
- Room‑temperature eggs mix more evenly and help the batter bake evenly.
- 1 tablespoon vanilla extract
- A good, real vanilla gives these a bakery‑style flavor.
- 2 tablespoons unsweetened cocoa powder
- Use natural cocoa powder, not Dutch‑processed, for classic red velvet flavor and color.
- 1 teaspoon distilled white vinegar
- This gives that slight red velvet tang and reacts with the cocoa and baking powder.
- 1 teaspoon baking powder
- ½ teaspoon fine sea salt
- 2 cups (240 g) all‑purpose flour, spooned and leveled
- Use regular all‑purpose, not self‑rising.
- 1–1 ½ tablespoons red gel food coloring
- Gel works better than liquid; you need less and it keeps the batter thick.
- ½–1 cup white chocolate chips (your choice)
- This is lovely with red velvet. You can leave them out or swap for dark or semi‑sweet chips.
For the Cream Cheese Swirl
- 8 oz (225 g) cream cheese, softened
- Full‑fat cream cheese gives the creamiest swirl.
- ¼ cup (50 g) granulated sugar
- 1 large egg yolk
- ½ teaspoon vanilla extract
If you’d rather skip the swirl, you can leave it out and just sprinkle the top with extra white chocolate chips before baking. But honestly, that swirl is what makes these red velvet dessert bars look bakery‑ready.
Pan and Equipment
- 9×13‑inch baking pan (metal pan bakes more evenly than glass)
- Parchment paper
- Medium and large mixing bowls
- Hand mixer or stand mixer (for the cream cheese layer)
- Whisk and rubber spatula
Step‑by‑Step Directions
You know what? This looks like a lot written out, but once you start, it moves fast. Here’s how to make your red velvet chocolate bars from scratch.
1. Prep the Pan and Oven
- Preheat your oven to 350°F (175°C).
- Line a 9×13‑inch pan with parchment paper, leaving an overhang on two sides to create a sling.
- Lightly grease the parchment and sides of the pan with cooking spray or a bit of butter.
- This helps the bars release cleanly and keeps those edges from sticking.
2. Make the Brownie Batter
-
In a large mixing bowl, whisk together the melted butter, granulated sugar, and brown sugar until glossy and well combined.
- You want the mixture to look a bit thick and shiny, almost like caramel.
-
Add the eggs, one at a time, whisking well after each addition.
-
Stir in the vanilla extract and vinegar.
-
Sprinkle in the cocoa powder, baking powder, and salt. Whisk until no dry cocoa streaks remain.
- It’s okay if the mixture looks a little thick at this point.
-
Add the red gel food coloring and whisk until the color is uniform.
- Start with 1 tablespoon, then add a little more if you’d like a brighter red. Remember, the color will dull slightly as it bakes.
-
Gently stir in the flour with a rubber spatula, folding just until combined.
- Don’t overmix; that can make brownies tough instead of chewy.
-
Fold in the white chocolate chips, if using.
-
Pour about ¾ of the batter into the prepared pan and spread it into an even layer. Set the remaining batter aside for the swirl.
3. Make the Cream Cheese Swirl
- In a medium bowl, beat the cream cheese with a hand mixer until smooth and creamy.
- Add the sugar, egg yolk, and vanilla, and beat again until the mixture is silky and lump‑free.
If your cream cheese is a little cold and lumpy, let it sit for a few minutes and keep mixing. It doesn’t have to be perfect, but smoother gives a prettier swirl.
4. Assemble the Layers
-
Gently spoon the cream cheese mixture over the brownie batter in the pan, dropping it in big dollops across the surface.
-
Spoon the remaining red velvet brownie batter between and on top of the cream cheese dollops.
-
Take a butter knife or a thin spatula and drag it through the batter in long, gentle S‑shapes, going both directions.
- Don’t over‑swirl; a few passes are enough. You want distinct ribbons of red and white.
5. Bake
- Place the pan on the center rack and bake for 28–35 minutes.
- Every oven is a little different. Start checking around 27 minutes.
- The red velvet brownies are done when the edges are set, the top looks slightly shiny, and a toothpick inserted about 2 inches from the edge comes out with just a few moist crumbs (not wet batter).
- The center might still look very slightly soft, and that’s okay; it will firm up as it cools.
6. Cool and Slice
- Let the pan cool completely on a wire rack—this can take about 1½ hours.
- I know it’s tempting to cut early, but cooling is what gives you clean slices and a fudgy texture.
- Once fully cool, use the parchment sling to lift the entire block out of the pan. Place it on a cutting board.
- Use a sharp knife, wiped clean between cuts, to slice into 16 larger bars or 24 smaller squares, depending on how you plan to serve them.
Servings & Timing
- Yield: 16–24 red velvet brownie bars
- Prep Time: 20 minutes
- Bake Time: 28–35 minutes
- Cooling Time: 1–1½ hours
- Total Time: About 2–2½ hours (mostly hands‑off cooling time)
These are great as a make‑ahead dessert, since the texture and flavor are even better after they rest for a few hours.
Easy Variations and Fun Twists
Once you’ve made the base Red Velvet Brownie Bars Recipe, you can play with it a bit. Here are some of my favorite spins:
- Triple Chocolate Red Velvet Bars – Fold in a mix of white, milk, and dark chocolate chips for extra richness.
- Nutty Red Velvet Brownies – Add ½–¾ cup chopped pecans or walnuts to the batter for crunch and a toasty flavor.
- Festive Sprinkle Topping – Scatter red, white, or heart sprinkles over the top right before baking for holiday trays.
- Red Velvet Cake Bars with Frosting – Skip the cream cheese swirl, bake the brownies, and once cool, spread with cream cheese frosting.
- Gluten‑Friendly Version – Use a 1:1 gluten‑free flour blend made for baking; the bars will be slightly softer but still delicious.
- Mini Bar Bites – Bake the batter in a parchment‑lined 10×15‑inch jelly roll pan and cut into small bite‑size squares for party platters.
Storage & Reheating
Room Temperature
- Store the bars in an airtight container at cool room temperature for up to 2 days if your kitchen isn’t too warm.
- Because of the cream cheese swirl, I usually keep them chilled after the first day, especially in warmer months.
Refrigerator
- Arrange the red velvet brownie bars in a single layer in a container (or stack with parchment between layers).
- Store in the fridge for up to 5 days.
- For best flavor and texture, let them sit at room temperature for about 20–30 minutes before serving, so they soften and taste extra fudgy.
Freezer
- Wrap each bar individually in plastic wrap, then place them in a freezer‑safe bag or container.
- Freeze for up to 2 months.
- Thaw at room temperature for about 1–2 hours or overnight in the fridge.
No real reheating is needed, but if you like warm brownies, you can microwave a thawed bar for 10–15 seconds for a melty, just‑baked feel. (Amazing with a scoop of vanilla ice cream.)
Notes from My Kitchen to Yours
- Don’t skimp on the cocoa. Some red velvet recipes barely use cocoa, which can leave them tasting flat. These red velvet brownies use enough cocoa to taste like a brownie, not just a red bar.
- Use gel color if you can. It keeps the batter thick and bold. Liquid coloring can thin the batter and give a duller shade.
- Watch the bake time. Overbaking is the fastest way to lose that fudgy center. When in doubt, pull them a minute early; they’ll keep cooking slightly as they cool.
- Let them rest. I almost always bake my red velvet dessert bars the night before serving. The flavor settles, the edges soften, and the bars slice like a dream the next day.
- For cleaner cuts. Chill the pan in the fridge for 30–45 minutes after cooling, then slice with a long, sharp knife. Wipe between each cut. It’s a small thing that makes your platter look “Pinterest‑ready.”
- Adjust the sweetness. If you add a lot of white chocolate chips and the cream cheese swirl, these are fairly sweet; you can cut ¼ cup sugar from the batter without hurting the texture.
Sometimes when I bake these, I set aside one lonely corner piece for myself, make a cup of tea, and sit at the kitchen table before the house wakes up. That little ritual reminds me why I love baking so much—it’s simple, it’s soothing, and it makes people happy.
Frequently Asked Questions
1. Can I make these red velvet brownies without the cream cheese swirl?
Yes, you can. Just bake the red velvet brownie batter on its own and, if you’d like, sprinkle white chocolate chips on top before baking or frost them once cooled.
2. How do I know when the brownies are done baking?
The edges should look set and slightly pulled away from the sides, and a toothpick inserted near the edge should come out with a few moist crumbs, not wet batter.
3. Can I use liquid food coloring instead of gel?
You can, but you’ll need more of it, and the batter may be slightly thinner and the color a bit softer; try starting with 2–3 tablespoons of liquid color and adjust as needed.
4. What if I don’t have white vinegar?
You can use apple cider vinegar or even lemon juice in a pinch. The flavor will be a bit different, but the brownies will still bake up nicely.
5. Can I halve this recipe?
Yes. Bake a half batch in an 8×8‑inch pan and start checking for doneness around 23–25 minutes.
6. Why did my red velvet brownie bars turn out dry or cakey?
Most likely they were overbaked or too much flour was added. Be sure to spoon and level your flour (don’t pack it) and pull the brownies from the oven once the center is just set.
7. Are these red velvet brownie bars very sweet?
They’re sweet like classic brownies, especially if you use white chocolate chips and the cream cheese swirl. You can reduce the sugar slightly or skip the chips if you prefer a less sweet bar.
8. Can I make these red velvet cake bars dairy‑free?
It’s possible with dairy‑free butter and a dairy‑free cream cheese alternative, though the texture will be a bit different. Use a dairy‑free baking chocolate instead of white chocolate chips.
Wrap‑Up: A New Favorite Red Velvet Baking Recipe
These Red Velvet Brownie Bars bring together the best of two worlds: the rich chew of fudgy brownies and the nostalgic charm of red velvet cake bars. They’re simple enough for a weeknight craving, yet pretty enough for holiday dessert tables and special events.
If you try this Red Velvet Brownie Bars Recipe, I’d love to hear how it went—tell me what occasion you made them for, what twists you tried, or who couldn’t stop going back for “just one more.” And if you’re in a red velvet mood, you might also enjoy exploring other red velvet treats, like cupcakes or cookies, for a full themed dessert spread. Happy baking, and save a corner piece for yourself.
Red Velvet Brownie Bars
Ingredients
- 1 cup unsalted butter 2 sticks / 226 g, melted and slightly cooled
- 1 3/4 cups granulated sugar 350 g
- 1/2 cup light brown sugar 100 g, packed
- 4 large eggs at room temperature
- 1 tablespoon vanilla extract
- 2 tablespoons unsweetened cocoa powder natural, not Dutch-processed
- 1 teaspoon distilled white vinegar
- 1 teaspoon baking powder
- 1/2 teaspoon fine sea salt
- 2 cups all-purpose flour 240 g, spooned and leveled
- 1-1 1/2 tablespoons red gel food coloring use gel for best color and texture
- 1/2-1 cup white chocolate chips optional; can substitute dark or semi-sweet chips
- 8 oz cream cheese 225 g, softened; full-fat preferred
- 1/4 cup granulated sugar 50 g, for cream cheese swirl
- 1 large egg yolk for cream cheese swirl
- 1/2 teaspoon vanilla extract for cream cheese swirl
- 1 nonstick cooking spray or butter for greasing the pan
- 1 parchment paper for lining a 9×13-inch pan
Instructions
- Preheat your oven to 350°F (175°C). Line a 9×13-inch baking pan with parchment paper, leaving an overhang on two sides to form a sling. Lightly grease the parchment and sides of the pan with cooking spray or butter.1 nonstick cooking spray or butter, 1 parchment paper
- In a large mixing bowl, whisk together the melted, slightly cooled butter, granulated sugar, and light brown sugar until glossy, thick, and well combined.1 cup unsalted butter, 1 3/4 cups granulated sugar, 1/2 cup light brown sugar
- Add the eggs one at a time, whisking well after each addition. Stir in the vanilla extract and distilled white vinegar until fully incorporated.4 large eggs, 1 tablespoon vanilla extract, 1 teaspoon distilled white vinegar
- Sprinkle in the cocoa powder, baking powder, and fine sea salt. Whisk until no dry cocoa streaks remain; the mixture will be somewhat thick.2 tablespoons unsweetened cocoa powder, 1 teaspoon baking powder, 1/2 teaspoon fine sea salt
- Add the red gel food coloring and whisk until the color is uniform. Start with 1 tablespoon and add more as needed for a bright red shade, keeping in mind the color will dull slightly as it bakes.1-1 1/2 tablespoons red gel food coloring
- Using a rubber spatula, gently fold in the all-purpose flour just until combined; do not overmix. Fold in the white chocolate chips, if using. Pour about 3/4 of the batter into the prepared pan and spread into an even layer. Set the remaining batter aside for swirling.2 cups all-purpose flour, 1/2-1 cup white chocolate chips
- In a medium bowl, beat the softened cream cheese with a hand mixer until smooth and creamy. Add the 1/4 cup granulated sugar, egg yolk, and 1/2 teaspoon vanilla extract. Beat until the mixture is silky and mostly lump-free.8 oz cream cheese, 1/4 cup granulated sugar, 1 large egg yolk, 1/2 teaspoon vanilla extract
- Spoon the cream cheese mixture over the brownie batter in the pan in large dollops across the surface. Spoon the reserved red velvet brownie batter between and on top of the cream cheese dollops. Use a butter knife or thin spatula to gently drag through the batter in long S-shapes in both directions, creating a swirl. Do not over-swirl; you want distinct ribbons of red and white.
- Place the pan on the center oven rack and bake for 28–35 minutes. Start checking around 27 minutes. The brownies are done when the edges are set, the top looks slightly shiny, and a toothpick inserted about 2 inches from the edge comes out with a few moist crumbs but no wet batter. The center may look slightly soft; it will firm up as it cools.
- Let the pan cool completely on a wire rack, about 1 1/2 hours. Once fully cool, use the parchment sling to lift the brownies out of the pan and transfer to a cutting board. Slice into 16 larger bars or up to 24 smaller squares, wiping the knife clean between cuts for the neatest edges.
Notes
BAKER’S TIPS: Use natural (not Dutch-processed) cocoa and gel food coloring for classic red velvet flavor and color. Do not overbake; pull the pan once the edges are set and a toothpick near the edge has moist crumbs. For extra-clean cuts, chill the cooled slab in the fridge for 30–45 minutes before slicing with a long, sharp knife, wiping between cuts.
VARIATIONS: Add a mix of white, milk, and dark chocolate chips for triple chocolate bars; add 1/2–3/4 cup chopped pecans or walnuts for crunch; top with festive sprinkles before baking; or skip the swirl and frost cooled bars with cream cheese frosting.