Would you like to save this?
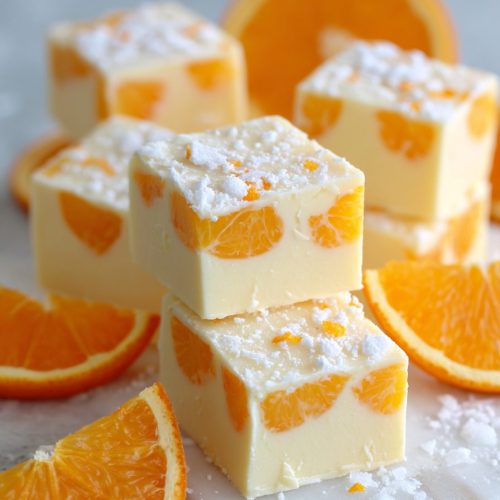
Orange Creamsicle Fudge Recipe
A Quick Little Tease
This Orange Creamsicle Fudge Recipe gives you all the nostalgic, creamy orange popsicle flavor in an easy no bake fudge recipe that’s silky, vibrant, and perfect for sharing—especially on warm summer days.
Full Recipe Introduction
If you grew up chasing the ice cream truck like I did back in the late 70s and early 80s, you probably remember that first bite of an orange creamsicle: bright citrus outside, creamy vanilla inside, a little messy, and absolutely worth it. This Orange Creamsicle Fudge Recipe is my grown-up, kitchen-friendly version of that flavor—wrapped up in smooth, sliceable squares of white chocolate orange fudge.
Think of it as a layered orange fudge meets orange vanilla fudge mash-up. You get a creamy vanilla base, a sunny orange swirl on top, and that sweet-tart citrus flavor that makes you feel like you’re standing on the sidewalk in flip flops again. It’s a fun citrus fudge recipe that looks beautiful on a dessert tray but is easy enough for a busy Tuesday.
This is a true stovetop fudge recipe: no candy thermometer, no oven, no baking. Just melt, stir, swirl, and chill. It relies on sweetened condensed milk for that soft, fudgy texture, so it’s technically a condensed milk fudge style—reliable, forgiving, and perfect for newer cooks or kids in the kitchen.
I like to make this creamy orange dessert for:
- Summer potlucks and picnics
- Baby showers and bridal showers (that color is darling)
- Christmas cookie trays (a bright break from all the chocolate and peppermint)
- Teacher gifts or neighbor treats
It also happens to be a great “bridge” dessert. If you’re not in the mood for heavy chocolate but still want something sweet, this fruity fudge squares recipe hits a lighter, citrusy note without feeling fussy. And if you’re watching your time or your oven space, you’ll love that this orange creamsicle candy is completely no bake and comes together in about 15–20 minutes of hands-on time.
Why You’ll Love This Orange Creamsicle Fudge Recipe
- No oven needed – This is a no bake fudge recipe that comes together right on the stovetop.
- Quick to make – About 15 minutes of stirring and swirling, then the fridge does the rest.
- Beginner-friendly – No candy thermometer, no soft-ball stage; sweetened condensed milk keeps it foolproof.
- Nostalgic flavors – Tastes just like an orange creamsicle bar in fudge form.
- Beautiful layers and swirls – You get pretty orange swirl fudge with minimal effort; it looks fancy but is so simple.
- Perfect for gifting – Cut into little orange flavored confection squares and tuck into tins or cellophane bags.
- Flexible flavor – Easily tweak the citrus level, switch extracts, or make other fruity fudge squares (lemon, Strawberry, etc.).
- Kid-approved and crowd-pleasing – The creamy vanilla and orange combo tends to win over chocolate lovers and citrus fans alike.
Ingredients for Layered Orange Fudge
Here’s what you’ll need for this white chocolate orange fudge. I’ll list some simple substitutions and tips as we go.
- 3 cups white chocolate chips (about 18 oz; use a good quality brand like Ghirardelli or Guittard for best melting)
- 1 can (14 oz) sweetened condensed milk (not evaporated milk—this is the base of the condensed milk fudge)
- 4 tablespoons unsalted butter, cut into pieces
- 1 teaspoon pure vanilla extract (this boosts the “creamsicle” element)
- 1–1½ teaspoons orange extract (start with 1 teaspoon, then taste; some brands are stronger than others)
- 1 teaspoon fresh orange zest (from 1 medium orange; optional, but it really brightens the flavor)
- ¼ teaspoon fine sea salt (just a pinch to balance the sweetness)
- Orange gel food coloring, a few drops (or a combo of red and yellow gel; liquid food coloring can make the fudge a little softer)
- 1–2 teaspoons heavy cream or whole milk, if needed (only if your mixture seems too thick or stiff while melting)
Ingredient Notes & Tips
- White chocolate chips – They scorch easily, so low heat is your friend. If you have white baking bars, those work too; just chop them small.
- Sweetened condensed milk – This is your safety net. It helps the fudge set without crystalizing like old-school sugar-and-cream fudge.
- Butter – Adds richness and helps keep the texture velvety instead of chalky.
- Orange extract vs. zest – Extract gives a clear orange flavor; zest adds a fresh, aromatic citrus note. I like to use both.
- Food coloring – Gel coloring is thicker and more concentrated. You only need a drop or two for a pretty creamsicle orange color.
- Salt – Don’t skip it. A tiny bit keeps the fudge from tasting one-note sweet.
You’ll also want:
- 8-inch square pan (or 9-inch for slightly thinner fudge)
- Parchment paper
- Small saucepan
- Heat-safe bowl (if using a double boiler style setup)
- Rubber spatula or wooden spoon

Step-by-Step Directions (Stovetop Fudge Recipe)
1. Prep your pan
Line an 8-inch square baking pan with parchment paper, leaving overhang on two sides like a sling. This makes it a breeze to lift the fudge out later. Lightly grease the parchment if your paper tends to stick.
2. Set up your “double boiler”
You can melt this directly in a heavy-bottomed saucepan on low heat, but I like the extra control from a makeshift double boiler.
- Fill a small saucepan with 1–2 inches of water and bring it to a gentle simmer.
- Place a heat-safe bowl over the top, making sure the bottom of the bowl doesn’t actually touch the water.
This helps keep your white chocolate from scorching or getting grainy.
3. Melt the white chocolate, butter, and condensed milk
Add the white chocolate chips, sweetened condensed milk, and butter pieces to the bowl.
- Stir slowly and constantly with a rubber spatula as the mixture melts.
- Keep the heat on low; if you see any signs of scorching, pull the bowl off the heat for a minute, then return it.
If things look too thick or stiff, you can stir in 1–2 teaspoons of heavy cream or whole milk to loosen it slightly, but usually the condensed milk is enough.
You’re aiming for a smooth, glossy mixture with no visible chips. This is your fudge base.
4. Flavor the fudge and separate into two bowls
When the mixture is smooth, remove the bowl from the heat.
- Stir in the vanilla extract, 1 teaspoon orange extract, orange zest (if using), and salt.
- Taste a tiny bit (careful, it’s warm). If you want a stronger citrus kick, add another ¼–½ teaspoon orange extract.
Now, pour about ⅔ of the mixture into a second bowl. This will stay “vanilla creamsicle” colored.
Leave the remaining ⅓ of the mixture in the original bowl to become your orange swirl layer.
5. Color the orange swirl
To the smaller portion left in the original bowl:
- Add a drop or two of orange gel food coloring.
- Stir well, adding more drop-by-drop until you get that soft creamsicle orange color you love.
You can go lighter or bolder; for a layered orange fudge look, I usually stay somewhere in the middle—enough to see the contrast but not neon.
6. Spread the vanilla base layer
Pour the larger, uncolored vanilla mixture into your prepared pan.
- Use your spatula to spread it into an even layer.
- Tap the pan gently on the counter a few times to release any air bubbles.
This will be the base of your orange vanilla fudge and helps the orange layer sit nicely on top.
7. Add the orange swirl layer
Spoon the orange-colored mixture over the vanilla layer in small dollops.
You’ve got two choices here, depending on the look you want:
- Layered look – Spread the orange fudge gently across the top with an offset spatula, leaving it mostly as a second layer with just a subtle swirl.
- Swirled look – Drag a butter knife or skewer through both layers, swirling gently. Don’t overdo it or you’ll lose your contrast and end up with one blended color.
Either way, this gives you that classic orange creamsicle candy vibe with the pretty marbled effect.
8. Chill until firm
Cover the pan lightly (a piece of foil works well) and place it in the refrigerator.
- Chill for at least 2–3 hours, or until the fudge is completely firm to the touch.
- For cleanest cuts, I like to let it chill at least 4 hours or even overnight.
If your kitchen is very warm, you may want to keep it chilled until right before serving, especially during summer fudge dessert season.
9. Slice into fruity fudge squares
Once the fudge is firm:
- Use the parchment sling to lift it out of the pan.
- Place it on a cutting board.
- Use a sharp knife to cut into small squares (about 1–1½ inches).
For super neat edges, warm your knife in hot water, wipe it dry, and cut—cleaning the blade between slices.
You should end up with smooth, creamy orange dessert squares that show off those pretty swirls.
Servings & Timing
- Yield: About 36 small squares (or 25 larger pieces)
- Prep Time: 15–20 minutes
- Chill Time: 2–4 hours
- Total Time: About 2½–4½ hours (mostly chill time)
I always say: the hands-on work is fast; the patience part happens in the fridge.
Fun Variations and Flavor Twists
Once you’ve made this Orange Creamsicle Fudge Recipe once or twice, you’ll probably start imagining all the other flavors you can play with. Here are some ideas:
- Creamy Lemon Fudge – Swap the orange extract and zest for lemon extract and lemon zest for a bright, tangy citrus fudge recipe.
- Strawberries & Cream Fudge – Use strawberry extract and a drop of pink food coloring for a fruity fudge squares twist that’s perfect for Valentine’s Day.
- Chocolate Swirl Creamsicle Fudge – Spread a thin layer of melted milk chocolate over the set fudge, then chill again for a chocolate-orange swirl fudge effect.
- Low-Sugar Version – Use sugar-free white chocolate chips and a sugar-free condensed milk alternative; texture will be slightly softer but still delicious.
- Extra Zesty Orange Fudge – Add more orange zest and a pinch more salt to deepen that citrus fudge vibe.
- Holiday Sprinkle Fudge – Top the orange swirl with festive sprinkles (pastel for spring, red and green for Christmas, orange and black for Halloween).
Storage & Make-Ahead Tips
One of my favorite things about this easy homemade fudge is that it keeps so well. It’s one of those recipes you can make ahead before company comes.
Room Temperature:
- In a cool house (under 70°F), you can store the fudge at room temperature for up to 2–3 days.
- Keep it in an airtight container with parchment between layers so the pieces don’t stick.
Refrigerator:
- For longer storage, refrigerate in a container for up to 2 weeks.
- Let the pieces sit at room temperature for about 10–15 minutes before serving so the texture softens and the creamy orange dessert feels extra luscious.
Freezer:
- Freeze the fudge squares in a single layer on a sheet pan, then transfer to a freezer bag or container once solid.
- Store up to 2–3 months.
- Thaw in the fridge overnight, then let sit at room temperature briefly before serving.
This makes it a wonderful make-ahead summer fudge dessert—especially if you’re bringing dessert to the lake or a family reunion and don’t want to fuss the day of.
Notes from My Kitchen Tests
I’ve tested this Orange Creamsicle Fudge Recipe several times now—my husband joked that our “quality assurance department” (that’d be the grandkids) was working overtime. Here are a few things I learned:
- White chocolate can be fussy. Keep your heat low and stir steadily. If it seizes or gets thick and grainy, a teaspoon of warm cream and persistent stirring will sometimes help smooth it out.
- Don’t skimp on the extract. Orange flavor fades a bit as the fudge chills, so it should smell and taste a little strong when warm. It mellows out in the fridge.
- Zest is powerful. If you’re sensitive to strong citrus oil flavor, start with ½ teaspoon zest instead of a full teaspoon.
- Salt is your friend. A flat-tasting fudge usually needs just a pinch more salt, not more sugar.
- Think small squares. This orange vanilla fudge is rich; little bite-sized pieces are perfect, especially if you’re serving other desserts.
- Color deepens as it sets. The orange shade looks slightly paler while warm and deepens a bit once chilled, so keep that in mind as you color it.
You know what? The batch we liked most had both extract and zest and a moderate swirl—enough orange layer that you could really see it, but still a thick creamy base.
Frequently Asked Questions
1. Can I make this Orange Creamsicle Fudge Recipe in the microwave?
Yes—melt the white chocolate chips, butter, and condensed milk together in a large microwave-safe bowl on 50% power in 20–30 second bursts, stirring well between each round until smooth. Just be careful not to overheat, since white chocolate burns easily.
2. My fudge didn’t set. What went wrong?
Most of the time, it either needed more chill time or too much liquid was added (like excess cream or liquid food coloring). Pop it back in the fridge overnight; if it’s still too soft, you can freeze it and serve as “fudge bites” straight from the freezer.
3. Can I use evaporated milk instead of sweetened condensed milk?
No—evaporated milk doesn’t have the same sugar content, and your fudge won’t set properly. For this condensed milk fudge style, you really do need sweetened condensed milk.
4. Is there a way to make this more “natural” without food coloring?
You can skip the food coloring entirely and rely on orange zest for flavor; the fudge will be more cream-colored with tiny orange flecks. Or add a bit of carrot juice powder or turmeric for a very light, naturally tinted orange—but go easy so you don’t change the flavor.
5. Can I double the recipe?
Yes, you can double it and use a 9×13-inch pan. The fudge will be slightly thicker, and you may need a bit more chill time for it to firm completely.
6. How strong is the orange flavor?
As written, it has a clear orange creamsicle flavor but still plenty of vanilla creaminess. If you’re a serious citrus lover, bump the orange extract up by ½ teaspoon and add extra zest.
7. Can I make this dairy-free?
You can try using dairy-free white chocolate chips and a vegan sweetened condensed milk substitute (often coconut based). The texture may be a little softer, but still sliceable if well chilled.
8. What’s the best way to package this for gifts?
Layer squares with small pieces of parchment in a tin or box, close it tightly, and include a little note that says “Store in a cool place” or “Refrigerate for best texture.” It’s a charming addition to holiday cookie boxes or teacher appreciation gifts.
Wrapping It Up (And Slicing It Into Squares)
This Orange Creamsicle Fudge Recipe gives you everything you want from an easy homemade fudge: creamy texture, bright citrus flavor, a pretty orange swirl, and absolutely no oven. It’s a nostalgic orange creamsicle candy flavor turned into a simple stovetop fudge recipe that you can make with kids, grandkids, or just a quiet cup of coffee on a Saturday afternoon.
If you try this white chocolate orange fudge, I’d love to hear how it went—tell me if you made any twists, like lemon or strawberry, or if you turned it into part of a big summer fudge dessert platter. And if you enjoy this recipe, you might like exploring more fruity fudge squares and no bake treats; they’re such a lifesaver when you want something sweet without heating up the whole kitchen.
Orange Creamsicle Fudge
Ingredients
- 3 cups white chocolate chips about 18 oz; good quality for best melting
- 1 can sweetened condensed milk 14 oz; not evaporated milk
- 4 tablespoons unsalted butter cut into pieces
- 1 teaspoon pure vanilla extract
- 1-1 1/2 teaspoons orange extract start with 1 teaspoon, add more to taste
- 1 teaspoon fresh orange zest from 1 medium orange; optional but recommended
- 1/4 teaspoon fine sea salt
- orange gel food coloring a few drops, or red and yellow gel combined
- 1-2 teaspoons heavy cream or whole milk optional, only if mixture seems too thick
Instructions
- Line an 8-inch square baking pan with parchment paper, leaving an overhang on two sides to form a sling. Lightly grease the parchment if it tends to stick.
- Fill a small saucepan with 1–2 inches of water and bring it to a gentle simmer. Place a heat-safe bowl over the saucepan, ensuring the bottom of the bowl does not touch the water.
- Add the white chocolate chips, sweetened condensed milk, and butter pieces to the bowl. Stir slowly and constantly over low heat until the mixture is smooth and glossy with no visible chips. If the mixture seems too thick, stir in 1–2 teaspoons of heavy cream or whole milk to loosen it slightly.
- Remove the bowl from the heat. Stir in the vanilla extract, 1 teaspoon orange extract, orange zest (if using), and salt. Taste carefully while warm and add up to an additional 1/2 teaspoon orange extract if you prefer a stronger citrus flavor.
- Pour about two-thirds of the warm fudge mixture into a second bowl and set aside; this will be the vanilla base layer. Leave the remaining one-third in the original bowl for the orange swirl layer.
- To the smaller portion in the original bowl, add a drop or two of orange gel food coloring. Stir well, adding more gel a tiny bit at a time until you reach a soft creamsicle orange shade.
- Pour the larger, uncolored vanilla mixture into the prepared pan. Use a spatula to spread it into an even layer, then tap the pan gently on the counter to release any air bubbles.
- Spoon the orange-colored mixture over the vanilla layer in small dollops. For a layered look, gently spread the orange mixture across the top into a mostly even second layer. For a swirled look, drag a butter knife or skewer through both layers, swirling gently without overmixing so you keep distinct orange and vanilla areas.
- Cover the pan lightly with foil and refrigerate for at least 2–3 hours, or until the fudge is completely firm. For the cleanest slices, chill 4 hours or overnight.
- Use the parchment sling to lift the fudge out of the pan and place it on a cutting board. With a sharp knife, cut into 1–1 1/2 inch squares, wiping the blade clean between cuts for neat edges. Serve slightly chilled or at cool room temperature.