Would you like to save this?
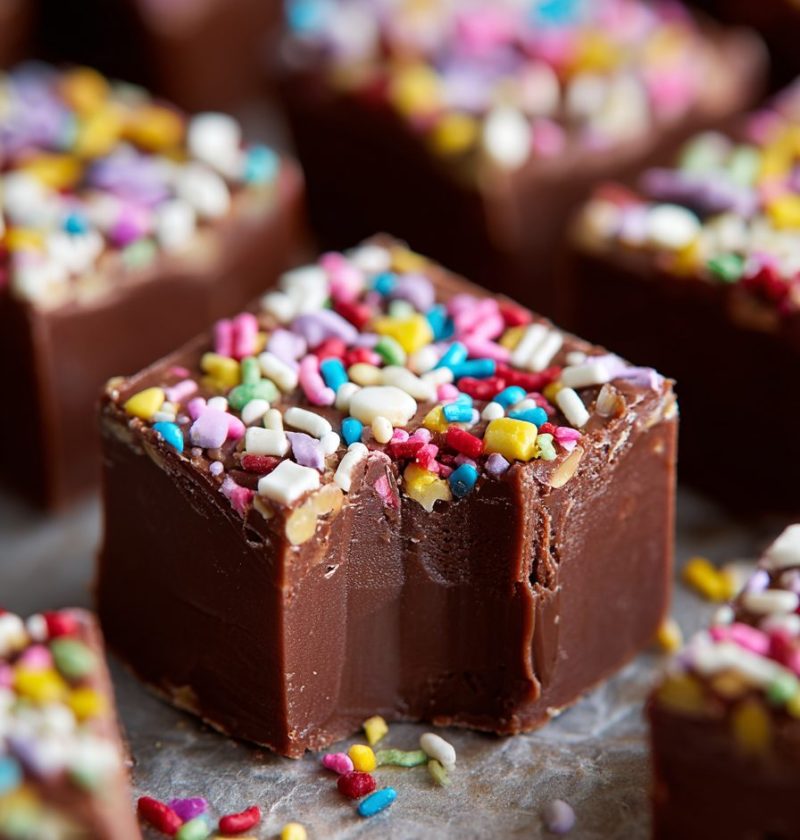
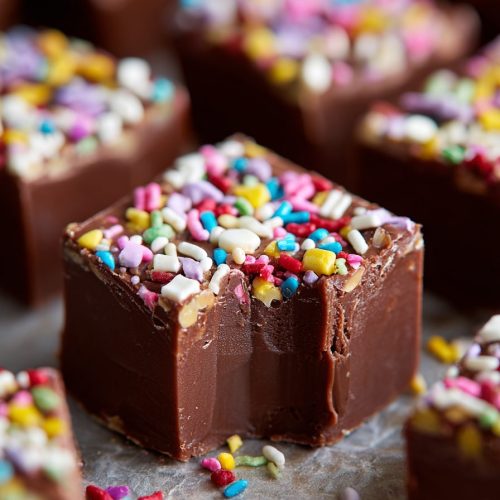
Million Dollar Fudge Recipe
This Million Dollar Fudge Recipe gives you rich, creamy chocolate fudge that tastes like it came straight out of a vintage candy shop—no baking, no fuss, just old fashioned fudge perfection in about 20 minutes of hands-on time.
What Is Million Dollar Fudge, Really?
If you grew up in the United States any time before smartphones took over the kitchen, chances are someone in your family had a handwritten card for million dollar fudge.
This is a classic old fashioned fudge that uses marshmallow creme, chocolate chips, sugar, and butter to make a silky, creamy chocolate fudge that sets up firm enough to slice, but melts the second it hits your tongue.
My version is inspired by the recipes I saw in church cookbooks in the late 70s and 80s. It’s that vintage fudge recipe you see on yellowed index cards, smudged with chocolate, usually marked with a little star or a note like “good for Christmas tins.”
Here’s why this Million Dollar Fudge Recipe really earns its name:
- It has layers of chocolate flavor from both semisweet and milk chocolate.
- The texture is creamy and smooth, not dry or crumbly.
- It’s a no bake fudge dessert—you cook on the stovetop, then chill.
- It makes a big batch, perfect as a crowd pleasing fudge for holidays, potlucks, or teacher gifts.
- It keeps beautifully, so you can make it ahead for busy seasons like Christmas.
I tend to pull this out around the holidays, but honestly, I’ve also made it in July for a family reunion when I needed something sweet that didn’t require turning on the oven. When your kitchen already feels like a sauna, an easy stovetop fudge recipe is a blessing.
Why You’ll Love This Recipe
Let me explain why this one earns a permanent spot in your recipe box.
- No oven needed – Everything cooks on the stovetop and then chills in the fridge.
- Foolproof texture – Thanks to marshmallow creme, it’s much more forgiving than traditional fudge.
- Rich but not fussy – You get that rich chocolate fudge flavor without candy thermometers or fancy skills.
- Perfect for gift-giving – Slices beautifully and holds up well in gift boxes and cookie trays.
- Big batch recipe – Makes plenty of homemade fudge for holiday parties or office treats.
- Flexible ingredients – You can use different chocolate chips, nuts, or even a condensed milk fudge variation.
- No bake fudge dessert – Great when it’s hot out or your oven is already full of cookies.
- Crowd-pleaser – Kids love it, adults ask for the recipe, and it’s familiar but still feels special.
You know what? This is the kind of candy that makes people say, “This tastes like my grandma’s.” And that’s exactly the feeling I’m going for.
Ingredients for Million Dollar Fudge
Here’s what you’ll need to make this Million Dollar Fudge Recipe at home. I’ll include a few notes and substitutions so you can use what you have on hand.
-
4 ½ cups granulated sugar
(Yes, it’s a lot—this is old fashioned fudge, not diet fudge.) -
1 (12-ounce) can evaporated milk
(Not sweetened condensed; look for “evaporated milk” like Carnation.) -
½ cup (1 stick) unsalted butter
(Salted works—just reduce added salt slightly.) -
1 teaspoon fine sea salt
(Helps balance the sweetness and deepen the chocolate flavor.) -
1 (7-ounce) jar marshmallow creme (marshmallow fluff)
(This is what makes it a marshmallow creme fudge and keeps it silky.) -
2 cups (12 ounces) semisweet chocolate chips
(Use a good brand like Ghirardelli or Guittard if you can.) -
2 cups (12 ounces) milk chocolate chips
(Gives that “million dollar” richness; you can use all semisweet if you prefer.) -
2 cups chopped nuts
(Traditional is walnuts or pecans; toast lightly for better flavor.) -
2 teaspoons pure vanilla extract
(Real vanilla makes a noticeable difference in such a simple candy.)
Ingredient Notes & Simple Swaps
- Want a sweeter fudge? Use more milk chocolate and fewer semisweet chips.
- Prefer a deeper, less sweet fudge? Use all semisweet or even part dark chocolate.
- Nut-free version: Leave out the nuts; the recipe still works perfectly.
- Condensed milk twist: Replace the evaporated milk and 1 ½ cups of the sugar with 1 can of sweetened condensed milk for an even creamier condensed milk fudge style variation.
- Butter: If you use salted butter, reduce the added salt to ½ teaspoon.

Step-by-Step Directions (Stovetop Fudge, No Oven Needed)
You don’t need candy-making experience for this easy fudge recipe. Just follow these steps and pay attention to the little sensory cues.
1. Prepare Your Pan
- Line a 9×13-inch baking pan with parchment paper or heavy-duty aluminum foil.
- Lightly grease the parchment or foil with butter or nonstick spray.
This makes it much easier to lift the whole block of fudge out for slicing. If you’ve ever tried to chisel fudge from a bare pan, you know why this step matters.
2. Measure and Prep Your Mix-Ins
- In a large heat-safe bowl, add the marshmallow creme, chocolate chips, chopped nuts, and vanilla extract.
- Set this bowl aside, right next to your stove.
You’ll be pouring hot syrup over this, and you’ll want everything close by, because once the sugar mixture is ready, things move quickly.
3. Cook the Sugar Mixture
- In a large, heavy-bottomed saucepan, combine the granulated sugar, evaporated milk, butter, and salt.
- Stir over medium heat until the butter melts and the mixture looks smooth.
- Bring to a gentle, steady boil, stirring constantly. Once it starts bubbling, cook for 5 full minutes, stirring the whole time.
Tips here:
- Use a wooden spoon or heat-safe silicone spatula.
- Scrape the bottom often so the sugar doesn’t scorch.
- Set a timer for those 5 minutes; undercooking can cause soft fudge that doesn’t set well.
You’re aiming for a thick, bubbly mixture that smells like caramel and butter. It will look a little foamy around the edges—totally normal.
4. Combine the Chocolate and Syrup
- As soon as the 5 minutes are up, carefully pour the hot sugar mixture over the bowl with chocolate chips, marshmallow creme, nuts, and vanilla.
- Let it sit for 30 seconds, then start stirring slowly from the center.
The heat from the syrup will melt the chocolate and marshmallow. Keep stirring steadily until everything is completely smooth, glossy, and well combined. This takes 2–3 minutes.
If you still see small streaks of marshmallow or chips, just keep stirring. It should come together into a thick, luscious fudge base that smells like a classic chocolate fudge shop.
5. Pour and Smooth
- Immediately scrape the fudge mixture into your prepared 9×13-inch pan.
- Use an offset spatula or the back of a spoon to spread it into an even layer, nudging it into the corners.
Don’t worry if the top isn’t perfectly smooth—fudge has character. A few swirls make it look homespun and inviting.
6. Let It Set
- Let the pan sit at room temperature for about 30 minutes, then transfer it to the refrigerator.
- Chill for at least 2 hours, or until the fudge is firm enough to slice cleanly.
If your kitchen runs cool, you can let it set completely on the counter, but for busy holiday kitchens, the fridge speeds things up.
7. Slice and Serve
- Once firm, use the parchment or foil to lift the whole slab of fudge out of the pan.
- Place it on a cutting board and slice into squares—anywhere from 1-inch to 2-inch pieces, depending on how generous you’re feeling.
Wipe the knife with a warm, damp cloth between cuts for neat, clean edges that look lovely on a dessert tray.
Servings & Timing
- Yield: About 48 small squares (or 36 larger pieces)
- Prep Time: 15–20 minutes
- Cook Time: 5 minutes
- Chill Time: 2 hours
- Total Time: About 2 hours 30 minutes, mostly hands-off
This Million Dollar Fudge Recipe is ideal when you want an impressive holiday candy recipe without spending all day in the kitchen. Make it in the afternoon, and it’s ready by evening.
Fun Variations to Try
Once you’ve made the classic version, you can play around a bit. Here are some easy twists:
- Rocky Road Fudge: Stir in 1 cup mini marshmallows and 1 cup peanuts instead of walnuts or pecans.
- Mocha Fudge: Add 2 teaspoons instant espresso powder with the vanilla for a coffee-kissed rich chocolate fudge.
- Salted Caramel Fudge: Drizzle caramel sauce over the top and sprinkle with flaky sea salt before chilling.
- Nut-Free Cookies & Cream: Skip the nuts and fold in 1 ½ cups crushed chocolate sandwich cookies.
- Dark Chocolate Almond: Use all dark chocolate chips and toasted almonds for a more grown-up, slightly less sweet chocolate nut fudge.
- Holiday Sprinkle Fudge: Leave out the nuts and add colorful sprinkles on top for a festive holiday candy recipe that kids adore.
How to Store, Freeze, and Make Ahead
One of the best parts about this homemade fudge recipe is how well it keeps. That makes it a real workhorse during busy seasons.
Storing in the Fridge
- Place cut fudge in an airtight container, layering pieces with parchment or wax paper.
- Store in the refrigerator for 2–3 weeks.
- Let pieces sit at room temperature for 15–20 minutes before serving for the best, creamy texture.
Freezing Fudge
- Wrap the whole slab (or individual portions) tightly in plastic wrap, then in foil.
- Place in a freezer-safe bag or container.
- Freeze for up to 3 months.
To serve, thaw in the fridge overnight, then let come to room temperature slightly. Fudge that’s too cold can taste muted, so a little time on the counter helps the flavor bloom.
Make-Ahead Advice
If you’re planning holiday trays or a big party, you can make this stovetop fudge recipe:
- Up to 2 weeks ahead (refrigerator only), or
- Up to 1–2 months ahead (frozen, then thawed as needed).
Just keep it well sealed so it doesn’t pick up any fridge or freezer odors—nobody wants onion-scented fudge.
Notes from My Kitchen (Little Things That Make a Big Difference)
After making this Million Dollar Fudge Recipe more times than I can count—Christmas, baby showers, office potlucks, you name it—here are a few things I’ve learned:
- Use a heavy pot. A thin saucepan is more likely to scorch the sugar. I like a good enamel-coated or stainless-steel pot with a heavy base.
- Don’t rush the boil. Those 5 minutes at a steady boil are important. It cooks off moisture and helps the fudge set properly.
- Stir, stir, stir. This isn’t the time to walk away and check email. Constant stirring keeps things smooth and prevents burning on the bottom.
- Measure ahead. Get all your chocolate, marshmallow creme, and nuts in the mixing bowl before you start cooking the sugar mixture. Once the syrup is hot and ready, you won’t want to be fumbling with bags and jars.
- Taste the chocolate. If your chips taste a little flat straight from the bag, the fudge will too. Good-quality chocolate really shines here.
- Cut small pieces. This is rich stuff. Small squares make it easier for people to enjoy a bite or two without feeling overwhelmed.
And one more thing: don’t panic if the top isn’t perfectly smooth or a corner breaks when you slice it. Homemade old fashioned fudge is supposed to look homemade. Those “imperfect” pieces usually disappear first.
Frequently Asked Questions
1. Why didn’t my fudge set?
Most often, it wasn’t boiled long enough. Make sure the sugar mixture boils for a full 5 minutes, stirring constantly, and chill it until completely firm.
2. Can I make this without marshmallow creme?
Marshmallow creme is what keeps this a soft, creamy, more foolproof fudge. If you skip it, you’re better off using a traditional candy-thermometer fudge recipe rather than this one.
3. Can I use only one kind of chocolate?
Yes. You can use all semisweet for a more classic creamy chocolate fudge, or all milk chocolate for a very sweet version. Just keep the total amount the same.
4. How do I keep the chocolate from seizing or getting grainy?
Pour the hot syrup evenly over the chocolate and marshmallow, let it sit for 30 seconds, then stir gently but steadily. Also, make sure no water or steam drips into the bowl.
5. Is this Million Dollar Fudge Recipe gluten-free?
The basic ingredients (chocolate, sugar, butter, marshmallow creme, nuts) are usually gluten-free, but always check labels—especially on chocolate chips and marshmallow products.
6. Can I halve the recipe?
Yes, you can make a half batch in an 8×8 or 9×9-inch pan. Just cut all ingredients in half and keep the cooking time for the sugar mixture the same.
7. How do I get neat, clean slices?
Chill the fudge thoroughly, use a large sharp knife, and wipe the blade between cuts. A warm knife (dipped in hot water and dried) helps too.
8. Can I leave out the nuts?
Absolutely. This classic chocolate fudge is wonderful plain. Just omit the nuts; no other changes needed.
Wrapping It Up (And Packing It in Tins!)
This Million Dollar Fudge Recipe gives you everything you want in a classic chocolate fudge: a glossy, creamy bite, deep chocolate flavor, and that nostalgic “grandma’s kitchen” feeling. It’s an easy homemade fudge recipe that still feels special enough for holidays, gifts, and celebrations.
If you make this fudge, let me know how it turns out—leave a comment, tell me which variation you tried, or share who you made it for. And when you’re ready for more holiday candy recipes and no-bake treats, you might like pairing this with homemade toffee, peanut brittle, or chocolate bark for a full candy tray.
Million Dollar Fudge
Ingredients
- 4 1/2 cups granulated sugar
- 12 ounces evaporated milk one 12-ounce can; not sweetened condensed milk
- 1/2 cup unsalted butter 1 stick; if using salted butter, reduce added salt to 1/2 teaspoon
- 1 teaspoon fine sea salt
- 7 ounces marshmallow creme one 7-ounce jar; also called marshmallow fluff
- 2 cups semisweet chocolate chips about 12 ounces; use good-quality chocolate
- 2 cups milk chocolate chips about 12 ounces; can substitute additional semisweet chips
- 2 cups chopped nuts walnuts or pecans, toasted if desired
- 2 teaspoons pure vanilla extract
Instructions
- Line a 9×13-inch baking pan with parchment paper or heavy-duty aluminum foil. Lightly grease the parchment or foil with butter or nonstick spray to make the fudge easier to remove and slice.
- In a large heat-safe bowl, combine the marshmallow creme, semisweet chocolate chips, milk chocolate chips, chopped nuts, and vanilla extract. Set the bowl aside next to the stove so it is ready when the hot sugar mixture is done.
- In a large, heavy-bottomed saucepan, combine the granulated sugar, evaporated milk, butter, and salt. Stir over medium heat until the butter melts and the mixture is smooth. Bring to a gentle, steady boil, stirring constantly. Once boiling, continue to cook for 5 full minutes, stirring the entire time to prevent scorching.
- As soon as the 5 minutes are up, carefully pour the hot sugar mixture over the bowl with the chocolate chips, marshmallow creme, nuts, and vanilla. Let sit for about 30 seconds, then stir steadily from the center outward until the chocolate and marshmallow are fully melted and the mixture is thick, smooth, and glossy, 2–3 minutes.
- Immediately scrape the fudge mixture into the prepared 9×13-inch pan. Use an offset spatula or the back of a spoon to spread it evenly and nudge it into the corners. The top does not need to be perfectly smooth.
- Let the pan stand at room temperature for about 30 minutes, then transfer it to the refrigerator. Chill for at least 2 hours, or until the fudge is firm enough to lift from the pan and slice cleanly.
- Once firm, use the parchment or foil sling to lift the slab of fudge out of the pan and place it on a cutting board. Slice into 1- to 2-inch squares, wiping the knife with a warm, damp cloth between cuts for neat edges. Serve at cool room temperature.