Would you like to save this?
Cowboy Candy Canning Recipe (Sweet, Spicy & Totally Addictive)
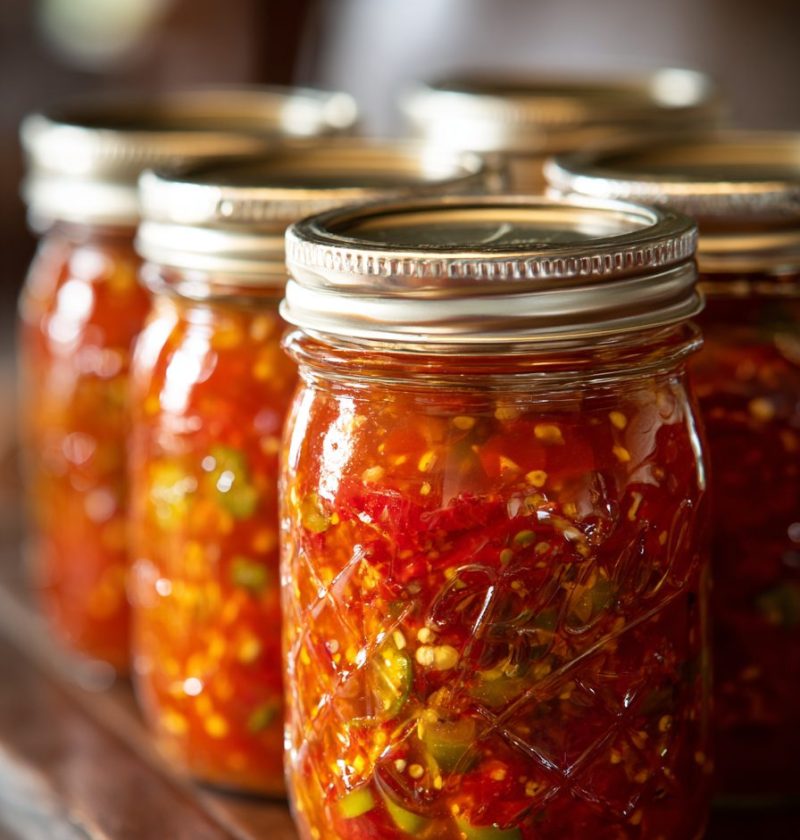
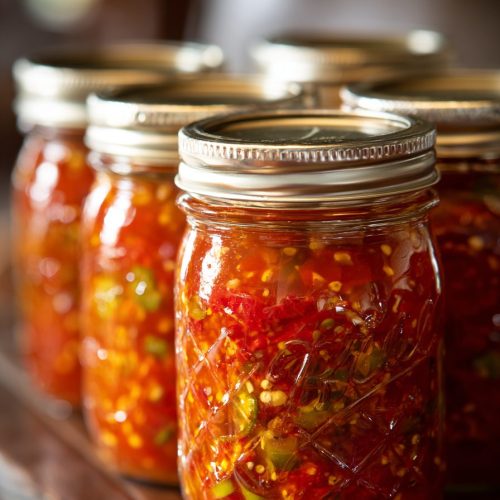
This Cowboy Candy Canning Recipe turns fresh jalapeños into glossy, sweet heat perfection—perfect for topping burgers, stirring into cream cheese, or gifting straight from your pantry shelves.
What Is Cowboy Candy, Anyway?
If you’ve never made cowboy candy before, you’re in for such a treat. Cowboy candy is simply candied jalapeno peppers—jalapeño slices simmered in a sweet sugar brine with vinegar and spices, then canned so they’re shelf stable and ready whenever you want that spicy-sweet kick.
This particular Cowboy Candy Canning Recipe leans into that perfect “sweet heat” balance: not so hot that your eyes water, but bold enough to wake up anything you put it on. It’s a classic way of preserving hot peppers, especially in late summer and early fall when the garden (or farmer’s market) is overflowing with jalapeños.
I’m a 50-year-old mom and lifelong home canner, and I’ll tell you: this is one of those recipes that people remember. I’ve brought jars of homemade cowboy candy to football parties, tucked them into Christmas baskets, and set them out on simple weeknight taco nights. Without fail, someone asks for “that cowboy candy recipe with the sweet pickled jalapenos.”
And you know what? It’s not just delicious—it’s also:
- A great way to reduce food waste
- A budget-friendly way to stock your pantry
- A simple, approachable jalapeno canning recipe if you’re new to water bath canning
We’ll walk through the full cowboy candy canning instructions, step by step, so you feel completely confident.
Why You’ll Love This Cowboy Candy Canning Recipe
- Perfect sweet heat balance – These spicy sweet jalapenos are bold but not brutal, with a lovely candy-like glaze.
- Pantry-friendly & shelf stable – Proper water bath canning jalapenos means you can store these jars right in your pantry for months.
- Beginner-friendly canning – If you’re new to candy jalapeno canning, this recipe is forgiving and straightforward.
- Endlessly versatile – Use them on burgers, tacos, sandwiches, charcuterie boards, or stirred into dips and sauces.
- Fantastic for gifting – Dress up jars with simple labels and you’ve got the most requested hostess or holiday gift.
- Flexible heat level – You can adjust the spice by seeding some jalapeños or mixing in milder peppers.
- Works with fresh or store-bought jalapeños – Garden haul or big-box bag of peppers? Either works beautifully.
- Easy to batch – This recipe scales well, so you can can 3 jars or 10 jars with small adjustments.
- Minimal equipment – A stockpot, canning pot, jars, and a few simple tools and you’re set.
Ingredients for the Best Cowboy Candy Canning Recipe
Here’s what you’ll need for about 6 half-pint (8-ounce) jars of pickled jalapeno slices in a sweet, sticky jalapeno sugar brine.
Jalapeños & Veggies
- 3 pounds fresh jalapeño peppers
- Choose firm, glossy peppers with smooth skin. Avoid soft or wrinkly ones.
- For milder cowboy candy, remove some or all of the seeds and membranes.
Optional add-ins (for variety and color):
- 1 small red bell pepper, thinly sliced (adds color and mild sweetness)
- 1 small onion, thinly sliced into rings (yellow or sweet onion works best)
Sugar Brine (Sweet Pickling Liquid)
- 6 cups granulated sugar
- White sugar works best for that clear, glossy syrup.
- 2 cups apple cider vinegar (5% acidity)
- Use a trusted brand labeled 5% acidity (very important for safe canning).
- ½ teaspoon turmeric
- Adds that golden color and a subtle warm flavor.
- ½ teaspoon celery seed
- 1½ teaspoons garlic powder (or 3–4 cloves garlic, minced)
- 2 teaspoons mustard seeds
- 1 teaspoon crushed red pepper flakes (optional, for extra heat)
- ½ teaspoon kosher salt or pickling salt
Canning Equipment (Recommended)
Not ingredients, but essential for safe, smooth cowboy candy canning:
- 6–7 half-pint canning jars with new lids and bands
- Large water bath canner or deep stockpot with rack
- Jar lifter, funnel, ladle, and bubble remover (a butter knife works in a pinch)
- Clean kitchen towels and paper towels
- Cutting board and sharp knife (or mandoline) for uniform canning pepper rings
If you’re just getting into canning, the Ball or Kerr starter kits you can find at Walmart, Target, or online usually have everything you need.
Directions: Step-by-Step Cowboy Candy Canning Instructions

Let’s walk through this slowly. Canning doesn’t have to feel intimidating, especially with a simple sweet heat jalapeno recipe like this.
1. Prepare Your Canning Jars and Equipment
-
Wash jars, lids, and bands.
Wash everything in hot, soapy water and rinse well. Inspect jars for chips or cracks. -
Preheat the jars.
Place clean jars in your water bath canner or a large pot, cover with water, and heat to a gentle simmer (not a hard boil). This keeps them warm and helps prevent cracking when you add hot brine. -
Heat lids (if needed).
Some modern lids don’t need preheating—check the box. If recommended, place lids in a small pan of warm (not boiling) water to soften the seal. -
Bring canner water to a simmer.
Keep the water at about 180°F while you prep the peppers and brine.
2. Slice the Jalapeños Safely
-
Wear gloves.
This seems fussy, but trust me: capsaicin under your fingernails is not fun—especially if you wear contacts or touch your face. -
Rinse and trim peppers.
Rinse jalapeños under cool water, pat dry, and trim off the stem ends. -
Slice into rings.
Cut into ⅛–¼ inch pepper rings. Thinner rings will be a bit more tender and “candied”; thicker rings have more bite. -
Adjust heat.
For less heat, knock out some seeds and white membranes as you go. You can do half seeded, half unseeded for a nice balance. -
Optional: prep onion and bell pepper.
If using, slice them into thin rings or strips.
3. Make the Sweet Jalapeño Sugar Brine
-
Combine brine ingredients.
In a large, non-reactive pot (stainless steel or enameled), add:- 6 cups sugar
- 2 cups apple cider vinegar
- Turmeric, celery seed, garlic powder, mustard seeds, red pepper flakes, and salt
-
Heat the brine.
Bring the mixture to a gentle boil over medium heat, stirring often until all the sugar dissolves. -
Simmer.
Once it comes to a boil, lower the heat and let it simmer for about 5 minutes. The brine should be clear and fragrant, with the spices evenly suspended.
4. Candy the Jalapeño Slices
-
Add the jalapeños.
Carefully add the jalapeño rings (and onion/bell pepper if using) into the hot brine. Stir to coat everything. -
Simmer the peppers.
Let the jalapeños simmer in the jalapeno sugar brine for 5–7 minutes.- You’ll see them turn a deeper, almost olive color and start to look slightly translucent.
-
Turn off the heat.
Once they’re just tender (not mushy), turn off the heat and get ready to pack your jars.
5. Pack the Jars
-
Pull jars from hot water.
Using a jar lifter, carefully remove hot jars from the canner and set them on a clean towel. Keep the canner water hot for processing. -
Pack the jalapeños.
Using tongs or a slotted spoon, fill each jar with jalapeño slices, leaving about ½ inch headspace at the top. Pack them snugly but not crushed. -
Ladle in the brine.
Pour hot brine over the peppers, still leaving ½ inch headspace. Make sure the pickled jalapeno slices are fully submerged. -
Remove air bubbles.
Slide a bubble remover tool or a butter knife gently down the sides of the jar. Add a bit more brine if needed to maintain that ½ inch headspace. -
Clean the rims.
Wipe jar rims with a clean, damp cloth or paper towel to remove any sticky syrup or seeds. -
Add lids and bands.
Center a warm lid on each jar, then screw bands on just until fingertip-tight (snug, but not cranked down).
6. Water Bath Canning Jalapeños
-
Load the canner.
Place filled jars back into the water bath canner. Make sure the water covers the jars by at least 1 inch. -
Bring to a full boil.
Turn heat to high and bring the water to a vigorous boil. -
Process the jars.
Once boiling, process half-pint jars for 10 minutes (adjust for altitude if above 1,000 feet—usually add 5 minutes, but always check a reliable source like the National Center for Home Food Preservation). -
Rest jars.
After the time is up, turn off heat and let jars sit in the hot water for 5 minutes. This helps prevent siphoning (liquid loss) when you pull them out. -
Cool the jars.
Use the jar lifter to move jars to a clean towel. Let them cool for 12–24 hours, undisturbed. You’ll hear those happy little pops as the lids seal. -
Check seals.
Once cool, check that each lid is concave and doesn’t flex up and down when pressed. Any unsealed jars should be refrigerated and used first.
Servings & Timing
- Yield: About 6 half-pint (8-ounce) jars of cowboy candy
- Prep Time: 25–35 minutes (washing, slicing, prepping brine)
- Cook Time: 20–25 minutes (simmering peppers + canning time)
- Total Time: About 1 hour 15 minutes (plus 12–24 hours cooling before storage)
Keep in mind, the flavor improves after about a week of resting—if you can wait that long!
Fun Variations on Cowboy Candy
A good cowboy candy recipe is like a denim jacket: classic—but easy to dress up.
- Smoky Cowboy Candy: Add ½–1 teaspoon smoked paprika or a little liquid smoke to the brine for a BBQ-style flavor.
- Citrus Twist: Replace ¼ cup of the vinegar with orange juice and add a few strips of orange zest for a bright, sweet note.
- Extra Hot Batch: Toss in a few sliced habaneros or serranos with the jalapeños for serious heat lovers.
- Honey-Kissed Version: Swap 1 cup of the sugar for mild honey (don’t reduce total sugar too much, though, as it helps preserve texture).
- Low-Sugar-Style (Refrigerator Only): Reduce sugar by half and skip canning—store in the fridge and eat within 1–2 months.
- Cowboy Candy Relish: After cooking and cooling slightly, pulse the mixture a few times in a food processor for a spreadable relish texture (then can as usual, keeping headspace and timing).
Storage & Make-Ahead Tips
One of the best things about this Cowboy Candy Canning Recipe is how well it fits into a busy schedule.
- Room Temperature Storage (Shelf Stable):
- Store sealed jars in a cool, dark place (pantry, cupboard, basement) for up to 12 months for best quality.
- Refrigeration:
- Once opened, store jars in the fridge and use within 2–3 months.
- Freezer Storage (If Not Canned):
- You can skip water bath canning and simply refrigerate for short-term, or freeze for 3–4 months in freezer-safe containers—but the texture will soften more.
- Make-Ahead:
- Cowboy candy is better after at least 7 days as the flavors meld and the peppers fully absorb that sweet brine.
- I often make my holiday gifting batch in October so it’s perfect by December.
No reheating needed—just spoon straight from the jar. If the syrup thickens a lot in the fridge, let the jar sit at room temperature for 10–15 minutes.
Notes from My Kitchen (What I’ve Learned Over the Years)
-
Let it rest for full flavor.
Freshly canned sweet pickled jalapenos taste good, but slightly sharp. After a week, they’re deeper, rounder, and more “candied.” -
Onion is your secret weapon.
If you like sweet-and-spicy onions, definitely toss in a small sliced onion. Those onion rings might disappear even faster than the jalapeños. -
Don’t skimp on headspace.
That ½ inch headspace helps ensure a safe seal and prevents sticky overflow in the canner. -
Slice thickness matters.
Very thin slices (about ⅛ inch) feel more like candy and are great on crackers with cream cheese. Thicker ¼ inch rings work beautifully on burgers, bratwurst, and sandwiches. -
Use consistent heat.
A good steady simmer when cooking the peppers and a true rolling boil in the canner help prevent cloudy brine and soft peppers. -
Brine is liquid gold.
Don’t toss leftover brine! It’s incredible drizzled over roasted veggies, whisked into vinaigrettes, or stirred into mayo for a spicy sandwich spread.
And honestly—don’t be afraid of canning. Once you do it a couple of times, it starts feeling less like a science project and more like a comforting little ritual.
FAQs About Cowboy Candy Canning
1. How hot is cowboy candy?
It’s warmly spicy, but the sugar and vinegar mellow the heat; if you leave in all the seeds and membranes, expect a good kick, but not “blow-your-head-off” hot.
2. Can I use other peppers instead of jalapeños?
Yes—Fresno, serrano, or even mild banana peppers work; just keep the same brine recipe and canning times.
3. Can I reduce the sugar in this recipe?
You can reduce it slightly for a refrigerator-only version, but for safe shelf stable jalapenos and proper texture, it’s best to stick close to the original sugar amount if you’re water bath canning.
4. Do I really have to use a water bath canner?
For long-term pantry storage, yes; the vinegar and sugar help, but proper water bath canning jalapenos is what makes them safe at room temperature.
5. Why did some liquid siphon out of my jars?
This can happen if the boil is too vigorous or jars weren’t rested before removing from the canner; as long as the jars seal and there’s still enough brine covering the peppers, they’re typically safe.
6. Can I use white vinegar instead of apple cider vinegar?
Yes, as long as it’s 5% acidity—white vinegar will create a slightly sharper flavor but also a clearer brine.
7. How long should I wait before eating my cowboy candy?
Try to give it at least 5–7 days for the best flavor, though technically you can eat it as soon as it’s cooled and sealed.
8. What do I serve cowboy candy with?
My favorites: cream cheese and crackers, burgers, pulled pork, tacos, grilled cheese, nachos, and charcuterie boards—anywhere you want a punch of sweet heat.
Wrapping It Up: Your New Favorite Jar on the Shelf
This Cowboy Candy Canning Recipe gives you glossy, sweet heat jalapeño rings that are just as good on a burger in July as they are on a Christmas cheese board in December. It’s a practical way to handle that pile of peppers on your counter, and it feels a little bit like bottling sunshine and spice for the months ahead.
If you try this recipe—especially if it’s your first time canning—come back and let me know how it went, what you served it with, and whether your family is as obsessed as mine. And if you’re in the mood to keep building up that pantry, you might like pairing these with pickled red onions or a homemade salsa recipe next.
Cowboy Candy (Candied Jalapeños) – Water Bath Canning Recipe
Ingredients
- 3 pounds fresh jalapeño peppers rinsed, stem ends trimmed, sliced into 1/8–1/4 inch rings; seed some or all for less heat if desired
- 1 small red bell pepper thinly sliced, optional, for color and mild sweetness
- 1 small onion thinly sliced into rings; yellow or sweet onion works best, optional
- 6 cups granulated sugar white sugar for a clear, glossy syrup
- 2 cups apple cider vinegar 5% acidity; use a trusted brand
- 1/2 teaspoon ground turmeric
- 1/2 teaspoon celery seed
- 1 1/2 teaspoons garlic powder or 3–4 cloves garlic, minced
- 2 teaspoons mustard seeds
- 1 teaspoon crushed red pepper flakes optional, for extra heat
- 1/2 teaspoon kosher salt or pickling salt
- 6 half-pint canning jars with lids and bands 6–7 jars, washed and inspected
- water for simmering jars and processing in water bath canner
- disposable or kitchen gloves for handling hot peppers safely
Instructions
- Wash canning jars, lids, and bands in hot, soapy water and rinse well. Inspect jars for any chips or cracks. Place the clean jars in a water bath canner or large deep pot, cover with water, and heat to a gentle simmer (about 180°F); keep them hot until ready to fill. If your lids require preheating, place them in a small pan of warm (not boiling) water to soften the seals.6 half-pint canning jars with lids and bands, water
- Maintain the water in the canner at a gentle simmer while you prepare the peppers and brine so the jars stay hot and ready for filling.water
- Put on gloves to protect your hands from capsaicin. Rinse the jalapeños under cool water and pat dry. Trim off the stem ends and slice the peppers into 1/8–1/4 inch rings. For a milder batch, remove some or all of the seeds and white membranes as you slice. If using, thinly slice the red bell pepper and onion into rings or strips.3 pounds fresh jalapeño peppers, 1 small red bell pepper, 1 small onion, disposable or kitchen gloves
- In a large non-reactive pot (stainless steel or enameled), combine the granulated sugar, apple cider vinegar, turmeric, celery seed, garlic powder (or minced garlic), mustard seeds, crushed red pepper flakes (if using), and salt. Stir to mix.6 cups granulated sugar, 2 cups apple cider vinegar, 1/2 teaspoon ground turmeric, 1/2 teaspoon celery seed, 1 1/2 teaspoons garlic powder, 2 teaspoons mustard seeds, 1 teaspoon crushed red pepper flakes, 1/2 teaspoon kosher salt or pickling salt
- Place the pot over medium heat and bring the mixture to a gentle boil, stirring often until the sugar is completely dissolved. Reduce the heat and simmer the brine for about 5 minutes. The liquid should be clear and fragrant, with spices evenly suspended.6 cups granulated sugar, 2 cups apple cider vinegar, 1/2 teaspoon ground turmeric, 1/2 teaspoon celery seed, 1 1/2 teaspoons garlic powder, 2 teaspoons mustard seeds, 1 teaspoon crushed red pepper flakes, 1/2 teaspoon kosher salt or pickling salt
- Carefully add the sliced jalapeños, and the onion and bell pepper if using, into the hot brine. Stir to coat all the slices. Simmer for 5–7 minutes, stirring occasionally, until the peppers turn a deeper, more olive color and start to look slightly translucent but are not mushy. Turn off the heat.3 pounds fresh jalapeño peppers, 1 small red bell pepper, 1 small onion
- Using a jar lifter, remove the hot jars from the canner and place them on a clean towel. Using tongs or a slotted spoon, pack the hot jalapeño slices (and onion/bell pepper, if using) into the jars, leaving about 1/2 inch headspace at the top. Pack the peppers snugly but do not crush them.3 pounds fresh jalapeño peppers, 1 small red bell pepper, 1 small onion, 6 half-pint canning jars with lids and bands
- Ladle the hot brine over the packed peppers in each jar, maintaining 1/2 inch headspace and making sure the peppers are fully submerged. Slide a bubble remover tool or a butter knife down the sides of each jar to release trapped air bubbles. Add a bit more brine if needed to restore 1/2 inch headspace.6 cups granulated sugar, 2 cups apple cider vinegar, 1/2 teaspoon ground turmeric, 1/2 teaspoon celery seed, 1 1/2 teaspoons garlic powder, 2 teaspoons mustard seeds, 1 teaspoon crushed red pepper flakes, 1/2 teaspoon kosher salt or pickling salt
- Wipe the rims of the jars with a clean, damp cloth or paper towel to remove any syrup or seeds. Center a warm lid on each jar and screw on a band until fingertip-tight (snug but not overly tight).6 half-pint canning jars with lids and bands
- Place the filled jars back into the water bath canner on the rack. Ensure the water covers the jars by at least 1 inch; add hot water if needed. Bring the canner to a vigorous boil over high heat, then process half-pint jars for 10 minutes (adjust time according to a trusted guideline if you live above 1,000 feet elevation).6 half-pint canning jars with lids and bands, water
- When processing time is complete, turn off the heat and let the jars rest in the hot water for 5 minutes to help prevent siphoning. Then, using a jar lifter, transfer the jars to a clean towel, leaving space between them. Let the jars cool undisturbed for 12–24 hours. You should hear the lids pop as they seal.6 half-pint canning jars with lids and bands
- After the jars are completely cool, check each lid to make sure it is concave and does not flex up and down when pressed. Remove the bands if desired, wipe down the jars, label, and store in a cool, dark place for up to 12 months. Refrigerate any jar that did not seal properly and use it first.6 half-pint canning jars with lids and bands
- For best flavor, let the cowboy candy rest for at least 5–7 days before opening a jar to allow the peppers to fully absorb the sweet, spicy brine.