Would you like to save this?
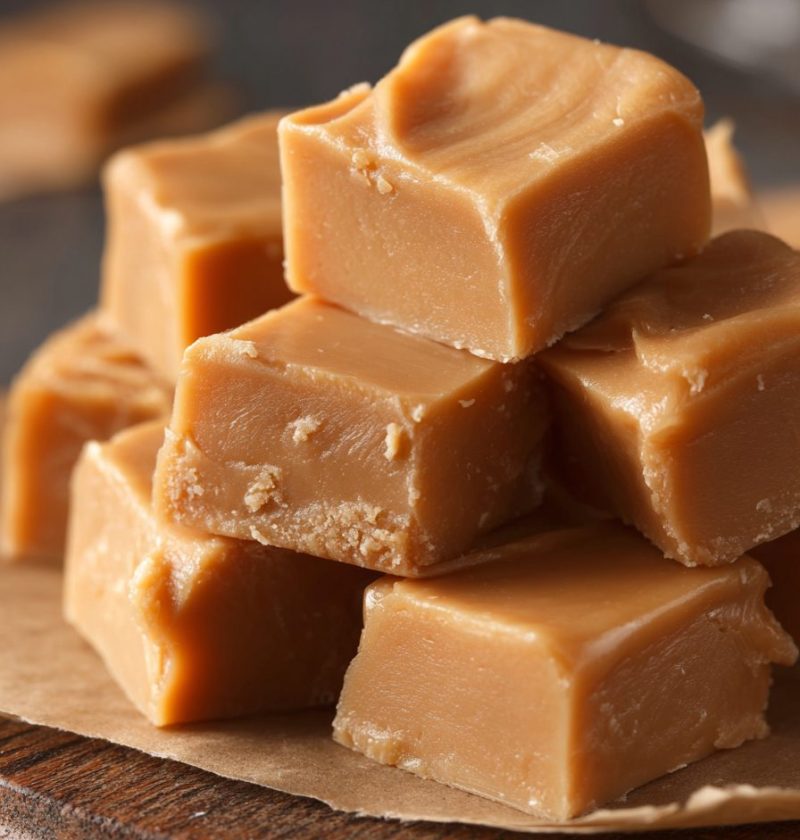
Peanut Butter Fudge Recipe
This Peanut Butter Fudge Recipe is creamy, rich, no-bake, and so easy that you can have a pan of fudge chilling in the fridge before your coffee even cools.
Why This Peanut Butter Fudge Recipe Has My Heart
I’ve been making homemade peanut butter fudge for more than 25 years, and this version is the one my grown kids still ask for every Christmas…and, let’s be honest, plenty of random Tuesdays too. It’s a simple fudge recipe with a short ingredient list, no thermometer, and no oven. Just smooth, rich peanut butter fudge with that old fashioned fudge flavor I grew up with.
What makes this Peanut Butter Fudge Recipe special is how forgiving it is. No candy-making drama, no gritty sugar crystals, no worrying about “soft ball stage.” You melt, stir, pour, chill, and suddenly you’ve got a quick peanut butter dessert that tastes like you spent all afternoon fussing over it.
I like to bring this creamy peanut butter fudge to:
- Church potlucks
- Cookie swaps
- Teacher appreciation lunches
- Or tucked into little tins for neighbors around the holidays
But honestly, it’s also the fudge I make when I’m sitting on the couch in my slippers, craving something sweet and peanut-buttery, and not in the mood to bake cookies.
This no bake peanut butter fudge is:
- Smooth and creamy, but still holds a clean slice
- Sweet without being cloying
- Easy to customize (chocolate swirl, anyone?)
- Just as good straight from the freezer as it is from the fridge
So if you’ve ever been nervous about making fudge, this is your “you-can-totally-do-this” recipe.

Why You’ll Love This Peanut Butter Fudge Recipe
- No thermometer needed – No fussing with candy stages or special equipment.
- No-bake and stove-top only – Keep the oven off, especially nice in summer.
- Ready in about an hour – Around 10 minutes of hands-on time, plus chilling.
- Short ingredient list – Just pantry staples you probably already have.
- Perfect texture – Soft and creamy peanut butter fudge that doesn’t crumble.
- Easy to scale – Make a half pan for a small family or double it for parties.
- Great for gifting – Holds up well in treat boxes and cookie trays.
- Works with chunky or smooth peanut butter – Use what you love.
- Naturally egg-free – A good peanut butter dessert recipe for many diets.
- Freezer-friendly – Make ahead and stash some away for “emergencies.”
Ingredients for the Creamiest Peanut Butter Fudge
Here’s everything you’ll need for this rich peanut butter fudge. I’ll add a few notes so you can adjust to what’s in your pantry.
- 1 cup (2 sticks / 226 g) unsalted butter
- Salted butter works too—just reduce or skip the added salt.
- 1 cup (240 ml) whole milk
- 2% works in a pinch; whole milk gives the best creamy texture.
- 2 cups (400 g) granulated sugar
- Classic white sugar gives that old fashioned peanut butter fudge sweetness.
- 1 cup (220 g) packed light brown sugar
- Adds a hint of caramel flavor and helps keep it extra soft and rich.
- 1 1/2 cups (about 400 g) creamy peanut butter
- Use a standard peanut butter like Jif or Skippy; natural peanut butter can cause the fudge to separate.
- 1 tablespoon pure vanilla extract
- I like real vanilla here; it softens the sweetness and adds depth.
- 1/2 teaspoon fine sea salt
- If using salted butter, start with just a pinch, then adjust to taste.
- 3 cups (about 360 g) powdered sugar, sifted
- Sifting helps prevent lumps and ensures smooth, creamy peanut butter fudge.
Ingredient Tips & Simple Swaps
- Peanut butter:
For a more old fashioned texture, you can use chunky peanut butter for little peanut bits in every bite. Avoid “natural” peanut butters that separate; they usually make the fudge greasy or grainy. - Butter:
If you only have salted butter, that’s fine—just taste before adding extra salt. - Powdered sugar:
If you don’t feel like sifting, whisk it briskly in a bowl to break up clumps. Your future self, slicing gorgeous squares, will be glad you took 30 seconds for this. - Milk:
For a richer fudge, you can use half-and-half. I don’t recommend fat-free milk here; it tends to make the fudge less creamy.
Step-by-Step Directions for Homemade Peanut Butter Fudge
This easy fudge recipe is perfect for beginners. Read through the steps once before you start—things move very quickly once the mixture is hot.
1. Prep your pan
- Line an 8×8-inch or 9×9-inch baking pan with parchment paper or foil, leaving some overhang on two sides for easy lifting.
- Lightly grease the parchment with a tiny bit of butter or nonstick spray.
- This keeps the fudge from sticking and makes neat squares much easier.
2. Measure and sift your powdered sugar
- In a large mixing bowl, add the 3 cups powdered sugar and sift it, or whisk well to break up any lumps.
- Set this bowl next to your stove—you’ll need it ready to go while the mixture is still hot.
3. Make the buttery sugar base
- In a medium saucepan (at least 3 quarts; this mixture bubbles), add the butter, granulated sugar, brown sugar, and milk.
- Set the pan over medium heat and stir gently as the butter melts and the sugar dissolves.
- Use a heat-safe spatula or wooden spoon; keep scraping the bottom so nothing scorches.
4. Bring to a gentle boil
- Once everything is melted and smooth, bring the mixture to a gentle boil, stirring often.
- When it reaches a bubbling boil across the whole surface, set a timer for 3 minutes.
- Keep stirring the entire time. The mixture will look silky and slightly thickened.
Tip: This recipe is forgiving, but try not to walk away during this step. Those 3 minutes matter for the final texture—too short and the fudge can be too soft, too long and it may set too firm.
5. Stir in the peanut butter, vanilla, and salt
- Turn off the heat and immediately stir in the peanut butter, vanilla, and salt.
- Continue stirring until the peanut butter is fully melted and the mixture looks very smooth and glossy.
At this point, your kitchen should smell like a peanut butter candy factory, in the best way.
6. Combine with powdered sugar
- Carefully pour the hot peanut butter mixture into the bowl with the powdered sugar.
- Using a sturdy spatula or a hand mixer on low speed, mix until the powdered sugar is fully incorporated and no streaks remain.
- The fudge will thicken quickly as it cools; keep mixing until it’s uniform and creamy.
If it looks a bit stiff, that’s normal. You just don’t want to see dry powdered sugar.
7. Transfer to the pan and smooth
- Scrape the fudge mixture into your prepared pan, spreading it out as evenly as you can.
- Use an offset spatula or the back of a spoon to smooth the top.
- If you like, you can tap the pan firmly on the counter a few times to help it settle.
8. Chill until set
- Let the pan cool on the counter for 10–15 minutes, then transfer to the refrigerator.
- Chill for 45–60 minutes, or until the fudge is firm enough to cut cleanly.
9. Slice and serve
- Use the parchment overhang to lift the fudge out of the pan and onto a cutting board.
- With a sharp knife, cut into 1-inch squares or any size you like.
For the cleanest cuts, wipe the knife with a warm, damp cloth between slices. It’s a small extra step that makes your homemade peanut butter fudge look like it came from a fancy candy shop.
Servings & Timing
- Yield: About 36 small squares (depending on how big you cut them)
- Prep Time: 10–15 minutes
- Cook Time: 10 minutes
- Chill Time: 45–60 minutes
- Total Time: About 1 hour 15 minutes
This makes plenty of fudge for sharing, but if you’re feeding a crowd or packing gift boxes, you can easily double the recipe and use a 9×13-inch pan.
Fun Variations on This Simple Fudge Recipe
Once you’ve made this classic version, you can start playing. Here are some favorite twists we come back to every year:
- Chocolate Swirl Peanut Butter Fudge – Melt 1/2 cup semi-sweet chocolate chips, drizzle over the top of the warm fudge, and swirl with a knife.
- Peanut Crunch Fudge – Fold 1/2 cup chopped roasted peanuts into the fudge right before spreading it in the pan.
- Salted Peanut Butter Fudge – Sprinkle flaky sea salt (like Maldon) over the top before chilling for a sweet-salty finish.
- Peanut Butter Cup Fudge – Press chopped mini peanut butter cups into the top while the fudge is still warm.
- Maple Peanut Butter Fudge – Replace 1/4 cup granulated sugar with 1/4 cup pure maple syrup for a cozy fall flavor.
- Vegan-Style Peanut Butter Fudge – Use vegan butter and a rich, unsweetened non-dairy milk (like oat or soy) and check that your sugar is vegan-friendly.
How to Store, Freeze, and (If Needed) Soften Your Fudge
Peanut butter fudge keeps surprisingly well, which is one reason it’s such a popular quick peanut butter dessert for holidays and make-ahead treat trays.
Storing in the Fridge
- Place fudge squares in an airtight container, with parchment or wax paper between layers.
- Store in the refrigerator for up to 2 weeks.
- For the very best texture, let a piece sit at room temperature for 5–10 minutes before eating.
Freezing for Longer Storage
- Arrange fudge pieces in a single layer on a baking sheet and freeze until solid.
- Transfer to a freezer-safe container or bag with parchment between layers.
- Freeze for up to 2–3 months.
- Thaw in the fridge overnight, or let sit on the counter for 20–30 minutes before serving.
The flavor actually deepens a bit after freezing, so frozen-and-thawed fudge can taste even more like rich peanut butter fudge candy.
Make-Ahead Tips
- Holiday baking: Make this no bake peanut butter fudge 1–2 weeks ahead and refrigerate it. Slice just before serving or gifting.
- Gifting: If you’re packing treat boxes, line them with parchment and use mini paper cups or squares of wax paper so the fudge doesn’t all stick together.
Notes from My Kitchen (And a Few Lessons Learned)
- Don’t rush the boil: Those 3 minutes of gentle boiling help the sugars dissolve fully and set correctly. When I tried to shorten that time, I ended up with fudge that was too soft around the edges.
- Powdered sugar matters: Sifting may feel fussy, but it’s the difference between silky, creamy peanut butter fudge and small sugar lumps that distract from the experience.
- Peanut butter choice: Classic, shelf-stable peanut butter gives the best texture. Natural peanut butter sometimes leads to greasy, separated fudge; if that’s all you have, give the jar a very thorough stir and be ready for a slightly softer result.
- Pan size: An 8×8 pan gives thicker pieces; a 9×9 pan gives slightly thinner, more bite-size pieces—great for party platters.
- Sweetness level: This is a treat; it’s supposed to be sweet. But if you want less sweetness, you can reduce the powdered sugar by 1/2 cup. The fudge will be a bit softer, but still sliceable if well chilled.
- Temperature of the kitchen: On a hot, humid summer day, your fudge may feel softer. Chill it longer, and store it in the fridge until right before serving.
You know what? The more you make this recipe, the more you’ll instinctively know when the mixture is “just right.” Candy-making can feel mysterious, but this easy fudge recipe takes most of the fear out of it.
FAQs About This Peanut Butter Fudge Recipe
1. Can I use natural peanut butter in this recipe?
You can, but it’s not my first choice. Natural peanut butter tends to separate and can make the fudge oily; if you use it, stir very well and know that the texture may be softer.
2. Why did my peanut butter fudge turn out grainy?
Grainy fudge usually means the sugar didn’t fully dissolve or the powdered sugar had lumps. Make sure the sugar mixture boils gently for the full 3 minutes, and sift or whisk the powdered sugar before mixing.
3. How do I fix fudge that’s too soft?
If your fudge is very soft even after chilling, you can refrigerate it longer and serve it in small squares in mini cupcake liners, or crumble it over ice cream as a peanut butter topping. For next time, boil the mixture for a full 3 minutes and measure your ingredients carefully.
4. Can I make this peanut butter fudge without dairy?
Yes. Use a good vegan butter stick (not a spread from a tub) and a full-fat non-dairy milk such as oat or soy. The flavor will be slightly different, but still delicious.
5. Does this work in a microwave instead of on the stove?
You can melt the butter, sugars, and milk in the microwave in short bursts, stirring often, but it’s harder to control the cooking time. For consistent results and that classic old fashioned peanut butter fudge texture, I recommend the stovetop.
6. How long can peanut butter fudge sit out at room temperature?
Fudge can usually sit out for 2–3 hours on a dessert table, especially in cooler weather. In warm rooms, keep it on a cool platter and rotate small batches from the fridge.
7. Can I add chocolate chips directly to the fudge?
Yes, but let the mixture cool for 5–10 minutes first so the chips don’t fully melt. Gently fold in 1/2 to 1 cup chocolate chips for a speckled chocolate peanut butter fudge.
8. Why is my fudge crumbly when I slice it?
Crumbly fudge can mean it cooked a little too long or cooled too fast. Try letting it sit at room temperature for 10–15 minutes before cutting, and use a sharp knife with a steady pressure.
Wrapping It Up: A Fudge Recipe You’ll Make Again and Again
This Peanut Butter Fudge Recipe is the kind of recipe that slips into your regular rotation without much fanfare—one minute you’re “just trying it,” and the next thing you know, your kids are asking if you’re bringing “your fudge” to every gathering.
It’s creamy, rich, and wonderfully nostalgic, with all the flavor of old fashioned peanut butter fudge and none of the candy thermometer stress. If you’re looking for a quick peanut butter dessert that always gets a “Can I have that recipe?” moment, this is it.
If you make this fudge, I’d love to hear how it turned out for you—tell me what variations you tried, or who you shared it with. And if you enjoy easy treats like this, you might also like my other no-bake desserts and holiday candies. Happy fudge-making, friend.
Peanut Butter Fudge
Ingredients
- 1 cup unsalted butter 2 sticks / 226 g; salted butter works if you reduce or omit added salt
- 1 cup whole milk 240 ml; 2% works in a pinch
- 2 cups granulated sugar 400 g
- 1 cup light brown sugar 220 g, packed
- 1 1/2 cups creamy peanut butter about 400 g; use standard peanut butter like Jif or Skippy, not natural
- 1 tablespoon pure vanilla extract
- 1/2 teaspoon fine sea salt reduce to a pinch if using salted butter, adjust to taste
- 3 cups powdered sugar about 360 g, sifted
- parchment paper or foil for lining the pan
- nonstick spray or butter for greasing the parchment
Instructions
- Line an 8x8-inch or 9x9-inch baking pan with parchment paper or foil, leaving an overhang on two sides for easy lifting. Lightly grease the parchment with a small amount of butter or nonstick spray.parchment paper or foil, nonstick spray or butter
- In a large mixing bowl, add the 3 cups powdered sugar and sift it, or whisk well to break up any lumps. Set the bowl next to your stove so it’s ready for the hot mixture.3 cups powdered sugar
- In a medium (at least 3-quart) saucepan, combine the butter, granulated sugar, light brown sugar, and milk. Set over medium heat and stir gently as the butter melts and the sugar dissolves, scraping the bottom of the pan so nothing scorches.1 cup unsalted butter, 1 cup whole milk, 2 cups granulated sugar, 1 cup light brown sugar
- Once the mixture is melted and smooth, bring it to a gentle boil over medium heat, stirring often. When it reaches a bubbling boil across the surface, boil for 3 minutes, stirring constantly, until the mixture looks silky and slightly thickened.1 cup unsalted butter, 1 cup whole milk, 2 cups granulated sugar, 1 cup light brown sugar
- Turn off the heat and immediately stir in the peanut butter, vanilla extract, and salt. Continue stirring until the peanut butter is fully melted and the mixture is very smooth and glossy.1 1/2 cups creamy peanut butter, 1 tablespoon pure vanilla extract, 1/2 teaspoon fine sea salt
- Carefully pour the hot peanut butter mixture into the bowl with the powdered sugar. Using a sturdy spatula or a hand mixer on low speed, mix until the powdered sugar is fully incorporated and the mixture is uniform and creamy, with no dry streaks.1 1/2 cups creamy peanut butter, 1 tablespoon pure vanilla extract, 1/2 teaspoon fine sea salt, 3 cups powdered sugar
- Scrape the fudge mixture into the prepared pan and spread it out as evenly as possible. Use an offset spatula or the back of a spoon to smooth the top. If desired, tap the pan firmly on the counter a few times to help it settle.
- Let the pan cool at room temperature for 10–15 minutes, then transfer to the refrigerator. Chill for 45–60 minutes, or until the fudge is firm enough to cut cleanly.
- Use the parchment overhang to lift the fudge from the pan onto a cutting board. With a sharp knife, cut into 1-inch squares or desired size. For the cleanest cuts, wipe the knife with a warm, damp cloth between slices.
Notes
- Chocolate Swirl: Melt 1/2 cup semi-sweet chocolate chips, drizzle over the warm fudge in the pan, and swirl with a knife.
- Peanut Crunch: Fold 1/2 cup chopped roasted peanuts into the fudge before spreading in the pan.
- Salted Peanut Butter Fudge: Sprinkle flaky sea salt over the top before chilling.
- Peanut Butter Cup Fudge: Press chopped mini peanut butter cups into the top while warm.
- Maple Peanut Butter Fudge: Replace 1/4 cup granulated sugar with 1/4 cup pure maple syrup.
- Vegan-Style: Use vegan butter sticks and a full-fat non-dairy milk such as oat or soy, and ensure your sugar is vegan-friendly. Troubleshooting: Grainy fudge usually means sugar didn’t fully dissolve or the powdered sugar had lumps—boil gently for the full 3 minutes and sift or whisk powdered sugar. Very soft fudge can be chilled longer and served in small squares or crumbled over ice cream; next time, ensure the full boil time. Crumbly fudge can mean it cooked a bit too long; let it sit at room temperature 10–15 minutes before cutting.