Would you like to save this?
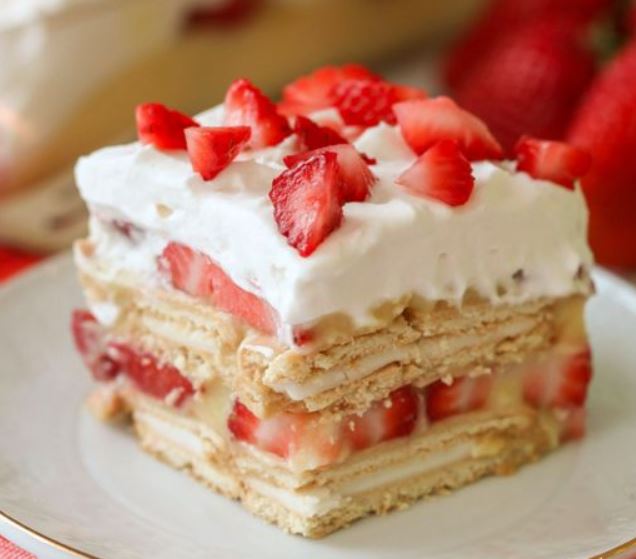
There’s something magical about a dessert that combines simplicity with elegance, and No-Bake Strawberry Shortcake is the epitome of that combination. This dessert brings together the fresh, fruity flavor of strawberries with a creamy, dreamy pudding layer and a light, airy whipped cream topping. Perfect for those warmer months when you want a dessert that’s both satisfying and not too heavy, this shortcake is a crowd-pleaser that’s simple to prepare and guaranteed to impress.
A Personal Touch: Growing up, my family always enjoyed desserts that allowed us to savor seasonal fruits. Strawberry shortcake was a staple during the summer months. I remember eagerly waiting for the strawberries to come into season, so we could make this dessert together. The anticipation of biting into those juicy, sun-ripened strawberries layered with creamy goodness was always worth the wait. This no-bake version, in particular, holds a special place in my heart because it captures all the flavors of the traditional shortcake while being incredibly easy to make. It’s a recipe that brings back warm memories of family gatherings and sunny afternoons.
Ingredients
1 box of vanilla instant pudding
½ cup strawberry juice
1½ cups nonfat milk
1 teaspoon vanilla extract
24 sponge fingers (ladyfingers)
220 grams (about 1 cup) Cool Whip (or any whipped topping)
1 pound fresh strawberries, hulled, sliced, and patted dry
Directions
1. Prepare the Pudding Mixture
Start by making the pudding mixture. In a medium-sized bowl, combine the vanilla instant pudding mix, nonfat milk, and vanilla extract. Whisk the ingredients together thoroughly until the pudding mix is fully dissolved and the mixture starts to thicken. This will take about 2 minutes of whisking. Once it’s thickened, set it aside to allow it to continue to set while you prepare the other components.
2. Whip the Cream
In a separate bowl, use a hand mixer or the bowl of a stand mixer to whip the Cool Whip or whipped topping. Beat the cream until it forms stiff peaks. This means the cream should be thick enough to hold its shape when the beaters are lifted. Be careful not to overwhip, as this can cause the cream to become grainy. Once it reaches stiff peaks, gently fold it into the prepared pudding mixture. This will give the pudding a light, airy texture.
3. Prepare the Ladyfingers
Briefly dip each ladyfinger into the strawberry juice. Do not soak them—just a quick dip to allow them to absorb some of the juice. Arrange the dipped ladyfingers in a single layer on the bottom of your serving dish. This forms the base layer of your dessert and adds a lovely spongey texture that complements the creamy pudding.
4. Layer the Pudding Mixture
Spread half of the pudding mixture evenly over the layer of ladyfingers. Use a spatula to smooth it out so it’s level. This layer will meld with the ladyfingers and create a deliciously creamy texture.
5. Add the Strawberries
Place the sliced strawberries in a single layer over the pudding. Try to cover the pudding as much as possible with the strawberries. This layer adds freshness and a burst of fruity flavor that contrasts beautifully with the creamy pudding.
6. Repeat Layers
Repeat the process by layering the remaining ladyfingers over the strawberries. Spread the remaining pudding mixture evenly on top of the ladyfingers. Add another layer of strawberries on top of the pudding.
7. Top with Whipped Cream
Finally, spread the whipped cream evenly over the top layer of strawberries. Smooth it out with a spatula to cover the dessert completely. You can also pipe the whipped cream on for a more decorative look if you prefer.
8. Chill and Serve
Cover the dish with plastic wrap or a lid and refrigerate for at least 4 hours. This chilling time allows the flavors to meld together and the pudding to fully set. For the best results, let it chill overnight.
Variations and Substitutions
Fruit Variations:
While strawberries are a classic choice, you can use other fruits to create variations of this dessert. Try raspberries, blueberries, or peaches for a different fruit flavor. You can even combine different fruits to create a mixed berry version.
Low-Fat Options: If you’re looking to reduce the calorie content, use low-fat or fat-free versions of pudding mix and whipped topping. Additionally, you can use a light version of ladyfingers or even swap them out for graham crackers.
Gluten-Free Option: To make this dessert gluten-free, use gluten-free ladyfingers or substitute them with gluten-free graham crackers or sponge cake.
Homemade Whipped Cream: For a more homemade touch, you can make your own whipped cream by whipping heavy cream and sugar to taste. This can replace the Cool Whip if you prefer a more natural option.
Vegan Version: To make this dessert vegan, use a plant-based pudding mix, dairy-free milk, and coconut whipped cream. You can also find vegan ladyfingers or use a suitable substitute.
Conclusion
No-Bake Strawberry Shortcake is not only a nostalgic favorite but also a versatile and easy-to-make dessert. Its layers of creamy pudding, fresh strawberries, and fluffy whipped cream create a delightful combination that’s both refreshing and indulgent. The no-bake nature of this dessert means you can enjoy a delicious treat without turning on the oven, making it perfect for warm weather or busy days.
Whether you’re serving it at a family gathering, a summer picnic, or simply as a sweet end to a weeknight dinner, this dessert is sure to be a hit. The layers of flavors and textures, combined with the ease of preparation, make No-Bake Strawberry Shortcake a delightful choice for any occasion. Enjoy this classic treat and let it bring a touch of sweetness and joy to your day.

