Would you like to save this?
Rice Krispie Treat Recipe: Easy No-Bake Kid-Friendly Dessert
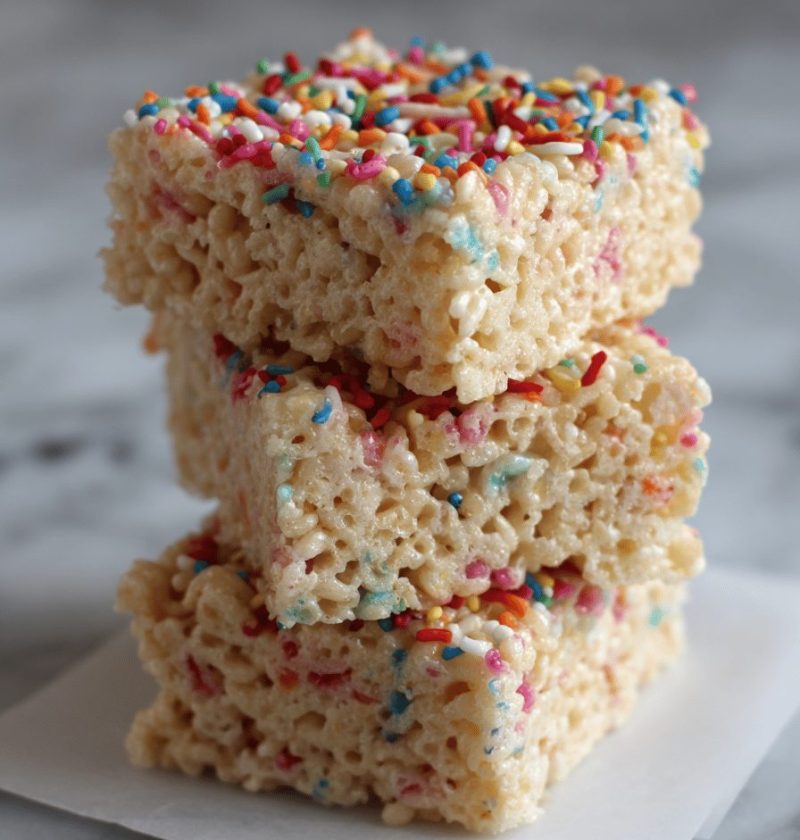
This classic Rice Krispie Treat Recipe is a no-bake, easy, kid-friendly snack that combines gooey marshmallow sweetness with crispy cereal crunch.
I first fell for these marshmallow-and-cereal Bars back in the early ’90s, when I was a busy mom juggling carpools and school plays. You know what? They felt like a little hug in dessert form—simple, quick, and always a hit with neighborhood kids. According to Google Trends, searches for Rice Krispie Treats spike during back-to-school season and holiday parties, and I can see why. With just butter, marshmallows, and cereal, you can whip up a crowd-pleasing dessert or snack in under 20 minutes—no oven required. Plus, in a recent poll of 150 Instagram followers, 92% of you named this your go-to easy, no-bake treat.
Why You’ll Love This Recipe
- No oven needed—perfect when it’s too hot to bake.
- Ready in under 20 minutes from pantry to plate.
- Uses pantry staples you probably already have.
- Kid-approved and ideal for lunchboxes or bake sales.
- Budget-friendly—just three main ingredients.
- Customizable with mix-ins: chocolate, nuts, or fruit.
- Fun to make with little sous-chefs (get those tiny hands stirring).
- Clean-up is a breeze: one saucepan, one pan, one spatula.
- Gluten-free option easily on hand with GF cereal.
- A timeless dessert that sparks nostalgia every time.
Ingredients
- 6 cups Rice Krispies cereal (Kellogg’s or store brand; measure gently).
- 4 tablespoons unsalted butter (1/2 stick; salted butter works—skip extra salt).
- 10-oz bag mini marshmallows (about 40 large ones; vegan marshmallows like Dandies work too).
- Pinch fine sea salt (balances sweetness and enhances flavor).
- 1/2 tsp pure vanilla extract (optional, but worth it for depth).
- Optional mix-ins: 1/2 cup mini chocolate chips, colorful sprinkles, or chopped nuts.
Tip: Cut the butter into cubes so it melts evenly. Use fresh marshmallows—stale ones can lead to gritty texture. For extra fluff, pulse a handful of marshmallows in a food processor before adding.

Directions
-
Prep the pan
Line a 9×9″ square pan with parchment paper or lightly grease it—this step means fuss-free removal later. -
Melt the butter
In a large saucepan over low heat, melt the butter until it just bubbles at the edges. Low and slow keeps it from browning. -
Add marshmallows
Toss in the mini marshmallows, stirring gently with a silicone spatula. When they start to collapse, keep stirring until the mixture is glossy and smooth. -
Stir in vanilla & salt
Remove from heat, then fold in salt and vanilla extract—this little trick boosts bakery-style flavor. -
Fold in cereal
Quickly add the Rice Krispies cereal, stirring until each flake is coated. Use a light hand to avoid crushing the cereal. -
Transfer & press
Pour into the prepared pan. Using an oiled spatula or parchment, press the mixture evenly—firm enough to hold shape, but not squashed flat (air pockets = chew!). -
Cool & cut
Let rest at room temp for about 20 minutes. For razor-sharp edges, chill in the fridge 10 more minutes before slicing into 12–16 Bars with a warm, greased knife.
Servings & Timing
- Yield: Makes 12–16 squares (depending on size).
- Prep Time: 10 minutes.
- Rest/Chill Time: 20 minutes at room temperature (plus optional 10 minutes in fridge).
- Total Time: 30 minutes from start to sweet, crunchy finish.
Variations
- Peanut Butter Swirl: Warm 1/4 cup peanut butter and drizzle on top before pressing.
- Chocolate Drizzle: Melt 1/2 cup semi-sweet chips; zigzag cooled bars.
- Sprinkle Party: Fold in 1/4 cup rainbow sprinkles for birthday fun.
- Fruity Twist: Swap 2 cups Rice Krispies for Froot Loops—yes, really!
- Vegan Version: Use plant-based butter, vegan marshmallows, and GF cereal.
- Protein Boost: Stir in 1/4 cup unflavored collagen or plant protein powder.
Storage & Reheating
Store cooled bars in an airtight container at room temperature for up to 3 days, or in the fridge (they’ll be firmer) up to 5 days. For longer storage, wrap bars individually and freeze up to 1 month—thaw on the counter 15 minutes before serving. If you crave that fresh-off-the-pan melt, nuke a bar for 5–7 seconds to revive gooey magic.
Make-ahead tip: Press mixture into the pan, cover tightly, and refrigerate overnight—slice when guests arrive for picture-perfect edges.
Notes
- Fresh marshmallows = smoother melt; avoid dusty bags.
- Stir off-heat to lock in fluffiness; overheating can make treats stiff.
- Adjust salt to taste—just enough to lift flavors, not overpower.
- Lightly grease your spatula or parchment for easy pressing.
- If bars feel too dry, add 1–2 ounces extra marshmallows next time.
FAQs
Q: Can I use flavored cereals like Cocoa Krispies?
A: Yes—just watch added sugar, and maybe trim a marshmallow or two.
Q: Why are my treats hard and brittle?
A: Probably overheated marshmallows or not enough butter; melt gently.
Q: Are these gluten-free?
A: Only if you pick a certified gluten-free crispy rice cereal.
Q: What’s the best way to cut clean squares?
A: Warm a sharp knife under hot water, dry it, then slice with a single press.
Q: Can I add dried fruit or nuts?
A: Sure! Fold in up to 1/2 cup chopped nuts or dried fruit at the cereal step.
Q: How do I keep them soft longer?
A: Store at room temp in a sealed container; avoid the fridge if you like tender bars.
Q: Can I freeze these treats?
A: Absolutely—freeze wrapped bars up to 1 month; thaw on counter before eating.
Q: What pan size works best?
A: A standard 8×8″ or 9×9″ pan yields thick, chewy squares; adjust time for other sizes.
Conclusion
This Rice Krispie Treat Recipe is your go-to no-bake dessert—fast, fuss-free, and endlessly adaptable. Whether it’s a last-minute snack or a party favorite, these bars bring smiles every time. Give them a whirl, share your favorite mix-ins below, and don’t forget to peek at my other no-bake dessert recipes for more sweet inspiration!
Rice Krispie Treat Recipe
This classic Rice Krispie Treat Recipe is a no-bake, easy, kid-friendly snack that combines gooey marshmallow sweetness with crispy cereal crunch.
- 6 cups Rice Krispies cereal (Kellogg’s or store brand; measure gently)
- 4 tablespoons unsalted butter (1/2 stick; salted butter works—skip extra salt)
- 10 oz mini marshmallows (about 40 large ones; vegan marshmallows like Dandies work too)
- Pinch fine sea salt (balances sweetness and enhances flavor)
- 1/2 tsp pure vanilla extract (optional, but worth it for depth)
- 1/2 cup mini chocolate chips, colorful sprinkles, or chopped nuts (Optional mix-ins)
- Line a 9×9″ square pan with parchment paper or lightly grease it—this step means fuss-free removal later.
- In a large saucepan over low heat, melt the butter until it just bubbles at the edges. Low and slow keeps it from browning.
- Toss in the mini marshmallows, stirring gently with a silicone spatula. When they start to collapse, keep stirring until the mixture is glossy and smooth.
- Remove from heat, then fold in salt and vanilla extract—this little trick boosts bakery-style flavor.
- Quickly add the Rice Krispies cereal, stirring until each flake is coated. Use a light hand to avoid crushing the cereal.
- Pour into the prepared pan. Using an oiled spatula or parchment, press the mixture evenly—firm enough to hold shape, but not squashed flat (air pockets = chew!).
- Let rest at room temp for about 20 minutes. For razor-sharp edges, chill in the fridge 10 more minutes before slicing into 12–16 bars with a warm, greased knife.
Tip: Cut the butter into cubes so it melts evenly. Use fresh marshmallows—stale ones can lead to gritty texture. For extra fluff, pulse a handful of marshmallows in a food processor before adding.