Would you like to save this?
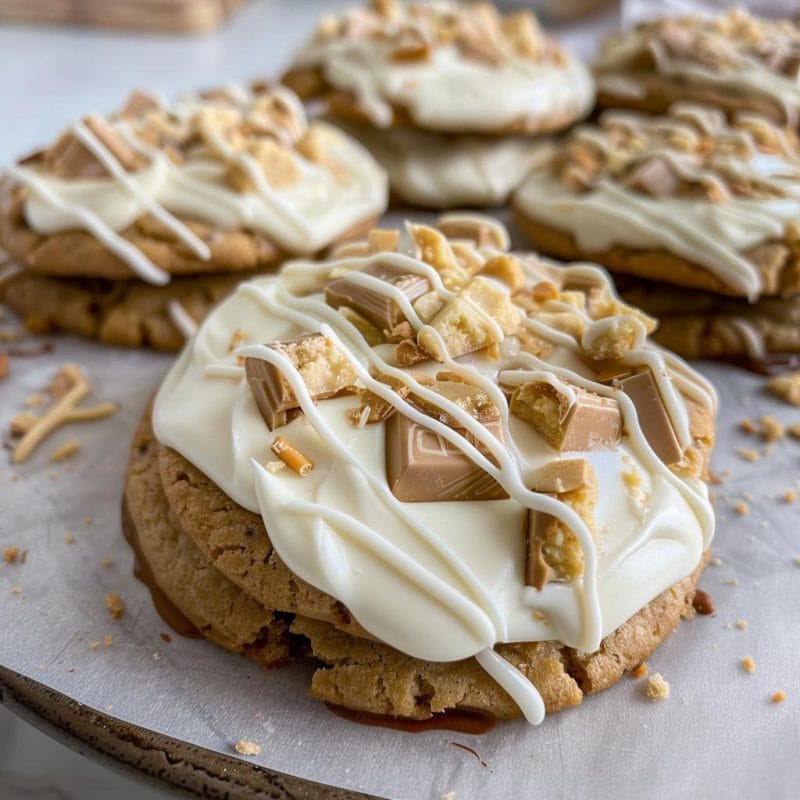
White Chocolate Reese’s Cheesecake Cookies
Imagine a cookie that combines the creamy richness of cheesecake, the comforting sweetness of white chocolate, and the irresistible crunch of Reese’s peanut butter cups. These White Chocolate Reese’s Cheesecake Cookies are not just a treat for the taste buds but a journey through layers of flavor and texture that leave a lasting impression.
The inspiration for this recipe comes from a fond childhood memory of baking with my grandmother. She believed that every cookie should tell a story, and these cookies certainly do. The buttery cookie dough, enriched with hints of vanilla and the perfect balance of sugars, sets the stage. It’s a canvas waiting to embrace a luxurious cheesecake filling, adding a creamy surprise to every bite. Topped with a decadent layer of melted white chocolate and a scattering of chopped Reese’s peanut butter cups, each cookie becomes a masterpiece of indulgence.
Ingredients:
For the Cookie Dough:
1 cup (2 sticks) unsalted butter, softened
1 cup granulated sugar
1 cup packed light brown sugar
2 large eggs
1 teaspoon vanilla extract
3 cups all-purpose flour
1 teaspoon baking soda
1/2 teaspoon salt
For the Cheesecake Filling:
8 oz cream cheese, softened
1/4 cup granulated sugar
1 large egg
1 teaspoon vanilla extract
For the White Chocolate Reese’s Topping:
1 cup white chocolate chips
1 cup chopped Reese’s peanut butter cups
Directions:
Step 1: Preparing the Cookie Dough
In a large mixing bowl, start by creaming together the softened butter, granulated sugar, and light brown sugar. This initial step is crucial as it ensures a light and fluffy texture to the cookie dough, providing a solid foundation for the decadence to come.
Next, add the eggs one at a time, ensuring each is fully incorporated before adding the next. The eggs not only bind the dough but also contribute to its structure and moisture.
Stir in the vanilla extract, which adds a warm, aromatic depth to the dough, complementing the sweetness of the sugars.
In a separate bowl, whisk together the flour, baking soda, and salt. Gradually add this dry mixture to the wet ingredients, mixing until just combined. Overmixing can lead to tough cookies, so stop as soon as the flour disappears into the dough.
Cover the cookie dough with plastic wrap and refrigerate it for at least an hour. Chilling the dough helps it firm up, making it easier to handle and shape later.
Step 2: Making the Cheesecake Filling
While the cookie dough chills, prepare the sumptuous cheesecake filling. In a medium bowl, beat the softened cream cheese until it becomes smooth and creamy. This ensures a silky texture that blends seamlessly into the cookie dough.
Add the granulated sugar, egg, and vanilla extract to the cream cheese, and continue to beat until everything is well incorporated. The addition of these ingredients creates a luscious, cheesecake-like filling that contrasts beautifully with the cookie’s sweetness.
Step 3: Assembling the Cookies
Preheat your oven to 350°F (175°C) and line a baking sheet with parchment paper. This preparation ensures that the cookies bake evenly and prevents them from sticking to the pan.
Take a tablespoon-sized portion of the chilled cookie dough and flatten it into a disk with your hands. This step creates a base for the cheesecake filling.
Place a spoonful of the prepared cheesecake filling in the center of the dough disk. The amount should be enough to create a generous filling without overflowing.
Carefully fold the edges of the cookie dough over the cheesecake filling, sealing it inside. Gently roll the stuffed cookie dough into a ball, ensuring the filling is completely enclosed. This step requires a gentle touch to maintain the shape and integrity of each cookie.
Place the stuffed cookie dough balls onto the prepared baking sheet, spacing them about 2 inches apart. This spacing allows the cookies room to spread as they bake, ensuring they cook evenly.
Bake the cookies in the preheated oven for 10-12 minutes or until the edges are lightly golden. The aroma of baking cookies will fill your kitchen, tempting you with the promise of a delightful treat.
Remove the cookies from the oven and let them cool on the baking sheet for 5 minutes. This resting period allows them to set slightly before transferring them to a wire rack to cool completely. The cooling process ensures the cookies achieve the perfect texture—crisp on the outside and chewy on the inside.
Step 4: White Chocolate Reese’s Topping
While the cookies cool, prepare the final luxurious touch: the white chocolate Reese’s topping.
Melt the white chocolate chips in a microwave-safe bowl in 30-second intervals, stirring until smooth. Be cautious not to overheat the chocolate, as it can scorch easily.
Drizzle the melted white chocolate over the cooled cookies. This step adds a creamy, sweet layer that contrasts beautifully with the cookie’s textures.
Sprinkle the chopped Reese’s peanut butter cups over the white chocolate topping. These crunchy, peanut-buttery morsels add a delightful surprise with every bite, enhancing both flavor and texture.
Allow the chocolate to set before serving the cookies. This final step ensures that each cookie is as visually appealing as it is delicious, ready to be enjoyed by family and friends alike.
Conclusion:
In conclusion, these White Chocolate Reese’s Cheesecake Cookies are more than just a cookie—they’re a celebration of flavors and textures that elevate the classic treat to new heights. From the buttery cookie base to the creamy cheesecake filling and the decadent white chocolate Reese’s topping, each element plays a vital role in creating a cookie that is both indulgent and unforgettable.
What makes this recipe truly special is its versatility. You can customize it to suit your preferences—try dark chocolate instead of white, or add a sprinkle of sea salt for a savory twist. For those with dietary restrictions, you can easily substitute ingredients to accommodate gluten-free or dairy-free diets without sacrificing taste.
Whether you’re baking these cookies for a special occasion or simply to indulge in a moment of sweetness, they are sure to bring joy with every bite. So, gather your ingredients, preheat your oven, and embark on a baking adventure that promises to delight your senses and create cherished memories with each batch. Enjoy the process as much as the final result, because after all, baking is as much about creating delicious treats as it is about savoring the moments shared with loved ones.

