Would you like to save this?
Ingredients
For the Crust:
1 lb of Pillsbury Sugar Cookie Dough (mini cookie dough pieces are perfect for this)
For the Filling:
4 blocks (8 oz each) of Cream Cheese, softened
4 Eggs
1 tablespoon Vanilla Extract
1 cup Granulated Sugar
1 can Cherry Pie Filling (for the topping)
Step-by-Step Instructions
Step 1: Preparing the Crust
Preheat the Oven:
Start by preheating your oven to 350°F (175°C). This ensures that the oven is at the perfect temperature when it’s time to bake the crust.
Prepare the Pan:
Use an 8-inch springform pan. Springform pans are ideal for cheesecakes as they allow for easy removal without damaging the sides of your cake.
Press the Cookie Dough:
Take the Pillsbury sugar cookie dough and press it evenly into the bottom of the springform pan. Make sure to cover the entire bottom to form a solid crust.
Bake the Crust:
Place the pan in the preheated oven and bake for about 15 minutes. The goal is to bake it until it’s almost done but not fully cooked. It should be slightly golden brown.
Cool the Crust:
Once baked, remove the pan from the oven and let the crust cool completely. This step is crucial as it ensures the crust remains firm and doesn’t mix with the filling.
Step 2: Making the Cheesecake Filling
Beat the Cream Cheese:
In a large mixing bowl, beat the softened cream cheese until it’s smooth and free of lumps. You can use a hand mixer or a stand mixer for this step.
Add the Sugar:
Gradually add the granulated sugar to the cream cheese while continuing to beat. This helps the sugar to dissolve and blend well with the cream cheese.
Incorporate the Vanilla Extract:
Add the tablespoon of vanilla extract and mix until it’s well incorporated. Vanilla adds a wonderful flavor that complements the cream cheese.
Add the Eggs:
Crack one egg at a time into the mixture, beating well after each addition. This step ensures that the eggs are fully integrated and helps to create a smooth, creamy texture for the cheesecake.
Step 3: Baking the Cheesecake
Pour the Filling into the Crust:
Once the filling is ready, pour it over the cooled sugar cookie crust in the springform pan. Use a spatula to spread it evenly.
Lower the Oven Temperature:
Reduce the oven temperature to 325°F (160°C). Baking at a lower temperature helps to prevent the cheesecake from cracking.
Bake the Cheesecake:
Place the pan in the oven and bake for 75 to 90 minutes. The cheesecake is done when the center is set but still slightly jiggly. The top should be lightly browned.
Cool the Cheesecake:
Once baked, remove the cheesecake from the oven and let it cool to room temperature. After it has cooled, place it in the refrigerator to chill overnight. This step is essential for the flavors to develop and the cheesecake to set properly.
Step 4: Adding the Cherry Topping
Top with Cherry Pie Filling:
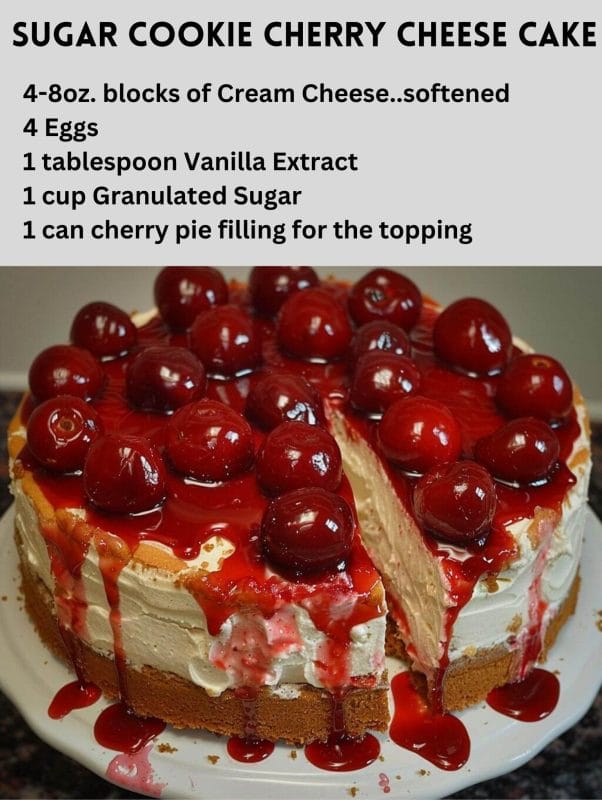
After the cheesecake has chilled overnight, it’s time to add the cherry pie filling. Spread the canned cherry pie filling evenly over the top of the cheesecake. The vibrant red cherries not only add a burst of flavor but also make the cheesecake look visually appealing.
Serve and Enjoy:
Your Sugar Cookie Cherry Cheesecake is now ready to be served. Use a knife to carefully run around the edges of the springform pan before releasing the sides. Slice into generous pieces and enjoy!
Variations and Substitutions
Gluten-Free Option:
For a gluten-free version, use gluten-free sugar cookie dough. Many brands offer this, or you can make your own at home.
Fruit Toppings:
While cherry pie filling is a classic choice, you can experiment with other fruit toppings like blueberry, raspberry, or strawberry pie fillings. Fresh fruit can also be used for a more natural and less sweet topping.
Chocolate Twist:
For chocolate lovers, add a layer of melted chocolate between the cookie crust and the cheesecake filling. You can also drizzle chocolate syrup over the top along with the cherry pie filling.
Lemon Flavor:
Add some lemon zest to the cream cheese filling for a refreshing citrus twist. You can also use lemon pie filling instead of cherry for a different flavor profile.
Conclusion
This Sugar Cookie Cherry Cheesecake is a dessert that brings joy to any occasion. The combination of a sweet, crumbly sugar cookie crust with the rich, creamy cheesecake filling and the tangy cherry topping creates a symphony of flavors and textures. It’s a versatile recipe that can be customized to suit various tastes and dietary needs, making it a great choice for gatherings, holidays, or simply a delightful treat to enjoy at home. The process of making this cheesecake is straightforward, and the end result is a show-stopping dessert that looks as good as it tastes. Whether you’re a seasoned baker or a novice, this recipe is sure to become a favorite in your repertoire. So, roll up your sleeves and get ready to bake a cheesecake that will impress everyone who tastes it!

