Would you like to save this?
Rocky Road Fudge Recipe
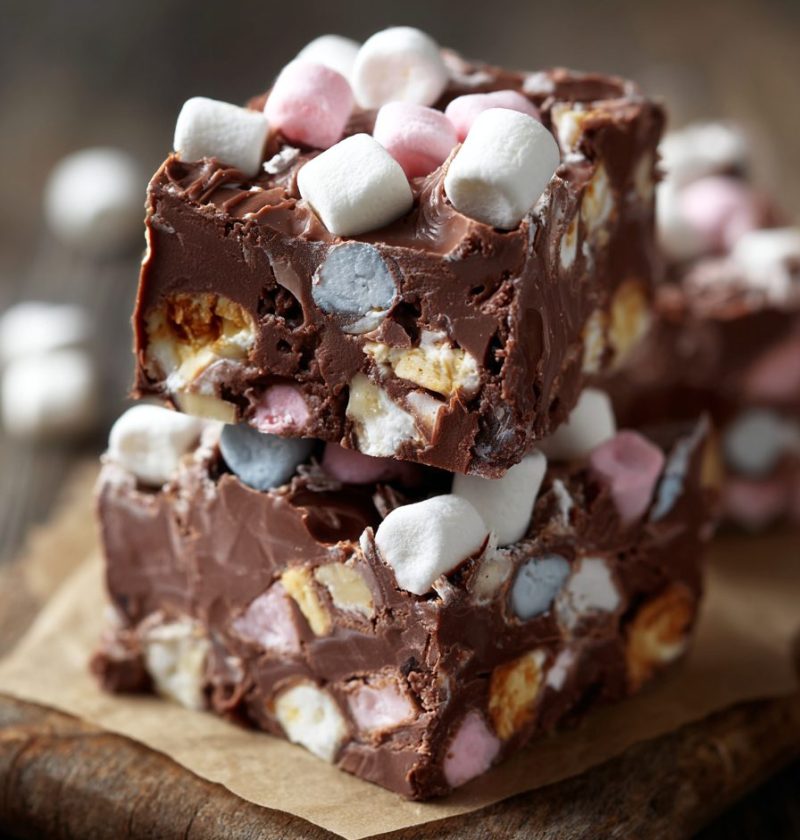
If you’re craving a rich Chocolate dessert that takes almost no effort, this Rocky Road Fudge Recipe is a no bake fudge dream—creamy chocolate, soft marshmallows, and crunchy nuts in every bite.
What Makes This Rocky Road Fudge Recipe So Special?
Rocky road fudge is what happens when classic chocolate fudge meets a big bowl of rocky road candy bars and marshmallow chocolate squares—everything cozy and nostalgic in one pan. It’s a simple fudge recipe built on a silky chocolate base, then loaded with fluffy mini marshmallows and crunchy nuts for a mix of textures that feels like a celebration.
I started making this homemade rocky road fudge when my kids were in middle school and I needed a fast holiday fudge recipe for bake sales, classroom parties, and last‑minute gift boxes for teachers. Over the years, it’s become my “I need a dessert now” recipe. You know those days when you don’t want to turn on the oven but still want something special? This is that recipe.
What I love most is how flexible it is. You can make chocolate peanut fudge or chocolate Walnut Fudge, or even a more classic rocky road dessert with almonds, just by swapping the nuts. It’s a quick fudge recipe that works for Christmas cookie trays, summer potlucks (yes, fudge in the summer—trust me), or a random Tuesday when you want something sweet with your coffee.
And while I won’t pretend this is “health food,” it is a no bake fudge you can control at home—better ingredients, no mystery flavors, and you can adjust the add‑ins to suit your family. That’s a win in my book.
Why You’ll Love This Rocky Road Fudge Recipe
- No oven needed – This is a true no bake fudge; your stovetop or microwave does all the work.
- Quick to make – About 15 minutes of hands-on time, then the fridge takes over.
- Perfect for gifting – Cuts clean, packs well, and looks gorgeous in holiday tins or treat bags.
- Customizable nuts and mix-ins – Make it a nutty chocolate fudge, peanut-heavy, or totally nut-free.
- Kid-friendly project – Simple steps that older kids can help with (especially stirring in marshmallows).
- Reliable, creamy texture – No candy thermometer, no fuss; it sets up into creamy chocolate fudge every time.
- Crowd-pleaser flavor – That classic rocky road recipe combo of chocolate, marshmallow, and crunch never disappoints.
- Make-ahead friendly – Keeps well in the fridge for days and freezes like a champ.
- Scales easily – Double the batch for parties or bake sales with the same method.
Ingredients for the Best Rocky Road Fudge
Let’s walk through what you’ll need for this Rocky Road Fudge Recipe. I’ll add a few tips and substitutions as we go, so you can adjust to your pantry and taste.
Fudge Base
-
3 cups (about 18 oz / 510 g) semi-sweet chocolate chips
Use a good-quality brand (like Ghirardelli or Guittard) for the smoothest, creamiest chocolate fudge. You can mix in some milk chocolate chips if you like a sweeter fudge. -
1 can (14 oz / 396 g) sweetened condensed milk
This is the secret to a simple fudge recipe with no sugar thermometer. Don’t swap this for evaporated milk—they’re not the same. -
4 tablespoons (1/2 stick / 56 g) unsalted butter
Butter adds richness and helps create that silky texture. Salted butter works too—just reduce the added salt slightly. -
1 teaspoon pure vanilla extract
Rounds out the chocolate flavor. If you love a deeper note, you can even do half vanilla, half almond extract. -
1/4 teaspoon fine sea salt
Just enough to balance the sweetness and make the chocolate taste more “chocolatey.”
Rocky Road Mix-Ins
You can think of these as the “personality” of your rocky road fudge. This is where you can play a bit.
-
3 cups mini marshmallows
These give that true marshmallow fudge texture. Mini is best so they distribute evenly. Use regular or colored minis for a fun holiday fudge recipe twist. -
1 1/2 cups chopped nuts
Pick your favorite, or mix:- Walnuts (for a classic chocolate walnut fudge feel)
- Peanuts (for chocolate peanut fudge, like an old-school candy bar)
- Almonds (for that rocky road candy bar vibe)
Lightly toast the nuts in a dry skillet for a few minutes to bring out their flavor.
-
Optional but lovely: 1/2 cup chocolate chips or chunks for topping
Sprinkle a handful over the top before chilling for a pretty, extra‑chocolate finish.
Pan Prep
- 8-inch or 9-inch square baking pan
Line the pan with parchment paper or heavy-duty aluminum foil, leaving some overhang on two sides. This makes it easy to lift the fudge out for clean slicing.
You can also use a small rectangle dish if that’s what you have—your fudge will just be a bit thicker or thinner.

Step-by-Step Directions
You can make this Rocky Road Fudge Recipe on the stovetop or in the microwave. I’ll describe the stovetop method first, with microwave notes along the way.
1. Prepare the Pan
-
Line your pan.
Line an 8- or 9‑inch square pan with parchment or foil. Lightly grease the parchment or foil with butter or a quick spray of cooking oil so the fudge releases cleanly. -
Clear a mixing space.
Once the chocolate starts melting, things move quickly. Have your marshmallows and nuts measured and ready to go in separate bowls.
2. Melt the Fudge Base
-
Combine chocolate, condensed milk, and butter.
In a medium, heavy-bottomed saucepan, add the semi-sweet chocolate chips, sweetened condensed milk, and butter. -
Heat gently.
Place the pan over low heat. Stir constantly with a silicone spatula or wooden spoon as the chocolate starts to melt.- You want slow, gentle heat—if the chocolate gets too hot, it can seize and turn grainy.
-
Stir until smooth.
Continue stirring until the mixture is completely melted and smooth, with no lumps. It should look thick, glossy, and creamy, almost like a rich chocolate frosting. -
Add vanilla and salt.
Remove the pan from the heat. Stir in the vanilla extract and sea salt until combined.
Microwave method:
Add chocolate chips, condensed milk, and butter to a large microwave-safe bowl. Heat in 20–30 second bursts at 50–70% power, stirring between each, until smooth and melted. Don’t rush this; short bursts are safer.
3. Fold in the Rocky Road Goodies
-
Cool for a minute.
Let the hot chocolate mixture sit for about 2 minutes. It should still be pourable, but just slightly cooler. This keeps the marshmallows from melting completely. -
Gently fold in marshmallows and nuts.
Add the mini marshmallows and chopped nuts. Using a spatula, fold them into the chocolate mixture until everything is well coated.
Don’t overmix—some streaks of white marshmallow peeking through is exactly what you want for that classic rocky road look.
4. Spread and Smooth
-
Transfer to the prepared pan.
Scrape the rocky road fudge mixture into your lined pan. Spread it out evenly, pushing it gently into the corners. -
Smooth the top.
Use the back of a spoon or an offset spatula to smooth the top. If you’re adding extra chocolate chips or a few extra nuts on top, sprinkle them now and press them in lightly so they stick.
5. Chill Until Set
-
Refrigerate.
Place the pan in the fridge and chill for at least 2 hours, or until the fudge is firm when you press the center. -
Slice.
Lift the fudge out of the pan using the parchment overhang. Place it on a cutting board.
Use a sharp knife to cut it into squares—small pieces go a long way with this rich chocolate dessert.
Tip: For cleaner cuts, warm your knife under hot water, wipe it dry, slice a row, then wipe and repeat.
Servings & Timing
- Yield: About 36 small squares (or 25 larger ones, depending on how you slice)
- Prep Time: 15–20 minutes
- Chill Time: 2–3 hours
- Total Time: Around 2 ½–3 ½ hours (mostly hands off)
This rocky road fudge is wonderful as part of a dessert board, tucked into lunchboxes, or wrapped as homemade rocky road gifts. It’s also a great “bring a plate” dessert when you’re short on time.
Fun Variations on Classic Rocky Road
One of my favorite things about this recipe is how easy it is to tweak. Think of the base as your little chocolate canvas.
- All-Peanut “Candy Bar” Fudge – Use salted peanuts only for the nuts and top with crushed peanuts to mimic old-fashioned chocolate marshmallow candy bars.
- Chocolate Walnut Fudge Twist – Use only walnuts, add an extra 1/2 cup, and drizzle melted dark chocolate over the chilled fudge.
- Salted Caramel Rocky Road – Swirl 1/3 cup thick caramel sauce into the fudge just before adding marshmallows, then sprinkle with flaky sea salt on top.
- Nut-Free Marshmallow Fudge – Skip the nuts and add an extra cup of mini marshmallows plus 1/2 cup crispy rice cereal for crunch.
- Holiday Fudge Recipe Version – Use red and green mini marshmallows, add 1/4 teaspoon peppermint extract, and top with crushed candy canes.
- Rocky Road Candy Bars – Instead of cutting into small squares, slice into narrow rectangles to mimic candy bars and wrap them individually in wax paper.
If you’ve got kids or grandkids around, this is a fun place to let them “design” their own pan of fudge with toppings.
Storage, Freezing & Make-Ahead Tips
This simple fudge recipe is very forgiving when it comes to storage—another reason it’s a go‑to during busy seasons.
Room Temperature
- Store pieces of fudge in an airtight container at cool room temperature (around 65–68°F) for up to 3 days.
- If your kitchen runs warm, you’re better off using the fridge so it doesn’t get too soft.
Refrigerator
- Place the rocky road fudge squares in an airtight container, layering with parchment or wax paper so they don’t stick.
- They keep well in the fridge for up to 2 weeks. The texture actually stays lovely and creamy.
Freezer
- For longer storage, arrange the cut fudge pieces on a baking sheet lined with parchment and freeze until solid.
- Transfer to a freezer bag or freezer-safe container, again using parchment between layers.
- Freeze for up to 3 months.
When you’re ready to enjoy, let the fudge sit at room temperature for about 20–30 minutes. It doesn’t really need “reheating” like some desserts—just a little time to soften works beautifully.
Make-Ahead Strategy
You can make this rocky road fudge recipe several days before a party or holiday gathering. I usually make it on a Sunday, stash it in the fridge, and then slice it fresh the day I’m serving. For gift boxes and cookie trays, it’s one of the easiest make-ahead pieces to prep.
Notes from My Kitchen
After years of testing variations of rocky road fudge and marshmallow fudge for my family, here’s what I’ve learned:
- Use good chocolate. Since chocolate is the main flavor, a mid-level baking chocolate or good chocolate chips make a real difference in taste and texture.
- Watch the heat. Low and slow melting gives you that creamy chocolate fudge. High heat can cause the chocolate to seize and turn grainy, which is frustrating.
- Add marshmallows last. If you add them when the chocolate is piping hot, they’ll melt right in and you’ll lose that rocky road look. A short cooling time helps.
- Toast the nuts. It sounds fancy, but it’s just a few minutes in a dry pan. You’ll get deeper, nuttier flavor and a better “nutty chocolate fudge” punch.
- Cut small pieces. This is a rich chocolate dessert; bite-size squares are perfect and help stretch the batch for a crowd.
- Let it fully chill. I know it’s hard to wait—believe me, I know—but for neat squares and the right texture, give it enough time in the fridge.
You know what? This is one of those desserts where people think you worked much harder than you did. We’ll keep that our little secret.
Rocky Road Fudge Recipe FAQs
Can I make this rocky road fudge without nuts?
Yes. Simply leave out the nuts and add an extra 1–1 1/2 cups of mini marshmallows, or replace the nuts with crispy rice cereal or crushed pretzels for crunch.
Can I use dark chocolate instead of semi-sweet?
You can. Dark chocolate gives a deeper, less sweet flavor. If you go very dark (like 70%), you may want to stir in 2–3 extra tablespoons of sweetened condensed milk for a softer, creamier texture.
My fudge turned grainy. What happened?
That usually means the chocolate got too hot or melted too fast. Next time, use a lower heat, stir gently, and avoid boiling the mixture. Using a heavy-bottomed saucepan helps too.
Can I make this in the microwave only?
Yes. Melt the chocolate chips, condensed milk, and butter together in short bursts at 50–70% power, stirring after each session until smooth. Then follow the same steps for adding vanilla, salt, and your mix-ins.
How long does rocky road fudge last?
At cool room temperature, it’s good for about 3 days; in the fridge, up to 2 weeks; and in the freezer, up to 3 months when stored well in an airtight container.
Can I use large marshmallows instead of mini?
You can, but cut them into small pieces with kitchen scissors. Lightly grease the scissors so they don’t stick too badly. Minis still work best for an even mix, though.
Do I need a candy thermometer for this recipe?
No. This is a no-fuss, no thermometer rocky road fudge recipe. The sweetened condensed milk does the heavy lifting, so you get reliable results without monitoring exact temperatures.
Can I turn this into marshmallow chocolate squares for a party tray?
Yes. Spread the fudge in a 9×13 pan for thinner pieces, chill, and cut into small squares. They’ll look great on a mixed dessert platter with cookies and brownies.
Final Thoughts
This Rocky Road Fudge Recipe is one of those simple, no bake fudge Treats that feels like pure comfort—creamy chocolate, fluffy marshmallows, and just enough crunch to keep every bite interesting. It’s fast, flexible, and perfect as a holiday fudge recipe, a quick weeknight treat, or a homemade gift straight from your kitchen.
If you make this rocky road fudge, let me know how it turned out—leave a comment, share your variations, or tell me if you went with walnuts, peanuts, or another favorite nut. And if you loved this, you might also enjoy my other easy fudge recipes and bar desserts that are just as simple and just as loved.
Rocky Road Fudge
Ingredients
- 3 cups semi-sweet chocolate chips about 18 oz / 510 g; good-quality brand for best texture
- 1 can sweetened condensed milk 14 oz / 396 g; do not substitute evaporated milk
- 4 tablespoons unsalted butter about 1/2 stick / 56 g
- 1 teaspoon pure vanilla extract
- 1/4 teaspoon fine sea salt
- 3 cups mini marshmallows regular or colored; minis work best for even distribution
- 1 1/2 cups chopped nuts such as walnuts, peanuts, or almonds; lightly toasted if desired
- 1/2 cup chocolate chips or chunks optional, for topping
- 1 8- or 9-inch square baking pan lined with parchment paper or heavy-duty foil and lightly greased
Instructions
- Line an 8- or 9-inch square baking pan with parchment paper or heavy-duty aluminum foil, leaving an overhang on two sides to create a sling. Lightly grease the parchment or foil with butter or a quick spray of cooking oil. Measure out the mini marshmallows and chopped nuts into separate bowls and set aside so they are ready to add quickly later.3 cups mini marshmallows, 1 1/2 cups chopped nuts, 1 8- or 9-inch square baking pan
- In a medium heavy-bottomed saucepan over low heat, combine the semi-sweet chocolate chips, sweetened condensed milk, and butter. Stir constantly with a silicone spatula or wooden spoon as the chocolate begins to melt, keeping the heat low to prevent scorching or seizing. Continue stirring until the mixture is completely smooth, thick, glossy, and lump-free. Remove the pan from the heat and stir in the vanilla extract and fine sea salt until fully incorporated.3 cups semi-sweet chocolate chips, 1 can sweetened condensed milk, 4 tablespoons unsalted butter, 1 teaspoon pure vanilla extract, 1/4 teaspoon fine sea salt
- As an alternative to the stovetop, place the semi-sweet chocolate chips, sweetened condensed milk, and butter in a large microwave-safe bowl. Microwave on 50–70% power in 20–30 second bursts, stirring well after each interval, until the mixture is fully melted and smooth. Do not rush this—short bursts at reduced power help prevent the chocolate from overheating and turning grainy. Once smooth, stir in the vanilla extract and fine sea salt.3 cups semi-sweet chocolate chips, 1 can sweetened condensed milk, 4 tablespoons unsalted butter, 1 teaspoon pure vanilla extract, 1/4 teaspoon fine sea salt
- Let the hot chocolate mixture sit off the heat for about 2 minutes; it should still be thick and pourable but slightly cooler. Add the mini marshmallows and chopped nuts to the pan. Using a spatula, gently fold them into the chocolate mixture until everything is well coated, taking care not to overmix so that some marshmallow pieces remain visible for a classic rocky road look.3 cups mini marshmallows, 1 1/2 cups chopped nuts
- Scrape the rocky road fudge mixture into the prepared pan, spreading it evenly and pressing it gently into the corners. Use the back of a spoon or an offset spatula to smooth the top. If using, sprinkle the additional chocolate chips or chunks and a few extra nuts over the surface and press them lightly so they adhere.1 1/2 cups chopped nuts, 1/2 cup chocolate chips or chunks, 1 8- or 9-inch square baking pan
- Place the pan in the refrigerator and chill for at least 2 hours, or until the fudge is firm to the touch in the center. For very clean slices, you can chill it closer to 3 hours or until fully set.
- Use the parchment or foil overhang to lift the firm fudge out of the pan and onto a cutting board. With a sharp knife, cut into about 36 small squares (or 25 larger pieces if preferred). For extra-neat edges, warm the knife under hot water, wipe it dry, slice a row, then wipe and repeat. Serve slightly chilled or at cool room temperature.
- Store fudge squares in an airtight container. Keep at cool room temperature for up to 3 days, in the refrigerator for up to 2 weeks, or freeze for up to 3 months. If layering pieces, separate layers with parchment or wax paper. Thaw frozen fudge briefly at room temperature until slightly softened before serving.
Notes
- All-Peanut “Candy Bar” Fudge: Use only salted peanuts for the nuts and top with crushed peanuts for a candy-bar-style fudge.
- Chocolate Walnut Fudge: Use only walnuts, add an extra 1/2 cup, and drizzle melted dark chocolate over the chilled fudge.
- Salted Caramel Rocky Road: Swirl 1/3 cup thick caramel sauce into the fudge base just before folding in marshmallows; sprinkle flaky sea salt on top.
- Nut-Free Marshmallow Fudge: Skip nuts and add an extra cup of mini marshmallows plus 1/2 cup crispy rice cereal for crunch.
- Holiday Version: Use red and green mini marshmallows, add 1/4 teaspoon peppermint extract, and top with crushed candy canes.
- Candy Bar Shapes: Spread into a 9×13-inch pan for thinner pieces or cut into narrow rectangles and wrap individually in wax paper.