Would you like to save this?
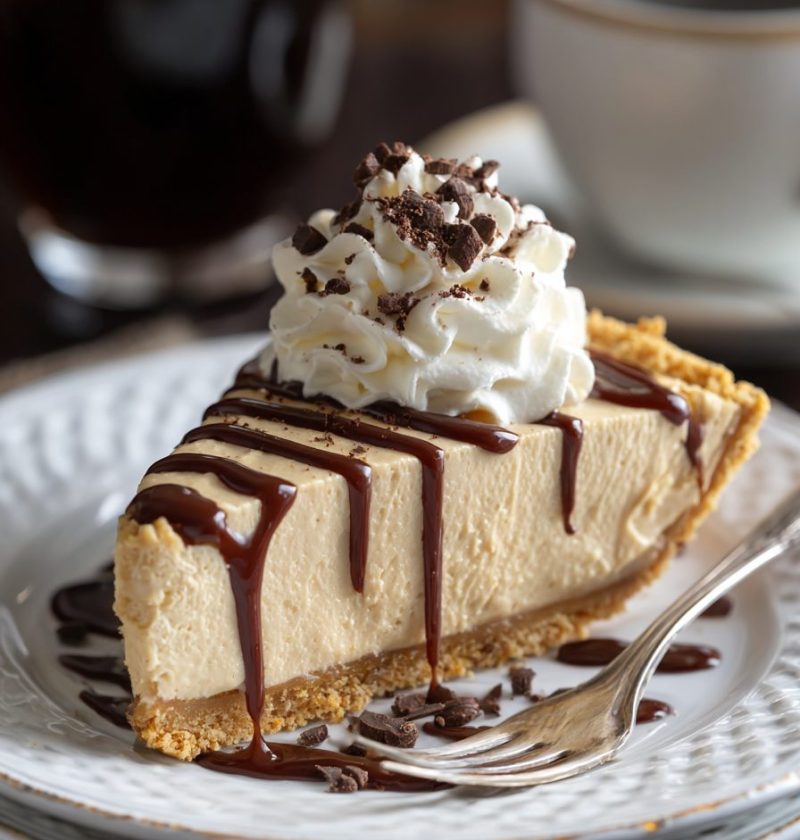
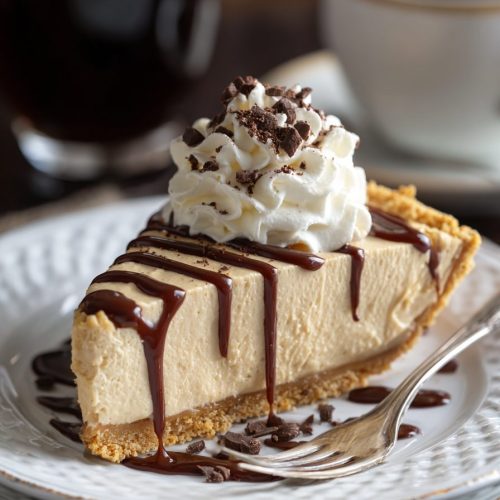
Peanut Butter Pie Recipe
If you’re craving a rich peanut butter dessert that’s Creamy, cool, and ridiculously easy, this Peanut Butter Pie Recipe is about to become your new go‑to treat—no baking, no fuss, and just the right amount of chocolate.
Full Recipe Introduction
This Peanut Butter Pie Recipe is my “break glass in case of emergency” dessert—the one I pull out when I’m short on time, the house is full, and everyone wants something special. It’s a creamy peanut butter pie with a crunchy graham cracker crust, a fluffy whipped filling, and a little chocolate drizzle that makes it look like you worked much harder than you did.
It’s a No Bake peanut butter pie, which means the oven gets the night off. That alone makes it perfect for summer cookouts, holidays when your oven is already packed, or honestly, any busy weeknight when you still want a homemade peanut butter pie that feels a little fancy.
I usually bring this easy peanut butter pie to family dinners on Sundays. My kids are grown now, but they still walk through the door asking, “Did you make the pie?” You know what? When a dessert has that kind of fan club, you keep it in rotation.
From a nutritional angle, is this health food? No, let’s be honest. But we can be a little intentional. I like using real peanut butter with no weird ingredients, and I swap in reduced-fat cream Cheese sometimes. You still get that rich, creamy texture without feeling like you need a nap after one slice.
This whipped cream peanut butter pie also scales beautifully. You can make it in a standard 9‑inch pie dish or spoon it into mini jars for individual dessert cups. That’s a fun trick for parties or when you want a dessert pie recipe that people can grab and carry around.
Why You’ll Love This Peanut Butter Pie Recipe
Why this pie earns a permanent spot in your recipe box:
- No oven needed—this is a true no bake peanut butter pie.
- Simple ingredients you probably already have in your pantry.
- Comes together in about 20 minutes, then your fridge does the rest.
- Perfect make-ahead dessert for holidays, potlucks, and parties.
- Creamy, fluffy texture that tastes like a frozen peanut butter cloud.
- Easy to customize—turn it into a chocolate peanut butter pie or mini pies.
- Kid-approved and grown-up approved (my husband sneaks forkfuls straight from the fridge).
- Looks impressive on the table, even though the steps are beginner-friendly.
- Budget-friendly—much cheaper than store-bought bakery pies.
- Reliable crowd-pleaser for anyone who loves peanut butter and chocolate together.
Ingredients
Before we jump into the mixing bowl, let’s talk ingredients. This homemade peanut butter pie uses basic items, but a few small choices make a big difference in taste and texture.

For the graham cracker crust
- 1 ½ cups graham cracker crumbs (about 10–12 full sheets)
- 6 tablespoons unsalted butter, melted
- 3 tablespoons granulated sugar
- Pinch of salt (enhances the nutty flavor)
Tip: You can use store-bought graham cracker crust if you’re in a rush, but a homemade graham cracker crust pie has better flavor and stays crisper. If you have a food processor, pulse whole crackers for the freshest crumbs.
For the creamy peanut butter filling
- 8 ounces cream cheese, softened (block style, not whipped)
- 1 cup creamy peanut butter (not natural “stir” peanut butter if you want the smoothest texture)
- 1 cup powdered sugar, sifted
- 1 teaspoon pure vanilla extract
- 1 ¼ cups heavy whipping cream, cold
Substitution notes:
- You can use reduced-fat cream cheese, but full-fat gives the most stable, creamy peanut butter pie filling.
- If you prefer natural peanut butter, choose one that’s well-stirred and not too oily; chill it a bit before using so the filling sets well.
For the topping
- 1 cup heavy whipping cream, cold
- 2 tablespoons powdered sugar
- ½ teaspoon vanilla extract
- 2–3 tablespoons chocolate sauce or melted chocolate chips (for drizzle)
- Chopped peanuts, mini chocolate chips, or crushed peanut butter cups (for garnish, optional but fun)
Brand suggestions: I often use Skippy or Jif for this rich peanut butter dessert because they’re consistent and smooth. For chocolate, Ghirardelli bittersweet chips melt nicely and balance the sweetness.
Directions
You’re just a few simple steps away from a chilled, creamy peanut butter pie. Take your time with the mixing, and the fridge will handle the rest.
1. Prepare the graham cracker crust
Crush the graham crackers into fine crumbs using a food processor or a zip-top bag and rolling pin. In a medium bowl, mix crumbs, sugar, melted butter, and salt until everything feels like damp sand and holds together when you press it between your fingers.
2. Press the crust into the pie dish
Pour the crust mixture into a 9‑inch pie dish. Use the bottom of a measuring cup or glass to press it firmly and evenly across the bottom and up the sides. Firm pressure helps prevent a crumbly crust when you slice. Chill the crust in the fridge for at least 15 minutes while you make the filling.
3. Whip the cream for the filling
In a cold mixing bowl, beat 1 ¼ cups heavy cream on medium-high speed until stiff peaks form—when you lift the beaters, the cream should stand up without drooping. Set this bowl in the fridge. Whipped cream adds that airy, mousse-like feel to your no bake peanut butter pie.
4. Make the peanut butter base
In a separate large bowl, beat the softened cream cheese and peanut butter together until smooth and creamy, about 1–2 minutes. Scrape the sides and bottom of the bowl so there are no lumps. Add powdered sugar and vanilla, then beat again until the mixture is thick but silky.
5. Fold in the whipped cream
Gently fold the whipped cream into the peanut butter mixture in 2–3 additions. Use a spatula and a light hand—scoop from the bottom and turn the mixture over itself. You want to keep as much air as possible so the filling stays fluffy instead of dense.
6. Fill the crust
Spoon the creamy peanut butter filling into the chilled graham cracker crust. Smooth the top with a spatula, creating little swirls if you like a rustic look. Give the pie a gentle wiggle to help the filling settle.
7. Chill the pie
Cover the pie loosely with plastic wrap or foil and refrigerate for at least 4 hours, or overnight for the cleanest slices. This waiting time lets the filling firm up and the flavors come together. If you’re in a real rush, you can chill it in the freezer for 1–1 ½ hours, but don’t let it freeze solid unless you intend to serve it as a frozen pie.
8. Whip the topping
When you’re close to serving, whip the remaining 1 cup heavy cream with 2 tablespoons powdered sugar and ½ teaspoon vanilla until soft-to-medium peaks form. Spread or pipe the whipped cream over the chilled pie.
9. Add chocolate and garnishes
Drizzle chocolate sauce or melted chocolate across the top. I like to do zigzags or circles. Sprinkle with chopped peanuts, mini chocolate chips, or chopped peanut butter cups if you’re going for that chocolate peanut butter pie look.
10. Slice and serve
Use a sharp knife, wiping it between slices, for neat pieces. The first slice is always a little stubborn—don’t stress. The rest will come out more cleanly once that first one is free.
Servings & Timing
Yield
- Serves 8–10, depending on how generous you slice.
Timing
- Prep Time: 20 minutes
- Chill Time: 4 hours (or overnight)
- Total Time: About 4 hours 20 minutes
If you’re planning this creamy peanut butter pie for a party, I’d make it the night before. It’s one less thing on your to‑do list, and the texture is even better the next day.
Variations
Once you’ve made this easy peanut butter pie once, it’s fun to play around a little. Here are some twists my family loves:
- Chocolate Cookie Crust: Swap the graham crackers for crushed chocolate sandwich cookies for a deeper chocolate peanut butter pie.
- Peanut Butter Cup Explosion: Stir chopped peanut butter cups into the filling and scatter more over the top.
- Frozen Peanut Butter Pie: Freeze the pie for 3–4 hours and serve slightly thawed for a semi-frozen, ice-cream-like dessert.
- Gluten-Free Version: Use gluten-free graham crackers or a nut-based crust made from ground peanuts and almonds.
- Lightened-Up Pie: Use reduced-fat cream cheese, a bit less powdered sugar, and a thinner layer of whipped cream topping.
- Mini Peanut Butter Pies: Press crust into muffin tins or small jars and fill for cute, individual desserts.
Storage & Reheating
How to store
- Cover the pie tightly with plastic wrap or store slices in an airtight container.
- Keep in the refrigerator for 3–4 days; the crust may soften slightly over time but still tastes great.
Freezing instructions
- For longer storage, freeze the pie (without the whipped cream topping if possible) for up to 2 months.
- Wrap well in plastic, then foil, to prevent freezer burn.
Thawing notes
- Thaw the pie in the fridge for several hours or overnight, then add fresh whipped cream and garnishes before serving.
- You can serve it slightly frozen for a firmer, icebox-style texture.
Make-ahead advice
- This dessert pie recipe is ideal for making ahead—prepare the crust and filling up to 24 hours in advance.
- Add the whipped cream topping and decorations the day you plan to serve for the prettiest presentation.
Notes
A few things I’ve picked up over the years while making this peanut butter pie recipe dozens (and dozens) of times:
- Room-temperature cream cheese is key. If it’s too cold, you’ll get tiny lumps in your filling. About 30 minutes on the counter usually does the trick.
- Cold cream whips better. If your kitchen is warm, pop the bowl and beaters in the fridge for 10 minutes first.
- Taste as you go. Peanut butter brands vary in sweetness and saltiness. After mixing the peanut butter and cream cheese, taste before adding all the powdered sugar—you might prefer a bit less.
- Crust pressure matters. Really press that crust down firmly; a loose crust crumbles when you try to serve it, and nobody wants a naked slice of pie sliding across the plate.
- Balance the sweetness. If you drizzle with a sweeter chocolate sauce, consider using slightly bittersweet chocolate chips inside the filling or as garnish.
- Let it chill fully. I know it’s hard to wait, but the longer chill gives you cleaner slices and a more set, mousse-like texture.
You know what? This is also a lovely “teach the kids” recipe. There’s something about pressing the crust and folding in the whipped cream that feels like kitchen magic to younger helpers.
FAQs
Can I use natural peanut butter in this pie?
Yes, but make sure it’s well-stirred and not too oily; the filling may be a bit softer, so chilling longer helps.
Can I make this peanut butter pie without cream cheese?
You can, but the texture will change—cream cheese adds structure. Subbing all whipped cream creates more of a soft mousse that doesn’t slice as cleanly.
How do I keep the crust from getting soggy?
Press it firmly, chill it before adding the filling, and don’t let the pie sit at room temperature too long before serving.
Can I use Cool Whip instead of whipped cream?
Yes—use an 8‑ounce tub for the filling and another for the topping; it will be sweeter and a bit more stable, very similar to many classic no bake peanut butter pie recipes from potlucks.
What size pie pan should I use?
A standard 9‑inch pie dish works best. A deep-dish pan works too, but the filling won’t quite reach the very top unless you increase the recipe by about 25%.
Can I make this as a chocolate peanut butter pie with layers?
Absolutely—spread a thin layer of melted chocolate or chocolate ganache over the crust, let it set, then add the peanut butter filling.
Why is my filling grainy?
Usually that means the powdered sugar wasn’t fully mixed in or the cream cheese wasn’t soft enough. Beat the base mixture until totally smooth before folding in the whipped cream.
How long can the pie sit out at room temperature?
Because of the dairy, I try to keep it under 2 hours; after that, pop it back in the fridge.
Conclusion
This Peanut Butter Pie Recipe is one of those rare desserts that checks every box: easy, impressive, creamy, and comforting. It’s the kind of rich peanut butter dessert that makes people close their eyes for a second when they take that first bite.
If you try this creamy peanut butter pie, let me know how it goes—leave a comment, tell me what variation you used, or share it with someone who loves peanut butter as much as we do. And if you’re in a dessert mood, you might also enjoy pairing this with a simple chocolate sheet cake or a big pitcher of iced coffee for the ultimate sweet spread.
Peanut Butter Pie
Ingredients
- 1 1/2 cups graham cracker crumbs about 10–12 full sheets
- 6 tablespoons unsalted butter melted
- 3 tablespoons granulated sugar
- salt pinch, to enhance flavor
- 8 ounces cream cheese softened, block style
- 1 cup creamy peanut butter avoid natural “stir” style for the smoothest texture
- 1 cup powdered sugar sifted
- 1 teaspoon vanilla extract pure
- 1 1/4 cups heavy whipping cream cold, for filling
- 1 cup heavy whipping cream cold, for topping
- 2 tablespoons powdered sugar for whipped cream topping
- 1/2 teaspoon vanilla extract for whipped cream topping
- 2-3 tablespoons chocolate sauce or melted chocolate chips for drizzle
- chopped peanuts optional, for garnish
- mini chocolate chips optional, for garnish
- chopped peanut butter cups optional, for garnish
Instructions
- Crush the graham crackers into fine crumbs using a food processor or a zip-top bag and rolling pin. In a medium bowl, mix the crumbs, granulated sugar, melted butter, and a pinch of salt until the mixture resembles damp sand and holds together when pressed.1 1/2 cups graham cracker crumbs, 6 tablespoons unsalted butter, 3 tablespoons granulated sugar, salt
- Pour the crust mixture into a 9-inch pie dish. Use the bottom of a measuring cup or glass to press it firmly and evenly across the bottom and up the sides. Chill the crust in the refrigerator for at least 15 minutes while you make the filling.
- In a cold mixing bowl, beat 1 1/4 cups heavy whipping cream on medium-high speed until stiff peaks form. When you lift the beaters, the cream should stand up without drooping. Refrigerate the whipped cream while you prepare the peanut butter base.1 1/4 cups heavy whipping cream
- In a separate large bowl, beat the softened cream cheese and peanut butter together until smooth and creamy, about 1–2 minutes. Scrape down the sides and bottom of the bowl. Add the powdered sugar and 1 teaspoon vanilla extract, then beat again until thick and silky.8 ounces cream cheese, 1 cup creamy peanut butter, 1 cup powdered sugar, 1 teaspoon vanilla extract
- Gently fold the whipped cream into the peanut butter mixture in 2–3 additions using a spatula. Scoop from the bottom and fold over the top, taking care not to deflate the cream so the filling stays light and fluffy.1 1/4 cups heavy whipping cream
- Spoon the creamy peanut butter filling into the chilled graham cracker crust. Smooth the top with a spatula, creating swirls if desired. Gently tap or wiggle the pie dish to help the filling settle evenly.
- Cover the pie loosely with plastic wrap or foil and refrigerate for at least 4 hours, or overnight for the firmest, cleanest slices. For a quicker set, you can chill in the freezer for 1–1 1/2 hours, but do not freeze solid unless serving as a frozen pie.
- Close to serving time, whip 1 cup heavy whipping cream with 2 tablespoons powdered sugar and 1/2 teaspoon vanilla extract until soft-to-medium peaks form. Spread or pipe the whipped cream over the chilled pie.1 cup heavy whipping cream, 2 tablespoons powdered sugar, 1/2 teaspoon vanilla extract
- Drizzle chocolate sauce or melted chocolate chips over the whipped cream in zigzags or circles. If desired, sprinkle with chopped peanuts, mini chocolate chips, or chopped peanut butter cups for extra texture and a chocolate-peanut butter look.2-3 tablespoons chocolate sauce or melted chocolate chips, chopped peanuts, mini chocolate chips, chopped peanut butter cups
- Use a sharp knife to slice the pie, wiping the blade between cuts for neat pieces. Serve chilled. The first slice may be a bit stubborn; the rest will come out more cleanly once it is removed.