Would you like to save this?
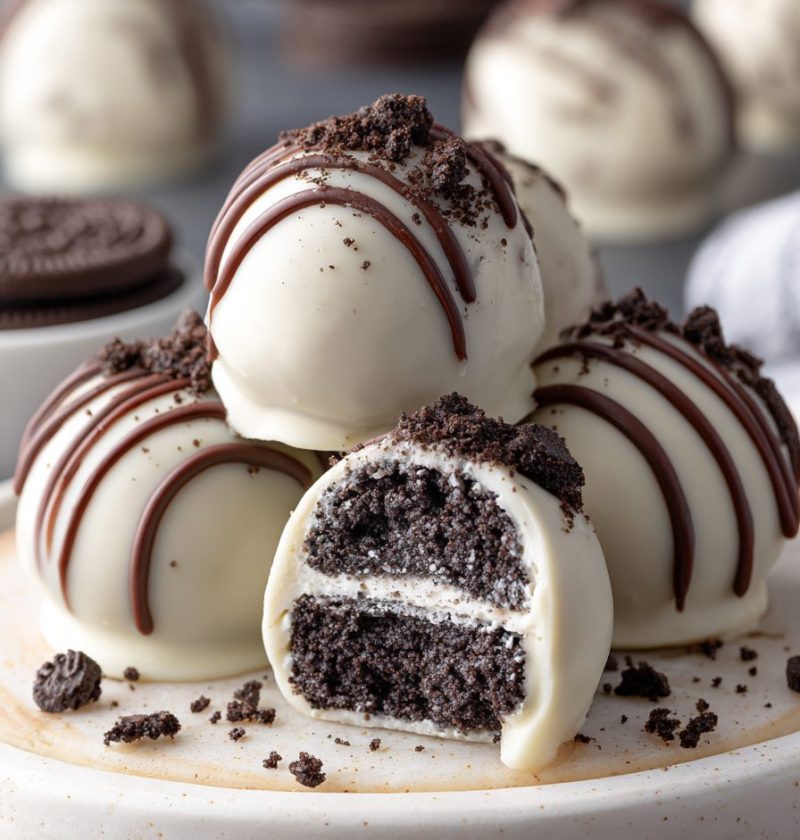
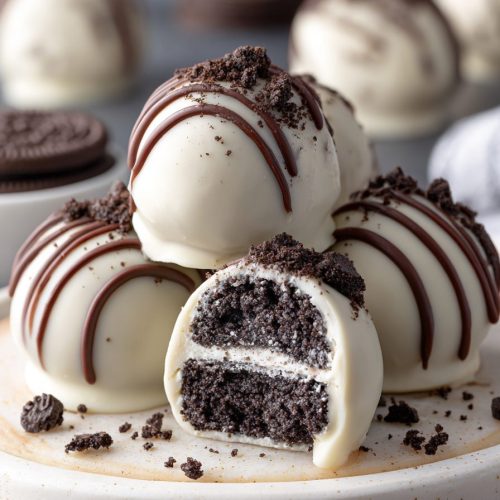
Oreo Truffles Recipe
This Oreo Truffles Recipe gives you rich, Chocolatey, no-bake truffle bites that taste like they came from a fancy candy shop—but you can make them in your kitchen with just three main ingredients.
Full Recipe Introduction
If you’ve never made Oreo truffles before, you’re in for such a treat. These little Oreo cream cheese truffles are smooth, fudgy, and coated in chocolate, with that classic Cookies-and-cream flavor we all grew up loving. They’re the kind of easy Oreo truffle balls that disappear from party platters before anyone even touches the cupcakes.
I started making this homemade Oreo truffles recipe when my kids were in middle school and money was tight around the holidays. I wanted something that felt special—like those expensive chocolate covered Oreo truffles you see in gift catalogs—but I needed simple ingredients and no fuss. This simple Oreo dessert recipe checked every box. No bake, very budget-friendly, and everyone raved about them.
Over the years, I’ve brought these Oreo truffles for parties, baby showers, church gatherings, school bake sales, and office potlucks. I’ve dressed them up with fancy sprinkles for Christmas, made “football” shapes for the Super Bowl, and rolled them in crushed candy canes for a winter dessert tray. They’re such a “set it and forget it” kind of treat: you mix, chill, roll, coat, and the freezer does most of the work.
Are these healthy? Let’s be honest—no, they’re not a “health food.” But they are small, portion-controlled bites, which I think helps. You get all that chocolate flavor in a couple of Oreo truffle bites without needing a big slice of cake. And because they’re so rich, one or two usually feels just right.
If you’re craving a quick Oreo truffles dessert that looks impressive but is secretly very simple, you’re exactly where you need to be.
Why You’ll Love This Oreo Truffles Recipe
- No baking required – No oven, no hot kitchen, and no complicated timing to worry about.
- Only 3 main ingredients – Just Oreos, cream cheese, and chocolate; everything else is optional decoration.
- Perfect for parties and holidays – These Oreo truffle balls look like you bought them from a chocolatier.
- Easy to make ahead – They chill and freeze beautifully, so you can prep days—甚至 weeks—before an event.
- Endlessly customizable – Change the chocolate, add toppings, or flavor the filling; there are so many fun twists.
- Budget-friendly dessert – A whole batch of Oreo truffle candy costs less than a single box of fancy chocolates.
- Kid- and teen-approved – My grown kids still ask for these every Christmas and for game nights.
- Great for gifting – Pack a few chocolate covered Oreo truffles in a cute box, and you’ve got an instant homemade gift.
Ingredients for the Best Oreo Truffles
You’ll be amazed how few ingredients you need for this Oreo truffles recipe. Here’s the base version, plus notes and easy substitutions.
For the Oreo Truffle Filling
- 36 Oreo cookies (1 standard 14.3 oz package, regular, not Double Stuf)
- Any chocolate sandwich cookie works, but classic Oreos give that nostalgic flavor.
- 8 oz (225 g) cream cheese, softened
- Use full-fat brick-style cream cheese for the creamiest Oreo truffles with cream cheese.
- Neufchâtel (⅓ less fat) can work, but the mixture may be a bit softer.
- 1 teaspoon pure vanilla extract (optional but recommended)
- Adds a cozy bakery-style note.
For the Chocolate Coating
- 16 oz (about 2 ⅔ cups) semi-sweet chocolate chips or baking wafers
- You can use dark, milk, or white chocolate; baking wafers melt more smoothly.
- 1–2 teaspoons coconut oil or vegetable shortening (optional)
- Helps thin the chocolate for a smoother, shinier coating.
Optional Toppings & Decorations
Use what you love or what you have in the pantry:
- Crushed Oreos – Sprinkle on top for extra crunch and a clear hint of what’s inside.
- Holiday sprinkles – Red and green for Christmas, pastels for Easter, team colors for game day.
- Drizzled white or dark chocolate – Easy way to make them look bakery-fancy.
- Sea salt flakes – Just a few crystals on top makes the chocolate flavor pop.
Ingredient Tips
- Choosing Oreos: Classic chocolate Oreos give the most reliable texture. If you use flavored Oreos (like Mint or Golden), the filling flavor will change but the method stays the same.
- Softening cream cheese: Let it sit on the counter for 30–45 minutes, or cut into cubes to speed it up. If it’s too cold, the Oreo mixture will be lumpy.
- Chocolate type: For a classic chocolate covered Oreo truffles look, I like semi-sweet for coating and a drizzle of white chocolate on top.

Step-by-Step Directions (No Stress, No Bake)
These no bake Oreo truffles come together in a few simple steps. Take your time with the chilling and rolling—that’s where the magic happens.
1. Crush the Oreos
Place the Oreo cookies in a food processor. Pulse until they’re very fine crumbs, almost like potting soil—no big chunks.
- No food processor?
Put the cookies in a large zip-top bag, squeeze out the air, seal it, and crush with a rolling pin or a heavy pan. It takes a bit longer, but it’s actually very satisfying.
Reserve about 2 tablespoons of crumbs if you’d like to sprinkle some on top of your truffles later.
2. Mix with Cream Cheese
Add the softened cream cheese and vanilla extract to the Oreo crumbs in the food processor bowl.
Pulse until everything is thoroughly combined and forms a thick, sticky dough. The mixture should look a bit like brownie batter that you can scoop and roll once chilled.
- If mixing by hand, stir the crumbs and cream cheese together in a large bowl with a sturdy spatula, pressing the cream cheese into the crumbs until no white streaks remain.
3. Chill the Mixture
Scrape the Oreo mixture into a bowl. Cover and chill in the refrigerator for 30–45 minutes, or in the freezer for 15–20 minutes, until the dough is firm but still scoopable.
You want it cold enough to roll into balls without sticking too much to your hands.
4. Shape the Oreo Truffle Balls
Line a baking sheet or large plate with parchment paper.
Use a small cookie scoop or tablespoon to portion out the dough—about 1 tablespoon per truffle gives you bite-size Oreo truffle bites.
Roll each portion between your palms to form a smooth ball and place on the parchment-lined sheet.
- If the mixture gets too soft or sticky as you roll, pop the tray in the fridge or freezer for 10 minutes and keep going.
Once all the balls are rolled, chill them again for 20–30 minutes. This step helps them stay round and firm when you coat them in chocolate.
5. Melt the Chocolate
Place the chocolate chips or wafers and coconut oil/shortening in a microwave-safe bowl.
Microwave in 20–30 second bursts, stirring well after each round, until the chocolate is smooth and glossy. Don’t rush this—burnt chocolate turns grainy fast.
You can also melt chocolate in a double boiler on the stove: set a heatproof bowl over a small pot of gently simmering water, stirring until melted.
6. Dip and Coat
Working with a few chilled Oreo balls at a time, drop one ball into the melted chocolate. Use a fork to gently roll it around, coating it completely.
Lift the truffle out with the fork, tap the fork handle lightly on the edge of the bowl to shake off extra chocolate, then slide the truffle back onto the parchment using a toothpick or another fork.
While the coating is still wet, add toppings:
- Sprinkle with reserved Oreo crumbs
- Add sprinkles or sea salt
- Or leave them plain for a smooth chocolate shell
Repeat with the remaining truffles. If the chocolate starts to thicken, warm it in the microwave for another 10–15 seconds and stir again.
7. Chill to Set
Refrigerate the coated oreo cookie truffles for 30–45 minutes, or until the chocolate coating is completely firm.
Once set, you can trim any “feet” or little chocolate puddles around the base with a small knife if you want a neater look—but honestly, most people don’t notice; they just grab and eat.
Servings & Timing
- Yield: About 24–30 truffles, depending on size
- Prep Time: 20–25 minutes active time
- Chill Time: 1–1½ hours (split between steps)
- Total Time: About 1½–2 hours including chilling
Most of that time is hands-off, which makes this quick Oreo truffles dessert perfect for busy weeks, holidays, or whenever you want dessert without fuss.
Fun Variations on Oreo Truffles
Once you know the base Oreo truffles with cream cheese method, you can play with flavors and coatings. Here are some ideas my family and readers have loved:
- Mint Oreo Truffles: Use Mint Oreos and coat with dark chocolate; top with crushed candy canes during the holidays.
- Golden Oreo Cheesecake Truffles: Use Golden Oreos, add a pinch of salt and a squeeze of lemon, and coat in white chocolate.
- Peanut Butter Oreo Truffles: Mix 2–3 tablespoons of creamy peanut butter into the filling and coat with milk chocolate.
- Mocha Oreo Truffles: Add 1–2 teaspoons instant espresso powder to the crumbs for a coffee shop twist.
- Birthday Cake Truffles: Use birthday cake-flavored Oreos, coat in white chocolate, and roll in rainbow sprinkles.
- Gluten-Friendly Version: Use gluten-free sandwich cookies and check that your chocolate is gluten-free; the process stays the same.
You can even make a whole tray of “sampler” Oreo truffle candy by splitting the filling and flavoring each portion differently.
How to Store and Freeze Oreo Truffles
One reason I love these so much is how well they store. They’re a hostess’ best friend.
Fridge Storage
- Place the truffles in a single layer in an airtight container.
- If stacking, separate layers with parchment paper so they don’t stick.
- Store in the refrigerator for up to 2 weeks.
- Let sit at room temperature for 5–10 minutes before serving for the best creamy texture.
Freezer Storage
- For longer storage, freeze the truffles on a baking sheet until firm.
- Transfer to a freezer-safe container or zip-top bag with parchment between layers.
- Freeze for up to 2–3 months.
To serve from frozen, thaw in the fridge overnight, or let them sit at room temperature for about 30 minutes. The chocolate coating may get a bit of condensation as they warm, but the taste stays wonderful.
Make-Ahead Tips
- You can make the Oreo-cream cheese mixture and keep it tightly covered in the fridge for up to 24 hours before rolling.
- Rolled but uncoated balls can chill in the fridge for a day before dipping in chocolate—handy if you’re breaking the work into steps.
Personal Notes & Tested Tips
After making this Oreo truffles recipe more times than I can count, here’s what I’ve learned (sometimes the hard way):
- Temperature is everything. If the filling is too warm, it’ll slide off your fork in the chocolate. If it’s too frozen, the chocolate can crack. Aim for cold but not rock-solid.
- Use a small, deep bowl for melting chocolate. It’s much easier to coat the Oreo truffle balls if the chocolate is deeper, not spread out in a shallow dish.
- Don’t rush the chilling. I know—it’s tempting. But chilling the rolled balls really helps them hold their shape and makes coating so much easier.
- Decorate right away. Whatever topping you’re using, add it while the chocolate is still wet or it won’t stick. I’ve learned this while watching sprinkles roll right off across the counter.
- Taste your chocolate. If you wouldn’t enjoy eating it on its own, it’s not going to make the best Oreo truffles with chocolate coating. Use chocolate you actually like.
- For very hot kitchens: If it’s summer and your kitchen runs warm, keep half the truffles in the fridge while you coat the first batch so they don’t soften too much.
Sometimes, I’ll make a little “decorating station” on my kitchen table, put on a podcast or some old Motown, and just enjoy the rhythm of dipping and sprinkling. There’s something almost soothing about it.
Frequently Asked Questions
1. Can I make Oreo truffles without cream cheese?
Yes. You can use thick, full-fat frosting or cookie butter instead, but the texture and flavor will change; they’ll taste sweeter and less cheesecake-like.
2. My mixture is too soft to roll—what did I do wrong?
Most likely, the cream cheese was very soft or you added a little too much. Just chill the mixture longer (even up to an hour) until it firms up enough to roll.
3. Why are my truffles cracking after dipping?
If the balls were extremely cold and the chocolate was hot, the temperature shock can cause cracking. Let the rolled balls sit at room temperature for 5–10 minutes before dipping or let the chocolate cool slightly.
4. Can I use flavored Oreos in this recipe?
Absolutely. Any Oreo flavor—Mint, Peanut Butter, Golden, Birthday Cake—works, and it’s a fun way to make different oreo truffle bites in one batch.
5. How do I keep the chocolate coating smooth and not too thick?
Add a teaspoon or two of coconut oil or shortening to the chocolate and stir well. It thins the chocolate just enough for a smoother, lighter coating.
6. Do Oreo truffles need to be refrigerated?
Yes. Because they contain cream cheese, they should be stored in the fridge when not being served, especially if you plan to keep them for more than a couple of hours.
7. Can I use white chocolate for the whole coating?
Yes. White chocolate makes a lovely coating, but it can be a bit fussier. Use a high-quality brand and melt it gently, stirring often so it doesn’t seize.
8. How far ahead can I make these for a party?
You can make them 2–3 days in advance and keep them chilled, or freeze them for a few weeks. For the freshest look, I like to dip them in chocolate no more than three days before serving.
Wrapping It Up (and Packing a Few to Go)
This Oreo Truffles Recipe is one of those little “secret weapons” I think every home baker should have. It uses basic pantry ingredients, needs no oven, and yet the results taste like something from a high-end chocolate shop. Whether you’re making chocolate covered Oreo truffles for a holiday dessert tray, gifting them to a friend, or sneaking a few with your afternoon coffee, they always feel special.
If you try this recipe, I’d love to hear how it goes—tell me what flavor combos you used and whether you served them at home or took them to a party. And if you enjoy this simple Oreo dessert recipe, you might also enjoy trying other no-bake treats like cheesecake bars or peanut butter balls next time you’re in a dessert-making mood.
Oreo Truffles
Ingredients
- 36 Oreo cookies about 1 (14.3 oz) package, regular, not Double Stuf
- 8 oz cream cheese softened; brick-style, full-fat preferred
- 1 teaspoon pure vanilla extract optional but recommended
- 16 oz semi-sweet chocolate chips or baking wafers for coating; dark, milk, or white chocolate also work
- 1-2 teaspoons coconut oil or vegetable shortening optional, to thin and smooth the chocolate
- Crushed Oreos optional, for topping
- Sprinkles optional, any color/theme you like
- White or dark chocolate optional, melted for drizzling
- Sea salt flakes optional, for topping
Instructions
- Place the Oreo cookies in a food processor and pulse until they are very fine crumbs with no large chunks remaining. Alternatively, place the cookies in a zip-top bag, seal, and crush with a rolling pin or heavy pan. If desired, reserve about 2 tablespoons of crumbs for topping later.
- Add the softened cream cheese and vanilla extract to the Oreo crumbs in the food processor bowl. Pulse until the mixture is thoroughly combined and forms a thick, sticky dough. If mixing by hand, combine the crumbs and cream cheese in a large bowl and stir with a sturdy spatula until no white streaks remain.
- Scrape the Oreo mixture into a bowl. Cover and chill in the refrigerator for 30–45 minutes, or in the freezer for 15–20 minutes, until the dough is firm but still scoopable and not overly sticky.
- Line a baking sheet or large plate with parchment paper. Use a small cookie scoop or tablespoon to portion about 1 tablespoon of dough per truffle. Roll each portion between your palms into a smooth ball and place on the prepared sheet. If the mixture becomes too soft or sticky, briefly chill again. Once all balls are rolled, chill them for another 20–30 minutes until firm.
- Place the chocolate chips or wafers and coconut oil/shortening (if using) in a microwave-safe bowl. Microwave in 20–30 second bursts, stirring well after each interval, until the chocolate is completely smooth and glossy. Alternatively, melt in a double boiler over gently simmering water, stirring until smooth.
- Working with a few chilled balls at a time, drop one Oreo ball into the melted chocolate. Use a fork to roll it around until fully coated. Lift it out with the fork and gently tap the fork on the edge of the bowl to remove excess chocolate. Slide the coated truffle back onto the parchment using a toothpick or another fork. While the chocolate is still wet, top with reserved Oreo crumbs, sprinkles, sea salt, or leave plain. Repeat with remaining truffles, reheating the chocolate briefly if it thickens.
- Refrigerate the coated truffles for 30–45 minutes, or until the chocolate coating is completely firm. If desired, trim any excess chocolate around the base with a small knife before serving.
- Serve the Oreo truffles slightly chilled or after resting at room temperature for 5–10 minutes for the creamiest texture. Store leftovers in an airtight container in the refrigerator for up to 2 weeks, or freeze for 2–3 months.
Notes
Storage: Keep truffles in a single layer or stacked with parchment between layers in an airtight container. They keep in the fridge up to 2 weeks or in the freezer 2–3 months. Thaw in the fridge or at room temperature before serving.
Tips: Make sure the filling is cold but not rock-solid when dipping to avoid cracking. Use a small, deep bowl for chocolate so coating is easier, and add toppings immediately while the chocolate is still wet so they adhere well.