Would you like to save this?
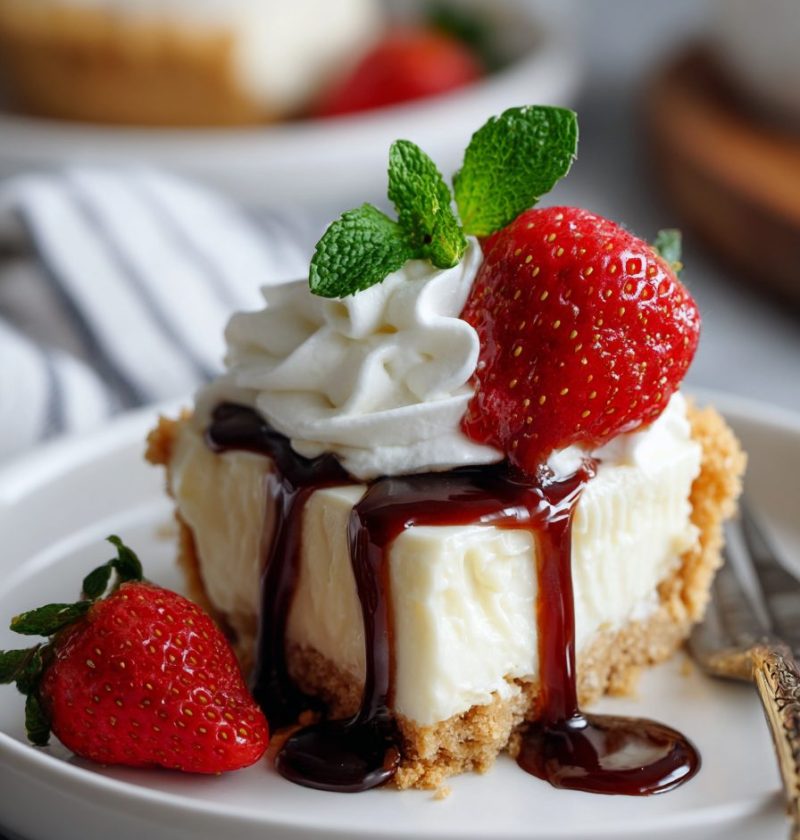
No Bake Cheesecake Dessert Recipe
If you need a simple, crowd-pleasing sweet treat, this No Bake Cheesecake Dessert Recipe is creamy, cool, and wonderfully easy—no oven, no fuss, and absolutely perfect for warm days, busy holidays, or anytime you want a homemade cheesecake without the extra work.
A creamy classic that feels a little special
There’s something downright comforting about a good no bake cheesecake. It has all the rich, tangy flavor you want from a classic cheesecake dessert, but without turning on the oven or worrying about cracks, water baths, or overbaking. And honestly, at this stage of life, I appreciate a dessert recipe that gives me beautiful results without asking me to babysit it for hours.
This No Bake Cheesecake Dessert Recipe is one I come back to again and again. I make it in spring for Easter brunch, in summer when it’s too hot to bake, and right through the holidays when I need an easy cheesecake I can prepare ahead. The texture is silky and light, the flavor is balanced—not too sweet—and that buttery graham cracker crust gives every bite a little crunch. It’s the sort of chilled dessert that disappears quietly at family gatherings because everyone goes back for “just one more little slice.”
What makes it special? For one thing, it’s approachable. Even if you’re not a confident baker, you can make this homemade cheesecake with ease. It also adapts beautifully. Top it with berries, lemon curd, cherry pie filling, salted caramel, or even crushed Oreos if that’s your house favorite. And while I won’t call cheesecake health food—let’s be honest here—it is portion-friendly, satisfying, and lovely for entertaining because a little slice goes a long way.
Why you’ll love this recipe
- No oven needed, which is a blessing in hot weather.
- The filling is smooth, rich, and wonderfully creamy cheesecake perfection.
- Easy enough for beginners and reliable enough for holidays.
- Uses simple grocery-store ingredients you may already have.
- The graham cracker crust comes together in minutes.
- A perfect make-ahead no bake dessert for parties and potlucks.
- Easy to dress up with fruit, chocolate, or caramel toppings.
- Slices neatly after chilling, so it looks bakery-worthy.
- Great for spring and summer, but honestly delicious all year.
- Tastes like a classic cheesecake filling without the baking stress.
Ingredients
Here’s everything you need for this dessert recipe, plus a few helpful notes from my own kitchen.
For the graham cracker crust
- 2 cups graham cracker crumbs
(about 14 full graham cracker sheets; use honey grahams for classic flavor) - 1/3 cup granulated sugar
(you can reduce to 1/4 cup if you prefer a less sweet crust) - 1/2 cup unsalted butter, melted
(use real butter for the best flavor and structure)
For the cheesecake filling
- 16 ounces cream cheese, softened
(full-fat brick-style cream cheese works best; avoid whipped tub cream cheese) - 1 cup powdered sugar
(sifts in smoothly and helps create that velvety texture) - 1 teaspoon pure vanilla extract
(Nielsen-Massey or McCormick are both dependable choices) - 1 tablespoon fresh lemon juice
(brightens the flavor without making it taste lemony) - 1 1/4 cups heavy whipping cream, very cold
(cold cream whips faster and holds better)
Optional toppings
- 1 1/2 cups fresh strawberries, sliced
- 1 cup blueberry or cherry pie filling
- 1/4 cup caramel sauce
- 2 tablespoons lemon zest
- Whipped cream for garnish
Helpful ingredient tips
- Cream cheese: Let it sit at room temperature for 30 to 45 minutes. If it’s too cold, your filling may turn lumpy.
- Heavy cream: Keep it in the refrigerator until the moment you use it. Cold cream is your friend here.
- Lemon juice: Don’t skip it. It gives the filling a fresh, balanced taste.
- Crust crumbs: A food processor makes very even crumbs, but a zip-top bag and rolling pin work just fine too.

Directions
-
Make the crust.
In a medium bowl, stir together the graham cracker crumbs and granulated sugar. Pour in the melted butter and mix until the texture feels like wet sand. That’s the cue you’re looking for—every crumb should be lightly coated. -
Press the crust into the pan.
Transfer the crust mixture into a 9-inch springform pan. Press it firmly into the bottom and slightly up the sides using the bottom of a measuring cup or glass. Pop it into the refrigerator for 20 to 30 minutes so it can firm up while you make the filling. -
Beat the cream cheese mixture.
In a large mixing bowl, beat the softened cream cheese until smooth and fluffy, about 2 minutes. Add the powdered sugar, vanilla extract, and lemon juice, then beat again until the mixture is creamy and fully blended. Scrape down the bowl once or twice so no sneaky lumps get left behind. -
Whip the cream.
In a separate bowl, whip the cold heavy cream with a hand mixer or stand mixer until stiff peaks form. This usually takes 3 to 4 minutes. You want those peaks to stand tall when you lift the beaters—soft peaks won’t hold the filling as well. -
Fold the whipped cream into the filling.
Gently fold the whipped cream into the cream cheese mixture in two or three additions. Use a spatula and a light hand. This is what keeps the cheesecake filling airy and silky rather than dense. -
Fill the crust.
Spoon the filling onto the chilled crust and smooth the top with an offset spatula or the back of a spoon. If you want a pretty finish, make a few soft swirls on top. It’s a little thing, but it makes the whole dessert feel more polished. -
Chill until set.
Cover the pan and refrigerate the cheesecake for at least 6 hours, though overnight is even better. Here’s the thing—waiting is hard, but it matters. A proper chill gives you clean slices and the best texture. -
Add toppings and serve.
Once fully chilled, remove the cheesecake from the springform pan. Top with fresh berries, pie filling, whipped cream, caramel, or whatever suits the occasion. Slice with a sharp knife, wiping the blade between cuts for those neat bakery-style pieces.
Servings & timing
- Yield: 10 to 12 slices
- Prep Time: 25 minutes
- Chill Time: 6 hours minimum
- Total Time: 6 hours 25 minutes
If you make it the night before, it feels almost effortless the next day—which, if you’re hosting, is worth its weight in gold.
Variations to keep things fun
- Lemon berry version: Add 1 teaspoon lemon zest to the filling and top with mixed berries.
- Chocolate cheesecake: Mix 1/3 cup melted and cooled semisweet chocolate into the filling.
- Oreo crust swap: Use crushed Oreos instead of graham crackers for a cookies-and-cream twist.
- Mini cheesecakes: Divide the crust and filling into muffin liners for individual servings.
- Lighter version: Use reduced-fat cream cheese and a little less sugar for a slightly lighter result.
- Pumpkin spice style: Stir 1/2 cup pumpkin purée and 1 teaspoon pumpkin pie spice into the filling in fall.
Storage & reheating
This chilled dessert stores beautifully, which is one more reason I love it.
- Refrigerator: Store covered in the fridge for up to 5 days. A cake carrier or loosely tented plastic wrap works well.
- Freezer: Freeze the whole cheesecake or individual slices for up to 2 months. Wrap tightly in plastic wrap, then foil for best protection.
- To thaw: Move frozen cheesecake to the refrigerator and let it thaw overnight.
- Make-ahead tip: Prepare it 1 day in advance for the best texture and easiest serving.
- Reheating: None needed—this is a cool, creamy treat meant to be served chilled.
Notes from my kitchen
A few small things can make the difference between good cheesecake and “Can I have that recipe?” cheesecake.
First, use full-fat cream cheese if you can. I’ve tested lower-fat versions, and while they work, the texture isn’t quite as lush. Second, don’t rush the whipping and folding. If the whipped cream is under-beaten, the filling may stay too soft. If it’s overmixed once combined, you lose some of that lovely lightness.
I’ve also learned that overnight chilling is the sweet spot. Technically, 6 hours works, yes—but overnight gives the no bake cheesecake a firmer, cleaner slice and a more settled flavor. It’s a bit like soup the next day; somehow everything comes together better.
And one more practical note: if your springform pan tends to stick, run a thin knife around the edge before releasing the ring. Saves heartache. I’ve learned that one the hard way.
FAQs
Can I make this No Bake Cheesecake Dessert Recipe ahead of time?
Yes, and I recommend it. Making it a day ahead gives the cheesecake time to fully set and makes entertaining much easier.
Why is my cheesecake filling too soft?
Usually the whipped cream wasn’t beaten enough, the cream cheese was too warm, or the cheesecake didn’t chill long enough. Give it more refrigerator time before serving.
Can I use Cool Whip instead of heavy cream?
You can. Use about 3 cups of thawed whipped topping, though the flavor and texture will be a little sweeter and less fresh.
Do I have to use a springform pan?
No, but it helps with clean presentation. A deep pie dish or square baking dish works too, especially if you plan to serve it more casually.
How do I get clean slices?
Use a sharp knife and wipe it clean between each cut. Warm water on the blade helps too—just dry it before slicing.
Can I freeze homemade cheesecake?
Absolutely. This homemade cheesecake freezes very well. Wrap it tightly and thaw overnight in the refrigerator.
What toppings go best with no bake cheesecake?
Fresh berries, cherry pie filling, lemon curd, chocolate ganache, and caramel are all excellent. Honestly, even a spoonful of good jam works in a pinch.
Can I make this gluten-free?
Yes. Simply use gluten-free graham crackers for the crust and double-check your toppings and vanilla extract labels.
A sweet finish worth sharing
This No Bake Cheesecake Dessert Recipe is easy, creamy, make-ahead friendly, and just plain dependable—the kind of dessert recipe every home cook should have tucked away. If you give it a try, I’d love to hear how you topped yours, and if you’re in the mood for more simple treats, take a look at my other no bake dessert favorites and chilled summer sweets.