Would you like to save this?
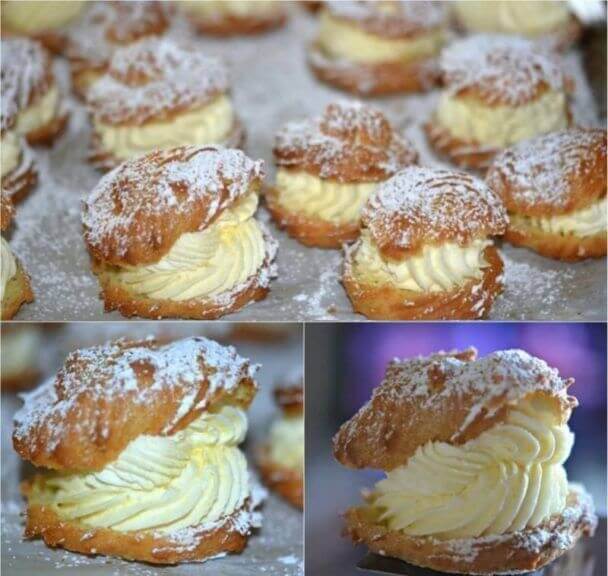
A Fond Memory: Growing up, Sundays were often spent in the kitchen with my mom, experimenting with various recipes. One of the highlights of these cooking sessions was making cream puffs. Mom’s Famous Cream Puffs were always the star of our dessert table, admired for their delicate texture and sumptuous filling. The process of making them—watching the dough rise beautifully in the oven and whipping up the creamy filling—was an experience in itself. These cream puffs weren’t just a treat; they were a celebration of our time together and a symbol of family love.
Ingredients
For the Cream Puffs:
1 stick butter (8 tablespoons)
1 cup water
1 teaspoon vanilla extract
4 large eggs
1 cup all-purpose flour
For Mom’s Famous Filling:
1 pint heavy cream
1 package (3.4 ounces) instant vanilla pudding mix
â…“ cup milk
Directions
1. Prepare the Cream Puff Dough
Preheat Your Oven:
Begin by preheating your oven to 400°F (200°C). This ensures that your oven is hot and ready for the cream puffs, which helps them rise perfectly.
Boil the Butter Mixture: In a medium-sized saucepan, combine 1 stick of butter, 1 cup of water, and 1 teaspoon of vanilla extract. Place the saucepan over medium-high heat and bring the mixture to a boil. Stir occasionally to prevent the butter from burning.
Incorporate the Flour: Once the mixture reaches a rolling boil, add 1 cup of all-purpose flour all at once. Stir vigorously with a wooden spoon or spatula until the flour is fully incorporated and the dough starts to pull away from the sides of the pot, forming a ball. This should take about 1-2 minutes.
Cool the Dough: Remove the saucepan from the heat and allow the dough to cool slightly. This helps prevent the eggs from cooking when added.
Add the Eggs: Beat 4 large eggs in a separate bowl. Gradually add the beaten eggs to the dough, one at a time, stirring continuously until each egg is fully incorporated before adding the next. The dough should be smooth and glossy once all the eggs are added.
2. Shape and Bake the Cream Puffs
Prepare the Baking Sheet:
Line a baking sheet with parchment paper. This will prevent the cream puffs from sticking and ensure an even bake.
Shape the Dough: Using a spoon or a cookie scoop, drop heaping tablespoons of dough onto the prepared baking sheet. Space them about 2 inches apart, as the puffs will expand while baking.
Bake: Place the baking sheet in the preheated oven and bake at 400°F (200°C) for 25-30 minutes. The cream puffs should be golden brown and puffed up. Avoid opening the oven door during the first 20 minutes of baking to prevent them from collapsing.
Cool: Remove the cream puffs from the oven and let them cool completely on a wire rack before filling them.
3. Prepare Mom’s Famous Filling
Mix the Filling Ingredients:
In a large mixing bowl, combine 1 pint of heavy cream, 1 package (3.4 ounces) of instant vanilla pudding mix, and â…“ cup of milk. Using an electric mixer, beat the mixture on medium speed until it thickens to the consistency of whipped cream. This should take about 2-3 minutes.
Chill: For the best texture, refrigerate the filling for a few minutes before using. This will make it easier to pipe or scoop into the cream puffs.
4. Assemble the Cream Puffs
Slice the Cream Puffs:
Once the cream puffs are completely cooled, carefully slice each puff in half horizontally. You can use a serrated knife or simply gently pull them apart.
Fill the Puffs: Using a piping bag fitted with a large round tip or a spoon, fill each cream puff with the prepared filling. Be generous—each puff should be filled with a good amount of creamy goodness.
Dust with Powdered Sugar: Lightly dust the tops of the filled cream puffs with powdered sugar for a touch of sweetness and a beautiful finish.
Variations and Substitutions
Flavored Cream Filling:
While vanilla is classic, you can experiment with different flavors. Try adding a teaspoon of cocoa powder for chocolate cream puffs, or fold in some fruit puree for a fruity twist.
Fruit Add-Ins: For added flavor and texture, consider incorporating fresh berries or fruit compote into the cream filling. Just make sure the fruit is well-drained to avoid making the filling too runny.
Gluten-Free Option: To make a gluten-free version, use a gluten-free all-purpose flour blend in place of regular flour. Ensure that all other ingredients are certified gluten-free.
Dairy-Free Adaptations: For a dairy-free option, use non-dairy substitutes for the butter, milk, and heavy cream. Coconut cream or almond milk can work well, but be aware that the texture and flavor may vary slightly.
Conclusion
Mom’s Famous Cream Puffs are more than just a dessert; they’re a culinary tradition that brings joy and comfort to any occasion. Their light and airy texture combined with the creamy filling makes them a delightful treat that’s both elegant and satisfying. Whether you’re celebrating a special event or simply indulging in a sweet moment, these cream puffs are sure to be a hit.
The process of making these cream puffs, from the initial boil to the final dusting of powdered sugar, is a rewarding experience that results in a dessert that looks as beautiful as it tastes. With their crisp exterior and creamy, luscious filling, they are perfect for impressing guests or enjoying with loved ones. So, gather your ingredients, follow these steps, and savor the delicious results of Mom’s famous recipe. Enjoy every bite of this timeless treat that continues to create lasting memories and smiles.


