Would you like to save this?
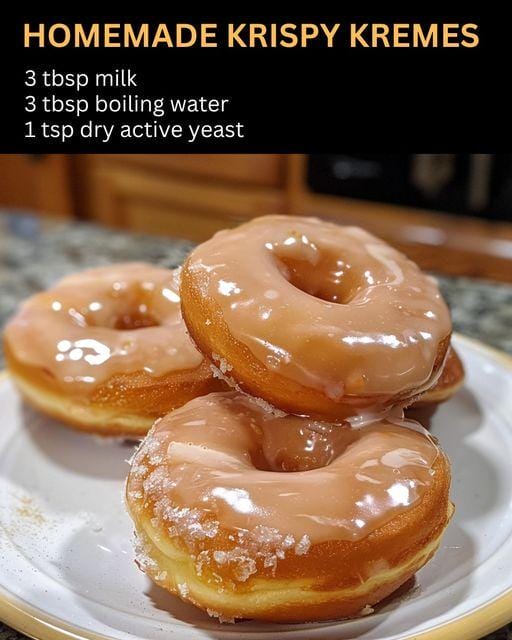
There’s something magical about biting into a freshly made doughnut, with its light, airy texture and sweet glaze that makes it almost impossible to stop at just one. Krispy Kreme doughnuts have long been a favorite for their unique softness and flavor. This homemade version captures that same magic, bringing the delightful experience of a Krispy Kreme doughnut straight to your kitchen. I remember the first time I made these; the joy and excitement were palpable as my family eagerly awaited their turn to taste the first warm, glazed doughnut right off the wire rack.
Ingredients
3 tablespoons milk
3 tablespoons boiling water
1 teaspoon dry active yeast
8 ounces all-purpose flour (a little under 2 cups)
1 1/2 ounces sugar (about 3 tablespoons)
1 egg
1 ounce butter, cold to room temperature
Dash of salt
Enough oil to cover the bottom few inches of a wok or deep fryer
Step-by-Step Instructions
Step 1: Activate the Yeast
Combine Milk and Water: In a large measuring jug, combine 3 tablespoons of milk with 3 tablespoons of boiling water. This creates a warm mixture that’s perfect for activating the yeast.
Add Sugar and Yeast: Add 1 teaspoon of sugar and the dry active yeast to the milk mixture. Stir gently to combine.
Let it Sit: Leave the mixture in a warm place for about 5-10 minutes until the yeast activates and becomes foamy. This step is crucial for ensuring that the dough rises properly.
Step 2: Prepare the Dry Ingredients
Mix Dry Ingredients: In a large mixing bowl, combine 8 ounces of all-purpose flour, the remaining sugar, and a dash of salt. Stir to combine.
Cut in the Butter: Cut 1 ounce of cold to room temperature butter into the flour mixture using your fingers or a pastry blender. The mixture should resemble coarse crumbs.
Step 3: Combine Wet and Dry Ingredients
Beat the Egg: Give the egg a quick beat before adding it to the flour mixture.
Mix Dough: Add the activated yeast mixture to the flour mixture. Mix until a smooth dough forms. This should take about 5 minutes of mixing. The dough should be slightly sticky but manageable.
Step 4: Knead the Dough
Knead the Dough: Turn the dough out onto a lightly floured surface. Knead for about 5-10 minutes until it feels springy and little bubbles form under the surface. Kneading helps develop the gluten, giving the doughnuts their signature texture.
First Rise: Place the kneaded dough back into the mixing bowl. Cover with a cloth or plastic wrap and let it rise in a warm place for about an hour, or until it has doubled in size.
Step 5: Shape the Doughnuts
Divide the Dough: Once the dough has risen, turn it out onto the counter and cut it into 4 equal pieces.
Form Doughnut Holes: Take one piece at a time and stretch it into a long rope about an inch to an inch and a half wide. Cut the rope into inch-long pieces, then roll each piece into a small ball with your hands.
Second Rise: Place the doughnut holes on a baking tray or wire rack. Cover with a cloth and let them rise for about 15-20 minutes while you prepare the oil.
Step 6: Fry the Doughnuts
Heat the Oil: Heat enough oil in a wok or deep fryer to cover the bottom few inches. The oil should reach 375°F (190°C). Use a kitchen thermometer to monitor the temperature.
Fry the Doughnuts: Carefully place the doughnut holes into the hot oil. Fry a few at a time to avoid overcrowding. Fry each side for about 2 minutes or until golden brown. Use a slotted spoon to turn them and remove them from the oil.
Drain the Doughnuts: Place the fried doughnuts on a paper towel or wire rack over a cloth to drain excess oil.
Step 7: Glaze the Doughnuts
Prepare the Glaze: While the doughnuts are frying, you can prepare a simple glaze by mixing powdered sugar with a bit of milk and vanilla extract until smooth.
Glaze While Warm: Once the doughnuts have drained and are still warm, dip them into the glaze. Ensure each doughnut is evenly coated. Glazing while warm ensures that the glaze sticks well and creates a shiny, delicious coating.
Step 8: Serve and Enjoy
Serve: Allow the glaze to set for a few minutes, then serve the doughnuts warm. The texture and flavor are best when enjoyed fresh.
Enjoy: Savor each bite of your homemade Krispy Kreme doughnuts, appreciating the light, airy texture and sweet, glossy glaze.
Variations and Substitutions
Flavor Variations: Add different extracts like almond or lemon to the glaze for a unique flavor twist.
Filled Doughnuts: Inject a bit of jam, custard, or Nutella into the center of the doughnuts for a filled variation.
Chocolate Glaze: Substitute the vanilla glaze with a chocolate glaze by adding cocoa powder and a bit of melted chocolate to the glaze mixture.
Vegan Version: Use plant-based milk and butter, and substitute the egg with a flax egg (1 tablespoon ground flaxseed mixed with 3 tablespoons water) to make a vegan version of these doughnuts.
Conclusion
Homemade Krispy Kremes bring the beloved taste of classic doughnuts right to your kitchen. The process of making these doughnuts is not only rewarding but also fun, especially when you see how much joy they bring to those who get to enjoy them. The combination of the light, fluffy dough and the sweet, shiny glaze is simply irresistible.
What makes this recipe particularly appealing is its versatility. You can experiment with different flavors, fillings, and glazes to suit your personal taste. Whether you stick to the classic version or try out some creative variations, these doughnuts are sure to be a hit.
In summary, this recipe is enjoyable to make and eat because it captures the essence of a beloved treat in a homemade format. The detailed steps ensure that even novice bakers can achieve delicious results. So gather your ingredients, follow these instructions, and indulge in the delightful experience of homemade Krispy Kremes.

