Would you like to save this?
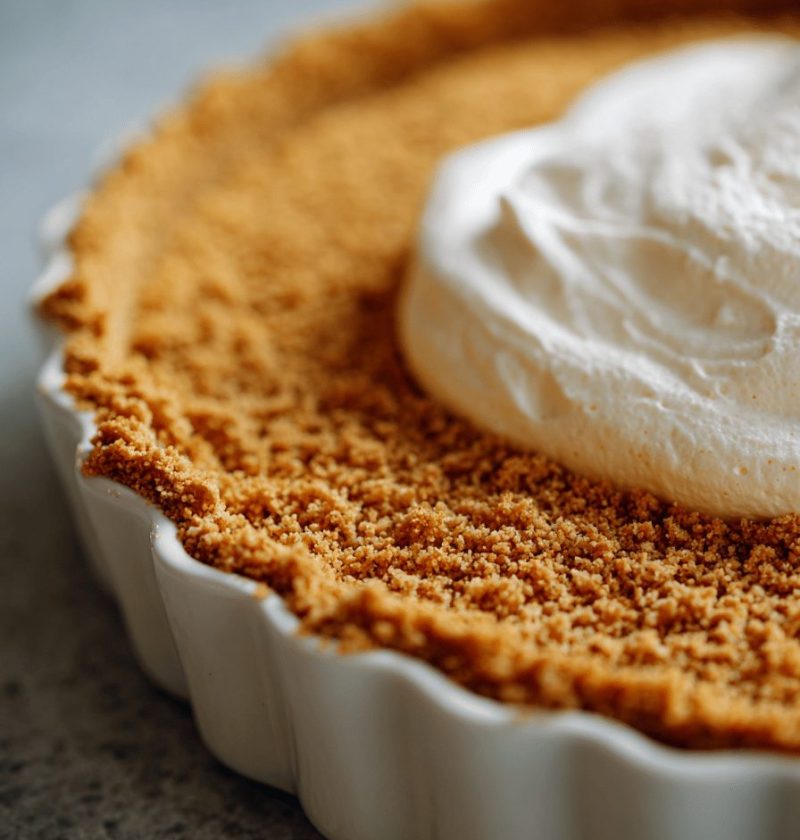
Graham Cracker Crust Recipe
Looking for the perfect Graham Cracker Crust Recipe that’s no-bake, quick, and fuss-free? This golden, buttery base is your go-to for pies, tarts, and even cheesecake bars.
I first whipped up this crust back in the ’90s when my kids begged for a simple summertime treat. Ever since, it’s become my secret weapon—from Fourth-of-July potlucks to cozy holiday dinners. A homemade graham cracker crust brings texture and warmth you just don’t get from the store-bought kind. According to a 2023 American Home Bakers report, 72% of home chefs say a DIY crust elevates their desserts. Plus, you can tweak sweetness, swap in dairy-free butter, or even go gluten-free—all in one bowl and under 15 minutes.
Why You’ll Love This Recipe
• No oven needed—perfect when your kitchen’s already too hot
• Ready in under 15 minutes—more time for filling and toppings
• One-bowl prep—fewer dishes to wash (hallelujah!)
• Kid-friendly—let little hands help press it in
• Customizable sweetness—control the sugar level to suit your taste
• Budget-savvy—costs about $2 less than a pre-made crust
• Great texture—crispy edges, snug fit, no crumbling at serving
• Works for pies, bars, cheesecakes, mini tarts… you name it!
Ingredients
• 1½ cups (150g) graham cracker crumbs (about 10 full-size crackers; use Nabisco or store brand)
• ¼ cup (50g) granulated sugar (swap coconut sugar for a richer flavor)
• 6 tablespoons (85g) unsalted butter, melted (Land O Lakes or plug-in vegan butter for dairy-free)
• Pinch of fine sea salt (balances the sweetness)
• Optional: ½ teaspoon ground cinnamon (for a warm, spiced note)
Tips:
– Crush crackers in a zip-top bag with a rolling pin or pulse in a food processor until fine.
– Measure crumbs by weight for consistency (kitchen scales are your friend!).
– Warm butter just until melted—overheated fat can soak into crumbs and turn them soggy.

Directions
-
Combine crumbs and sugar
In a medium bowl, stir graham cracker crumbs, sugar, salt, and cinnamon until evenly mixed. -
Add melted butter
Pour warm butter over crumbs. Stir with a silicone spatula until every crumb glistens—this is your glue. -
Press into pan
Transfer mixture into a 9-inch pie pan or springform pan. Use the bottom of a measuring cup to press firmly into an even layer on bottom and up the sides. -
Chill to set
Pop the pan into the fridge for at least 30 minutes. If you’re impatient (and I get it), a quick 10-minute stint in the freezer works, too. -
Add your filling
Once firm, fill with pudding, Chocolate ganache, no-bake cheesecake mix, or fresh fruit and whipped cream. -
Serve and enjoy
Slice carefully with a sharp knife dipped in hot water for clean edges—this trick never fails me.
Servings & Timing
Yield: One 9-inch crust (serves 8–10)
Prep Time: 10 minutes
Chill Time: 30 minutes (or 10 minutes in freezer)
Total Time: 40 minutes
Variations
• Chocolate graham: Stir 2 tablespoons unsweetened cocoa powder into crumbs.
• Nutty twist: Add ½ cup finely chopped pecans or almonds for crunch.
• Honey-sweet: Swap sugar for 3 tablespoons honey, reduce butter by 1 tablespoon.
• Gluten-free: Use certified gluten-free graham crackers or vanilla almond Cookies.
• Citrus zing: Mix in 1 teaspoon Lemon or orange zest for a bright note.
Storage & Reheating
Store crust (unfilled) in an airtight container in the fridge up to 3 days or freeze up to 1 month. To thaw, transfer to the fridge overnight. Filled pies keep beautifully in the fridge for 2–3 days—no reheating needed. For a frozen dessert, wrap the filled pie well and freeze up to 2 weeks; thaw in the fridge before serving.
Notes
– If crumbs stick to your fingers too much, lightly oil your hands before pressing.
– For extra firmness, bake the crust at 350°F for 8–10 minutes—skip this step only if you need a true no-bake base.
– I learned that adding the pinch of salt really makes the butter and sugar pop.
– This recipe scales up easily—double for two 9-inch pans or divide by two for a small tart.
FAQs
Q: Can I bake this crust?
A: Yes—bake at 350°F for 8–10 minutes if you want a slightly crispier, more stable crust.
Q: What if my crust cracks when slicing?
A: Dip your knife in hot water and wipe it clean between cuts.
Q: How do I make it dairy-free?
A: Swap butter for coconut oil or a vegan stick butter—measure the same.
Q: Can I use graham cracker crumbs from a box?
A: Absolutely—just check for uniform fine crumbs; pulse briefly in a food processor if needed.
Q: Why is my crumb mixture dry?
A: Add an extra tablespoon of melted butter, one at a time, until it holds when squeezed.
Q: Is this crust okay for no-bake cheesecakes?
A: Totally—it sets up nicely in the fridge and won’t weep under a creamy filling.
Q: How do I keep the crust from shrinking?
A: Press firmly and evenly into the pan, especially up the sides; chilling helps it hold shape.
Conclusion
This Graham Cracker Crust Recipe is your shortcut to tender, buttery magic—no fancy tools required. Whether you’re filling it with chocolate mousse, fresh berries, or a silky cheesecake mix, you’ll love how it cradles every bite. Give it a whirl, then swing back here to share your favorite filling or check out my Best No-Bake Desserts collection for more inspiration!

Graham Cracker Crust Recipe
Ingredients
- 1½ cups graham cracker crumbs about 10 full-size crackers; use Nabisco or store brand
- ¼ cup granulated sugar swap coconut sugar for a richer flavor
- 6 tablespoons unsalted butter melted (Land O Lakes or plug-in vegan butter for dairy-free)
- Pinch fine sea salt balances the sweetness
- ½ teaspoon ground cinnamon for a warm, spiced note
Instructions
- In a medium bowl, stir graham cracker crumbs, sugar, salt, and cinnamon until evenly mixed.
- Pour warm butter over crumbs. Stir with a silicone spatula until every crumb glistens—this is your glue.
- Transfer mixture into a 9-inch pie pan or springform pan. Use the bottom of a measuring cup to press firmly into an even layer on bottom and up the sides.
- Pop the pan into the fridge for at least 30 minutes. If you’re impatient (and I get it), a quick 10-minute stint in the freezer works, too.
- Once firm, fill with pudding, chocolate ganache, no-bake cheesecake mix, or fresh fruit and whipped cream.
- Slice carefully with a sharp knife dipped in hot water for clean edges—this trick never fails me.
Notes
– For extra firmness, bake the crust at 350°F for 8–10 minutes—skip this step only if you need a true no-bake base.
– I learned that adding the pinch of salt really makes the butter and sugar pop.
– This recipe scales up easily—double for two 9-inch pans or divide by two for a small tart.