Would you like to save this?
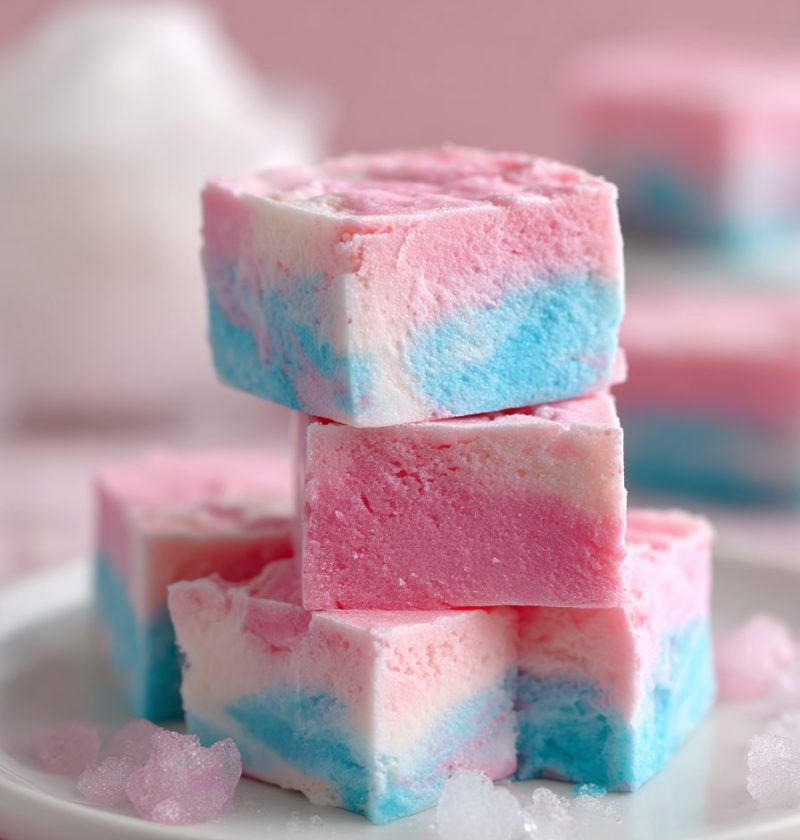
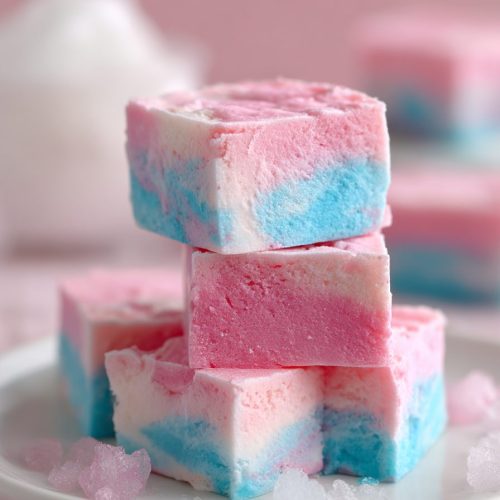
Cotton Candy Fudge Recipe
This Cotton Candy Fudge Recipe is a no-bake, kid-approved, pastel-swirled treat that tastes like a trip to the carnival—without ever turning on your oven.
A Sweet Little Throwback: Full Recipe Introduction
Cotton candy just feels like childhood, doesn’t it? Sticky fingers, blue tongues, and walking around the fair with a big fluffy cloud on a paper cone. This cotton candy Fudge Recipe takes all of that fun, then wraps it up into creamy, bite-size pastel fudge squares that melt in your mouth.
Unlike old-fashioned fudge that needs a candy thermometer and a bit of patience, this is a modern, easy Fudge Recipe made with sweetened condensed milk, white chocolate, and cotton candy flavoring. It’s an almost foolproof condensed milk fudge that you can stir together in minutes and chill in the fridge—no stovetop guesswork, no sweating over “soft-ball stage.”
I love bringing this cotton candy dessert to kids’ birthday parties, baby showers, and carnival themed dessert tables. The pink and blue fudge swirls look like tiny pieces of pastel marble. It’s a total showstopper on a platter, yet it’s one of the simplest homemade fudge candy recipes I make. Honestly, this is the kind of treat that makes you look like you fussed for hours…when you secretly used the microwave and were done in 10–15 minutes.
Around our house, this easy no bake fudge has become a summer and birthday party staple. My kids are grown now, but they still request it when they’re home, and my grand-niece thinks I “invented” cotton candy fudge—so let’s just keep that between us, okay?
Whether you’re planning a kids party dessert, a fun movie night, or just want something playful and colorful on your dessert tray, this creamy candy fudge is a sweet, nostalgic way to bring the fair home.
Why You’ll Love This Recipe
- No oven needed: This is a true no bake Fudge Recipe—perfect for hot days or busy weeks.
- Microwave-friendly: Everything melts right in the microwave, so no candy thermometer or stovetop babysitting.
- Fast and simple: About 10–15 minutes of hands-on prep, then the fridge does the rest.
- Festive and colorful: The pink and blue fudge swirls scream carnival themed dessert and look gorgeous on any dessert table.
- Kid-approved flavor: Sweet cotton candy flavoring makes this a huge hit as a kids party dessert or birthday party treat.
- Soft, creamy texture: Sweetened condensed milk and white chocolate create that smooth, melt-in-your-mouth creamy candy fudge.
- Perfect for gifting: Cut into neat pastel fudge squares, package in little boxes or bags, and you’ve got the cutest homemade fudge candy gifts.
- Customizable: Change the colors, add sprinkles, or tweak the flavor for holidays, baby showers, or gender reveal parties.
- Make-ahead friendly: This cotton candy fudge keeps well in the fridge and freezer, so you can prep days before your event.
Ingredients For The Prettiest Pastel Fudge Squares

Let’s walk through exactly what you’ll need for this cotton candy recipe. I’ll include ideas for substitutions and little tricks I’ve learned along the way.
For the fudge base:
-
3 cups (about 18 oz / 510 g) white chocolate chips
- Use a good-quality brand that melts smoothly (Ghirardelli, Guittard, or store brands labeled “premium” work well).
- Avoid “baking melts” that are meant for coating; they can set a bit too firm.
-
1 can (14 oz / 396 g) sweetened condensed milk
- This is the key to a creamy, no-fail condensed milk fudge.
- Don’t substitute evaporated milk—they’re not the same.
-
2 tablespoons unsalted butter
- Butter adds richness and helps the fudge set with a silky texture.
- Salted butter works in a pinch—just reduce or skip any added salt.
-
1 teaspoon pure vanilla extract
- Adds depth so the cotton candy flavor doesn’t taste one-note.
-
½ teaspoon fine sea salt
- Just a little salt balances out all that sweetness; you’ll notice the difference.
For the cotton candy flavor & color:
-
1–1½ teaspoons cotton candy flavoring or extract
- Brands like LorAnn or Wilton cotton candy flavor oils work beautifully—start with 1 teaspoon and add more to taste.
- Flavor oils are strong, so go slowly; you can always add, but you can’t take away.
-
Pink gel food coloring
- Gel or paste gives vibrant color without thinning the fudge mixture.
- A light baby pink looks especially pretty for pastel fudge squares.
-
Blue gel food coloring
- Aim for a soft sky blue or “cotton candy” blue, not dark navy.
- You can use teal for a twist, but keep it in the pastel family if you want that classic cotton candy look.
Optional toppings and add-ins:
-
2–3 tablespoons pastel sprinkles or nonpareils
- Adds crunch and that fun carnival-themed dessert vibe.
- Use jimmies or confetti-style sprinkles; nonpareils can sometimes bleed, so sprinkle lightly.
-
Loose cotton candy for garnish (optional, for serving)
- Only add this right before serving—cotton candy melts on contact with moisture.
- A tiny tuft on top of each piece makes a cute kids party dessert.
Ingredient Tips & Simple Substitutions
- No cotton candy flavoring? Use a mix of vanilla and a tiny bit of strawberry extract to mimic that “sweet carnival” flavor. It won’t be perfect, but it’s still tasty.
- Dairy-free variation: Use dairy-free white chips and coconut condensed milk; the flavor changes a bit but still works.
- Want less sweetness? Add an extra pinch of salt and a teaspoon of lemon juice. It doesn’t make the fudge lemony; it just cuts the richness slightly.
Step-By-Step Directions (So Easy, You’ll Make It Twice)
This is a classic microwave Fudge Recipe with a cotton candy twist. If you prefer, you can melt everything in a double boiler on the stove, but the microwave method keeps things simple.
1. Prepare your pan.
Line an 8×8-inch (20×20 cm) baking pan with parchment paper, letting it hang over the sides to create “handles.” Lightly spray with nonstick spray if your parchment tends to stick. This makes removing and slicing the fudge much easier.
2. Measure and set up your mix-ins.
Set out your cotton candy flavoring, gel colors, and sprinkles before you melt the chocolate. Once the fudge mixture is warm, you’ll want everything ready so you can work quickly.
3. Melt the white chocolate, condensed milk, and butter.
In a large microwave-safe bowl, add the white chocolate chips, sweetened condensed milk, and butter. Microwave on 50% power for 60 seconds, then stir very well. Continue microwaving in 20–30 second bursts at 50% power, stirring after each, until the chocolate is almost melted.
- Tip: Stop when a few small lumps remain; the residual heat will finish the melting. This helps prevent scorching or seizing.
4. Stir until smooth and glossy.
Once the mixture is mostly melted, stir patiently until it’s completely smooth, thick, and glossy. If you see stubborn chunks, you can microwave for another 10–15 seconds at 50% power.
5. Add vanilla, salt, and cotton candy flavoring.
Stir in the vanilla extract and salt first, then add 1 teaspoon of cotton candy flavoring. Taste a tiny bit (careful, it’s warm). If you want a stronger cotton candy flavor, add up to ½ teaspoon more.
- Remember: The flavor will mellow slightly as the fudge chills, so it’s okay if it tastes just a touch bold while warm.
6. Divide the fudge for coloring.
Quickly divide the fudge mixture into two bowls—try to get them as even as possible. You’ll create one pink and one blue fudge layer.
7. Tint one bowl pink.
Add 1–2 drops of pink gel food coloring to one bowl and stir until fully blended. Adjust with another drop if needed, but keep it soft and pastel-looking.
8. Tint the second bowl blue.
Add 1–2 drops of blue gel food coloring to the other bowl. Stir until the color is even. Again, stay in that light, airy “cotton candy blue” range.
9. Create the swirl in the pan.
Working fairly quickly (the fudge thickens as it cools), spoon alternating dollops of pink and blue fudge into your prepared pan. Think checkerboard or random patches, like you’re quilting with fudge.
- Use a small offset spatula or the back of a spoon to gently nudge the dollops together and smooth the top.
10. Swirl—but not too much.
Take a butter knife or skewer and gently drag it through the fudge in wavy lines, first one direction, then the other. Aim for just a few passes; if you swirl too much, the colors will blend and you’ll lose that clear pink and blue fudge pattern.
11. Add sprinkles (if using).
While the fudge is still soft, scatter pastel sprinkles or nonpareils over the top. Press lightly with clean hands or the back of a spoon so they stick.
12. Chill until firm.
Cover the pan loosely with plastic wrap or foil and refrigerate for at least 2 hours, or until completely set. For the cleanest squares, 3–4 hours or overnight is ideal.
13. Slice into pastel fudge squares.
Use the parchment handles to lift the set fudge out of the pan and place it on a cutting board. With a sharp knife, slice into 1-inch or 1½-inch squares. Wiping the knife with a warm, damp cloth between cuts helps keep the edges neat.
14. Garnish with cotton candy before serving (optional).
If you’re adding real cotton candy on top, place a tiny tuft on each square just before serving. Don’t do this ahead of time—cotton candy melts quickly when it touches moisture.
And that’s it—your colorful fudge candy is ready to serve, gift, or sneak straight from the pan when no one’s looking.
Servings & Timing
- Yield: About 36 small squares (1-inch pieces) or 25 larger squares
- Prep Time: 15 minutes (including melting, coloring, and swirling)
- Chill Time: 2–4 hours in the fridge (overnight for ultra-clean cuts)
- Total Time: About 2 hours 15 minutes, mostly hands-off
For a kids’ party platter, I like to cut smaller squares so little hands can grab a piece without committing to a giant chunk of fudge. For gifts or holiday tins, you can mix these pastel fudge squares with brownies, cookies, or other no bake fudge pieces for a fun variety box.
Fun Variations To Try
You know what? Once you’ve made this cotton candy fudge once, it’s hard not to start playing. Here are a few of my favorite twists:
- Confetti Carnival Fudge: Stir ¼ cup pastel jimmies into the fudge before spreading in the pan for sprinkle-filled bites.
- Birthday Party Fudge: Add ½ teaspoon butter flavor along with the vanilla and use rainbow sprinkles on top for a birthday cake vibe.
- Gender Reveal Fudge: Keep the top layer white and hide the pink and blue fudge swirl in the center; slice to reveal the surprise.
- Unicorn Fudge: Add a third pastel color (lavender or mint) and top with star or unicorn sprinkles for a magical kids party dessert.
- Cotton Candy Crunch: Fold in ½ cup crushed vanilla sandwich cookies or waffle cones for a fun textural contrast.
- Holiday Pastel Fudge: Change the colors to pastel green and light yellow for spring or Easter, or red and light blue for a whimsical winter dessert.
Storage, Freezing & Make-Ahead Tips
One of the reasons I love microwave fudge recipes like this is how well they store. That makes entertaining so much easier.
How to store in the fridge:
- Place the fudge squares in an airtight container, layering with parchment or wax paper between layers.
- Store in the refrigerator for up to 2 weeks.
- Let the pieces sit at room temperature for about 10–15 minutes before serving so the texture softens slightly.
Can you freeze cotton candy fudge?
Yes, you can absolutely freeze this cotton candy dessert.
- Arrange the fudge in a single layer on a parchment-lined baking sheet and freeze until solid.
- Transfer the frozen pieces to a freezer-safe bag or container, with parchment between layers.
- Label and freeze for up to 2–3 months.
Thawing instructions:
- For best texture, thaw the fudge in the refrigerator overnight.
- Then bring to room temperature for 10–15 minutes before serving.
- Avoid thawing at room temperature straight from the freezer; condensation can form and make the top a bit sticky.
Make-ahead advice:
- For a birthday party or carnival themed dessert table, you can make this cotton candy fudge recipe 3–4 days ahead and store it in the fridge.
- If prepping more than a week ahead for holiday tins or big events, freeze the fudge and thaw the day before you plan to serve or package it.
Notes From My Kitchen
After testing this recipe a handful of times (my neighbors were very happy), here are a few personal tips:
- Don’t rush the chill time. I know, it’s hard to wait when the kitchen smells like warm candy, but cutting too early gives you smeared edges and soft centers. Let it get fully cold.
- A metal pan chills more evenly. Glass can work, but I find an 8×8 metal baking pan sets the fudge a bit faster and more evenly.
- Go light on the food coloring. It’s easy to get carried away, but cotton candy fudge looks prettiest when it’s soft and pastel, not neon. Start with a drop or two and build up very slowly.
- Flavor oils are strong. Cotton candy flavor oils can be more intense than extracts. Start with less, stir, taste, then adjust. It’s easier to make it sweeter than to tone it down.
- Cut with a hot knife for perfect edges. Run your knife under hot water, dry it, then slice. Wipe and repeat. It sounds fussy, but it makes those pastel fudge squares look bakery-worthy.
- Use this as a base recipe. The ratio of white chocolate to sweetened condensed milk here makes a very reliable easy fudge recipe. Swap the cotton candy flavoring for other extracts (peppermint, orange, almond) and you’ve got a whole new fudge.
And one more thing: if you’re serving this at a party with little ones, keep the pieces on the smaller side. Kids’ eyes are always bigger than their stomachs with sweets like this.
Cotton Candy Fudge Recipe FAQs
1. Can I make this cotton candy fudge recipe without a microwave?
Yes. Melt the white chocolate, sweetened condensed milk, and butter in a heavy saucepan over very low heat, stirring constantly until smooth, then proceed with the recipe.
2. My fudge turned grainy—what happened?
Usually this means the chocolate overheated. Next time, use 50% power in the microwave, stir more often, and stop when a few small lumps remain so the residual heat can finish melting.
3. Can I use actual cotton candy in the fudge?
You can sprinkle a little on top right before serving, but cotton candy melts into a sticky mess when mixed into the warm fudge, so it’s better as a garnish only.
4. What if I can’t find cotton candy flavoring?
Use 1½ teaspoons vanilla extract plus ¼ teaspoon strawberry extract; it won’t be exact, but it gives a similar sweet, nostalgic flavor.
5. Is this cotton candy dessert too sweet for adults?
It is a sweet treat, but the salt and vanilla help balance it. Cut small pieces and serve alongside coffee or unsweetened tea—most grown-ups enjoy a bite or two.
6. How do I keep the pink and blue colors from mixing too much?
Work quickly when swirling and stop after a few gentle passes with a knife. Over-swirling blends the colors and turns them muddy.
7. Can I double the recipe?
Yes. Use a 9×13-inch pan for a double batch. The chill time may be a bit longer, but the method stays the same.
8. Can I ship this fudge for the holidays or birthdays?
If the weather is cool, yes. Wrap the fudge tightly, pack in a lined tin or box, and ship quickly. Avoid hot, humid days, since the fudge can soften and the colors may smudge.
Wrapping Up: A Carnival Treat At Home
This cotton candy fudge recipe brings all the charm of the fair—those fluffy pink and blue memories—into a simple, creamy, no bake fudge you can whip up any time. It’s colorful, nostalgic, easy enough for beginners, and special enough for birthdays, baby showers, and every kids party dessert table you can dream up.
If you make this pastel fudge candy, I’d love to hear how it turned out for you—tell me in the comments if you served it as birthday party treats, a carnival themed dessert, or just a fun weekend sweet. And if you enjoy no bake fudge recipes, be sure to check out my other easy fudge and candy treats next time you’re planning a party platter or gift box.
Cotton Candy Fudge
Ingredients
- 3 cups white chocolate chips about 18 oz / 510 g; use good-quality chips that melt smoothly
- 14 oz can sweetened condensed milk about 396 g; do not substitute evaporated milk
- 2 tablespoons unsalted butter
- 1 teaspoon pure vanilla extract
- 1/2 teaspoon fine sea salt
- 1 to 1 1/2 teaspoons cotton candy flavoring or extract start with 1 teaspoon and add more to taste
- pink gel food coloring 1–2 drops, for a light pastel pink
- blue gel food coloring 1–2 drops, for a soft cotton candy blue
- 2 tablespoons pastel sprinkles or nonpareils up to 3 tablespoons; optional topping
- loose cotton candy optional, for garnish just before serving
Instructions
- Line an 8×8-inch (20×20 cm) baking pan with parchment paper, leaving overhang on two sides to form handles. Lightly spray the parchment with nonstick spray if needed to prevent sticking.
- Measure out the cotton candy flavoring and have the pink and blue gel food colorings and pastel sprinkles ready near your workspace so you can work quickly once the fudge base is warm.
- In a large microwave-safe bowl, combine the white chocolate chips, sweetened condensed milk, and butter. Microwave on 50% power for 60 seconds, then stir well. Continue microwaving in 20–30 second bursts at 50% power, stirring after each, until the chocolate is mostly melted with just a few small lumps remaining.3 cups white chocolate chips, 14 oz can sweetened condensed milk, 2 tablespoons unsalted butter
- Remove the bowl from the microwave and stir until the mixture is completely smooth, thick, and glossy. If small chunks of chocolate remain, microwave once more for 10–15 seconds at 50% power and stir again.
- Stir in the vanilla extract and fine sea salt. Add 1 teaspoon of cotton candy flavoring, mix well, and taste a tiny bit carefully (it will be warm). If desired, add up to an additional 1/2 teaspoon to intensify the flavor, keeping in mind it will mellow slightly as the fudge chills.1 teaspoon pure vanilla extract, 1/2 teaspoon fine sea salt, 1 to 1 1/2 teaspoons cotton candy flavoring or extract
- Quickly divide the warm fudge mixture evenly between two bowls. You will tint one portion pink and the other blue to create the swirl.
- Add 1–2 drops of pink gel food coloring to one bowl and stir until the color is fully blended and pastel. Add an extra small drop if needed, but keep the color soft rather than neon.pink gel food coloring
- Add 1–2 drops of blue gel food coloring to the second bowl and stir until evenly colored, aiming for a light cotton candy blue shade.blue gel food coloring
- Working fairly quickly before the fudge thickens, spoon alternating dollops of pink and blue fudge into the prepared pan, creating a patchwork or checkerboard pattern. Use a small offset spatula or the back of a spoon to gently nudge the dollops together and level the surface.
- With a butter knife or skewer, gently drag through the fudge in wavy lines in one direction, then in the perpendicular direction to lightly swirl the colors. Make only a few passes so the pink and blue remain distinct and do not blend into a single color.
- While the fudge is still soft, sprinkle the top evenly with pastel sprinkles or nonpareils if using. Press the sprinkles very lightly with clean hands or the back of a spoon so they adhere.2 tablespoons pastel sprinkles or nonpareils
- Cover the pan loosely with plastic wrap or foil and refrigerate for at least 2 hours, or 3–4 hours or overnight for the firmest texture and cleanest cuts, until the fudge is completely set.
- Use the parchment handles to lift the chilled fudge from the pan onto a cutting board. With a sharp knife (wiping it with a warm, damp cloth between cuts), slice into about 36 small 1-inch squares or 25 larger squares.
- If desired, top each square with a tiny tuft of loose cotton candy just before serving. Do not add cotton candy in advance, as it will melt on contact with moisture.loose cotton candy
Notes
- Confetti Carnival Fudge: Stir 1/4 cup pastel jimmies into the fudge before spreading in the pan.
- Birthday Party Fudge: Add 1/2 teaspoon butter flavor with the vanilla and use rainbow sprinkles on top.
- Gender Reveal Fudge: Keep the top layer white and hide the pink and blue swirls inside.
- Unicorn Fudge: Add a third pastel color (like lavender) and top with themed sprinkles.
- Cotton Candy Crunch: Fold in 1/2 cup crushed vanilla sandwich cookies or waffle cones. Storage: Store fudge squares in an airtight container in the refrigerator for up to 2 weeks, with parchment or wax paper between layers. Let sit at room temperature 10–15 minutes before serving. Freezing: Freeze pieces in a single layer on a parchment-lined sheet until solid, then transfer to a freezer-safe container with parchment between layers. Freeze up to 2–3 months. Thaw in the refrigerator overnight, then let sit at room temperature for 10–15 minutes before serving. Tips: Do not rush the chill time. Use a metal 8×8 pan for more even chilling. Go light on food coloring for the prettiest pastels. Cotton candy flavor oils are strong—start with less and adjust. For perfect edges, cut with a hot knife, wiping between cuts.