Would you like to save this?
Ever since I was a little kid, I’ve been head-over-heels for any cookie that feels like a hug in dessert form. I still remember the first time I pressed my thumb into buttery dough, creating that perfect little well, then filling it with glossy melted chocolate—like a tiny chocolate lake nestled in a sugar shore. My heart may or may not have skipped a beat. (Don’t judge me.)
Fast-forward a few decades, and I’m still just as obsessed. These Chocolate Thumbprint Cookies are hands-down one of my favorite comfort-baking adventures. They’ve got that classic soft-and-chewy cookie exterior, kissed with unsweetened cocoa for a deep chocolate vibe, and then—boom—you get that luscious ganache center that practically demands a second (or third) helping. I swear they vanish faster than you can say “cookie exchange.”

Why You’ll Love This
- Ready in under an hour (yes, really!)—perfect for last-minute baking cravings.
- Soft, chewy, melt-in-your-mouth texture that even chocolate purists adore.
- Kid-friendly steps—little helpers will feel like pros making those thumbprints.
- Pantry staples you probably already have—no special shopping trip needed.
- Make-ahead dough can chill or freeze so you’ve always got a sweet fix on hand.
- Gluten-free swap is a breeze with a 1:1 baking flour blend.
- Double-chocolate style with a decadent chip-studded ganache center.
Ingredient Notes
- Butter: 1 cup (2 sticks) unsalted, at room temp but not melting—too soft and cookies spread like pancake batter. I’m a Kerrygold fan for that silky creaminess.
- Sugars: ½ cup granulated + ½ cup light brown sugar, packed—balances sweetness and chew.
- Egg & Vanilla: 1 large egg (room temp) + 1 teaspoon pure vanilla extract for warmth and aroma.
- Flour: 2 cups all-purpose (or swap ½ cup for whole-wheat pastry flour to sneak in some fiber without losing tenderness).
- Cocoa Powder: ½ cup unsweetened (I love Ghirardelli)—sift it first to avoid lumps.
- Salt: ½ teaspoon fine sea salt in the dough + an optional pinch of flaky sea salt atop the ganache for that irresistible sweet-salty contrast.
- Rolling Sugar: 2 tablespoons granulated—gives the edges a tiny sparkly crunch.
- Ganache Filling: 8 ounces semi-sweet chocolate chips (60–70% cacao) + ½ cup heavy cream (or full-fat coconut cream for dairy-free friends).
Quick Tip: If your dough feels a little crumbly when you’re pressing thumbprints, stir in 1–2 teaspoons of milk. That extra touch of moisture brings it right together.
Step-by-Step Directions
- Warm up the stage: Preheat your oven to 350°F (175°C) and line two baking sheets with parchment paper or silicone mats—trust me, this makes cookie removal painless.
- Cream the good stuff: In a large bowl, beat the butter, granulated sugar, and brown sugar with a handheld mixer on medium speed for about 2–3 minutes. You want it light, fluffy, and leaving little ribbon trails—kinda like soft-serve ice cream but without the brain freeze.
- Egg & vanilla magic: Crack in your egg, drizzle in the vanilla, and give it a quick swirl until you can’t see any streaks of egg white. Don’t overbeat or these guys might puff up then deflate—nobody wants sad, deflated cookies.
- Dry ingredients unite: In a separate bowl, whisk together the flour, cocoa powder, and salt. Slowly fold this mix into the butter–sugar combo with a spatula until no streaks remain. The dough will feel a bit soft but sturdy enough to roll—perfection!
- Chill time: Cover the bowl with plastic wrap and pop it in the fridge for 20–30 minutes. This keeps the dough from running all over your baking sheet. (Pro tip: chilling also deepens the flavor—bonus!)
- Roll & sugar-coat: Scoop dough out with a 1-inch cookie scoop or a heaping tablespoon, then roll each ball between your palms. Toss them in the extra granulated sugar so they’ve got that sweet, slightly crunchy coating.
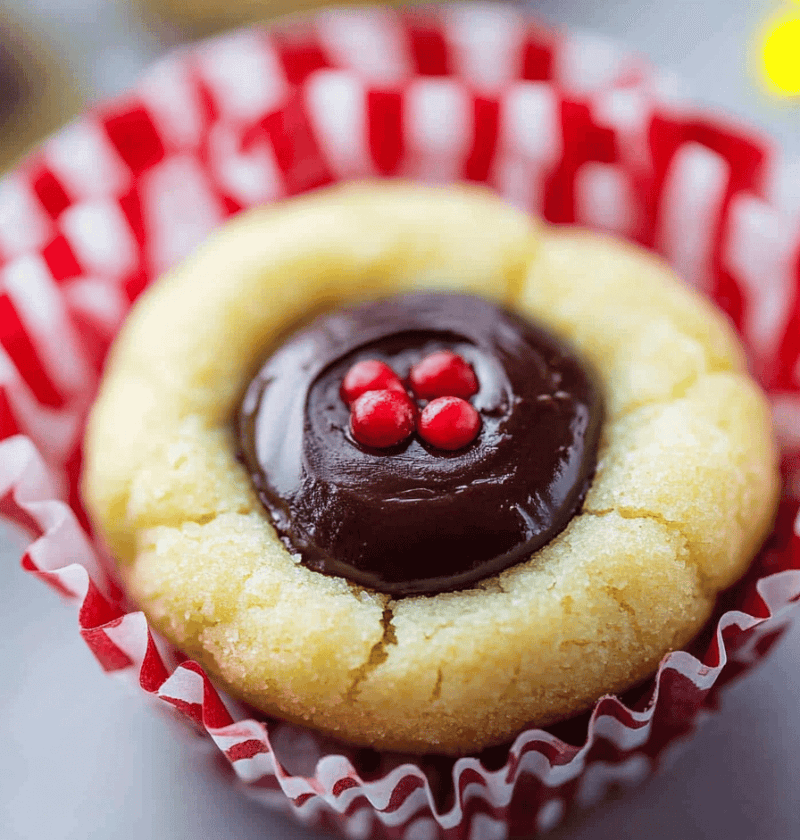
- Thumbprint action: Place balls 2 inches apart on your prepared sheets. Now the fun part—gently press your thumb (or the handle end of a wooden spoon) into the center of each ball, making a ¼-inch deep well. Not too hard—you want dough around the edges to cradle that gooey ganache later!
- Bake to perfection: Slide cookies into the oven for 10–12 minutes. You’re looking for set edges and centers that still look a tad soft—they’ll firm right up as they cool.
- Make that ganache: While cookies bake, heat your cream in a small saucepan over medium heat until it just simmers around the edges. Pour it over the chocolate chips in a heatproof bowl. Let sit 2 minutes, then stir until silky smooth. If you’re feeling fancy, whisk in a pinch of flaky sea salt. Let the ganache cool until it’s thick but still pourable (about 5–10 minutes).
- Fill ’em up: Once cookies have rested 5 minutes on the pan, transfer them to a wire rack. Use a teaspoon or small piping bag to spoon ganache into each thumbprint well. For extra flair, press a couple of mini chocolate chips into the top or sprinkle a few flakes of sea salt. Let everything cool completely—roughly 30 more minutes—so that ganache sets into a dreamy, fudge-like center.
Optional Variations & Flavor Twists
- Raspberry Jam Swap: Ditch the ganache and fill wells with seedless raspberry jam for a sweet-tart surprise.
- Salted Caramel: Drizzle homemade or store-bought caramel sauce into each indent—sprinkle with sea salt for bliss.
- Peppermint Crunch: Stir in ½ teaspoon peppermint extract to your ganache, then dust tops with crushed candy canes.
- Nutty Delight: Fold chopped toasted pecans or hazelnuts into the dough for a little extra crunch in every bite.
- Orange-Zest Infusion: Add 1 tablespoon fresh orange zest to the dough for a bright citrusy note that pairs beautifully with dark chocolate.
- Go Gluten-Free: Swap in a 1:1 gluten-free baking flour blend—no other tweaks needed for chewy, chocolatey perfection.
Storage & Reheating Tips
Once cooled, store these babies in an airtight container at room temperature for up to 5 days. Want them extra soft? Tuck a slice of bread in the container—the cookies will steal its moisture (in the best way possible).
If you’d rather freeze for later, lay cooled, unfilled cookie shells on a baking sheet in a single layer. Flash-freeze until firm, then transfer to a resealable freezer bag for up to 3 months. When you’re ready to indulge, thaw at room temp, whip up some ganache, fill ’em, and let set as usual.
Reviving day-old cookies is easy: pop one in the microwave for 5–8 seconds—voilà, a soft, warm center that tastes fresh-baked.
Final Thoughts
There you have it—my go-to, can’t-stop-eating Chocolate Thumbprint Cookies that feel like a cozy hug every time you bite into them. They’re perfect for holiday cookie swaps, gifting to neighbors (you know they’ll love ’em!), or just whenever you need a quick comfort fix. I’d love to hear how yours turn out—drop me a comment below, share your favorite variation, or ask any questions. Happy baking, friends!
Chocolate Thumbprint Cookies
Ingredients
- 1 cup (2 sticks) unsalted butter room temperature I love Kerrygold for creaminess
- ½ cup light brown sugar packed
- 1 large egg room temp
- 2 cups all-purpose flour (or 1½ cups AP + ½ cup whole-wheat pastry flour)
- ½ cup unsweetened cocoa powder Ghirardelli recommended
- 2 tablespoons granulated sugar for rolling
- 8 ounces semi-sweet chocolate chips (60–70% cacao)
- ½ cup heavy cream (or full-fat coconut cream for dairy-free)
- Pinch flaky sea salt (optional)
- Butter Soft but not melty—too warm and dough spreads too much.
- Flour Measure by spooning into the cup and leveling with a knife to avoid dense cookies.
- Cocoa powder Sift first to keep dough smooth and lump-free.
- Chocolate chips Stir in mini chips after baking for a “just-melted” look.
Instructions
- Preheat your oven to 350°F (175°C). Line two baking sheets with parchment paper or silicone mats—this keeps cookies soft on the bottom and easy to lift.
- In a large bowl, beat the butter, granulated sugar, and brown sugar with a hand mixer on medium speed for 2–3 minutes, until light and fluffy. You’ll know it’s ready when the mixture leaves ribbon-like trails.
- Crack in the egg, add vanilla, and mix until just combined—avoid overbeating or the cookies can puff up then deflate.
- In a separate bowl, whisk together flour, cocoa powder, and salt. Slowly add the dry mix to the wet, stirring with a spatula until no streaks remain. The dough will feel soft but slightly firm.
- Cover the bowl and chill in the fridge for 20–30 minutes. Chilled dough keeps its shape better and prevents the cookies from spreading too thin.
- Using a 1-inch cookie scoop or tablespoon, portion dough into balls. Roll each in the extra granulated sugar, then set 2 inches apart on the prepared sheets.
- Press your thumb (or the end of a wooden spoon handle) gently into the center of each dough ball to form a well about ¼-inch deep. Don’t press too hard—leave a bit of dough around the edges.
- Bake for 10–12 minutes. The edges should look set but centers still a bit soft—cookies firm up as they cool. Let them rest 5 minutes on the pan.
- While cookies bake, heat cream in a small saucepan over medium heat until simmering. Pour over chocolate chips in a heatproof bowl. Let sit 2 minutes, then stir until silky. Allow ganache to cool until slightly thickened but still pourable.
- Use a tsp or small piping bag to fill each thumbprint with ganache. For extra flair, sprinkle a pinch of flaky sea salt or press a few mini chocolate chips on top. Let cookies cool completely so centers firm up, about 30 minutes.