Would you like to save this?
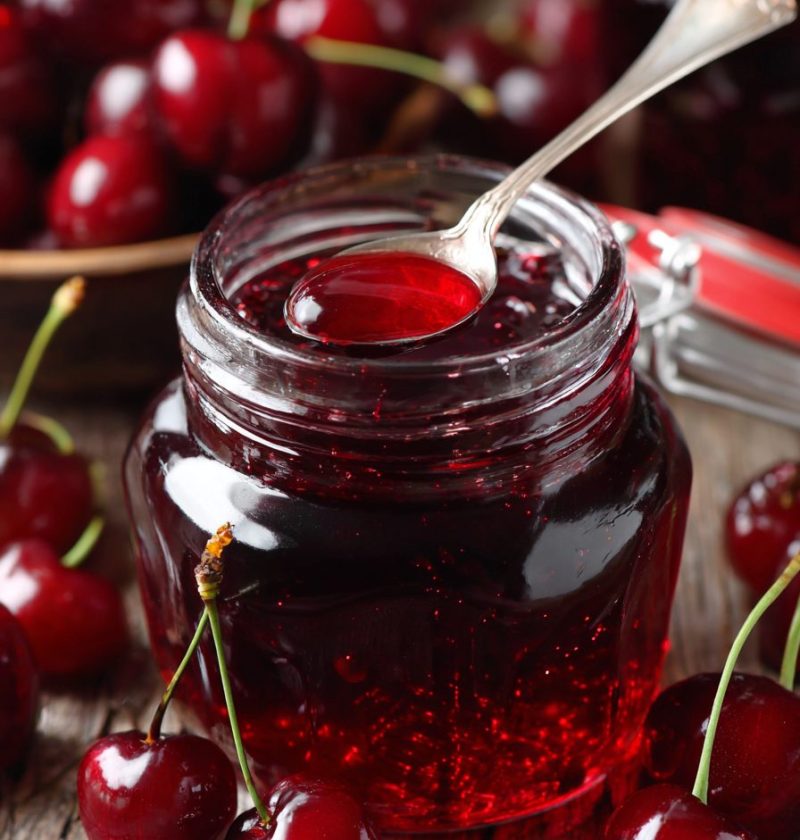
Cherry Jelly Recipe
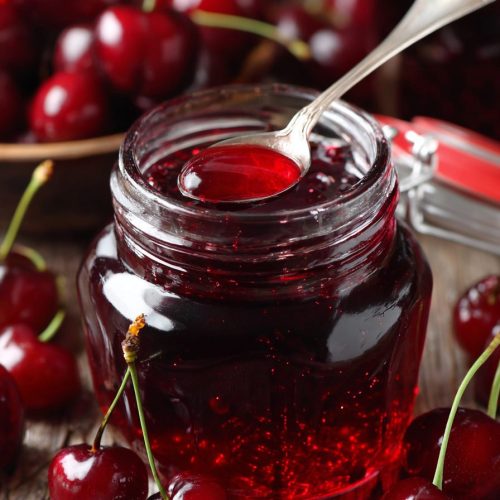
A sparkling jar of ruby-red cherry jelly feels like summer sunshine on your toast—this Cherry Jelly Recipe is bright, sweet-tart, and perfect for canning, gifting, or spooning straight from the jar.
Meet My Favorite Cherry Jelly Recipe
If you’ve been looking for a reliable, easy Cherry Jelly Recipe that tastes like fresh cherries and doesn’t feel fussy, you’re in the right kitchen. This is a classic, old-fashioned-style homemade cherry jelly that uses real fruit, simple ingredients, and straightforward steps. It’s the kind of fruit jelly recipe your grandma might’ve made, but with a few modern tips to make things less stressful and a whole lot more predictable.
I like to make a big batch of this cherry jelly spread in late spring or early summer when cherries are everywhere—on sale at the grocery store, piled high at the farmer’s market, and honestly, too pretty to walk past. You can use sweet cherries, tart cherries, or a mix. Sweet cherries give you a dessert-like, rich flavor, while tart cherries bring that mouthwatering tang. Both make an incredible traditional cherry jelly that’s gorgeous on toast, biscuits, yogurt, or swirled into desserts.
And because I just turned 50 and my joints like to “talk” more than they used to, I’ve added some notes on using tart cherries if you’re also curious about their potential benefits. Think of this as a recipe that’s part comfort food, part smart pantry planning, and a little bit of self-care in a jar.
Whether you’re new to canning or you’ve been making cherry preserves recipes since before Pinterest existed, this cherry jelly from scratch gives you a clean set of directions, can be canned for the pantry, and includes a version of cherry jelly without pectin if you’re more old-school.

Why You’ll Love This Cherry Jelly
- Simple ingredients – Just cherries, sugar, lemon juice, and pectin (or not, if you go the no-pectin route).
- Perfect for beginners – Clear, step-by-step directions on cooking and cherry jelly canning with safety in mind.
- Customizable flavor – Make sweet cherry jelly, tart cherry jelly, or a half-and-half blend.
- Great for gift-giving – Homemade cherry jelly looks so fancy in small jars, but it’s budget-friendly.
- Freezer- or pantry-friendly – Can it, or skip canning and keep it as a simple cherry jelly for toast in the fridge or freezer.
- Flexible thickness – I’ll show you how to adjust the set for softer cherry jam and jelly style or a firmer jelly slice.
- Make-ahead friendly – A batch on the weekend keeps breakfasts interesting for weeks (or months, if canned).
- Kid-approved flavor – It’s bright, fruity, and not bitter—great for PB&J, thumbprint cookies, or jelly bars.
Ingredients for Fresh Cherry Jelly
This makes a classic, pectin-set batch of easy cherry jelly. I’ll give a no-pectin variation right after.
For the Pectin Version
- 4 cups cherry juice
- From about 3 pounds fresh cherries (sweet, tart, or a mix), pitted
- You can also use unsweetened bottled cherry juice (look for 100% juice, no added sugar).
- 4 cups granulated sugar
- Classic ratio for a good set and bright flavor.
- 2 tablespoons bottled lemon juice
- Adds acidity for safety and helps the jelly set nicely.
- 1 (1.75 oz) box powdered fruit pectin
- Look for classic pectin like Sure-Jell (yellow box) or Ball Classic Pectin.
Ingredient Tips
-
Cherries:
If you’re using fresh cherry jelly style with whole fruit, start by tasting one. If your cherries are very sweet, the jelly will be lush and dessert-like. If they’re tart, the jelly will be perky and tangy. I often use half sweet, half tart for balance. -
Sugar:
Regular white sugar gives you the clearest, jewel-like jelly. Brown sugar or honey will cloud the jelly and change the set, so if you experiment, do it in small batches. -
Lemon juice:
Use bottled here, not fresh. The acidity level of bottled lemon juice is standardized, which matters for safe canning and consistent gelling. -
Pectin:
Different brands have slightly different instructions. If your box has specific directions for “cherry jelly,” you can cross-check, but the recipe below is tested for a classic powdered pectin.
No-Pectin Cherry Jelly (Old-Fashioned Variation)
If you prefer cherry jelly without pectin, cherries do have some natural pectin—especially tart cherries—but you’ll need more cooking time and a bit more fruit.
- 5 cups cherry juice (from about 4 pounds cherries)
- 4–5 cups granulated sugar (start with 4; add more to taste if needed)
- 3 tablespoons bottled lemon juice
You’ll cook this longer and test for gel with the spoon or plate test (explained in the Directions section).
Step-by-Step Directions
We’ll start with how to make the cherry juice, then we’ll move into cooking and, if you’d like, cherry jelly canning.
1. Prep the Cherries
-
Wash and stem the cherries.
Rinse them well in cool water and remove stems. Swish them around to loosen any dirt. -
Pit the cherries.
Use a cherry pitter if you have one—it’s a small tool but worth its drawer space—or carefully cut around the pit with a paring knife. Yes, it’s a little meditative; I like to do this with a podcast on. -
Check for bruised fruit.
Slightly soft cherries are fine, but skip any that are moldy or very shriveled.
2. Make the Cherry Juice
-
Cook the cherries with water.
Add the pitted cherries to a large, heavy-bottomed pot. Add just enough water to barely cover the fruit—usually about 1 to 1½ cups for 3 pounds. -
Simmer until soft.
Bring to a gentle boil, then lower to a simmer for about 15–20 minutes, stirring occasionally. The cherries should be very soft and releasing lots of juice. -
Mash lightly.
Use a potato masher or the back of a spoon to crush the cherries a bit. This helps release more juice and flavor. -
Strain the juice.
Pour the mixture through a fine-mesh strainer lined with cheesecloth, a jelly bag, or a clean flour sack towel into a large bowl or measuring pitcher.- For the clearest traditional cherry jelly, don’t press or squeeze; just let it drip for 2–3 hours (or overnight in the fridge).
- If you don’t mind a slightly cloudier jelly and want a little more yield, you can gently press the solids.
-
Measure your juice.
You want 4 cups for the pectin version or 5 cups for the no-pectin version. If you’re a little short, top it up with unsweetened cherry juice or water.
3. Prepare Jars and Canning Gear (If Canning)
-
Wash jars, lids, and bands.
Clean everything in hot, soapy water and rinse well. Use half-pint or pint jars for jelly. -
Keep jars hot.
Place jars in a canner or large pot of simmering water while you make the jelly. This helps prevent cracking when you add the hot jelly. -
Set up your station.
Have a ladle, jar funnel, clean cloth, and jar lifter ready. It feels a bit like setting up a tiny assembly line, but it makes things so much smoother later.
4. Cook the Pectin Cherry Jelly
-
Combine juice and pectin.
In a large pot, whisk together the 4 cups cherry juice and the powdered pectin. Stir well to dissolve any lumps. -
Bring to a rolling boil.
Over high heat, bring the mixture to a full rolling boil—one that doesn’t stop bubbling when you stir. -
Add sugar and lemon juice.
Stir in the 4 cups sugar and 2 tablespoons bottled lemon juice all at once. Stir constantly until the sugar is fully dissolved. -
Boil hard.
Return the mixture to a full rolling boil and boil hard for 1 minute, stirring the whole time.- This is the part where you don’t walk away—jelly can foam up quickly.
-
Check for set.
Remove the pot from the heat. Skim off any foam with a spoon if you’d like a clearer jelly.- Spoon a little jelly onto a chilled plate. After a minute, push it gently with your finger. If it wrinkles slightly and doesn’t run like syrup, you’re good.
- If it’s too thin, return to heat and boil another 30–60 seconds, then test again.
5. Cook the No-Pectin Version
For cherry jelly without pectin, the basic method is similar but longer:
-
Combine juice, sugar, and lemon juice.
Add 5 cups juice, 4–5 cups sugar, and 3 tablespoons lemon juice to a large pot and stir to dissolve. -
Bring to a boil and simmer.
Bring to a boil, then lower heat slightly and cook at a steady boil, stirring often, for 25–40 minutes, or until the mixture thickens and darkens a bit. -
Test for gel.
Use the chilled plate test or watch for “sheeting” off the spoon—that moment when the jelly drips off the spoon more slowly and forms a sheet instead of quick drips.
6. Fill and Process the Jars
-
Fill jars.
Working quickly, ladle hot jelly into hot jars, leaving ¼-inch headspace at the top. -
Remove air bubbles.
Gently run a clean butter knife or spatula around the inside edges to release bubbles. -
Wipe rims and add lids.
Wipe jar rims with a clean, damp cloth. Place lids on top and screw on bands until fingertip-tight. -
Process in a water-bath canner.
Place jars in the canner, making sure they’re covered by at least 1–2 inches of water. Bring to a gentle boil and process for 10 minutes (adjust for altitude if needed). -
Cool and check seals.
Carefully lift jars out and place on a towel. Let them sit, undisturbed, for 12–24 hours. Check for seals—the lids should be concave and not flex when pressed.
Servings & Timing
- Yield: About 6–7 half-pint (8 oz) jars of cherry jelly
- Prep Time: 25–30 minutes (pitting cherries, prepping jars)
- Cook Time: 30–40 minutes (including juice making and jelly cooking)
- Total Time: About 1½–2 hours, plus cooling and setting time
If you already have cherry juice (bottled or leftover from another recipe), you’ll shave off a good 20–30 minutes.
Fun Variations to Try
- Cherry Vanilla Jelly – Add 1 split vanilla bean while the juice heats, then remove before adding sugar and pectin.
- Cherry Lime Jelly – Swap half the lemon juice for lime juice and add 1 teaspoon finely grated lime zest.
- Spiced Cherry Jelly – Add a cinnamon stick and 2–3 whole cloves while simmering the juice, then strain well.
- Low-Sugar Cherry Jelly – Use a low- or no-sugar pectin and follow the package’s sugar guidelines, keeping the same juice amount.
- Cherry Jam-style Spread – Stir in ½–1 cup very finely chopped cherries at the end for a cross between cherry jam and jelly.
- Adult Dessert Cherry Jelly – Add 2–3 tablespoons kirsch or cherry liqueur after removing from heat (don’t can this version; refrigerate or freeze).
Storage & Reheating (Or, Really, Just Thawing)
-
Room Temperature (Canned):
Properly processed and sealed jars keep in a cool, dark pantry for 12–18 months. The color may fade a bit over time, but it’s still fine. -
Refrigerator:
Once opened, keep jars in the fridge and use within 3–4 weeks. -
Freezer Version:
If you don’t want to can, ladle hot jelly into clean jars or freezer containers, leaving more headspace (about ½ inch), cool, then freeze for up to 6 months. Thaw overnight in the fridge. -
Reheating / Softening:
Jelly that’s too firm can be softened by gently warming the jar in a bowl of warm water and stirring. For baking, you can warm jelly in a small saucepan over low heat with 1–2 teaspoons water to make it glaze-friendly. -
Make-Ahead:
I like to make a batch before the holidays and stash it away; having cherry jelly dessert ready for thumbprint cookies and cheesecake toppings is a gift to my future self.
Notes From My Kitchen to Yours
-
Foam control:
If you get a lot of foam on top while boiling, you can add a small pat (½ teaspoon) of butter at the beginning of cooking. It helps limit foaming—old canning trick. -
Color and flavor:
Tart cherries give a brighter, more vivid red. Sweet cherries can lean deeper, almost garnet. If color matters for gifting, you can mix varieties. -
Set too soft?
Honestly, a softer set is lovely on pancakes, yogurt, or as a cherry jelly dessert sauce. But if you really want it firmer, you can reprocess:- Reheat the jelly with a little extra pectin and boil again, then re-jar and process.
-
Set too firm?
I’ve had batches where the jelly almost cuts like candy. You can gently heat a jar with a tablespoon or two of water and stir until it loosens, then use as a warm sauce. -
Flavor layering:
For a more complex taste, try combining cherry juice with a splash of apple or white grape juice (not too much, ½ cup or so) to support the cherry flavor without stealing the show. -
Gift idea:
Tie a small spoon or a handwritten label around each jar—people love knowing it’s homemade cherry jelly and seeing the date it was made.
FAQs About Cherry Jelly
1. Can I use frozen cherries for this cherry jelly recipe?
Yes. Thaw frozen cherries first, then use them just like fresh to make the juice; they often release juice even more easily.
2. Why didn’t my jelly set properly?
Usually it’s undercooking, not enough sugar, or the pectin was old. Let the jars sit 24–48 hours—many batches thicken more as they rest.
3. Can I cut down the sugar?
Not with regular pectin if you want a reliable set. For lower sugar cherry jelly spread, use a low- or no-sugar pectin designed for that.
4. Do I have to can the jelly?
No. You can pour the hot jelly into clean jars, cool, and refrigerate for up to 3–4 weeks, or freeze it for a few months.
5. Can I leave the cherry bits in and make it chunkier?
Yes, but then it’s closer to cherry jam and jelly hybrid. Stir in very finely chopped cherries after cooking and before filling jars.
6. How do I know if my jars are sealed safely?
Once cooled, the lid should be slightly indented and shouldn’t pop up when pressed. If it flexes, refrigerate that jar and use it first.
7. What’s the difference between cherry preserves, jam, and jelly?
Preserves use larger pieces of fruit, jam has mashed fruit, and jelly is made from strained juice—no pieces of fruit, just that beautiful clear shine.
8. Can I use this cherry jelly for baking?
Absolutely. It’s great in thumbprint cookies, jelly bars, cake fillings, or warmed and brushed on fruit tarts as a glaze.
Wrapping It Up (And Spreading It On Toast)
This Cherry Jelly Recipe gives you a bright, fruity, old-fashioned jelly that fits just as well on a weekday slice of toast as it does on a holiday cheese board. With options for homemade cherry jelly with or without pectin, you can make it your own—sweet, tart, or somewhere in between.
If you give this easy cherry jelly a try, I’d love to hear how it turned out for you—did you go sweet or tart, pantry or freezer? Leave a comment, share your tweaks, or snap a photo of your jars and tag it with your favorite jelly moment. And when you’re ready for more, try pairing this with a batch of homemade bread or another fruit jelly recipe from your collection for a breakfast that feels a little extra special.
Cherry Jelly Recipe
Ingredients
- 3 pounds fresh cherries sweet, tart, or a mix; washed, stemmed, and pitted (for pectin version; yields about 4 cups juice)
- 1-1 1/2 cups water just enough to barely cover cherries when cooking to make juice
- 4 cups cherry juice from cooked cherries above or 100% unsweetened bottled cherry juice (pectin version)
- 4 cups granulated sugar classic ratio for a good set and bright flavor
- 2 tablespoons bottled lemon juice for acidity and better set; use bottled for consistent acidity
- 1 box (1.75 oz) powdered fruit pectin classic powdered pectin such as Sure-Jell (yellow box) or Ball Classic Pectin
- 4 pounds fresh cherries for no-pectin version; washed, stemmed, and pitted (yields about 5 cups juice)
- 5 cups cherry juice from cooked cherries (no-pectin version)
- 4-5 cups granulated sugar start with 4 cups, add up to 1 cup more to taste (no-pectin version)
- 3 tablespoons bottled lemon juice no-pectin version
- 1/2 teaspoon unsalted butter optional; helps reduce foaming while boiling jelly
- Vanilla bean optional; 1 split bean for cherry vanilla jelly variation
- 1 teaspoon lime zest optional; plus swap half the lemon juice for lime juice for cherry lime variation
- 1 cinnamon stick optional; for spiced cherry jelly
- 2-3 whole cloves optional; for spiced cherry jelly
- 1/2-1 cup very finely chopped cherries optional; stirred in at the end for jam-style spread
- 2-3 tablespoons kirsch or cherry liqueur optional; for adult dessert cherry jelly (do not can this version)
Instructions
- Rinse cherries well in cool water, remove stems, and pit them using a cherry pitter or a small paring knife. Discard any moldy or badly shriveled cherries. Slightly soft fruit is fine.3 pounds fresh cherries, 4 pounds fresh cherries
- Add the pitted cherries to a large, heavy-bottomed pot. Pour in just enough water to barely cover the fruit (about 1–1 1/2 cups per 3 pounds). Bring to a gentle boil, then reduce to a simmer and cook for 15–20 minutes, stirring occasionally, until the cherries are very soft and releasing lots of juice.3 pounds fresh cherries, 1-1 1/2 cups water, 4 pounds fresh cherries
- Lightly mash the softened cherries with a potato masher or the back of a spoon to release more juice. Pour the mixture through a fine-mesh strainer lined with cheesecloth, a jelly bag, or a clean flour sack towel into a large bowl or measuring pitcher. For the clearest jelly, let it drip on its own for 2–3 hours or overnight in the fridge without squeezing. For a higher yield and slightly cloudier jelly, gently press the solids. Measure the strained juice: you need 4 cups for the pectin version or 5 cups for the no-pectin version. If short, top up with unsweetened cherry juice or water.4 cups cherry juice, 5 cups cherry juice
- Wash jars, lids, and bands in hot, soapy water and rinse well. Use half-pint or pint jars for jelly. Place the clean jars in a canner or large pot of simmering water to keep them hot while you cook the jelly. Set up a canning station with a jar funnel, ladle, clean damp cloth, and jar lifter.
- For the pectin version, pour 4 cups of cherry juice into a large pot. Whisk in the powdered fruit pectin until fully dissolved, breaking up any lumps. Over high heat, bring the mixture to a full rolling boil that doesn’t stop when stirred. If desired, add a 1/2 teaspoon pat of butter to help reduce foam. Stir in 4 cups granulated sugar and 2 tablespoons bottled lemon juice all at once. Stir constantly until the sugar is fully dissolved, then return to a full rolling boil. Boil hard for 1 minute, stirring the entire time so it doesn’t scorch or boil over.4 cups cherry juice, 4 cups granulated sugar, 2 tablespoons bottled lemon juice, 1 box (1.75 oz) powdered fruit pectin, 1/2 teaspoon unsalted butter
- Remove the pot from the heat and skim off any foam from the surface if you prefer a clearer jelly. To test the set, spoon a little hot jelly onto a chilled plate and let it sit for about a minute. Gently push the edge with your fingertip; if it wrinkles slightly and doesn’t run like syrup, the jelly has reached a good gel. If it is still too thin, return the pot to the heat and boil for another 30–60 seconds, then test again.
- For the no-pectin version, add 5 cups cherry juice, 4–5 cups granulated sugar, and 3 tablespoons bottled lemon juice to a large pot. Stir to dissolve the sugar. Bring to a boil over medium-high heat, then lower the heat slightly and maintain a steady boil, stirring often, for 25–40 minutes, until the mixture thickens slightly and darkens a bit. Use the chilled plate test to check for gel or watch for the jelly to begin sheeting off the spoon: it should drip more slowly and form a sheet instead of quick, separate drops.5 cups cherry juice, 4-5 cups granulated sugar, 3 tablespoons bottled lemon juice
- For cherry vanilla jelly, add a split vanilla bean to the cherry juice while heating, then remove it before adding sugar and pectin. For cherry lime jelly, replace half of the bottled lemon juice with lime juice and add 1 teaspoon finely grated lime zest. For spiced cherry jelly, add a cinnamon stick and 2–3 whole cloves while simmering the juice, then strain well before measuring and proceeding. For a jam-style spread, stir in 1/2–1 cup very finely chopped cherries at the end of cooking, just before filling the jars. For an adult dessert version, stir in 2–3 tablespoons kirsch or cherry liqueur after removing the jelly from heat; do not can this version—refrigerate or freeze instead.Vanilla bean, 1 teaspoon lime zest, 1 cinnamon stick, 2-3 whole cloves, 1/2-1 cup very finely chopped cherries, 2-3 tablespoons kirsch or cherry liqueur
- Working quickly while the jelly is hot and the jars are hot, remove a jar from the simmering water and drain it. Ladle hot jelly into the jar using a funnel, leaving 1/4-inch headspace at the top. Run a clean butter knife or nonmetallic spatula around the inside edge of the jar to release air bubbles. Wipe the rim with a clean, damp cloth to remove any spills. Place a lid on the jar and screw on the band until fingertip-tight. Repeat with remaining jars and jelly.
- Place the filled jars in a water-bath canner or large pot with a rack, ensuring the jars are covered by at least 1–2 inches of water. Bring to a gentle, steady boil and process for 10 minutes (adjust processing time if needed for your altitude per standard canning guidelines). When the time is up, turn off the heat, remove the lid, and let the jars rest in the hot water for about 5 minutes.
- Use a jar lifter to carefully transfer the jars to a towel-lined counter, keeping them upright. Let them cool undisturbed for 12–24 hours. Once cooled, check the seals: the lids should be slightly concave and should not flex up and down when pressed in the center. Any unsealed jars should be refrigerated and used first within 3–4 weeks.
- Label sealed jars with the contents and date. Store in a cool, dark pantry for 12–18 months. Once opened, refrigerate and use within 3–4 weeks. For a freezer version (no canning), ladle hot jelly into clean jars or freezer containers, leaving about 1/2 inch headspace, cool completely, then freeze for up to 6 months. Thaw overnight in the refrigerator before using. Serve on toast, biscuits, yogurt, PB&J sandwiches, desserts, cheese boards, or use warmed as a glaze for baked goods.