Would you like to save this?
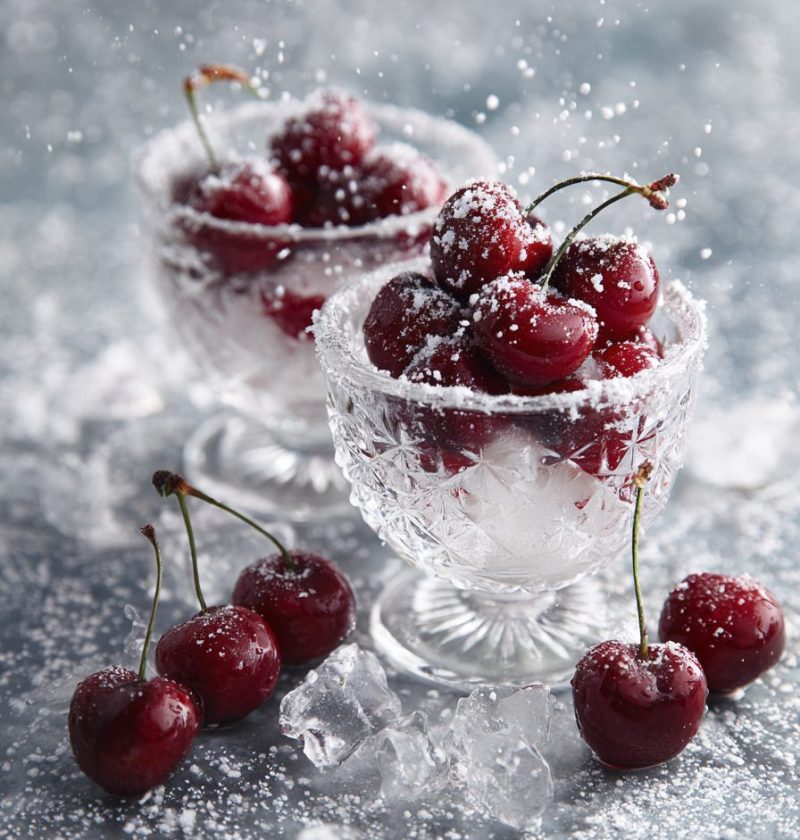
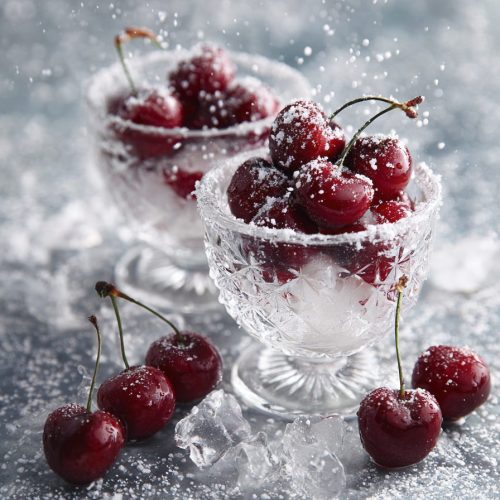
Cherries In The Snow Recipe
If you love creamy, no-bake desserts that look like they took all afternoon—but really took 20 minutes—this Cherries In The Snow Recipe is about to be your new favorite treat.
What Is Cherries In The Snow (And Why We Love It So Much)?
Cherries In The Snow is a classic layered cherry dessert: a crumbly graham cracker crust on the bottom, a fluffy cream cheese and whipped topping layer in the middle, and glossy cherry pie filling on top. It’s cold, creamy, and just sweet enough, with those bright cherries shining like little jewels against the “snowy” white cream.
Around my house, this is the “please bring that cherry thing” dessert. I’ve made it for Christmas Eve, Fourth of July cookouts (that red and white is so festive), church potlucks, and more birthdays than I can count. It’s the kind of cherry cream cheese dessert that feels nostalgic—even if you’ve never had it before.
This version leans on simple pantry ingredients: graham crackers, butter, cream cheese, powdered sugar, vanilla, whipped topping, and canned cherry pie filling. No oven, no water bath, no fussy steps. Just straightforward comfort.
And yes, we’re keeping it easy, but we’re also paying attention to balance. The filling isn’t cloyingly sweet, the crust has a bit of salt, and you can absolutely lighten things up with a few smart swaps (I’ll share those down below).
If you were searching specifically for a Cherries In The Snow Recipe, a no bake cherry dessert, or a cherry dessert with cool whip and graham crackers—welcome, you’re in the right kitchen.
Why You’ll Love This Cherries In The Snow Recipe
Here’s the thing: this isn’t just pretty; it’s practical.
- No oven needed—perfect for hot summer days or crowded holiday kitchens.
- Quick to assemble—about 20 minutes of hands-on time.
- Uses simple pantry and grocery store ingredients—nothing fancy or hard to find.
- Crowd-pleasing flavor—classic cherry and cream cheese layers that everyone recognizes.
- Flexible—easy to halve, double, or build in individual cups or jars.
- Great make-ahead dessert—the flavors actually improve after chilling.
- Kid- and teen-approved—sweet, creamy, and not “weird” or experimental.
- Works across seasons—cozy at Christmas, refreshing at spring brunch, bright at summer cookouts.
- Beautiful presentation with almost no effort—those red cherries over white cream look restaurant-worthy.
Ingredients For The Best Cherries In The Snow Dessert
You know what? One of my favorite things about this creamy cherry dessert recipe is that you can keep almost everything on hand. Let me walk you through what you’ll need and how to choose it.
For the graham cracker crust
- 2 cups graham cracker crumbs
- (About 14–16 full sheets; you can also use pre-crushed crumbs. Honey grahams work beautifully.)
- ½ cup (1 stick) unsalted butter, melted
- 3 tablespoons granulated sugar
- Pinch of fine sea salt
- (Salt makes the crust taste like, well, something—not just sweet dust.)
For the creamy “snow” layer
- 8 ounces cream cheese, softened to room temperature
- (Full-fat gives you the richest texture, but reduced-fat works in a pinch.)
- 1 cup powdered sugar, sifted
- (Sifting helps avoid lumps in that silky filling.)
- 1 teaspoon pure vanilla extract
- 1 teaspoon fresh lemon juice
- (Optional but recommended; it brightens the cream cheese and keeps the dessert from tasting flat.)
- 8 ounces whipped topping (like Cool Whip), thawed
- (You can substitute 3 cups of freshly whipped heavy cream, lightly sweetened, for a less processed touch.)
For the cherry topping
- 1 (21-ounce) can cherry pie filling
- (Look for “extra fruit” or “more fruit” versions for a better cherry-to-gel ratio.)
Ingredient tips & easy substitutions
- Graham crackers: You can swap in vanilla wafers, shortbread cookies, or even digestive biscuits for a fun twist on this graham cracker crust dessert.
- Butter: Salted butter is fine—just reduce or skip the added salt in the crust.
- Cream cheese: If you’re using cream cheese straight from the fridge, soften it in the microwave at 50% power in 10–15 second bursts, checking and turning often.
- Whipped topping vs. real cream: Whipped topping gives this classic “potluck” flavor. Fresh whipped cream gives you more of a bakery-style feel. Both work.
- Cherry pie filling: That’s traditional for a cherry pie filling dessert like this, but you can swap with blueberry or strawberry pie filling for a different flavor.
Step-By-Step Directions: Layered Cherry Dessert Made Simple

This Cherries In The Snow Recipe is basically three layers: crust, cream, cherries. Let’s build it.
-
Prepare your pan
Lightly grease a 9×13-inch baking dish with butter or nonstick spray.- Glass dishes work especially well because you can see the pretty layers and it chills evenly.
-
Make the graham cracker crumbs
Crush graham crackers in a food processor until fine, or place them in a sturdy zip-top bag and roll with a rolling pin.- Don’t stress over tiny uneven bits; a little texture is nice.
-
Mix the crust
In a medium bowl, combine graham cracker crumbs, granulated sugar, melted butter, and a pinch of salt. Stir until everything looks like damp sand and holds together when you squeeze a bit in your hand.- If it feels too dry and crumbly, drizzle in another tablespoon of melted butter.
-
Press the crust into the pan
Pour the crust mixture into your prepared pan. Press it firmly and evenly across the bottom using your fingertips or the bottom of a measuring cup.- Firm pressure is key here; it helps the crust slice neatly and not crumble everywhere.
-
Chill the crust briefly
Pop the pan into the fridge for about 10–15 minutes while you make the cream cheese layer.- This quick chill helps set the butter and keeps the layers nice and defined.
-
Beat the cream cheese
In a large mixing bowl, add the softened cream cheese. Beat with a hand mixer (or stand mixer with the paddle attachment) on medium speed until smooth and fluffy, 1–2 minutes.- Scrape down the sides once or twice; no one wants surprise cream cheese lumps.
-
Sweeten and flavor the cream layer
Add powdered sugar, vanilla extract, and lemon juice to the bowl. Beat again until smooth and well combined. The mixture should be creamy and a bit thick.- Taste here and adjust to your preference—add a little more powdered sugar if you like it sweeter.
-
Fold in the whipped topping
Gently fold in the whipped topping using a spatula. Don’t stir aggressively; you want to keep the mixture light and airy.- Fold until no streaks remain and the mixture looks like smooth, fluffy “snow.”
-
Spread the cream layer over the crust
Take your chilled crust out of the fridge. Dollop the cream mixture over the crust, then spread it into an even layer using an offset spatula or the back of a spoon.- Spread all the way to the edges so the cherry topping doesn’t sink down around the sides.
-
Add the cherry topping
Spoon the cherry pie filling gently over the cream layer. Spread it out carefully so you don’t drag the cream layer up into the cherries.- If you’re worried about mixing, dollop the filling in smaller piles and then connect them.
-
Chill until set
Cover the pan with plastic wrap or a lid and refrigerate for at least 4 hours, or overnight for best texture.- This waiting period lets the layers firm up and the flavors mingle; it’s worth it, I promise.
-
Slice and serve
When you’re ready to serve, cut into squares with a sharp knife. Wipe the knife between cuts for the cleanest layers.- For a slightly fancier presentation, add a little dollop of whipped cream on each square and sprinkle crushed graham crackers on top.
Servings & Timing
- Yield: About 12 generous squares (or up to 16 smaller pieces)
- Prep Time: 20 minutes
- Chill Time: 4 hours (overnight is even better)
- Total Time: About 4 hours 20 minutes, mostly hands-off
This is one of those easy cherry dessert recipes you assemble earlier in the day and completely forget about until it’s time to serve.
Fun Variations On This Creamy Cherry Dessert Recipe
Once you’ve made the classic Cherries In The Snow Recipe, you can play a little. Here are some simple twists:
- Individual parfaits: Layer graham crumbs, cream cheese filling, and cherry pie filling in small jars or glasses for grab-and-go desserts.
- Chocolate cherry version: Use chocolate graham crackers or crushed chocolate cookies for the crust and shave a little dark chocolate over the top.
- Lightened-up twist: Use reduced-fat cream cheese, sugar-free whipped topping, and a no-sugar-added cherry pie filling.
- Berry medley: Swap half the cherry filling with blueberry or strawberry pie filling for a mixed-berry “snow” dessert.
- Almond-kissed cherry: Add ½ teaspoon almond extract to the cream layer and sprinkle slivered almonds over the top.
- Gluten-free version: Use gluten-free graham crackers or cookies—just check labels to make sure they’re certified gluten-free.
Storage, Freezing & Make-Ahead Tips
One reason this layered cherry dessert shows up at so many potlucks is that it behaves well in the fridge.
-
Refrigerator:
- Store covered in the pan or in airtight containers for up to 3–4 days.
- The crust softens slightly by day 3, but the flavors are still lovely.
-
Freezer:
- You can freeze it, but the texture of the cream layer and whipped topping can change a bit—slightly grainy or icy.
- If you do freeze it, wrap tightly and store for up to 1 month. Thaw overnight in the fridge, not on the counter.
-
Make-ahead tips:
- Make the whole dessert the day before serving and chill overnight—that’s my favorite method.
- For the firmest crust, you can bake the crust at 350°F (175°C) for 8–10 minutes, cool completely, then continue as directed (still a mostly no-bake cherry dessert, but with extra structure).
Notes From My Kitchen (Little Things That Make It Better)
- Softening the cream cheese properly: This is the number one key to a smooth cherry and cream cheese layers situation. If your cream cheese is cold, you’ll get tiny lumps you’ll chase and chase. Room temperature cream cheese beats up fluffy in seconds.
- Balancing sweetness: Cherry pie filling is sweet on its own. That’s why I don’t go overboard with sugar in the cream layer. If you’re sugar-sensitive, you can reduce the powdered sugar to ¾ cup.
- Thin vs. thick layers: If you love a taller cream layer, use 12 ounces of cream cheese and 12 ounces of whipped topping and adjust the powdered sugar up slightly (about 1½ cups).
- Serving for parties: Cut smaller squares for buffet-style gatherings and set them out on mini cupcake liners or small plates so people can grab and go.
- Temperature for serving: I like this dessert well-chilled, but not ice-cold. If your fridge runs very cold, let it sit at room temperature for 10–15 minutes before serving so the cream layer softens a touch.
FAQs About Cherries In The Snow
1. Can I make this Cherries In The Snow Recipe the night before?
Yes, and honestly, you should. The flavors meld and the layers set up beautifully overnight.
2. Can I use fresh cherries instead of cherry pie filling?
You can, but you’ll need to cook them briefly with sugar and a bit of cornstarch to create a saucy topping; plain fresh cherries will be too dry and won’t give that classic glossy layer.
3. How do I keep the layers from mixing when I spread them?
Make sure the crust is chilled, spread the cream layer gently, and then dollop the cherry filling in several spots before lightly connecting them instead of dragging hard across the cream.
4. Can I cut this recipe in half?
Absolutely. Use an 8×8- or 9×9-inch pan and halve all the ingredients; the chill time stays about the same.
5. Is there a way to make this without whipped topping (Cool Whip)?
Yes—use about 3 cups of heavy whipping cream, whipped with 3–4 tablespoons powdered sugar and 1 teaspoon vanilla, then fold that into the sweetened cream cheese.
6. How long can this sit out at a party?
Since it contains dairy, I recommend keeping it out no more than 2 hours at room temperature. For outdoor summer events, set the pan on a tray of ice if possible.
7. My crust falls apart when I cut it. What happened?
Either the mixture was a little too dry or it wasn’t pressed firmly enough. Next time, add another tablespoon of melted butter and really press the crumbs into the pan before chilling.
8. Can I use a different fruit topping with the same base?
Yes—blueberry, strawberry, raspberry, and even lemon pie filling all work beautifully with this same creamy base and graham cracker crust.
Wrapping It Up (And Grabbing a Fork)
This Cherries In The Snow Recipe is one of those old-fashioned, church-basement-style desserts that just never stops making people happy. It’s creamy, cool, and bright with cherries, with that familiar graham cracker crunch underneath—a simple cherry dessert with graham crackers that somehow feels special every single time.
If you try this cherry dessert with cool whip and cream cheese, I’d love to hear how it went—tell me in the comments what occasion you made it for, or what fun variation you tried. And if you’re in the mood for more no bake cherry dessert ideas, stick around; there are plenty more sweet treats where this one came from.
Cherries In The Snow
Ingredients
- 2 cups graham cracker crumbs about 14–16 full sheets; honey grahams work well
- 1/2 cup unsalted butter melted
- 3 tablespoons granulated sugar
- pinch fine sea salt
- 8 ounces cream cheese softened to room temperature
- 1 cup powdered sugar sifted
- 1 teaspoon pure vanilla extract
- 1 teaspoon fresh lemon juice optional but recommended
- 8 ounces whipped topping like Cool Whip, thawed
- 21 ounces cherry pie filling 1 can; look for “extra fruit” if possible
Instructions
- Lightly grease a 9×13-inch baking dish with butter or nonstick spray. Glass dishes work especially well because you can see the layers and it chills evenly.
- Crush the graham crackers into fine crumbs using a food processor, or place them in a sturdy zip-top bag and roll with a rolling pin until finely crushed.2 cups graham cracker crumbs
- In a medium bowl, combine the graham cracker crumbs, granulated sugar, melted butter, and a pinch of fine sea salt. Stir until the mixture looks like damp sand and holds together when squeezed. If it seems too dry, add another tablespoon of melted butter.2 cups graham cracker crumbs, 1/2 cup unsalted butter, 3 tablespoons granulated sugar, pinch fine sea salt
- Pour the crumb mixture into the prepared baking dish. Press it firmly and evenly across the bottom using your fingertips or the bottom of a measuring cup so the crust holds together when sliced.
- Refrigerate the crust for 10–15 minutes to help it set while you prepare the cream cheese layer.
- In a large mixing bowl, add the softened cream cheese. Beat with a hand mixer (or stand mixer with the paddle attachment) on medium speed until smooth and fluffy, about 1–2 minutes, scraping down the sides as needed.8 ounces cream cheese
- Add the powdered sugar, vanilla extract, and lemon juice to the cream cheese. Beat again until smooth and well combined. Taste and adjust sweetness if desired.1 cup powdered sugar, 1 teaspoon pure vanilla extract, 1 teaspoon fresh lemon juice
- Gently fold the thawed whipped topping into the sweetened cream cheese mixture with a spatula until no streaks remain and the mixture is light and fluffy.8 ounces whipped topping
- Remove the chilled crust from the refrigerator. Dollop the cream mixture over the crust, then spread it into an even layer all the way to the edges using an offset spatula or the back of a spoon.
- Spoon the cherry pie filling gently over the cream layer. Dollop it in several spots, then carefully spread to connect the dollops, taking care not to drag the cream layer up into the cherries.21 ounces cherry pie filling
- Cover the dish with plastic wrap or a lid and refrigerate for at least 4 hours, or overnight for best texture and flavor.
- When ready to serve, cut into squares with a sharp knife, wiping the blade between cuts for the cleanest layers. Serve chilled. Optionally top each square with a dollop of whipped cream and a sprinkle of crushed graham crackers.