Would you like to save this?
Butterfinger Balls Recipe
If you love peanut butter, chocolate, and no-fuss desserts, this Butterfinger Balls Recipe is about to become your new “everyone-begs-for-it” favorite—no baking, no stress, just sweet, crunchy, peanut-buttery perfection.
What Are Butterfinger Balls, Anyway?
Let me explain. These little Butterfinger balls are bite-size candy balls made from crushed Butterfinger candies, creamy peanut butter, a touch of sweetness, and a silky chocolate coating. Think of them as Butterfinger truffle balls or butterfinger cookie balls, all dressed up and ready for a party.
They’re no bake Butterfinger balls, so you won’t have to turn on the oven—always a win when you’re juggling kids, pets, and maybe a holiday turkey already in the oven. I first started making these as a quick holiday candy recipe for Christmas cookie trays, and now they’ve become my “bring this or don’t come” dessert for potlucks, tailgates, and game nights.
What I love about this homemade Butterfinger balls recipe is that it tastes like a fancy candy shop treat, but you can make it in about 20 minutes with simple pantry staples. They’re easy Butterfinger dessert bites that also work beautifully for:
- Halloween leftover candy
- Holiday treat boxes
- School bake sales
- Last-minute party dessert bites
And yes, they’re dangerously snackable. You’ve been warned.
Why You’ll Love This Butterfinger Balls Recipe
You know what? Let’s just spell out why this needs to go on your must-make list:
- No oven needed – These no bake Butterfinger balls come together right on your countertop.
- Ready fast – About 20 minutes of hands-on time; the rest is just chilling in the fridge.
- Perfect for parties and holidays – These bite size candy balls look special on cookie platters and dessert boards.
- Amazing way to use leftover candy – Crushed Butterfinger candies finally get their moment to shine.
- Kid- and teen-approved – Big chocolate-peanut-butter flavor that’s familiar and fun.
- Freezer-friendly – Make a batch ahead and stash them for last-minute guests or gifting.
- Customizable – Turn them into peanut butter Butterfinger balls, add sprinkles, or make them gluten-free with simple swaps.
- Giftable and portable – They travel well in little treat boxes or tins for neighbors, coworkers, and teachers.
If you’re a peanut butter chocolate person—like, you order the peanut butter cup blizzard every single time—these are going to feel like a hug in candy form.
Ingredients for Butterfinger Balls
Here’s exactly what you’ll need to make this Butterfinger Balls Recipe. I’ll add little notes as we go, because after 50 years of baking and candy-making mishaps, I’ve learned a few tricks.
-
1 ½ cups crushed Butterfinger candies
(About 8 regular-sized bars or 16 fun-size; you want small, crunchy pieces, not powder.) -
1 cup creamy peanut butter
(Use regular, shelf-stable peanut butter like Jif, Skippy, or Peter Pan—not natural peanut butter that separates, or the mixture can be too oily.) -
4 tablespoons unsalted butter, softened
(Room temperature blends more easily; if you only have salted butter, just reduce any added salt elsewhere.) -
1 ½ – 2 cups powdered sugar
(Start with 1 ½ cups and add more as needed to form a soft, rollable dough.) -
1 teaspoon pure vanilla extract
(Adds a rounder flavor and helps the filling taste like a real candy center.) -
¼ teaspoon fine sea salt
(Optional but recommended; helps balance all that sweetness and bring out the peanut butter flavor.) -
2 cups semisweet chocolate chips or melting wafers
(You can use dark chocolate for a less sweet version, or almond bark/candy melts for easier dipping.) -
1 tablespoon coconut oil or vegetable shortening (optional)
(Thins the chocolate a bit so it coats more smoothly.) -
Optional garnish:
- Extra crushed Butterfinger candies
- Sprinkles
- Sea salt flakes
A quick tip: If you’re planning a lot of candy-making this season, look for big bags of fun-size Butterfingers after Halloween or holiday sales. They crush beautifully and are often cheaper than full-size bars.
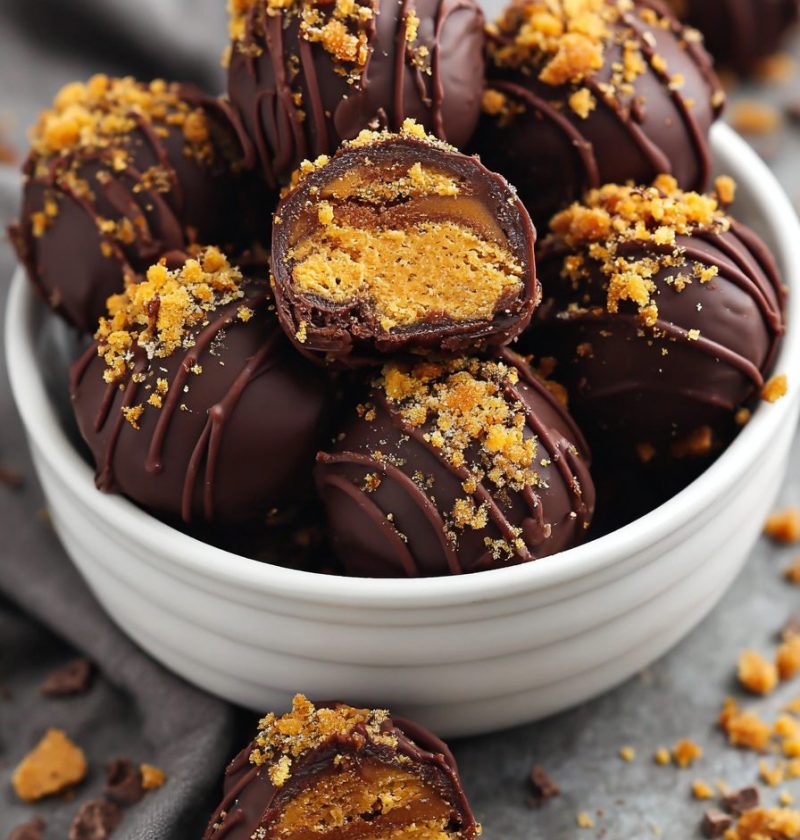
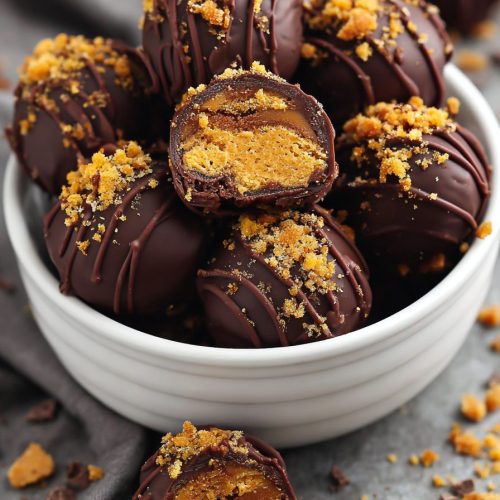
Photo Inspiration

Just look at that glossy chocolate and the crunchy peanut butter center—this is what I mean when I say “dangerously snackable.”
How to Make Butterfinger Balls (Step-by-Step)
These chocolate covered Butterfinger balls are very forgiving, so don’t stress. The main goal is a soft, rollable peanut butter center and chocolate that coats nicely.
1. Crush the Butterfinger Candies
Place your Butterfinger bars in a large zip-top bag, press out the air, seal it well, and use a rolling pin or a heavy skillet to crush them into small pieces.
- You want a mix of fine crumbs and little crunchy chunks.
- Too powdery and you lose that signature Butterfinger crunch; too chunky and the balls won’t shape as nicely.
You can also pulse them a few times in a food processor—but stop before you hit “dust.”
2. Make the Peanut Butter Filling
In a medium mixing bowl, add:
- Peanut butter
- Softened butter
- Vanilla extract
- Salt
Use a hand mixer (or a sturdy spatula if you’re feeling old-school) to beat until smooth and creamy. It should look like thick frosting.
Gradually add in the powdered sugar, starting with about 1 ½ cups:
- Mix on low speed until the mixture starts to form a thick dough.
- If it still feels sticky and doesn’t easily roll into a ball, add more powdered sugar, 1–2 tablespoons at a time.
You’re aiming for a texture similar to playdough—soft, but it holds its shape.
3. Fold in the Crushed Butterfinger
Add the crushed Butterfinger candies to the peanut butter mixture and gently fold them in with a spatula or wooden spoon.
- Don’t overmix; you want the candy distributed evenly, but you still want those little crunchy pieces.
- If the mixture becomes too crumbly after adding the candy, you can mix in 1–2 teaspoons of extra peanut butter to bring it back together.
4. Shape the Balls
Line a baking sheet with parchment paper or a silicone baking mat.
- Scoop about 1 tablespoon of the mixture (a small cookie scoop works beautifully) and roll it between your palms to form a smooth ball.
- Place each ball on the prepared baking sheet, spacing them slightly apart.
If the mixture sticks to your hands, lightly dust your palms with powdered sugar or chill the mixture for 10–15 minutes before rolling.
5. Chill the Centers
Transfer the baking sheet to the fridge and chill for at least 30 minutes, or 15–20 minutes in the freezer.
Chilling is important here:
- It helps the peanut butter butterfinger balls firm up so they don’t fall apart when dipped.
- It also prevents them from making the chocolate “seize” or become grainy.
6. Melt the Chocolate
When the centers are almost done chilling, place your chocolate chips or melting wafers in a microwave-safe bowl.
- Microwave in 20–30 second bursts, stirring between each, until smooth and melted.
- If using, stir in the coconut oil or shortening until the chocolate is glossy and flows easily from a spoon.
You can also melt chocolate in a double boiler on the stove—just be careful not to get any water in the bowl, or the chocolate can seize.
7. Dip the Butterfinger Balls
Remove the chilled centers from the fridge or freezer.
Using a fork or a candy-dipping tool:
- Drop one ball into the melted chocolate.
- Gently roll to coat completely.
- Lift it out with the fork, tapping the fork lightly on the side of the bowl so excess chocolate drips off.
- Slide it back onto the parchment-lined tray by gently nudging with a toothpick or another fork.
While the chocolate is still wet, sprinkle the tops with:
- A pinch of crushed Butterfinger
- Festive sprinkles
- Or a tiny pinch of flaky salt
Repeat with the remaining balls. Work in small batches if your kitchen is warm—you can keep half the centers in the fridge so they stay firm for dipping.
8. Let the Chocolate Set
Allow the chocolate covered Butterfinger balls to sit at room temperature until the coating is firm, about 20–30 minutes. If your kitchen is warm or you’re in a hurry, pop the tray in the fridge for 10–15 minutes.
Once set, gently peel them off the parchment. You’ll have a tray full of glossy, bite size candy balls that look like they came from a fancy chocolate shop.
Servings & Timing
- Yield: About 24–28 Butterfinger balls (1-tablespoon size)
- Prep Time: 20 minutes
- Chill Time: 30–45 minutes
- Total Time: About 1 hour (mostly hands-off chilling time)
Honestly, the hardest part is waiting for the chocolate to set before “taste-testing.”
Fun Variations to Try
Once you’ve made the classic recipe, you can start playing with flavors. Here are some easy twists:
- Dark Chocolate Butterfinger Truffle Balls – Use dark chocolate chips and a pinch more salt for a grown-up, less sweet version.
- White Chocolate Drizzle – Coat in semisweet chocolate, then drizzle with melted white chocolate for a candy-shop look.
- Crunchy Peanut Butter Version – Use crunchy peanut butter for even more texture in each bite.
- Gluten-Friendly Swap – Use a certified gluten-free peanut butter candy bar alternative if you’re serving gluten-sensitive guests.
- Holiday Sprinkle Butterfinger Balls – Top with red and green sprinkles for Christmas, orange and black for Halloween, or team colors for game day.
- Mini Butterfinger Cookie Balls – Stir a few tablespoons of crushed graham crackers or vanilla wafer crumbs into the filling for a more “truffle-cookie” flavor.
How to Store & Freeze Butterfinger Balls
These little treats are wonderfully make-ahead friendly, which makes them ideal for busy seasons like Thanksgiving and Christmas.
-
Fridge:
Store your butterfinger ball treats in an airtight container in the refrigerator for up to 1 week. Layer them with parchment or wax paper to prevent sticking. -
Freezer:
Freeze in a single layer on a baking sheet, then transfer to a freezer-safe bag or container. They’ll keep well for 2–3 months. -
Thawing:
For the best texture, let frozen butterfinger truffle balls sit in the fridge for a few hours, or on the counter for 20–30 minutes before serving. They’re also pretty delicious cold straight from the fridge, like a candy bar. -
Make-Ahead Tip:
You can make the peanut butter centers, freeze them uncoated, and then dip them in chocolate the day before serving. That’s especially helpful if you’re putting together big holiday candy trays.
Notes & Personal Tips
- Consistency is key: If the filling feels too soft and sticky, don’t panic—just add a bit more powdered sugar. If it’s too stiff or crumbly, work in another teaspoon or two of peanut butter until it rolls nicely.
- Work with cold centers: Warm centers + warm chocolate often equal frustration. Keep your butterfinger cookie balls cold before you dip, and your chocolate will behave.
- Don’t overheat the chocolate: Too hot and it gets thick, chalky, or scorched. Melt slowly, stir often, and if it thickens as you work, microwave for just 5–10 seconds.
- Use what you have: If you only have milk chocolate chips, you can mix half milk and half semisweet to keep the sweetness more balanced.
- Kids’ project: My grandkids love rolling the balls and sprinkling crushed Butterfinger on top. I handle the hot chocolate and the messiest bits. It’s a fun little candy “assembly line.”
- Serving tip: Arrange these on a pretty platter with a mix of other small treats—maybe peanut butter chocolate balls, fudge, and a few cookies—for an easy dessert board that looks far fancier than the effort it took.
FAQs About Butterfinger Balls Recipe
1. Can I use natural peanut butter?
You can, but the oil separation can make the mixture too greasy and prone to cracking. If you try it, stir the peanut butter very well and be prepared to add a little extra powdered sugar to firm it up.
2. How small should I crush the Butterfinger candies?
Aim for a mix of fine crumbs and small bits—about pea size or smaller. You want that classic Butterfinger crunch without huge chunks breaking the balls apart.
3. My balls are falling apart when I dip them. What went wrong?
They’re probably too warm or the filling is too soft. Chill them longer, or add a bit more powdered sugar to firm up the mixture before reshaping and dipping again.
4. The chocolate coating looks dull or streaky. How can I fix that?
That usually happens when the chocolate is overheated or cooled too fast. Use gentle heating, add a teaspoon of coconut oil for shine, and let them set in a cool room instead of straight in the freezer when possible.
5. Can I make these without Butterfinger candies?
You won’t have true Butterfinger balls, but you can use another crispy peanut butter candy bar. The flavor will change slightly, but the recipe still works.
6. Are Butterfinger balls gluten-free?
Standard Butterfinger bars in the U.S. are typically gluten-free, but labels can change. Always check the packaging, and be sure all your other ingredients are certified gluten-free if you’re serving someone with celiac disease.
7. Can I use almond butter or another nut butter?
Yes, but the flavor will be different. Almond or cashew butter can be delicious—just use a thicker, no-stir version and taste as you go.
8. How do I keep the bottoms from getting that little “chocolate puddle”?
That’s called a “foot,” and honestly, most home candy makers just embrace it. But if it bugs you, let a little more chocolate drip off before placing the ball down, or trim the excess with a small paring knife after the chocolate sets.
Final Thoughts & Call to Action
These Butterfinger balls are everything I love about an easy butterfinger dessert: no baking, big flavor, simple ingredients, and that fun mix of creamy peanut butter and crunchy candy in every bite. They’re the kind of simple candy ball recipe that slips into your regular holiday rotation and never leaves.
If you try this Butterfinger Balls Recipe, come back and tell me how it went—did you stash some in the freezer for yourself, or did they disappear in five minutes at the party? Leave a comment with your tweaks or toppings, and if you’re in the mood for more no-bake treats, make sure you explore my other peanut butter chocolate balls and party dessert bites next.
Butterfinger Balls
Ingredients
- 1 1/2 cups crushed Butterfinger candies about 8 regular-size bars or 16 fun-size; small crunchy pieces, not powder
- 1 cup creamy peanut butter regular shelf-stable (like Jif or Skippy), not natural
- 4 tablespoons unsalted butter softened to room temperature
- 1 1/2–2 cups powdered sugar start with 1 1/2 cups and add more as needed for a soft, rollable dough
- 1 teaspoon pure vanilla extract
- 1/4 teaspoon fine sea salt optional but recommended
- 2 cups semisweet chocolate chips or melting wafers or dark chocolate, almond bark, or candy melts
- 1 tablespoon coconut oil or vegetable shortening optional, to thin the melted chocolate
- extra crushed Butterfinger candies optional, for garnish
- sprinkles optional, for garnish
- flaky sea salt optional, for garnish
Instructions
- Place the Butterfinger bars in a large zip-top bag, press out the air, and seal. Use a rolling pin or heavy skillet to crush them into small pieces. Aim for a mix of fine crumbs and small crunchy bits—too powdery and you lose the crunch; too chunky and the balls won’t shape as nicely. Alternatively, pulse a few times in a food processor, stopping before the candy becomes dust.
- In a medium mixing bowl, combine the creamy peanut butter, softened butter, vanilla extract, and fine sea salt. Beat with a hand mixer or mix with a sturdy spatula until smooth and creamy, like thick frosting.
- Gradually add 1 1/2 cups of powdered sugar to the peanut butter mixture, mixing on low until a thick dough forms. If the mixture is still sticky and doesn’t roll easily, add more powdered sugar 1–2 tablespoons at a time until the texture is soft but holds its shape, similar to playdough.
- Add the crushed Butterfinger candies to the peanut butter dough and gently fold in with a spatula or wooden spoon until evenly distributed. Do not overmix—you want to keep the crunchy pieces intact. If the mixture becomes too crumbly, mix in 1–2 teaspoons of additional peanut butter to bring it back together.
- Line a baking sheet with parchment paper or a silicone baking mat. Scoop about 1 tablespoon of the mixture (a small cookie scoop works well) and roll between your palms to form a smooth ball. Place each ball on the prepared baking sheet, spacing them slightly apart. If the mixture sticks to your hands, lightly dust your palms with powdered sugar or chill the mixture for 10–15 minutes before rolling.
- Transfer the baking sheet with the shaped balls to the refrigerator and chill for at least 30 minutes, or 15–20 minutes in the freezer. Chilling helps the centers firm up so they don’t fall apart in the warm chocolate and prevents the chocolate from seizing.
- Near the end of the chilling time, place the chocolate chips or melting wafers in a microwave-safe bowl. Microwave in 20–30 second bursts, stirring after each interval, until the chocolate is smooth and fully melted. If using, stir in the coconut oil or shortening until the chocolate is glossy and flows easily from a spoon. Alternatively, melt the chocolate in a double boiler, being careful not to let any water get into the bowl.
- Remove the chilled centers from the fridge or freezer. Using a fork or candy-dipping tool, drop one ball into the melted chocolate and gently roll to coat completely. Lift it out with the fork, tapping the fork lightly on the side of the bowl so excess chocolate drips off. Slide the coated ball back onto the parchment-lined tray by gently nudging it off the fork with a toothpick or another fork.
- While the chocolate is still wet, sprinkle the tops with a pinch of extra crushed Butterfinger, sprinkles, or a tiny pinch of flaky sea salt, if desired. Repeat the dipping and topping process with the remaining balls, working in batches and keeping some of the undipped centers in the refrigerator if your kitchen is warm.
- Allow the coated Butterfinger balls to sit at room temperature until the chocolate is firm, about 20–30 minutes. If your kitchen is warm or you’re in a hurry, place the tray in the refrigerator for 10–15 minutes. Once set, gently peel the balls off the parchment. Serve or transfer to an airtight container for storage.