Would you like to save this?
Buckwheat Flour Recipe (Two Ways: Homemade Flour + Everyday Pancakes)
If you’ve been curious about a simple, healthy Buckwheat Flour Recipe that’s gluten free, budget-friendly, and easy enough for a sleepy weekday morning, you’re in the right place.
What This Buckwheat Flour Recipe Is All About
I’m a 50-year-old Midwestern mom who grew up on classic white-flour pancakes and church-basement potlucks, and let me tell you—buckwheat felt “too healthy” to younger me. It sounded like something from a dusty health food store aisle.
Fast-forward a few decades, a couple of food sensitivities in the family, and a whole lot of recipe testing, and now I keep a big jar of homemade buckwheat flour on my counter at all times. It’s nutty, hearty, naturally gluten free (as long as your oats and other ingredients are, too), and it behaves beautifully in both sweet and savory buckwheat flour cooking.
So in this post, I’ll walk you through:
- A simple homemade buckwheat flour recipe (just one ingredient!)
- My go-to buckwheat flour pancakes that you can adapt into waffles, muffins, crepes, and even a quick buckwheat flour flatbread or savory buckwheat flour recipe for dinner.
Think of this as your friendly starter guide to buckwheat flour baking and cooking—practical, cozy, and completely doable.
Why You’ll Love This Buckwheat Flour Recipe
- Naturally gluten free – When made with certified gluten free groats, this buckwheat flour recipe is safe for many gluten-sensitive folks.
- Budget-friendly – Homemade buckwheat flour is usually cheaper than the store-bought bags, especially if you buy groats in bulk.
- Two recipes in one – You get a basic homemade buckwheat flour recipe plus a flexible buckwheat flour breakfast recipe (pancakes) that can become waffles, muffins, or crepes.
- Wholesome and hearty – Buckwheat is a whole grain (technically a seed) rich in fiber and plant-based protein, making these breakfasts feel sturdy and satisfying.
- Easy enough for beginners – No fancy skills, no obscure tools—just a blender, a bowl, and a pan.
- Customizable for many diets – I’ll show you how to make it a vegan buckwheat flour recipe, dairy free, or egg free with simple swaps.
- Great texture (not dry!) – The batter has yogurt and a touch of oil, which keeps pancakes moist instead of chalky like some gluten free recipes.
- All-day friendly – Use the same base batter for sweet breakfast, a wholesome buckwheat flour dessert recipe with berries and maple, or a savory buckwheat flour bread-style flat pancake with veggies on top.
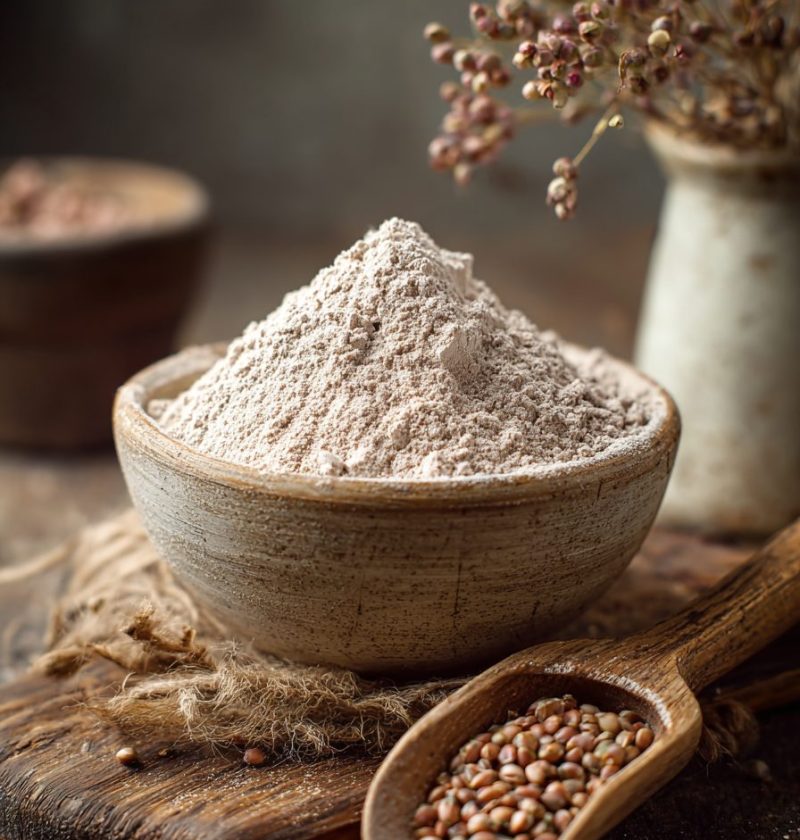
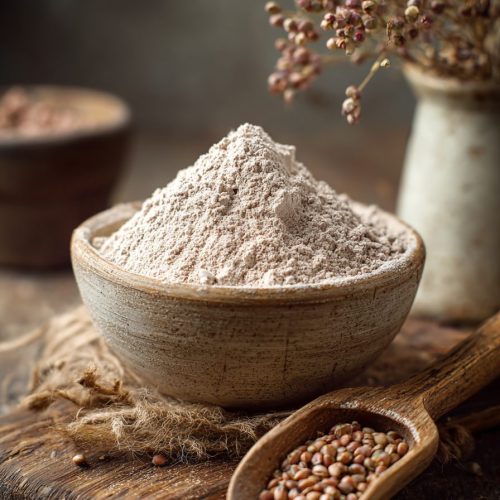
Ingredients for Homemade Buckwheat Flour
This is the easiest part. For homemade buckwheat flour, you only need:
- 2 cups raw buckwheat groats (hulled; look for light green or tan, not dark roasted “kasha”)
Notes & Tips:
- Groats vs. Kasha: Use raw buckwheat groats, not roasted kasha, or your flour will taste too strong and bitter.
- Gluten free check: If you’re celiac or very sensitive, make sure the package says certified gluten free buckwheat groats to avoid cross-contact.
- Amount: Two cups of groats will yield about 2¼ cups flour, depending on how finely you grind it. You can scale up or down.

How to Make Homemade Buckwheat Flour
-
Check and rinse (optional but helpful).
Pour the buckwheat groats into a shallow bowl and quickly scan for any stones or debris. If your brand suggests rinsing, place groats in a fine-mesh strainer and rinse under cool water, then spread on a clean towel and let them dry completely (this can take an hour or so). Wet groats will clog your blender. -
Add groats to a high-speed blender or grain mill.
Once dry, add the groats to a powerful blender (like a Vitamix, Ninja, or Blendtec) or a grain mill. Don’t fill past the “max” line; it grinds best with some room to move around. -
Grind until fine.
Blend on high for 30–60 seconds, stopping to shake or stir as needed. You’re looking for a powdery, soft texture similar to whole wheat flour. A tiny bit of coarseness is okay for pancakes and rustic buckwheat flour bread or flatbread. -
Sift for extra-fine flour (optional).
For delicate buckwheat flour crepes or a softer buckwheat flour dessert recipe, pour the flour through a fine-mesh sieve set over a bowl. Larger bits can go back into the blender for another spin. -
Store properly.
Transfer your homemade buckwheat flour to an airtight jar or container. Label it with the date (trust me, you’ll forget), and store it in a cool, dark place for up to 2 months, or in the fridge or freezer for 4–6 months for the freshest flavor.
Now that your whole grain buckwheat flour is ready, let’s put it to work in a simple buckwheat flour recipe the whole family can enjoy.
Ingredients for Everyday Buckwheat Flour Pancakes
This is my base buckwheat flour breakfast recipe. It’s flexible, hearty, and not too sweet, so you can dress it up however you like.
For about 10–12 medium pancakes, you’ll need:
- 1½ cups buckwheat flour (homemade or store-bought)
- 2 tbsp oat flour or all-purpose gluten free flour (helps with structure; you can use more buckwheat if needed)
- 2 tbsp coconut sugar or brown sugar (or maple syrup, see note)
- 2 tsp baking powder (aluminum-free, if possible)
- ½ tsp baking soda
- ½ tsp fine sea salt
- 1½ cups milk (dairy or unsweetened almond, oat, or soy milk)
- ½ cup plain Greek yogurt (for creaminess; use a thick dairy-free yogurt for vegan)
- 2 large eggs (or 2 flax eggs for a vegan buckwheat flour recipe)
- 2 tbsp neutral oil (like avocado, sunflower, or light olive oil)
- 1 tsp pure vanilla extract
Optional add-ins:
- ½ tsp ground cinnamon – cozy, especially in fall and winter.
- ¼ cup mini chocolate chips – turns it into a kid-friendly buckwheat flour dessert recipe.
- ¼–½ cup fresh or frozen blueberries – classic, and they pair beautifully with the nutty flavor.
Ingredient Tips:
- Yogurt: Whole milk Greek yogurt gives the best tenderness and a bit of tang, but any thick yogurt works. Thin yogurt? Reduce milk by 2–3 tablespoons.
- Sweetener: If you use maple syrup or honey instead of dry sugar, reduce the milk slightly (start with 1⅓ cups and adjust as needed).
- Egg-free: For each egg, mix 1 tbsp ground flaxseed with 3 tbsp water, let it sit 5–10 minutes until gelled. This keeps your vegan buckwheat flour pancakes from crumbling.
Step-by-Step Directions for Buckwheat Flour Pancakes
-
Whisk dry ingredients.
In a medium bowl, whisk together buckwheat flour, oat flour, coconut sugar, baking powder, baking soda, and salt. If using cinnamon, whisk it in now. Breaking up any little clumps means a smoother batter later. -
Mix wet ingredients.
In a larger bowl, whisk the eggs until slightly frothy. Add the milk, Greek yogurt, oil, and vanilla. Whisk until mostly smooth—tiny yogurt lumps are okay. -
Combine wet and dry.
Pour the dry ingredients into the wet mixture and gently whisk or stir with a spatula just until combined. The batter will be thicker than classic pancake batter but still pourable. If it feels too thick (like muffin batter), whisk in 1–2 tablespoons more milk. Let the batter rest for 5–10 minutes; this lets the buckwheat flour hydrate and gives you fluffier pancakes. -
Preheat the pan or griddle.
Heat a nonstick skillet or lightly greased griddle over medium heat. You want it hot enough that a drop of water sizzles but doesn’t evaporate instantly. If your pancakes are browning too fast, turn the heat down a notch. -
Cook the pancakes.
Scoop about ¼ cup batter per pancake onto the hot surface. If you’re adding blueberries or chocolate chips, sprinkle them on top of each pancake right after pouring the batter. Cook 2–3 minutes, until bubbles form on the surface and the edges look set. Flip and cook another 1–2 minutes, until the center feels springy when gently pressed. -
Keep warm and serve.
Transfer cooked pancakes to a plate and cover with a clean kitchen towel, or place them on a baking sheet in a 200°F (95°C) oven to keep warm while you finish the batch. Serve with maple syrup, fresh fruit, yogurt, nut butter, or a drizzle of honey.
You know what? A cup of hot coffee and one of these buckwheat pancakes with peanut butter on top has gotten me through many busy mornings.
Servings & Timing
- Yield: About 10–12 medium pancakes (3–4 servings)
- Prep Time: 10–15 minutes (including grinding flour if you’re quick)
- Cook Time: 15–20 minutes
- Total Time: About 30 minutes
For the homemade buckwheat flour alone:
- Active Time: 5–10 minutes
- Total Time: 15–60 minutes (depending on whether you rinse/dry the groats)
Fun Variations: One Batter, Many Buckwheat Flour Recipes
Think of this as your base “buckwheat flour dough” for breakfast. Here are a few easy twists:
- Buckwheat Flour Waffles: Add 1 extra tablespoon of oil and reduce milk by 2 tablespoons; cook in a preheated waffle iron until crisp at the edges.
- Buckwheat Flour Muffins: Add an extra ¼ cup buckwheat flour, fold in ½ cup berries or nuts, and bake in a greased muffin tin at 350°F (175°C) for 16–20 minutes.
- Savory Buckwheat Pancakes (Flatbread-style): Skip the sugar and vanilla, add ¼ cup chopped scallions and ¼ cup shredded cheese, and serve as a savory side with soup or salad.
- Simple Buckwheat Flour Crepes: Thin the batter with ½–¾ cup more milk until it’s pourable like heavy cream, then cook in a lightly oiled nonstick pan, swirling to coat.
- Cocoa Buckwheat Dessert Pancakes: Add 2 tbsp cocoa powder plus 2 more tbsp sweetener, and top with berries and a spoonful of whipped cream or coconut yogurt.
- Pumpkin Spice Buckwheat Pancakes: Replace ¼ cup of the milk with pumpkin puree and add pumpkin pie spice instead of cinnamon.
How to Store & Reheat Buckwheat Flour and Pancakes
Storing homemade buckwheat flour:
- Pantry: Airtight container, up to 2 months.
- Fridge or freezer: For the freshest flavor, keep buckwheat flour chilled up to 4–6 months. Bring to room temp before baking to avoid clumps.
Storing cooked pancakes:
- Cool pancakes completely on a wire rack so they don’t steam and get soggy.
- Store in an airtight container in the fridge for up to 4 days.
- For longer storage, freeze in a single layer on a baking sheet, then transfer to a freezer bag for up to 2 months.
Reheating:
- Toaster: My favorite—pop them straight from fridge or freezer into the toaster until warm and slightly crisp.
- Oven: Place on a baking sheet and warm at 325°F (165°C) for 8–10 minutes.
- Microwave: 20–30 seconds works in a pinch, but the texture will be softer.
Make-ahead tip:
You can mix the dry ingredients (flours, baking powder, baking soda, salt, sugar) and store them in a jar as your own little “buckwheat pancake mix.” In the morning, just whisk with the wet ingredients and cook—homemade convenience food.
Notes from My Kitchen Tests
- Grind size matters. Very coarse buckwheat flour will give you grainy pancakes, which some people like, but my family prefers a medium-fine grind. I usually sift half and leave half as is.
- Resting the batter is key. I tested these pancakes with and without resting the batter. Five to ten minutes of rest gave noticeably fluffier, more tender pancakes. Don’t skip it.
- Watch the heat. Buckwheat browns a little faster than white flour, so keep your pan on medium, not screaming hot.
- Salt is not the enemy. Because buckwheat flour has a deep, nutty flavor, the right amount of salt actually makes it taste more complex, not salty.
- Kids and picky eaters: If you’re introducing buckwheat to hesitant eaters, start with half buckwheat flour and half oat or gluten free all-purpose flour, then gradually move toward 100% buckwheat.
FAQs About Buckwheat Flour Recipes
1. Is buckwheat flour gluten free?
Yes—buckwheat is naturally gluten free, but you should always buy certified gluten free buckwheat flour or groats if you’re cooking for someone with celiac disease or a strong sensitivity.
2. Can I use this buckwheat flour recipe in bread?
You can use homemade buckwheat flour in buckwheat flour bread, but because it’s gluten free, you’ll usually need a blend of flours or binders (like psyllium husk or xanthan gum) for a good rise and structure.
3. My pancakes are too dense. What happened?
You might have packed the flour when measuring, or the batter might be too thick. Try whisking in a bit more milk and make sure the baking powder and baking soda are fresh.
4. Can I make the pancakes without eggs and dairy?
Yes—use flax eggs instead of eggs, dairy-free yogurt instead of Greek yogurt, and your favorite plant milk. This gives you a satisfying vegan buckwheat flour recipe with very similar texture.
5. Why do my pancakes taste bitter?
That usually means your buckwheat was roasted (kasha) or old. Use fresh, raw buckwheat groats and store the flour in the fridge or freezer for the best, mild flavor.
6. Can I turn this batter into buckwheat flour waffles?
Absolutely—add a bit more oil (about 1 tbsp) and reduce the milk slightly. Waffle batter should be just a touch thicker than pancake batter.
7. Is buckwheat healthy?
Buckwheat is a whole grain–like seed that’s rich in fiber, plant protein, and minerals like magnesium. It’s a wonderful base for a healthy buckwheat flour recipe, especially for breakfast.
8. Can I sweeten the pancakes with only fruit?
Yes—skip the sugar and serve the pancakes with mashed banana, applesauce, or a warm berry compote on top. You can also mix mashed banana right into the batter.
Wrapping It Up: A Cozy, Everyday Buckwheat Flour Recipe
Homemade buckwheat flour plus a simple pancake batter might not sound flashy, but it’s the kind of everyday recipe that quietly changes your routine—wholesome, flexible, and surprisingly comforting. Whether you turn this into buckwheat flour muffins, waffles, crepes, or a savory buckwheat flour flatbread, you’ve got a reliable gluten free buckwheat flour base ready to go.
If you try this buckwheat flour recipe, I’d love to hear how you served it—sweet, savory, vegan, kid-approved, all of the above. Leave a comment with your tweaks, and if you’re craving more whole grain breakfast ideas, explore my other healthy pancake and waffle recipes next.
Buckwheat Flour Recipe (Homemade Flour + Everyday Pancakes)
Ingredients
- 2 cups raw buckwheat groats hulled; light green or tan, not roasted kasha
- 1 1/2 cups buckwheat flour homemade or store-bought
- 2 tablespoons oat flour or all-purpose gluten free flour; can use more buckwheat if needed
- 2 tablespoons coconut sugar or brown sugar; see notes if using maple syrup or honey
- 2 teaspoons baking powder aluminum-free, if possible
- 1/2 teaspoon baking soda
- 1/2 teaspoon fine sea salt
- 1 1/2 cups milk dairy or unsweetened almond, oat, or soy milk
- 1/2 cup plain Greek yogurt or thick dairy-free yogurt for vegan
- 2 large eggs or 2 flax eggs for vegan
- 2 tablespoons neutral oil such as avocado, sunflower, or light olive oil
- 1 teaspoon pure vanilla extract
- 1/2 teaspoon ground cinnamon optional
- 1/4 cup mini chocolate chips optional
- 1/4-1/2 cup fresh or frozen blueberries optional
Instructions
- Pour the buckwheat groats into a shallow bowl and scan for any stones or debris. If your brand recommends it, place groats in a fine-mesh strainer and rinse under cool water, then spread on a clean towel and let dry completely so they do not clog the blender.2 cups raw buckwheat groats
- Once dry, add the groats to a high-speed blender or grain mill, without filling past the max line. Blend on high for 30–60 seconds, stopping to shake or stir as needed, until you have a fine, powdery flour similar to whole wheat flour.2 cups raw buckwheat groats
- For an extra-fine texture, pour the ground buckwheat through a fine-mesh sieve set over a bowl. Return any larger bits to the blender and grind again if desired.2 cups raw buckwheat groats
- Transfer the buckwheat flour to an airtight jar or container, label with the date, and store in a cool, dark place for up to 2 months, or in the refrigerator or freezer for 4–6 months.2 cups raw buckwheat groats
- In a medium bowl, whisk together buckwheat flour, oat flour, coconut sugar, baking powder, baking soda, salt, and cinnamon if using, breaking up any clumps for a smoother batter.1 1/2 cups buckwheat flour, 2 tablespoons oat flour, 2 tablespoons coconut sugar, 2 teaspoons baking powder, 1/2 teaspoon baking soda, 1/2 teaspoon fine sea salt, 1/2 teaspoon ground cinnamon
- In a larger bowl, whisk the eggs until slightly frothy. Add the milk, Greek yogurt, neutral oil, and vanilla, and whisk until mostly smooth; a few small yogurt lumps are fine.1 1/2 cups milk, 1/2 cup plain Greek yogurt, 2 large eggs, 2 tablespoons neutral oil, 1 teaspoon pure vanilla extract
- Pour the dry mixture into the wet ingredients and gently whisk or stir just until combined. The batter should be thicker than classic pancake batter but still pourable. If it seems too thick, add 1–2 tablespoons more milk. Let the batter rest for 5–10 minutes to hydrate the buckwheat and improve texture.1 1/2 cups buckwheat flour, 2 tablespoons oat flour, 2 tablespoons coconut sugar, 2 teaspoons baking powder, 1/2 teaspoon baking soda, 1/2 teaspoon fine sea salt, 1 1/2 cups milk, 1/2 cup plain Greek yogurt, 2 large eggs, 2 tablespoons neutral oil, 1 teaspoon pure vanilla extract
- Heat a nonstick skillet or lightly greased griddle over medium heat until a drop of water sizzles gently but does not evaporate immediately. Adjust heat as needed to prevent over-browning.
- Scoop about 1/4 cup batter per pancake onto the hot surface. If using blueberries or chocolate chips, sprinkle them on top of each pancake immediately after pouring the batter. Cook for 2–3 minutes, until bubbles form and the edges look set, then flip and cook 1–2 minutes more, until the centers feel springy.1/4 cup mini chocolate chips, 1/4-1/2 cup fresh or frozen blueberries
- Transfer cooked pancakes to a plate covered with a clean kitchen towel, or place them on a baking sheet in a 200°F (95°C) oven to keep warm while you finish cooking the rest. Serve with maple syrup, fresh fruit, yogurt, nut butter, or your favorite toppings.