Would you like to save this?
Toasted Walnuts Recipe (Perfect Every Time!)
This Toasted Walnuts Recipe gives you golden, crunchy, fragrant walnuts that are perfect for snacking, baking, salads, and quick toppings—ready in minutes with almost no effort.
Meet Your New Kitchen Workhorse: Toasted Walnuts
Let me just say this upfront: once you learn how to make a good toasted walnuts recipe, plain raw walnuts start to feel a little… sad.
Toasting walnuts wakes up their natural oils, deepens their flavor, and gives them that rich, nutty aroma that makes your whole kitchen smell cozy. Whether you’re making oven toasted walnuts, using them as a toasted walnut topping for salads and yogurt, or tossing them into Banana bread, this simple method turns everyday walnuts into something special.
I started toasting nuts regularly when my kids were in high school and constantly “foraging” in the pantry. I wanted quick, healthy snacks that felt satisfying but didn’t require me to stand at the stove forever. A jar of crunchy toasted walnuts on the counter, next to apples and a little bowl of dark chocolate, became our unofficial “snack bar.” They disappeared faster than potato chips, which honestly felt like a small parenting win.
What I love about this roasted walnuts recipe is how flexible it is. You can keep them plain for baking, season them for snacks, or sweeten them slightly for a holiday nut mix. And once you know how to toast walnuts properly—without burning them—you can apply the same technique to almost any toasted Nuts Recipe.
Why You’ll Love This Toasted Walnuts Recipe
- Fast and fuss-free – Just a few minutes of hands-on time, and the oven does the rest.
- Deep, nutty flavor – Toasting brings out a rich, buttery taste you’ll never get from raw nuts.
- Perfect for baking – Ideal toasted walnuts for baking in brownies, Cookies, banana bread, and cakes.
- Healthy snack upgrade – Protein, healthy fats, and crunch—way more satisfying than most packaged snacks.
- Customizable seasoning – Go sweet, savory, spicy, or plain, depending on what you need.
- Great for salads and toppings – Use as a toasted walnut topping for oatmeal, yogurt, roasted veggies, and salads.
- Budget-friendly – Toasting at home is cheaper than buying pre-roasted nuts (and tastes fresher).
- Scales easily – Make a small batch for one week or a big tray for holidays and meal prep.
Ingredients: Simple, But Let’s Get Them Right
For basic oven toasted walnuts (savory or neutral):
- 2 cups walnut halves (raw; preferably untoasted, unsalted)
- Tip: Use toasted walnut halves rather than pieces; halves toast more evenly and stay crunchier.
- 1–2 teaspoons neutral oil (optional; avocado, canola, or light olive oil)
- Tip: Oil isn’t required, but a light coat helps seasonings stick and encourages even browning.
- ¼–½ teaspoon fine sea salt (optional, to taste)
Optional flavor add-ins (choose 1–2 directions or keep them plain for baking):
- Sweet version:
- 1–2 tablespoons maple syrup or honey
- ¼ teaspoon ground cinnamon
- Small pinch of flaky sea salt
- Savory/herby version:
- ½ teaspoon garlic powder or granulated garlic
- ½ teaspoon dried rosemary or thyme, lightly crushed
- Freshly ground black pepper, to taste
- Spicy version:
- ¼–½ teaspoon smoked paprika or chili powder
- Tiny pinch of cayenne (go easy, it gets stronger as it cools)
If you’re planning to use these toasted walnuts for baking (cookies, brownies, cakes), I recommend:
- Keeping them plain or just lightly salted, with no oil and no sweeteners, so they don’t affect the recipe’s texture.

How to Toast Walnuts: Step-by-Step Directions
You know what? Toasting walnuts is incredibly simple, but they do go from perfect to burnt in what feels like a blink. So we’ll walk through it carefully.
1. Preheat Your Oven
Preheat your oven to 325°F (165°C).
- This slightly lower temperature helps you avoid burned edges and bitter flavors. Walnuts are a bit more delicate than, say, almonds or peanuts.
2. Prep Your Baking Sheet
Line a rimmed baking sheet with parchment paper or a silicone baking mat.
- Parchment makes cleanup easier and prevents the nuts from picking up any off flavors from an older pan.
- A rimmed sheet keeps stray nuts from rolling off when you stir them.
3. Toss the Walnuts with Oil and Seasonings (If Using)
In a medium bowl, add:
- 2 cups walnut halves
- 1–2 teaspoons oil (if using)
- Any seasonings or sweeteners you like
Gently toss until all the walnuts are lightly and evenly coated.
- If you’re making snack toasted walnuts, season boldly; flavors mellow a bit after cooling.
- For baking, keep them mostly plain or just a touch salted.
4. Spread in a Single Layer
Pour the walnuts onto the prepared baking sheet.
- Spread them into a single layer, with a little space between them.
- Crowding the pan leads to uneven toasting and soft spots instead of that nice crunch.
5. Toast in the Oven, Stirring Once or Twice
Place the baking sheet on the middle rack and toast for:
- 8–12 minutes, stirring the walnuts halfway through.
Watch for:
- A warm, nutty aroma
- Light golden-brown color, especially on the edges
- Slightly darker spots on some walnuts, but not black or overly brown
Every oven is different. In my gas oven, 9–10 minutes is perfect; in my daughter’s electric oven, they need almost 12 minutes. Start checking at the 7-minute mark.
If you smell even a hint of sharp, burnt aroma, pull them out immediately—they keep toasting a bit on the hot pan.
6. Cool Completely
Remove the tray from the oven and let the walnuts cool on the pan.
- They’ll crisp up as they cool, so don’t worry if they still feel a bit soft when hot.
- Once fully cooled, taste and adjust salt if needed.
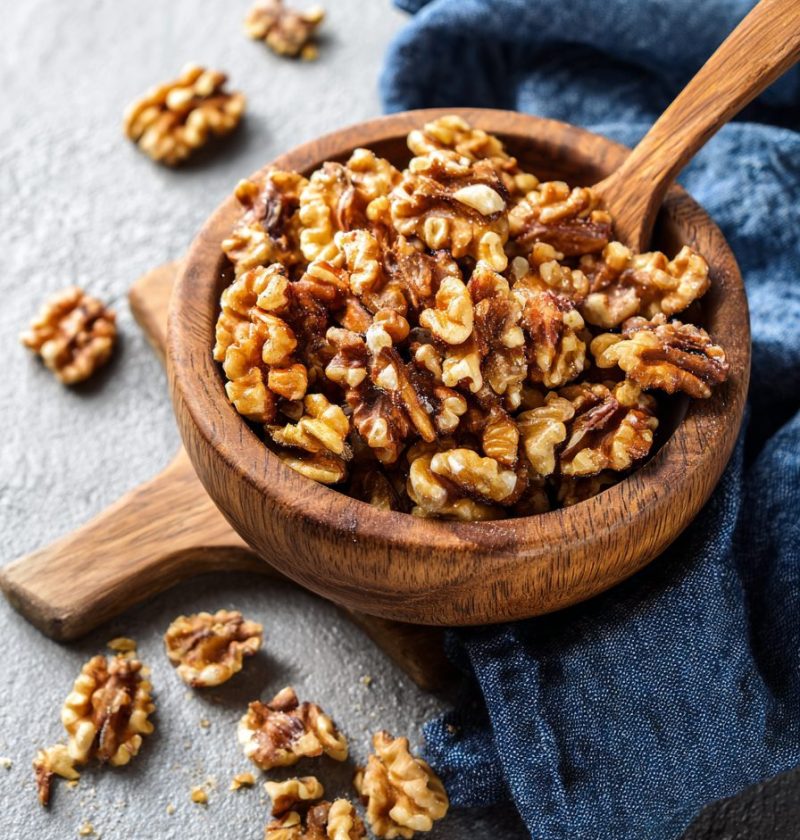
Now you’ve got gorgeous crunchy toasted walnuts ready for snacking, toppings, or baking.
Servings & Timing
- Yield: About 2 cups toasted walnut halves (roughly 8 servings of ¼ cup each)
- Prep Time: 5 minutes
- Cook Time: 8–12 minutes
- Total Time: 13–17 minutes
If you’re seasoning multiple flavors (sweet batch + savory batch), plan for a few extra minutes to divide and season.
Creative Variations (Because Plain Is Just the Beginning)
Once you’ve mastered the basic toasted walnuts recipe, try one of these fun twists:
- Maple Cinnamon Toasted Walnuts – Toss with maple syrup, cinnamon, and a pinch of salt for a cozy, breakfast-style nut.
- Rosemary Garlic Walnuts – Add olive oil, finely chopped fresh rosemary, garlic powder, and black pepper; perfect for cheese boards.
- Spicy Smoked Paprika Walnuts – Use smoked paprika, cayenne, and a touch of brown sugar for a smoky, slightly sweet snack.
- Vanilla Sugar Toasted Walnuts – Stir in vanilla extract and sugar (or coconut sugar) for a lighter, less sticky candied nut.
- Everything Bagel Walnuts – Toss with a bit of oil and everything bagel seasoning; delicious over salads or avocado toast.
- Cocoa Crunch Dessert Walnuts – Once toasted and cooled slightly, toss with cocoa powder and powdered sugar for a brownie-like snack topping.
If you’re using these as toasted walnuts for baking, think about matching the flavors—cinnamon walnuts in apple muffins, rosemary walnuts on roasted potatoes, and so on.
Storage & Reheating Tips
You’ve got a beautiful batch of walnuts—let’s keep them that way.
Short-Term Storage
- Store cooled toasted walnuts in an airtight container at room temperature for up to 1–2 weeks.
- Keep them in a cool, dark spot like a pantry cabinet (heat and light speed up rancidity).
Longer Storage (Best for Meal Prep or Bulk Batches)
- For longer freshness, store toasted walnuts in:
- The refrigerator for up to 1 month
- The freezer for up to 3–4 months
Just make sure they’re well sealed (Mason jars, Snapware, or a zip-top freezer bag with the air pressed out). Walnuts love to absorb odors, so don’t park them next to leftover onions.
Reheating or Refreshing
If your toasted walnuts start to lose their crunch:
- Spread them on a baking sheet and warm at 300°F (150°C) for 4–6 minutes, then cool.
- This “refreshes” the texture and perks up the flavor.
Make-Ahead Advice
I often double this toasted nuts recipe:
- Keep half plain for baking.
- Season the other half for snacking and salads.
If you’re prepping for holidays or parties, toast the nuts up to a week ahead, store in an airtight container, and season again lightly (if needed) right before serving.
Notes from My Kitchen Tests
- Watch them like a hawk. Every time I’ve burned a batch, it was because I thought, “I’ll just check an email.” Toasting nuts is not multitasking time.
- Use your nose. The first whiff of a rich, toasty walnut scent is your sign to check. If you smell anything sharp or bitter, they’re likely done—or almost over.
- Pieces toast faster than halves. If you have a mix of pieces and halves, check the pan earlier or pull the smaller bits off as they brown.
- For baking, keep them plain. Salt, sugar, and oil can all slightly shift how a baked recipe behaves. Use plain toasted walnut halves for brownies, cakes, or cookies unless the recipe says otherwise.
- Cool completely before storing. Even a little trapped heat or steam can soften the nuts and make them stale faster.
- Don’t toss “almost burnt” nuts automatically. Very dark walnuts can sometimes taste pleasantly bitter in small amounts, especially in chocolate desserts. Taste before you toss.
FAQs About Toasted Walnuts
1. How long does it take to toast walnuts in the oven?
Usually 8–12 minutes at 325°F (165°C), depending on your oven and the size of the walnut pieces. Start checking around 7 minutes.
2. Can I toast walnuts on the stovetop instead of in the oven?
Yes—use a dry skillet over medium-low heat, stir frequently, and toast for about 5–8 minutes, watching carefully so they don’t burn.
3. Do I have to use oil when toasting walnuts?
No, you can toast them dry, especially if you’re using them for baking. Oil just helps with even browning and seasoning adhesion.
4. Why did my toasted walnuts turn out bitter?
They likely over-toasted or burned slightly. Dark brown or black spots can make them taste bitter—next time, lower the temperature or shorten the time.
5. Can I use this toasted walnuts recipe for other nuts?
Yes, this method works for many nuts—pecans, almonds, hazelnuts—but the timing may change a bit. Pecans toast similarly; almonds need a few extra minutes.
6. Are toasted walnuts healthy?
Yes—walnuts are rich in healthy fats, omega-3s, and some protein. Toasting doesn’t erase those benefits, though heavy sugary coatings can add extra calories.
7. Can I freeze toasted walnuts?
Absolutely. Store them in a well-sealed container or freezer bag and freeze for 3–4 months. Let them sit at room temperature for a few minutes before serving or baking.
8. Should I toast walnuts before adding them to baking recipes?
If you want deeper flavor and better texture, yes. Toasted walnuts for baking give a more pronounced nutty taste than raw walnuts baked directly in batter.
Wrapping It Up (And Passing You the Baking Sheet)
This simple Toasted Walnuts Recipe is one of those small kitchen habits that quietly upgrades so many things—snacks, salads, breakfasts, and all your favorite baked goods. It’s fast, flexible, and once you know how to toast walnuts without burning them, you’ll probably never go back to using them raw all the time.
If you try this recipe, I’d love to hear how you season your snack toasted walnuts—sweet, savory, or a little of both. Leave a comment with your favorite twist, and if you’re in a baking mood, try these walnuts in your next batch of banana bread, brownies, or oatmeal cookies.
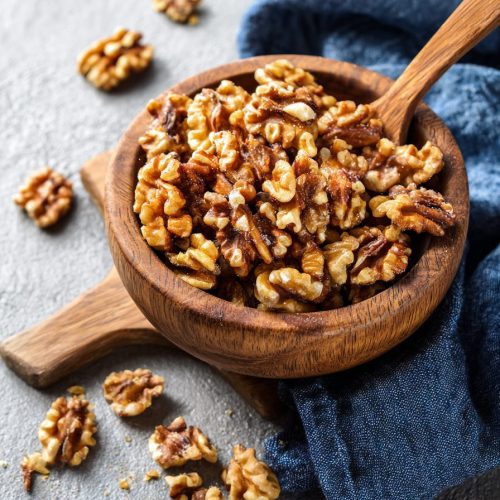
Toasted Walnuts (Oven Method)
Ingredients
- 2 cups walnut halves raw, untoasted, unsalted
- 1-2 teaspoons neutral oil optional; avocado, canola, or light olive oil
- 1/4-1/2 teaspoon fine sea salt optional, to taste
- 1-2 tablespoons maple syrup or honey optional, for sweet version
- 1/4 teaspoon ground cinnamon optional, for sweet version
- flaky sea salt small pinch, optional, for sweet version
- 1/2 teaspoon garlic powder or granulated garlic optional, for savory/herby version
- 1/2 teaspoon dried rosemary or thyme lightly crushed; optional, for savory/herby version
- freshly ground black pepper to taste; optional, for savory/herby version
- 1/4-1/2 teaspoon smoked paprika or chili powder optional, for spicy version
- cayenne pepper tiny pinch; optional, for spicy version
Instructions
- Preheat your oven to 325°F (165°C). Using a slightly lower temperature helps walnuts toast evenly without burning or turning bitter.
- Line a rimmed baking sheet with parchment paper or a silicone baking mat. This prevents sticking, makes cleanup easier, and keeps the nuts from picking up any off flavors from the pan.
- In a medium bowl, add the walnut halves, oil (if using), and any seasonings or sweeteners you like (keep them plain or just lightly salted if you plan to use them for baking). Gently toss until all of the walnuts are lightly and evenly coated.2 cups walnut halves, 1-2 teaspoons neutral oil, 1/4-1/2 teaspoon fine sea salt, 1-2 tablespoons maple syrup or honey, 1/4 teaspoon ground cinnamon, flaky sea salt, 1/2 teaspoon garlic powder or granulated garlic, 1/2 teaspoon dried rosemary or thyme, freshly ground black pepper, 1/4-1/2 teaspoon smoked paprika or chili powder, cayenne pepper
- Pour the coated walnuts onto the prepared baking sheet and spread them into a single layer with a little space between each piece. Avoid crowding the pan to ensure even toasting and a crisp texture.
- Place the baking sheet on the middle oven rack and toast for 8–12 minutes, stirring once about halfway through. Start checking around the 7-minute mark. The walnuts are done when they are lightly golden-brown, smell warm and nutty, and may have a few slightly darker spots but no black or burned areas.
- Remove the baking sheet from the oven and let the walnuts cool completely on the pan. They will crisp up as they cool. Once cooled, taste and adjust the salt if needed. Use immediately or store for later.