Would you like to save this?
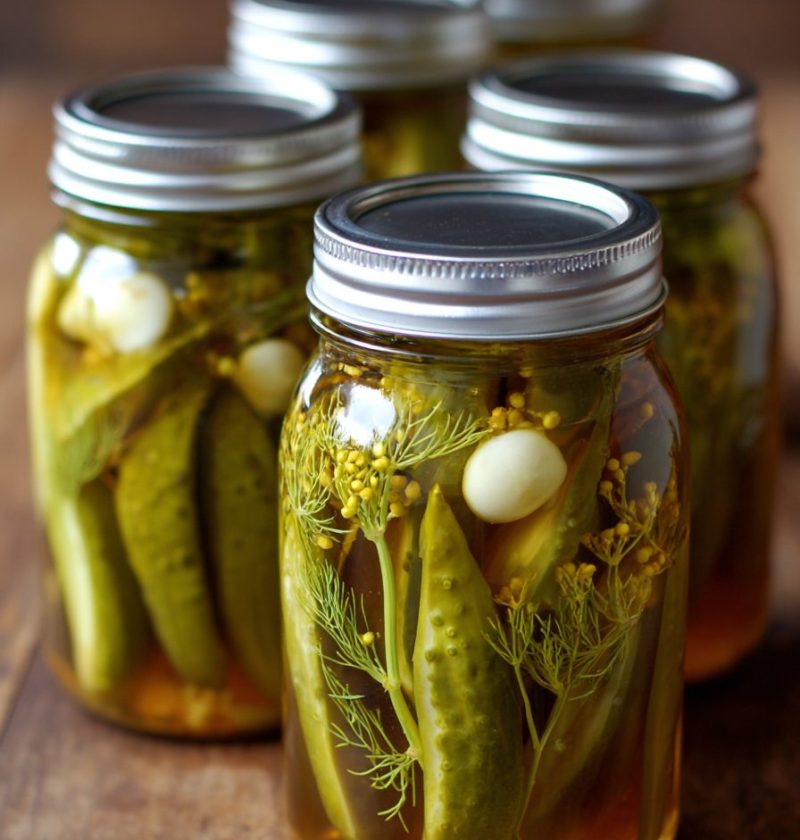
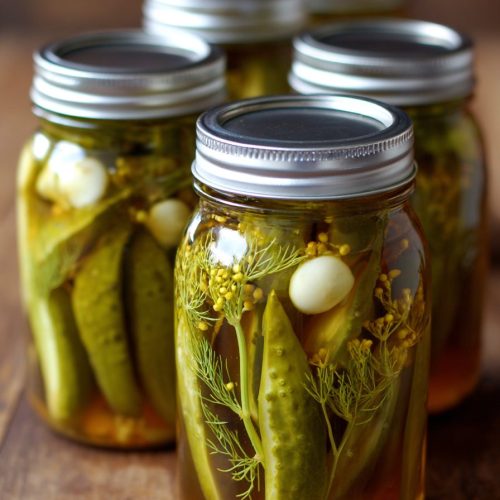
Canned Dill Pickle Recipe (Crisp, Garlicky & Pantry-Perfect)
If you’ve been dreaming about a reliable, crunchy Canned Dill Pickle Recipe that tastes like the old-fashioned jars Grandma kept in her cellar, you’re in exactly the right place.
This canned dill pickle recipe gives you crisp, garlicky, shelf-stable pickles using a simple vinegar pickling brine, basic water bath canning, and fresh cucumbers—perfect for stocking the pantry, sharing as gifts, or snacking straight from the jar.

What Makes This Canned Dill Pickle Recipe Special?
These are classic homemade dill pickles: firm, tangy, and packed with dill, garlic, and just enough salt to make them downright addictive. The recipe leans on a simple vinegar and salt brine and uses water bath canning so the jars are safely shelf stable for months.
I’ve been making some version of this canned dill pickle recipe for about 25 years now. My first batch was a sticky August afternoon with my aunt in her steamy little kitchen—jars clinking, canner boiling, every surface full of pickling cucumbers. We joked that the kitchen smelled like a salad bar exploded, but when we opened the first jar that winter… oh my. Pure crunch and nostalgia.
These homemade canned pickles are:
- Ideal for preserving cucumbers at the peak of summer.
- Dependable if you’re new to water bath canning.
- Flexible enough to tweak into spicy, extra-garlicky, or even “hamburger chip” style slices.
They’re also more budget-friendly than store-bought crunchy dill pickles, and you control the ingredients—no mystery additives, just clean pantry staples.
Why You’ll Love This Recipe
- Crunchy every time – Simple tricks (like pre-chilling cucumbers) give you crunchy dill pickles instead of soft, sad spears.
- Pantry-friendly & shelf stable – Proper water bath canning makes these shelf stable pickles that sit happily in your pantry for up to a year.
- Straightforward canning process – This is a great “first canning pickle recipe” if you’re new to canning and want success without stress.
- Flexible flavor – Easy to adjust the garlic, dill, and spices for sweet heat, extra tang, or mild kid-friendly flavor.
- Small-batch or big-batch friendly – Scale the brine and cucumbers up or down, whether you bring home a few pounds or a whole bushel.
- Fantastic for gifting – A jar of homemade dill pickles tucked into a holiday basket or hostess gift is always a hit.
- Naturally gluten-free & vegan – Just vinegar, salt, water, herbs and spices—nothing fussy or hard to source.
- Perfect for garden overload – A reliable preserving cucumbers method when your plants suddenly all ripen at once.
Ingredients for Classic Canned Dill Pickles
This recipe makes about 6 pint jars of garlic dill pickles. You can also use 3 quart jars if you prefer larger jars; just pack them tightly.
For the Pickles
-
4 pounds pickling cucumbers
Use small, firm pickling cucumbers—ideally 3–4 inches long. The fresher the better; cucumbers soften quickly after harvest. Look for smooth, unwrinkled skin and avoid any that feel bendy. -
6 cloves garlic, peeled
One clove per pint jar (use more if you like extra garlicky dill pickles). Fresh, firm cloves work best. -
12 sprigs fresh dill
Two sprigs per pint jar. Both the feathery fronds and the flowering dill heads are great. (Dried dill seed can be used in a pinch—see notes below.) -
1 ½ teaspoons black peppercorns
About ¼ teaspoon per pint jar. Adds a subtle heat and complexity. -
1 ½ teaspoons mustard seeds (optional but recommended)
Also about ¼ teaspoon per jar. Gives that classic deli pickle note. -
½ teaspoon red pepper flakes (optional)
Use more for spicy dill pickles or omit for a milder version. -
Grape leaves or bay leaves (optional, 6 pieces)
One per jar. The tannins can help maintain crunch. Not essential, but a nice old-fashioned trick.
For the Dill Pickle Brine
This vinegar pickling brine is simple and reliable:
-
4 cups water
Filtered or non-chlorinated if possible; hard or heavily chlorinated water can affect texture and taste. -
4 cups distilled white vinegar (5% acidity)
Gives that classic sharp dill pickle flavor. You can swap part of it with apple cider vinegar for a softer tang, but keep total acidity the same. -
½ cup pickling salt or canning salt
Don’t use regular table salt—it often has anti-caking agents that cloud the brine and can affect flavor. Kosher salt can work if it has no additives; measure by weight if you can. -
1 tablespoon sugar (optional, but I like it)
Doesn’t make the pickles sweet; it just rounds out the acidity.
Equipment You’ll Need
- Water bath canner or a large, deep stockpot with a lid
- Canning rack or a folded kitchen towel for the bottom of the pot
- 6 pint-size canning jars with new lids and rings
- Jar lifter (very handy and safer than tongs)
- Funnel and ladle
- Bubble remover or a clean butter knife
- Clean kitchen towels
Step-by-Step Directions
1. Prep Your Jars and Equipment
- Wash jars, lids, and rings in hot, soapy water and rinse well.
- Place the jars upright in your water bath canner or large pot. Cover with water and let them heat until they’re hot but not boiling. This helps prevent breakage when you add hot brine.
- Keep the lids and rings clean and ready on a towel. (Modern lids don’t always need pre-simmering—follow the instructions on your specific brand.)
Tip: I like to start heating my canner first—by the time my cucumbers and brine are ready, the jars are hot and waiting.
2. Prep the Cucumbers
- Wash the cucumbers thoroughly and trim ¼ inch from the blossom end. This side contains enzymes that can soften pickles.
- Decide how you want them cut:
- Spears – Cut small cucumbers into quarters lengthwise.
- Chips – Slice into ¼-inch rounds for Sandwich pickles.
- Whole – Keep them whole if they’re tiny (2–3 inches).
- For extra-crunchy dill pickles, you can soak the cucumbers in an ice water bath for 30 minutes before packing the jars. Pat dry before canning.
3. Make the Dill and Garlic Brine
- In a medium pot, combine 4 cups water, 4 cups distilled white vinegar, ½ cup pickling salt, and 1 tablespoon sugar.
- Bring to a gentle boil, stirring occasionally until the salt (and sugar, if using) fully dissolves.
- Reduce the heat to low to keep the brine hot while you pack the jars.
Here’s the thing: A hot brine poured into hot jars helps you get a good seal and reduces the risk of thermal shock.
4. Pack the Jars with Flavor
- Using your jar lifter, carefully remove one hot jar from the canner, pouring the water back into the pot. Place the jar on a kitchen towel.
- To the bottom of each pint jar, add:
- 1 clove garlic
- 2 dill sprigs (or 1 dill head + some fronds)
- ¼ teaspoon black peppercorns
- ¼ teaspoon mustard seeds (if using)
- A pinch of red pepper flakes (if using)
- 1 grape leaf or bay leaf (optional)
- Pack the cucumbers snugly into the jar, leaving about ½-inch headspace at the top. Don’t crush them, but don’t be shy about rearranging; tight packing helps keep them submerged in brine.
5. Add the Hot Brine
- Ladle the hot dill pickle brine into the jar using a funnel, covering the cucumbers completely while maintaining ½-inch headspace.
- Slide a bubble remover or a clean butter knife down the inside edges of the jar to release trapped air bubbles. Add a little more brine if needed to keep that ½-inch headspace.
- Wipe the jar rim with a clean, damp cloth so no spice or brine interferes with sealing.
- Center a lid on the jar and screw on the ring until fingertip tight—snug, but not cranked down.
Repeat steps 10–16 for all remaining jars.
6. Process in a Water Bath Canner
- Carefully place the filled jars back into the canner, ensuring they’re upright and not touching directly.
- Make sure there’s at least 1–2 inches of water above the tops of the jars. Add more hot water if needed.
- Bring the water to a full rolling boil, then start your timer:
- 10 minutes for pint jars at sea level.
- If you’re above 1,000 feet, add extra time based on your local canning guidelines (usually 5 extra minutes in many regions).
- When time is up, turn off the heat, remove the lid, and let the jars rest in the hot water for 5 minutes to settle.
7. Cool, Check Seals, and Store
- Using the jar lifter, transfer the jars to a clean towel, leaving space between them. Keep them upright and don’t tilt.
- Let them cool, undisturbed, for 12–24 hours. You’ll likely hear that satisfying “ping” as the lids seal.
- After cooling, check seals: the lids should be slightly concave and not flex when pressed in the center.
- Label with the date and store your canned dill pickles in a cool, dark place.
Very important: Let the jars sit at least 1–2 weeks before eating. The longer rest helps the flavors fully develop.
Servings & Timing
- Yield: About 6 pint jars (or 3 quart jars) of canned dill pickles
- Prep Time: 30–40 minutes (washing, trimming, packing cucumbers)
- Brine & Canning Time: 30–40 minutes (heating brine, processing jars)
- Total Active Time: About 1 hour 15 minutes
- Resting Time: 12–24 hours for cooling, plus at least 1 week for flavor development
Fun Variations on This Dill Pickle Canning Recipe
You know what? Once you’ve got the basic process down, it’s easy to play a little.
- Spicy Garlic Dill Pickles – Add an extra clove of garlic and ¼–½ teaspoon red pepper flakes per jar.
- Bread-and-Butter Style (Sweet Dill Hybrid) – Add 1–2 tablespoons sugar per jar and a few slices of sweet onion.
- Herby Garden Pickles – Add a few sprigs of fresh thyme or tarragon with the dill for a more complex flavor.
- Zesty Pickle Chips – Slice all cucumbers into ¼-inch rounds and add a lemon slice to each jar.
- Low-Sodium Pickles – Slightly reduce the salt (but not too much; it’s part of the preservation)—keep jars refrigerated if you cut the salt heavily.
- Mixed Veggie Pickles – Tuck in carrot sticks, cauliflower florets, or green beans with the cucumbers for a colorful mixed jar.
Storage & Make-Ahead Tips
- Pantry storage: Properly processed and sealed jars are shelf stable for up to 1 year in a cool, dark place (around 50–70°F).
- Refrigeration after opening: Once opened, keep the jar in the fridge and use within 1–2 months for best crunch and flavor.
- Make-ahead bonus: Canning is basically one big make-ahead project—do the work once, enjoy pickles for months.
- Softening prevention: Try to use your jars within a year; over longer periods the pickles can gradually lose some crunch, though they’re still safe if the seal holds and there’s no spoilage.
- Freezing: Don’t freeze; the texture turns mealy and the brine can get weird.
No reheating needed, of course—these are grab-straight-from-the-jar snacks. Just chill, pop the lid, and crunch away.
Notes & Helpful Tips from My Kitchen
- On vinegar: Always use vinegar that’s 5% acidity; it’s critical for safe water bath canning. I usually stick with plain white vinegar for a classic flavor, but you can replace up to half with apple cider vinegar if you like a fruitier tang.
- On salt: Pickling or canning salt is worth keeping around if you like to preserve food. It’s inexpensive, dissolves cleanly, and gives a clear brine—no cloudiness.
- On crunch: Besides ice baths and trimming the blossom end, grape leaves really can help. My Midwest grandmother swore by them, and I have to admit, she was onto something. If you can’t find grape leaves, bay leaves, black tea leaves, or oak leaves contain tannins too (use just one small leaf per jar).
- On spice levels: Remember that flavors intensify over time. A jar that seems mild the first week can be quite assertive by week four.
- On testing a jar early: I always crack one “test jar” around day 7. If it’s not strong enough in flavor for you, let the other jars sit another week or two.
Every batch teaches you a little more about your own taste—more garlic, less heat, more dill—and that’s part of the fun.
FAQs About Making Canned Dill Pickles
1. Can I use regular cucumbers instead of pickling cucumbers?
You can, but pickling cucumbers give much better texture. Regular slicing cucumbers tend to be more watery and can turn soft.
2. How do I keep my canned dill pickles crunchy?
Use very fresh cucumbers, trim the blossom end, soak in ice water, pack tightly, and process only as long as needed. Grape leaves or bay leaves also help.
3. Do I have to use a water bath canner?
You need some form of water bath canning for shelf-stable pickles. A large, deep stockpot with a rack works fine as long as the jars are fully submerged with extra water above.
4. Can I reuse jars and lids?
You can reuse glass jars and rings if they’re in good shape, but always use new lids for reliable seals.
5. How long should I wait before eating the pickles?
Give them at least 1 week, but 2–3 weeks is even better for deeper flavor and a more developed dill and garlic brine.
6. My brine turned cloudy—are the pickles still safe?
If you used table salt, cloudiness is common and not necessarily unsafe. But if you see mold, off smells, or bubbling fermentation, discard the jar.
7. Can I reduce the vinegar in the brine?
No, not for shelf-stable canning. The vinegar ratio in this dill pickle canning recipe keeps the acidity high enough for safe storage.
8. What if a jar doesn’t seal?
Store any unsealed jars in the refrigerator and eat those first—within a few weeks. Don’t try to reprocess after more than 24 hours.
Wrapping It Up (And Sealing Those Jars)
This canned dill pickle recipe gives you a dependable, crunchy, garlic-and-dill packed pickle you can proudly line up on your pantry shelves. With a simple vinegar and salt brine, basic water bath canning, and a few old-fashioned tricks, you’ll have homemade dill pickles ready for burgers, snack plates, and late-night fridge raids.
Give this a try the next time you come home with an armful of cucumbers—then let me know how it goes. Leave a comment with your tweaks (more garlic? extra heat?), share your own family stories of canning, and feel free to explore other preserving recipes while you’re here. Your future self, standing in front of the pantry in January, will be so glad you did.
Canned Dill Pickle Recipe (Crisp, Garlicky & Pantry-Perfect)
Ingredients
- 4 pounds pickling cucumbers small, firm, about 3–4 inches long; washed and trimmed
- 6 cloves garlic peeled; about 1 clove per pint jar (use more for extra garlicky pickles)
- 12 sprigs fresh dill about 2 sprigs per pint jar; fronds or flowering heads
- 1 1/2 teaspoons black peppercorns about 1/4 teaspoon per pint jar
- 1 1/2 teaspoons mustard seeds optional but recommended; about 1/4 teaspoon per jar
- 1/2 teaspoon red pepper flakes optional; use more for spicy pickles or omit for mild
- 6 grape leaves or bay leaves optional; about 1 leaf per jar, for crunch
- 4 cups water filtered or non-chlorinated if possible
- 4 cups distilled white vinegar 5% acidity; can replace up to half with apple cider vinegar but keep total acidity
- 1/2 cup pickling salt or canning salt; do not use regular table salt
- 1 tablespoon sugar optional; rounds out acidity but does not make pickles sweet
Instructions
- Wash canning jars, lids, and rings in hot, soapy water and rinse well. Place jars upright in a water bath canner or large deep pot, cover with water, and heat until hot but not boiling to prevent breakage. Keep lids and rings clean and ready on a towel; follow your lid manufacturer’s directions about pre-heating or not.
- Wash cucumbers thoroughly and trim about 1/4 inch from the blossom end to remove softening enzymes. Cut into spears (lengthwise quarters), 1/4-inch rounds for chips, or leave whole if they are very small (2–3 inches). For extra crunch, soak cucumbers in an ice water bath for 30 minutes, then drain and pat dry.
- In a medium pot, combine 4 cups water, 4 cups distilled white vinegar, 1/2 cup pickling salt, and 1 tablespoon sugar (if using). Bring to a gentle boil, stirring occasionally until the salt and sugar are fully dissolved. Reduce heat to low to keep the brine hot while packing jars.4 cups water, 4 cups distilled white vinegar, 1/2 cup pickling salt, 1 tablespoon sugar
- Using a jar lifter, remove one hot jar from the canner, pouring water back into the pot. To the bottom of the jar add 1 clove garlic, 2 sprigs fresh dill, about 1/4 teaspoon black peppercorns, about 1/4 teaspoon mustard seeds (if using), and a pinch of red pepper flakes (if using). Add 1 grape or bay leaf if using. Pack cucumbers snugly into the jar, leaving about 1/2 inch headspace at the top.4 pounds pickling cucumbers, 6 cloves garlic, 12 sprigs fresh dill, 1 1/2 teaspoons black peppercorns, 1 1/2 teaspoons mustard seeds, 1/2 teaspoon red pepper flakes, 6 grape leaves or bay leaves
- Ladle hot brine into the jar using a funnel, fully covering cucumbers while maintaining 1/2 inch headspace. Slide a bubble remover or clean butter knife down the inside of the jar to release air bubbles. Add more brine if needed to restore 1/2 inch headspace. Wipe the rim with a clean, damp cloth. Center a lid on the jar and screw on the ring until fingertip tight. Repeat packing and filling with remaining jars and cucumbers.
- Place filled jars back into the canner on the rack, upright and not touching. Ensure there is at least 1–2 inches of water above the jar tops; add hot water if needed. Bring to a full rolling boil, then process pint jars for 10 minutes at sea level (add extra time as recommended for altitudes above 1,000 feet). When time is up, turn off heat, remove the lid, and let jars rest in the hot water for 5 minutes.
- Using a jar lifter, transfer jars to a clean towel, leaving space between them. Keep upright and do not tilt. Let cool undisturbed for 12–24 hours. Check seals: lids should be slightly concave and not flex when pressed in the center. Label jars with the date and store in a cool, dark place. Allow pickles to sit at least 1–2 weeks before eating for best flavor.