Would you like to save this?
Blue Salt Trick Recipe – A Magical Kitchen Science Moment You’ll Actually Use
If you’ve ever wanted a party food trick that makes people stop mid-sentence and say, “Wait…how did you do that?” this Blue Salt Trick Recipe is for you—simple, no-cook, and wildly eye-catching.
What Is This Blue Salt Trick Recipe, Really?
Let me explain, because the name sounds a little mysterious.
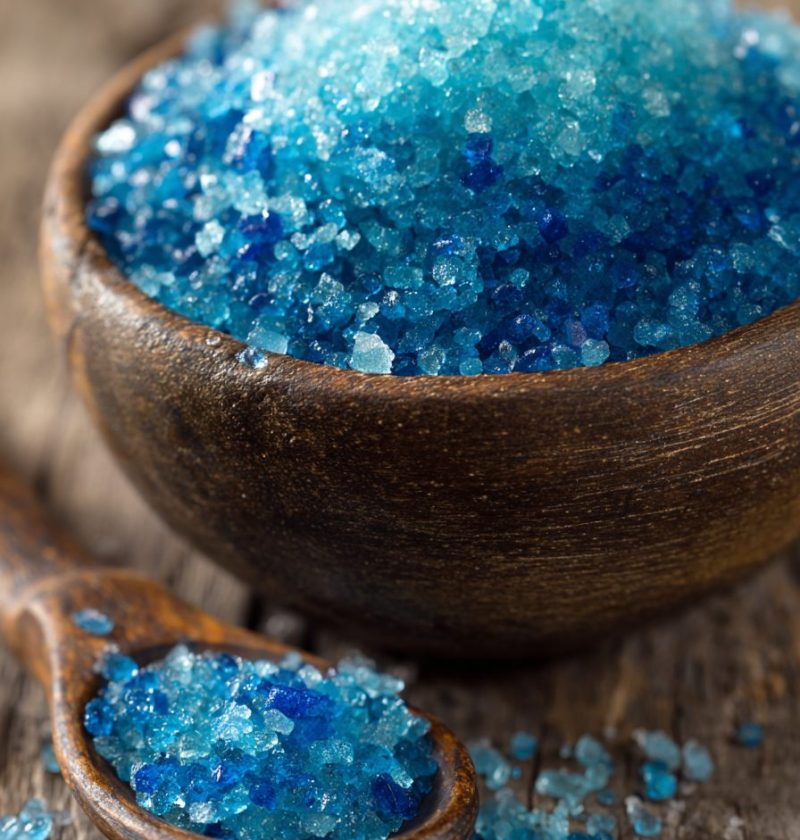
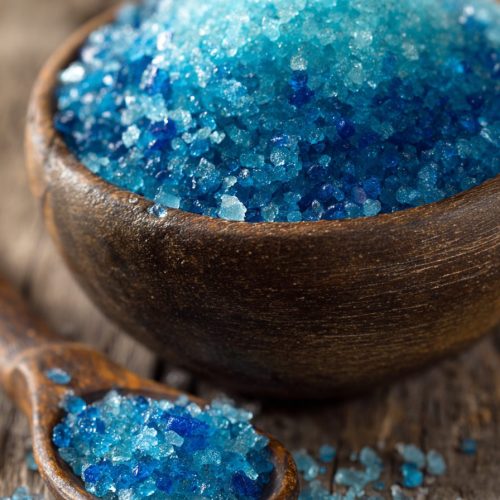
This Blue Salt Trick Recipe isn’t a single dish as much as it is a clever colored salt technique you can use a dozen different ways—on margarita glasses, over roasted veggies, sprinkled on chocolate truffles, or as a fun kitchen science trick with kids. You start with plain salt and transform it into a bright, ocean-blue sprinkle using basic pantry items and a bit of patience.
I first made this “magic” blue salt years ago for a beach-themed birthday party. I wanted something festive and a little whimsical that didn’t require hours in a hot kitchen. Blue sugar felt too sweet; I wanted something savory, pretty, and grown-up—but still fun. So I went down a rabbit hole of salt color change methods, tried all sorts of food coloring salt experiments, and landed on this version: vibrant color, no clumps, no strange taste.
Is it healthy? Well, it’s still salt—so we’re not calling it a superfood. But here’s what I do love:
- You control the Ingredients (no weird additives; just salt and food coloring).
- You can use natural colorings if you prefer, like spirulina or butterfly pea powder.
- A tiny pinch adds a huge visual punch, so you use less than you might think.
And you know what? For something so simple, this little culinary salt experiment turns any ordinary snack board into something that looks professionally styled.
Why You’ll Love This Blue Salt Trick Recipe
- Ridiculously easy: No cooking, no special tools—just a bowl, a spoon, and a baking sheet.
- Fast results: About 10 minutes of hands-on time plus drying; you can have it ready the same day.
- Party showstopper: Perfect for rimming cocktail glasses, dressing up deviled eggs, or sprinkling on party appetizers.
- Customizable color: Go from soft pastel blue to deep ocean blue by adjusting the food coloring.
- Kid-friendly kitchen science: A simple kitchen science trick that shows how salt and food coloring interact.
- Budget-friendly DIY: Cheaper than buying fancy finishing salts or specialty colored salts online.
- Make-ahead friendly: Store it in a jar and use your blue salt DIY for weeks.
- Versatile decoration idea: Works as a salt decoration idea for charcuterie boards, brunch tables, or even holiday spreads.
- Flexible ingredients: Use standard food coloring, gel, or natural powders, depending on your preferences.
- Scales up easily: Make a small batch for a cozy happy hour or a big batch for a big celebration.
Ingredients for the Blue Salt Trick Recipe
You only need a handful of basic items to pull off this blue salt trick. I’ll give measurements for a modest batch, but you can double or triple it easily.
-
1 cup coarse sea salt
Use coarse or kosher salt, not fine table salt. Coarser grains show off the color better and don’t clump as easily. (I often use Morton Coarse Kosher Salt or a medium-grain sea salt.) -
3–6 drops blue liquid food coloring
Regular grocery-store food coloring works just fine. For a lighter, sky-blue shade, start with 3 drops; for deeper, ocean-blue salt, go up to 6 drops. -
1–2 teaspoons water
Just enough to help distribute the coloring. Too much water equals clumpy salt, so we go light. -
Optional: 1–2 drops green food coloring
A tiny touch of green gives a teal, “mermaid lagoon” vibe. Don’t overdo it—one drop can be enough. -
Optional (natural version): ½–1 teaspoon blue spirulina or butterfly pea powder
For those who prefer a natural food coloring salt, you can skip the liquid colors and use a powder instead; just whisk it with a teaspoon of water first to help it cling to the salt.
Ingredient Tips:
- Salt type: Avoid iodized table salt here. The powder-fine texture clumps more and doesn’t look as pretty. Coarse or “flake” salt is the star.
- Food coloring form: Liquid is easy for beginners. Gel food color is more concentrated; use a toothpick’s tip instead of full drops.
- Color intensity: Remember, the salt will look darker when wet and lighten slightly as it dries—so don’t panic if it looks intense at first.

Step-by-Step Directions: How To Make the Blue Salt Trick Recipe
1. Prep your drying surface
Line a baking sheet or large plate with parchment paper. This gives you a non-stick surface and makes cleanup easy. Spread the paper flat so there are no big wrinkles that trap salt.
2. Add the salt to a mixing bowl
Pour your 1 cup coarse sea salt (or kosher salt) into a medium bowl. A white or light-colored bowl helps you see the color change clearly as you mix.
3. Mix the coloring liquid (your “blue magic”)
In a small cup or bowl, combine:
- 3–6 drops blue food coloring
- 1 teaspoon water
Stir well so the color disperses evenly. If you’re using gel coloring, swirl a toothpick tip in the water instead of full drops. For a teal shade, stir in 1 drop green. It’s always easier to add more color than to fix an overly dark shade, so err on the lighter side.
Naturally colored version: Stir ½–1 teaspoon blue spirulina or butterfly pea powder with 1 teaspoon water until smooth.
4. Slowly drizzle and stir
Now comes the fun part of this colored salt technique. Drizzle about half of the colored liquid over the salt. Using a spoon (or clean hands), stir and toss the salt vigorously, coating as many crystals as possible. Think of folding a salad: scoop from the bottom, toss upward, and turn the bowl as you go.
You’ll see salt color change gradually as you go—from white to speckled blue to more evenly coated.
5. Adjust color and moisture
Take a look at your salt. If you see:
- Color too pale? Add a little more of the coloring water (or an extra drop or two of food coloring mixed in ½ teaspoon water).
- Too wet or clumpy? Add another tablespoon or two of plain salt to the bowl and mix again. This helps distribute both moisture and color.
You’re aiming for evenly tinted, slightly damp crystals that still pour and separate when you stir them with the spoon.
6. Spread the salt to dry
Transfer the blue salt to your parchment-lined baking sheet. Spread it into a thin, even layer with the back of the spoon or your fingers. The more spread out it is, the faster it dries. Try not to pile it thick in the center.
7. Air dry (or speed it up in the oven)
Let the salt air dry at room temperature for 4–6 hours, or overnight if your kitchen is humid. Stir once or twice during drying to break up any forming clumps.
Want to speed it up?
- Preheat your oven to the lowest setting (usually 170–200°F / 75–95°C).
- Turn the oven off.
- Place the tray of salt inside with the door cracked slightly for 30–45 minutes, stirring halfway.
You’re not baking the salt—just using the residual warmth to dry it.
8. Break up clumps and bottle it up
Once fully dry, rub the salt between your fingers to break up any small clumps. It should feel dry and loose, not sticky. Funnel or spoon your blue salt into a small glass jar, spice bottle, or even an old salt shaker (clean and fully dry, of course).
Label it with the date and a fun note like “Mermaid Blue Salt” or “Ocean Rim Salt.” Future you will appreciate it.
Servings & Timing
- Yield: About 1 cup blue salt (enough to rim 20–25 cocktail glasses or garnish multiple platters)
- Prep Time: 10 minutes
- Drying Time: 4–6 hours (or about 45 minutes with oven-boosted drying)
- Total Time: Roughly 15 minutes active time, plus drying
Fun Variations on the Blue Salt Trick Recipe
Once you’ve made the basic version, it’s Hard not to play. Here are some quick twists:
- Citrus cocktail salt: Mix in 1–2 teaspoons finely grated lime or orange zest before drying for a fragrant margarita rim.
- Smoky party salt: Add ½ teaspoon smoked paprika or chipotle powder for a blue-and-rust colored salt with a smoky kick.
- Glitter party salt: Stir in a pinch of edible glitter or luster dust for a sparkling cocktail rim—especially fun for New Year’s or kids’ mocktails.
- Pastel sprinkle salt: Use just 1–2 drops of food coloring and mix with flaky salt (like Maldon) for a soft pastel “confetti” effect.
- Rainbow salt set: Make multiple batches in different colors (blue, pink, purple, yellow) and serve them as a whimsical salt tasting board.
- Herb-flecked version: Once the salt is dry, stir in finely chopped dried herbs like dill or parsley for a savory finishing salt with a hint of green speckle.
Storage & Make-Ahead Tips
One of my favorite things about this blue salt DIY is how well it stores.
- Storage: Keep your blue salt in an airtight jar at room temperature, away from moisture and direct sunlight. A cabinet or pantry shelf is ideal.
- Shelf life: Up to 6 months for the plain version. If you added fresh citrus zest, I recommend using it within 2–3 weeks and storing in the fridge.
- Reheating or drying again: If your salt picks up moisture and feels slightly damp or clumpy, spread it on a tray and let it air dry for a few hours, or pop it into a barely warm oven (turned off) for 20–30 minutes.
- Make-ahead: This is perfect for making ahead of parties. You can prepare big batches several weeks before, so party day is all assembly and fun—not scrambling.
Notes from My Kitchen Tests
After a few rounds of “why is my salt clumpy?” and “oops, that’s neon,” here’s what I learned:
- Less water is your friend. The biggest mistake is adding too much liquid. If your salt starts looking like wet sand, sprinkle in more plain salt and stir until it loosens.
- Color lightens as it dries. If your wet salt looks exactly like the color you want, it might finish a shade lighter. Aim just a tiny bit deeper than your final goal.
- Gel food color is more powerful. If you’re using gel, start with the tiniest amount—literally a toothpick’s tip. You can always add more.
- Humidity matters. On very humid days, drying can take longer. If your climate is sticky (hello, summer in the South), use the oven-drying method.
- Natural colors are softer. Blue spirulina or butterfly pea powder gives a gorgeous but more muted tone and sometimes a mild earthy flavor. That’s lovely on savory dishes but can slightly alter the taste of delicate sweets.
- Try a test spoon. Before you salt an entire tray of appetizers, sprinkle a pinch over one bite and taste it. Adjust intensity or flavor add-ins (like citrus zest or herbs) from there.
FAQs About the Blue Salt Trick Recipe
1. Does the blue salt taste different from regular salt?
On its own, no—the base flavor is the same, unless you add herbs, zest, or spices. Basic food coloring doesn’t add flavor if you use just a few drops.
2. Can I use regular table salt for this recipe?
You can, but I don’t recommend it. Fine table salt tends to clump more and doesn’t show off the pretty blue crystals as well as coarse or flake salt.
3. Is this blue salt safe for kids to eat?
Yes, when made with standard food-grade coloring, it’s safe in normal amounts. Just treat it like regular salt and go easy—especially with younger kids.
4. How can I make this with natural color instead of food dye?
Use blue spirulina or butterfly pea powder mixed with a bit of water, then follow the same mixing and drying steps. Expect a more subtle shade and a slight earthy note.
5. My salt is clumping—what went wrong?
Most likely, too much water or high humidity. Add extra plain salt, mix well, and spread it very thin to dry. You can also use the warm-oven method to help it dry faster.
6. Can I use this blue salt for rimming glasses ahead of time?
Yes. Moisten the rim, dip in your blue salt, and let it dry for 5–10 minutes. If you’re prepping several hours ahead, store the glasses in a cool spot away from steam or condensation.
7. Will the color stain my plates or fingers?
A tiny bit may transfer if the salt is still damp. Once fully dry and used sparingly, staining is minimal. If you’re worried about porous surfaces (like unfinished wood), serve on lined platters.
8. Can I mix flavors like sweet and salty with this?
Absolutely. For example, sprinkle blue salt over dark chocolate bark, caramel popcorn, or Brownies. The sweet-salty contrast is lovely, and the blue color makes it look like something from a boutique bakery.
Wrapping It Up: Why This Little Trick Is Worth Remembering
This Blue Salt Trick Recipe is one of those low-effort, high-impact kitchen tricks I wish I’d learned in my 20s. It’s simple, fun, and strangely satisfying—like arts and crafts for people who also love snacks. A small jar of blue salt turns everyday foods into party-worthy nibbles, and it’s a great way to get kids (and honestly, adults) curious about what’s happening in the kitchen.
If you try this blue salt trick, I’d love to hear how you used it—cocktail rims, roasted potatoes, deviled eggs, or something completely unexpected. Leave a comment with your creations, or bookmark this recipe and share it with a friend who loves a good party food trick. And if you enjoyed this, you might also like experimenting with other homemade finishing salts and simple kitchen science ideas that make cooking feel a little more magical.
Blue Salt Trick Recipe
Ingredients
- 1 cup coarse sea salt or coarse kosher salt; avoid fine iodized table salt
- 3-6 drops blue liquid food coloring use fewer drops for pastel blue, more for deep ocean blue
- 1-2 teaspoons water start with 1 teaspoon; add only as needed to distribute color
- 1-2 drops green food coloring optional; 1 drop creates a teal or "mermaid" blue
- 1/2-1 teaspoon blue spirulina or butterfly pea powder optional natural color version; mix with water before adding to salt
Instructions
- Line a baking sheet or large plate with parchment paper to create a non-stick surface for drying. Smooth out any large wrinkles so the salt can spread in an even layer.
- Place 1 cup of coarse sea salt (or coarse kosher salt) into a medium mixing bowl. A white or light-colored bowl makes it easier to see the color develop as you mix.1 cup coarse sea salt
- In a small cup or bowl, stir together 3–6 drops blue liquid food coloring and 1 teaspoon water until evenly combined. For a teal shade, mix in 1 drop green food coloring. If using blue spirulina or butterfly pea powder, mix 1/2–1 teaspoon of the powder with 1 teaspoon water until smooth.3-6 drops blue liquid food coloring, 1-2 teaspoons water, 1-2 drops green food coloring, 1/2-1 teaspoon blue spirulina or butterfly pea powder
- Drizzle about half of the colored liquid over the salt. Stir vigorously with a spoon or your hands, folding and tossing so the color coats as many crystals as possible. Continue adding the colored liquid a little at a time, mixing well after each addition, until the salt is evenly tinted and only slightly damp.1 cup coarse sea salt, 3-6 drops blue liquid food coloring, 1-2 teaspoons water, 1-2 drops green food coloring, 1/2-1 teaspoon blue spirulina or butterfly pea powder
- Check the salt. If the color is too pale, mix an extra drop or two of food coloring into 1/2 teaspoon water and add gradually, stirring well. If the salt seems wet or clumpy, sprinkle in an extra tablespoon or two of plain coarse salt and mix until the crystals feel loose and separate again.1 cup coarse sea salt, 3-6 drops blue liquid food coloring, 1-2 teaspoons water
- Transfer the tinted salt to the parchment-lined baking sheet. Spread it into a thin, even layer using the back of a spoon or your fingers. The thinner the layer, the faster and more evenly it will dry.1 cup coarse sea salt
- Let the salt air dry at room temperature for 4–6 hours or overnight, stirring once or twice to break up any clumps. To speed things up, preheat your oven to the lowest setting (about 170–200°F / 75–95°C), then turn the oven off. Place the tray of salt inside with the door cracked slightly for 30–45 minutes, stirring halfway through. You are only drying the salt, not baking it.
- Once the salt is completely dry, rub it between your fingers to break up any remaining clumps. Transfer the blue salt to a clean, dry glass jar, spice bottle, or shaker. Seal tightly, label, and store at room temperature away from moisture and direct sunlight.1 cup coarse sea salt