Would you like to save this?
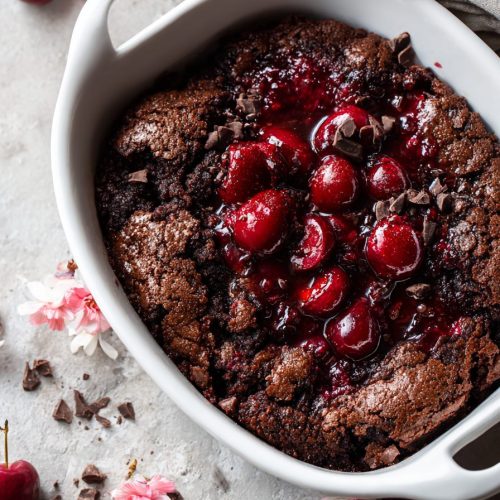
Chocolate Cherry Dump Cake Recipe
If you’re craving a rich, gooey, Chocolate cherry dessert that takes almost no effort, this Chocolate Cherry Dump Cake Recipe is going to be your new favorite “company’s coming in an hour” trick.
What Is Chocolate Cherry Dump Cake, Anyway?
Let me explain, because “dump cake” isn’t exactly the most glamorous name, right?
A chocolate cherry dump cake is a cozy, cobbler-style dessert made with just a few pantry staples—usually chocolate cake mix, cherry pie filling, and butter. You literally “dump” everything into the baking dish, bake it off, and out comes this bubbly, fudgy, cherry-filled dessert that tastes like you fussed all afternoon.
This version leans into that deep chocolate flavor with a boxed cake mix and highlights the sweet-tart cherries from canned cherry pie filling. It’s a simple cherry chocolate cake that feels special enough for the holidays, but easy enough to throw together on a random Tuesday when you just need something warm and chocolatey after dinner.
When my kids were little, this was my go-to “oh no, I forgot dessert” recipe. I could keep a box of chocolate cake mix and a couple of cans of cherry pie filling in the pantry, and nobody ever guessed it started with a mix. They just asked for seconds.
It’s also a lovely recipe for newer bakers or busy folks—there’s no mixer, no frosting, no decorating. Just press, sprinkle, pour, and bake. And if you want to make it a little lighter or a little richer, I’ll share some variations below.
So if you’re searching for an easy dump Cake Recipe, a quick cherry chocolate dessert, or a boxed cake mix recipe you can actually feel proud to share, this Chocolate Cherry Dump Cake Recipe checks all those boxes.
Why You’ll Love This Chocolate Cherry Dump Cake Recipe
- Only 3 main ingredients – This is a true 3 ingredient dump cake: chocolate cake mix, cherry pie filling, and butter.
- Ridiculously easy – No mixer, no frosting, very little measuring. It’s almost impossible to mess up.
- Crowd-pleasing flavor – Think chocolate-covered cherries, but warm, gooey, and in casserole form.
- Perfect for last-minute guests – You can keep everything on hand for a “just in case” chocolate cherry dessert.
- Flexible and forgiving – Works with different cake mixes, pie fillings, and lots of fun add-ins.
- Cobbler-style comfort – It’s like a chocolate cherry cobbler style dessert: crisp on top, jammy and soft underneath.
- Budget-friendly – Uses pantry staples and store brands work just as well as the fancy names.
- Great with almost any topping – Vanilla ice cream, whipped cream, chocolate sauce, even yogurt if you want to make breakfast feel exciting.
Ingredients for the Easiest Chocolate Cherry Dessert
Here’s exactly what you’ll need for this Chocolate Cherry Dump Cake Recipe. I’ll add little notes as we go, like we’re shopping together.
- 2 cans (21 ounces each) cherry pie filling
- Look for “cherry pie filling” rather than just canned cherries. The pie filling already has sugar and thickener. Store brand is fine.
- 1 box (15.25 ounces) chocolate cake mix
- Any regular chocolate cake mix works (Duncan Hines, Betty Crocker, Pillsbury). Devil’s food gives a deeper cocoa flavor.
- 1/2 cup (1 stick / 113 g) unsalted butter, melted
- Salted butter works too—just skip any added salt. Melting helps the top bake up more evenly.
Optional but highly recommended add-ins:
- 1 teaspoon vanilla extract – Stirred into the cherry pie filling for a little extra warmth.
- 1/2 teaspoon almond extract – Cherry and almond are like old friends; this makes it taste bakery-made.
- 1/2 cup semi-sweet chocolate chips – For an extra gooey, Fudge-like layer.
- 1/4 cup chopped nuts (pecans or walnuts) – Sprinkle on top for crunch, if your crowd likes nuts.
- Pinch of salt – If you’re using unsalted butter and want that sweet-salty balance.
A quick note about cake mix: if you only have a slightly larger or smaller box (some gluten-free or special brands are), don’t stress. Anything in the 15–18 ounce range will work; the texture may be a hair thicker or thinner, but still delicious.

Step-by-Step Directions (It’s Really This Simple)
-
Preheat your oven and prep the pan.
Set your oven to 350°F (175°C). Lightly grease a 9×13-inch baking dish with butter or nonstick spray. This keeps the edges from sticking and makes serving much easier. -
Spread the cherry pie filling.
Open both cans of cherry pie filling and spoon them into the baking dish. Use a spatula to spread the filling into an even layer.- If you’re using vanilla or almond extract, stir them into the cherry layer right in the pan. Fewer dishes to wash—my kind of recipe.
-
Add extra chocolate (if using).
Sprinkle chocolate chips evenly over the cherry layer. They’ll melt into little pockets of fudgy goodness. You can also add a small handful of nuts here if you want crunch throughout. -
Add the dry cake mix.
Open the box of chocolate cake mix and sprinkle the dry mix evenly over the cherries. Don’t stir. Gently shake the pan back and forth so the mix spreads out and covers as much of the cherries as possible.- A small offset spatula or clean dry hand can help nudge any stubborn clumps into place.
-
Pour on the melted butter.
Melt the butter in the microwave or on the stove. Slowly drizzle the melted butter over the surface of the dry cake mix, trying to cover as much of the top as you can.- A few dry spots are fine; the cherry filling will bubble up and moisten them as it bakes.
- If you see large dry patches, you can lightly mist them with cooking spray, or drizzle an extra tablespoon or two of butter.
-
Add nuts on top (optional).
If you’re a nut lover, sprinkle chopped pecans or walnuts over the buttery cake mix. They’ll toast as the cake bakes and give a lovely crunch. -
Bake until bubbly and set.
Place the pan in the preheated oven and bake for 35–45 minutes.- You’ll know it’s done when the top looks set and slightly crisp, and you see the cherry filling bubbling up around the edges.
- If you like a crispier top, let it go closer to 45 minutes. For a softer, more cake-like top, start checking around 35 minutes.
-
Cool slightly and serve warm.
Let the chocolate cherry dump cake rest for about 10–15 minutes. This helps it thicken a bit so it’s easier to scoop.
Serve warm, ideally with vanilla ice cream or whipped cream. If you’re feeling fancy, a drizzle of chocolate sauce or a few fresh cherries on top looks beautiful.
Servings & Timing
- Yield: About 10–12 servings (depending on how big you scoop—I’ve seen it serve 8 in my family!)
- Prep Time: 10 minutes
- Bake Time: 35–45 minutes
- Rest Time: 10–15 minutes
- Total Time: About 1 hour
This makes it perfect for weeknight desserts, casual potlucks, or a quick chocolate cherry dessert after Sunday dinner.
Fun Variations on This Simple Cherry Chocolate Cake
You know what? Once you’ve made the classic version, it’s hard not to start playing with it. Here are a few ideas:
- Black Forest Style – Use devil’s food cake mix, add a splash of kirsch or cherry liqueur to the filling (for adults), and top with whipped cream and shaved chocolate.
- “Almost Healthy” Twist – Use reduced-sugar cherry pie filling and a sugar-free or reduced-sugar chocolate cake mix for a lighter take.
- Triple Chocolate Dump Cake – Stir in Dark Chocolate chips with the cherries and sprinkle mini chocolate chips on top of the cake mix.
- Cherry Cola Version – Replace half the melted butter with room temperature cola for a fun flavor and a slightly lighter texture.
- Gluten-Free Chocolate Cherry Dump Cake – Use a gluten-free chocolate cake mix and double-check that your pie filling is gluten-free.
- Mocha Cherry Dessert – Stir 1 tablespoon instant espresso powder into the dry cake mix for a subtle coffee flavor that makes the chocolate taste deeper.
How to Store, Reheat, and Make Ahead
This chocolate cherry cobbler-style cake keeps surprisingly well, which makes it great for making ahead.
-
Room Temperature:
- If your kitchen is cool, you can keep the cake tightly covered at room temperature for up to 1 day.
-
Refrigerator:
- Store leftovers in an airtight container (or cover the baking dish well) in the fridge for up to 4 days.
- The topping will soften a little, but the flavors get even more cozy.
-
Freezer:
- Cool the cake completely, then wrap well and freeze for up to 3 months.
- For easier serving later, freeze in individual portions.
-
Reheating:
- Microwave: Warm single servings for 20–40 seconds until heated through.
- Oven: Cover the pan loosely with foil and reheat at 300°F (150°C) for 10–15 minutes.
- If reheating from frozen, thaw overnight in the fridge first for the best texture.
-
Make-Ahead Tip:
- You can assemble the cherry layer and have the dry cake mix measured out and ready. When you’re close to serving time, sprinkle on the mix, add the butter, and bake fresh.
Notes from My Kitchen (Little Things That Help)
- Use room temperature pie filling if you can. Cold filling straight from the fridge works, but room temperature helps the cake bake more evenly.
- Don’t pack down the cake mix. Lightly sprinkle it—if you press it, the top can turn a bit dense instead of crisp.
- Golden spots are good. A few deeply browned areas give a nice crunchy contrast to the soft cherries underneath.
- Let it rest before scooping. Ten minutes doesn’t sound like much, but it really helps the cherry pie filling thicken up, so you get more of that cobbler-style scoop rather than a cherry puddle.
- Taste your pie filling. If it’s very sweet, you can balance it with a pinch of salt or a squeeze of lemon juice stirred into the cherries.
- Serve it warm, not piping hot. The flavors show up better once it cools very slightly; plus, your tongue will thank you.
Honestly, this is one of those boxed cake mix desserts that reminds me why “semi-homemade” has such a loyal following. It’s easy, fast, and still feels like a homemade treat.
Frequently Asked Questions
1. Can I use a different flavor of cake mix?
Yes, you can! Yellow cake mix, fudge cake mix, or even dark chocolate all work. Each one will give the chocolate cherry dump cake a slightly different personality, but they all taste great.
2. Can I use fresh or frozen cherries instead of pie filling?
You can, but you’ll need to cook them with sugar and a little cornstarch first to mimic the thickness and sweetness of cherry pie filling. Using ready-made pie filling keeps this a true easy dump cake recipe.
3. Why is my dump cake still powdery on top?
You probably had some dry spots that didn’t get enough butter or moisture from the cherries. Next time, drizzle the butter more evenly and gently shake the pan to help the cake mix settle. You can also lightly mist any dry areas with cooking spray before baking.
4. Can I make this Chocolate Cherry Dump Cake Recipe dairy-free?
Yes. Use a dairy-free margarine or vegan butter in place of regular butter, and check that your cake mix is dairy-free. Most are, but it’s worth a quick label check.
5. Is this recipe gluten-free?
Not as written, because regular cake mix contains wheat. To make a gluten-free chocolate cherry dessert, use a gluten-free chocolate cake mix and confirm your cherry pie filling is gluten-free.
6. Do I need to refrigerate leftovers?
After the first day, yes. Store leftovers covered in the fridge for up to 4 days. Reheat gently for that fresh-from-the-oven feel.
7. Can I cut the recipe in half?
You sure can. Use a small baking dish (about 8×8 inches), 1 can of pie filling, half the cake mix, and 1/4 cup butter. Keep an eye on the baking time; it may be a little shorter.
8. What’s the best way to serve this for guests?
Scoop warm portions into bowls, top with a small scoop of vanilla ice cream or whipped cream, and maybe add a sprinkle of shaved chocolate or sliced almonds. It looks and tastes like a restaurant dessert, but with almost no work.
Wrapping It Up (And Serving It Warm)
This Chocolate Cherry Dump Cake Recipe is one of those quietly brilliant desserts: simple ingredients, hardly any prep, and a big payoff in comfort and flavor. It’s rich, chocolatey, a little tart from the cherries, and incredibly cozy—especially served warm with ice cream.
If you try this chocolate cherry dump cake, I’d love to hear how it went—tell me if you added your own twist or stuck with the classic. And if you enjoy easy desserts like this, check out some of my other quick cherry and chocolate treats next time you’re in the mood for something sweet but short on time.
Chocolate Cherry Dump Cake
Ingredients
- 2 cans (21 oz each) cherry pie filling
- 1 box (15.25 oz) chocolate cake mix regular or devil’s food
- 1/2 cup unsalted butter melted (1 stick / 113 g)
- 1 teaspoon vanilla extract optional
- 1/2 teaspoon almond extract optional
- 1/2 cup semi-sweet chocolate chips optional
- 1/4 cup chopped nuts pecans or walnuts, optional
- pinch of salt optional, especially if using unsalted butter
Instructions
- Preheat the oven to 350°F (175°C). Lightly grease a 9×13-inch baking dish with butter or nonstick spray.
- Spoon the cherry pie filling into the prepared baking dish and spread into an even layer. If using vanilla or almond extract (and a pinch of salt, if desired), stir them into the cherry layer right in the pan.2 cans (21 oz each) cherry pie filling, 1 teaspoon vanilla extract, 1/2 teaspoon almond extract, pinch of salt
- Sprinkle the chocolate chips evenly over the cherry layer. You can also add a small handful of nuts here if you want crunch throughout.1/2 cup semi-sweet chocolate chips, 1/4 cup chopped nuts
- Sprinkle the dry chocolate cake mix evenly over the cherries and chocolate chips. Do not stir. Gently shake the pan to help the mix cover the cherry layer as evenly as possible.1 box (15.25 oz) chocolate cake mix
- Slowly drizzle the melted butter over the surface of the dry cake mix, trying to cover as much of the top as possible. A few small dry spots are fine; the cherry filling will bubble up as it bakes.1/2 cup unsalted butter
- If desired, sprinkle additional chopped pecans or walnuts evenly over the top. They will toast as the cake bakes.1/4 cup chopped nuts
- Bake in the preheated oven for 35–45 minutes, until the top looks set and lightly crisp and the cherry filling is bubbling around the edges.
- Let the dump cake rest for 10–15 minutes to thicken slightly. Serve warm, ideally with vanilla ice cream or whipped cream.