Would you like to save this?
Cornflake Wreaths Recipe
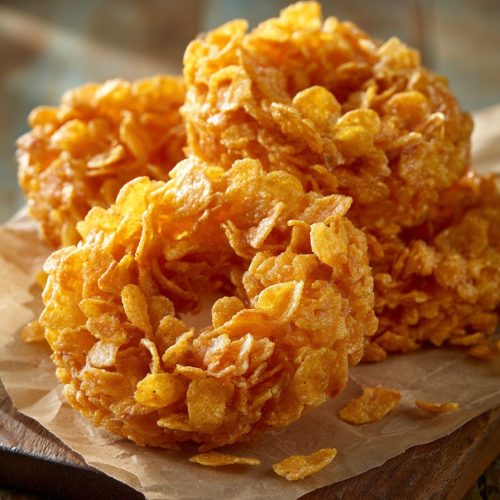
If you’re looking for a festive, no-fuss holiday treat that kids and adults both adore, this Cornflake Wreaths Recipe is your new go-to December tradition—no oven, no stress, just chewy, buttery, Marshmallow magic shaped into cute little Christmas wreath desserts.
A Sweet Holiday Story Behind These Cornflake Wreaths
Let me explain why this simple little recipe means so much to me.
These marshmallow cornflake wreaths are one of those classic American Christmas Treats that have been floating around church potlucks and school bake sales since at least the 1960s. They’re basically the holiday twin of Rice Krispie treats—but with cornflakes for crunch, green food coloring for that Christmas wreath look, and little red candies for “berries.”
Every December, my kitchen turns into a mini workshop for easy Christmas cookies: no-bake cornflake wreaths on one counter, chocolate bark on another, something with peppermint in the fridge. I started making these when my kids were in elementary school because they were labeled as “kids Christmas baking.” Translation: simple enough for little hands, but still cute enough for the cookie tray at the office.
What makes this Cornflake Wreaths Recipe special?
- It’s a stovetop cornflake cookies recipe—no oven needed.
- The wreaths stay soft and chewy, not rock-hard, thanks to a gentle marshmallow method.
- They look like edible Christmas wreaths, but they’re essentially holiday cornflake snacks that you can grab and munch with a cup of coffee or cocoa.
- You can easily tweak them for allergies or preferences—dairy-free, gluten-free cornflakes, less food coloring, different candies, and so on.
Search trends for “christmas cornflake wreaths” and “no bake cornflake wreaths” always spike in late November and December, and I understand why. Busy families want festive cereal wreaths and cornflake Christmas treats that don’t tie them to the oven all day.
So let’s walk through this step by step, like we’re standing in my kitchen together—aprons on, Christmas music playing a little too loud.
Why You’ll Love This Cornflake Wreaths Recipe
You know what? Let’s get practical for a second. Here’s exactly why this recipe earns a permanent spot in your holiday binder.
- No oven needed: These holiday cornflake cookies are completely no-bake—perfect when the oven is busy with pies and hams.
- Quick to make: About 20 minutes of hands-on time, and you’re done (cooling time is mostly hands-off).
- Kid-friendly project: Safe and fun for kids Christmas baking—with adult help at the stove, they can do all the shaping and decorating.
- Budget-conscious: Simple pantry ingredients—cornflakes, marshmallows, butter, and food coloring—stretch into a whole tray of treats.
- Festive and cute: Bright green cornflake wreath cookies with little red “berries” look charming on cookie trays and dessert tables.
- Portable and party-ready: Great for potlucks, school parties, office snack tables, and cookie exchanges.
- Easy to customize: Make them smaller, bigger, more or less sweet, or even use holiday sprinkles instead of candies.
- Crowd-pleasing texture: Chewy, buttery, marshmallow cornflake wreaths with little crispy edges—no one explains it, they just keep reaching for another.
- Perfect make-ahead treat: These cornflake holiday snacks keep well for several days, so you can prep before the rush kicks in.
Ingredients for Festive Cereal Wreaths
Here’s everything you’ll need to make this classic Cornflake Wreaths Recipe at home. I’ll include some substitutions and little tricks I’ve picked up over the years.
-
6 cups cornflakes cereal
Use plain cornflakes (not frosted); classic Kellogg’s Corn Flakes work well, but any crisp brand is fine. Slightly crushed flakes hold together a bit better. -
1/2 cup (1 stick / 113 g) unsalted butter
Salted butter works too—just reduce added salt if you’re very sensitive. Real butter gives the best flavor. Avoid margarine if you can; it can make the mixture greasy or flat-tasting. -
1 bag (10 oz / about 40 regular) mini marshmallows
Mini marshmallows melt more evenly. You can use large ones, just measure by weight and stir patiently. -
1 teaspoon pure vanilla extract
This rounds out the marshmallow sweetness and gives a bakery-style flavor. -
1/4 teaspoon fine sea salt
Optional, but a pinch of salt keeps the wreaths from tasting one-note sweet. -
Green food coloring
About 10–20 drops liquid green food coloring, or 1/2 teaspoon gel, depending on how deep you want the color. Gel is more concentrated and gives brighter green cornflake wreath cookies with less liquid. -
Red cinnamon candies, red mini M&M’s, or red sugar pearls
These become your “holly berries.” About 1/2 cup total is plenty. -
Nonstick spray or a little extra butter (for your hands and spoon)
This keeps the sticky marshmallow mixture from gluing itself to everything in sight. -
Optional but helpful:
- Parchment paper or a silicone baking mat for easy shaping and cleanup
- Holiday sprinkles if you want extra decoration
- Gluten-free cornflakes if you need a gluten-free friendly version (check the label; some brands add barley malt)

A quick ingredient tip: if you like slightly softer wreaths, add an extra handful of marshmallows (about 1 cup) to the recipe. If you prefer them firmer and crunchier, stick to the base amount or use a heaping 6 cups of cornflakes.
Step-by-Step Directions for No Bake Cornflake Wreaths
Take a breath, turn on some holiday music, and let’s make these Christmas cornflake wreaths together.
1. Prep your workspace
-
Line your baking sheets.
Set out 2 large baking sheets and line them with parchment paper or silicone mats. These are your shaping “stations.” -
Grease your tools.
Lightly spray a large spoon or rubber spatula with nonstick spray. You can also lightly butter your hands before shaping—it makes a big difference once the marshmallow mixture gets sticky.
2. Melt the butter and marshmallows
-
Heat the butter.
In a large, heavy-bottomed pot (I like my Dutch oven), melt the 1/2 cup butter over low to medium-low heat. Don’t rush this—if the butter browns, it changes the flavor. Delicious, but not very “bright green Christmas wreath.” -
Add the marshmallows.
Once the butter is fully melted, add the bag of mini marshmallows. Stir constantly with your greased spatula. -
Melt gently.
Keep the heat low and stir until the marshmallows are completely smooth and melted. This takes about 3–5 minutes. If you see small lumps, keep stirring off the heat for another minute. Overheating can make the mixture stiff and dry as it cools.
3. Flavor and color the mixture
-
Add vanilla and salt.
Turn the heat off. Stir in the 1 teaspoon vanilla extract and 1/4 teaspoon sea salt until well combined. -
Add green food coloring.
Start with about 10 drops of liquid green food coloring (or a small squeeze/1/4 teaspoon of gel), and mix well. Add more drop by drop until you reach a holly leaf shade of green. Remember: it will look a touch lighter once the cornflakes are mixed in.Tip: If you’re aiming for very bright green cornflake wreath cookies, gel food coloring gives a stronger color without watering down the marshmallow mixture.
4. Stir in the cornflakes
-
Add the cornflakes in batches.
Pour about half of the 6 cups cornflakes into the green marshmallow mixture. Gently fold them in, scraping from the bottom of the pan up, so you don’t crush the flakes too much. -
Add the rest.
Add the remaining cornflakes and keep folding until everything is evenly coated—no bare flakes. Work quickly; as the mixture cools, it becomes harder to shape.If the mixture feels too wet or doesn’t hold shape at all, sprinkle in another 1/2 to 1 cup of cornflakes and stir again.
5. Shape your Christmas wreath desserts
-
Portion the mixture.
Using a greased spoon or a cookie scoop, drop small mounds of the mixture onto your prepared baking sheets—about 2–3 tablespoons each, depending on how big you want your wreaths. -
Form the wreath shape.
Lightly butter or spray your fingers. Working with one mound at a time, press down gently to flatten slightly, then use your thumb or the back of a small measuring spoon to make a hole in the center. Push the mixture outward, shaping it into a little ring.They don’t have to be perfect circles—think “handmade Christmas,” not factory-made.
-
Decorate with “berries.”
While the wreaths are still warm and sticky, press 2–4 red cinnamon candies, mini M&Ms, or sugar pearls onto each one as berries. If you’re using sprinkles, scatter a few on each wreath.If your candies slide off, the mixture might be a bit too hot. Give it a minute to set, then press them back on.
6. Cool and set
-
Let them cool.
Leave the cornflake wreaths at room temperature for about 30–45 minutes, or until they’re firm enough to pick up but still slightly soft and chewy. -
Transfer and serve.
Once set, gently lift them from the parchment and arrange on a platter, cookie tray, or in gift boxes with wax paper between layers.
There you go—no bake cornflake wreaths that look like you spent all afternoon, but really you just managed your time well.
Servings & Timing
- Yield: About 18–24 cornflake wreath cookies (depending on size)
- Prep Time: 10 minutes (measuring ingredients, lining trays)
- Cook Time: 10 minutes on the stovetop
- Cooling/Setting Time: 30–45 minutes
- Total Time: About 50–65 minutes from start to finish
If you’re working with kids, add an extra 10 minutes for “creative decorating time” and the occasional sticky-finger break.
Fun Variations on Cornflake Wreaths
Once you’ve made this classic Cornflake Wreaths Recipe once or twice, you might want to play with it a bit. Here are some easy ideas.
- Minty Wreaths: Add 1/2 teaspoon peppermint extract along with the vanilla for a cool, candy-cane vibe.
- White Chocolate Drizzle: Melt 1/2 cup white chocolate chips and drizzle over the cooled wreaths for extra sweetness and a pretty finish.
- Gluten-Free Version: Use certified gluten-free cornflakes (and confirm your marshmallows are GF) to make these safe for gluten-sensitive friends.
- Dairy-Free Twist: Swap the butter for a dairy-free butter or refined coconut oil; the flavor changes slightly, but the texture still works.
- Extra Crunch Wreaths: Stir in 1/2 cup chopped toasted pecans or almonds with the cornflakes for a nutty crunch.
- Color-Swirl Wreaths: Leave part of the marshmallow mixture white, color the rest green, then fold them together lightly so you get a marbled, snow-dusted effect.
Honestly, these are so forgiving that once you understand the base cornflake marshmallow recipe, you can experiment without too much worry.
Storage, Freezing & Make-Ahead Tips
These holiday cornflake cookies are excellent for make-ahead planning, especially if December tends to run away from you. (It does for me—every single year.)
Room Temperature Storage
- Where to store: Keep your cornflake wreaths in an airtight container at cool room temperature.
- Shelf life: They’re best within 3–4 days, while they’re still soft and a little chewy. After that, they gradually harden.
Separate layers with wax paper or parchment so they don’t stick together or smudge each other’s decorations.
Refrigerator Storage
You can refrigerate them, but it’s not my first choice. The cold can make them very firm.
- If you do chill them, let them sit at room temperature for 20–30 minutes before serving so they soften up a bit.
- Great if your kitchen runs warm or you live in a very humid climate and worry about them getting sticky.
Freezing Cornflake Wreaths
Freezing works better than people think.
-
To freeze:
- Place the set wreaths on a baking sheet and freeze until solid.
- Transfer to a freezer-safe container or zip-top bag with parchment between layers.
-
Freezer shelf life: Up to 1 month for best flavor and texture.
-
Thawing:
Let them thaw at room temperature, still in the container or bag, for about 1 hour. This keeps condensation on the container, not on your wreaths.
Make-Ahead for Parties and Gift Boxes
- For a cookie swap, you can make these 1–2 days in advance, store at room temperature, and they’ll be just right.
- If packaging as gifts, wrap each wreath in a small cellophane bag or place in a tin with parchment layers to keep the “berries” from falling off.
Notes from My Kitchen (What I Learned Testing This Recipe)
A few real-life lessons from years of making these cornflake Christmas treats:
- Low heat is your friend. When I rushed the marshmallow melting on higher heat, the finished wreaths turned out tougher and less chewy. Gentle heat keeps them soft.
- Work in small batches when shaping. If the mixture starts to firm up in the pot, warm it gently on low heat for 30 seconds, stirring constantly—this loosens it up again.
- Shape quickly, but don’t stress perfection. Some of my favorite wreaths have slightly lopsided shapes. On a big holiday tray, the imperfections actually make them look homemade and charming.
- Food coloring strength varies. Drugstore liquid food coloring takes more drops to get that classic green, while gel colors (like Wilton or Americolor) are more intense. Start small; you can always add more.
- Size matters for texture. Larger wreaths (2–3 tablespoons each) stay softer in the center, while smaller ones get a little crunchier—both good, just different.
- Kids love decorating control. If you’re doing kids Christmas baking, pre-portion the mixture and let them add berries and sprinkles however they like. You’ll get some wild wreaths, but also a lot of happy little bakers.
And if one or two wreaths fall apart? Just press the pieces together, call it a “snow-covered wreath,” and move on. No one complains.
FAQs About Cornflake Wreaths
1. Why are my cornflake wreaths hard instead of soft and chewy?
They were probably cooked on heat that was a bit too high or for too long; next time, melt the marshmallows gently over low heat and remove the pot from the burner as soon as they’re smooth.
2. Can I make these cornflake wreaths without food coloring?
Yes, they’ll just be a light Golden or pale color—still delicious; you can add extra sprinkles or red candies to keep them festive.
3. What can I use instead of cinnamon candies for the “berries”?
Red mini M&Ms, red Sixlets, red sugar pearls, or even little dots of red icing all work well as holly berries.
4. How do I keep the mixture from sticking to my hands?
Lightly grease your hands with butter or nonstick spray and work with slightly cooled (but still warm) mixture; re-grease your fingers every few wreaths.
5. Can I double this Cornflake Wreaths Recipe for a big party?
Yes, you can double it as long as you use a large enough pot; stirring gets a little more intense, so sometimes I prefer making two single batches instead of one giant one.
6. Are these christmas cornflake wreaths gluten-free?
They can be—use certified gluten-free cornflakes and check your marshmallow and candy labels to confirm they’re gluten-free as well.
7. Can kids help make these cornflake holiday snacks?
Absolutely; adults should handle the hot pot and melted marshmallows, but kids can help pour in the cereal, shape the wreaths once the mixture has cooled a bit, and decorate with the berries.
8. My “wreath holes” keep closing—what am I doing wrong?
Nothing! The mixture likes to settle; make the center hole a bit bigger than you think you need, and if needed, gently poke the hole again after a few minutes while they’re still soft.
Wrapping Up: Your New Holiday Tradition
This Cornflake Wreaths Recipe is simple, nostalgic, and a little bit magical. You get all the fun of festive Christmas cornflake wreaths, without turning on the oven or juggling complicated steps—and that’s a gift in itself when December gets hectic.
If you make these marshmallow cornflake wreaths, I’d love to hear how they turned out—did your kids help? Did you go classic with cinnamon candies or try sprinkles or chocolate? Leave a comment, share your tweaks, and if you’re in the mood for more easy christmas cookies and cornflake marshmallow recipes, try pairing these wreaths with no-bake chocolate oatmeal cookies or a simple peppermint bark next.
Happy holiday baking—may your kitchen smell like butter and sugar, and may your cookie trays always come back empty.
Cornflake Wreaths
Ingredients
- 6 cups cornflakes cereal plain, not frosted; slightly crushed if desired
- 1/2 cup unsalted butter 1 stick (113 g); salted butter okay, reduce added salt if sensitive
- 10 oz mini marshmallows about 1 bag (about 40 regular marshmallows by weight)
- 1 teaspoon vanilla extract pure, if possible
- 1/4 teaspoon fine sea salt optional, balances sweetness
- green food coloring about 10–20 drops liquid or ~1/2 teaspoon gel, to desired color
- 1/2 cup red cinnamon candies, red mini M&M’s, or red sugar pearls for "holly berries"; amount is approximate
- nonstick spray or extra butter for greasing hands, spoon, and spatula
- parchment paper or silicone baking mats for lining baking sheets
- holiday sprinkles optional, for extra decoration
- gluten-free cornflakes optional, use if a gluten-free version is needed
Instructions
- Line 2 large baking sheets with parchment paper or silicone baking mats. Lightly grease a large spoon or rubber spatula with nonstick spray, and have additional spray or a little softened butter ready to grease your hands for shaping.
- In a large, heavy-bottomed pot (such as a Dutch oven), melt the 1/2 cup unsalted butter over low to medium-low heat. Do not brown the butter; keep the heat gentle so the mixture stays light in color.
- Add the 10 oz bag of mini marshmallows to the melted butter. Stir constantly with the greased spatula over low heat until the marshmallows are fully melted and smooth, 3–5 minutes. Avoid overheating; remove the pot from the heat as soon as the mixture is smooth.
- Turn off the heat. Stir in the vanilla extract and fine sea salt until evenly combined. Add green food coloring, starting with about 10 drops liquid (or a small amount of gel), and mix well. Add more coloring as needed until the mixture reaches a bright holly-leaf green, remembering it will lighten slightly once the cornflakes are added.
- Pour about half of the 6 cups of cornflakes into the green marshmallow mixture. Gently fold to coat, then add the remaining cornflakes and continue folding until all flakes are evenly coated with no dry spots. Work quickly, as the mixture will firm up as it cools. If it seems too wet and won’t hold its shape, fold in an additional 1/2–1 cup cornflakes.
- Using a greased spoon or a medium cookie scoop, drop mounds of the warm mixture onto the prepared baking sheets, using about 2–3 tablespoons per mound depending on how large you want each wreath.
- Lightly grease your fingers with butter or nonstick spray. Working with one mound at a time, gently flatten it slightly, then use your thumb or the back of a small measuring spoon to make a hole in the center. Push the mixture outward to form a ring or wreath shape. They do not need to be perfectly round—slight irregularities add to the homemade look.
- While the wreaths are still warm and sticky, press 2–4 red cinnamon candies, mini M&M’s, or red sugar pearls into each wreath to resemble holly berries. Add holiday sprinkles if desired. If candies slide off, wait a minute for the mixture to cool slightly, then press them back on.
- Let the cornflake wreaths sit at room temperature on the baking sheets for 30–45 minutes, or until they are firm enough to pick up but still soft and chewy in texture.
- Once set, gently lift the wreaths from the parchment and arrange them on a serving platter, cookie tray, or in gift boxes. Store in an airtight container at cool room temperature for 3–4 days, separating layers with parchment or wax paper.