Would you like to save this?
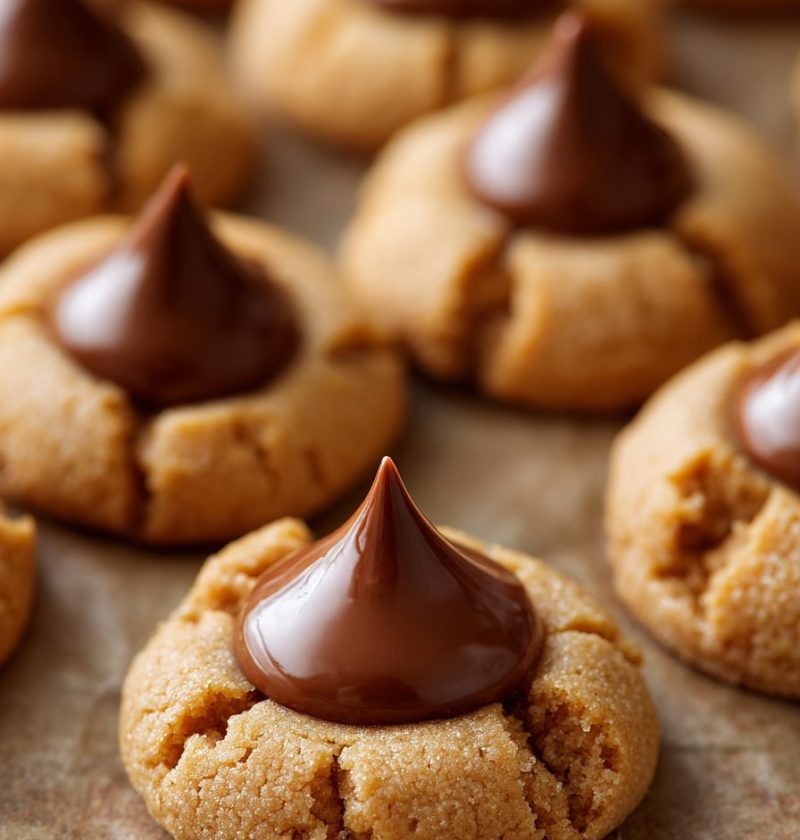
Peanut Butter Blossoms Recipe
If you’re looking for a Peanut Butter Blossoms Recipe that gives you soft peanut butter cookies with melty chocolate kiss centers and that cozy “I’m home” feeling, you’re in exactly the right place.
These classic holiday cookies are everything I loved as a kid in the Midwest cookie swaps of the ’80s—still simple, still dependable, and still the first empty tray at any Christmas party. This Peanut Butter Blossoms Recipe keeps the traditional flavor (that perfect peanut butter and chocolate combo), but I’ve added a few modern tips so your cookies stay soft, bake evenly, and look as pretty as the photos on Pinterest… without stressing yourself out.
You can absolutely bake these year-round, but there’s something about December, a big mug of coffee or cocoa, and a plate of peanut butter blossom cookies that just feels right, don’t you think? I make several batches every holiday season for gift boxes, school parties, and “just one more” snacks. And yes, they freeze beautifully, so you can be that person who has homemade peanut butter cookies on stand-by.
What Are Peanut Butter Blossoms, Anyway?
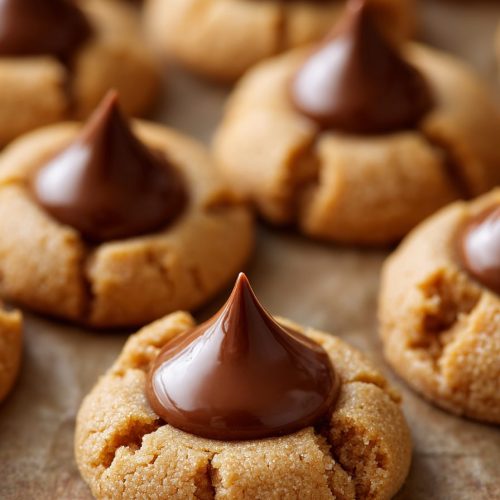
Peanut Butter Blossoms are classic peanut butter and chocolate cookies: soft, slightly chewy peanut butter cookies rolled in sugar and baked, then topped with a Hershey’s Kiss while they’re still warm. The heat from the cookie softens the chocolate just enough so it sets with that shiny, iconic “blossom” look.
They’re one of those traditional blossom cookies that show up on so many Christmas cookie trays. If you grew up in the U.S., there’s a good chance someone’s mom, aunt, or neighbor made these every December. They feel like a hug from the past—just basic pantry ingredients, nothing fancy, but big flavor.
Why are they special?
- They’re easy enough for beginner bakers, but still impressive.
- They use simple ingredients you probably already have.
- They work beautifully for gift-giving, cookie exchanges, or bake sales.
- They strike that sweet spot between soft peanut butter cookies and rich chocolate Kiss Cookies.
And although they’re often called a “Christmas cookie recipe,” I’ll be honest: I’ve made these for summer potlucks, fall football Sundays, and even for a neighbor who just had a baby. They travel well, kids love them, and adults get a hit of nostalgia.
Why You’ll Love This Peanut Butter Blossoms Recipe
Let me explain why this version might become your new family favorite Cookies Recipe:
- Soft and tender, not dry – A little extra fat and the right baking time keep these soft peanut butter cookies from turning crumbly.
- Classic flavor with better texture – Peanut butter and chocolate, just like the original, but with simple tweaks so they stay chewy the next day.
- Perfect for holiday cookie trays – These classic holiday cookies look festive and stack neatly, which is a real win for gift boxes.
- Kid-tested and grandparent-approved – Easy steps that kids can help with (rolling dough in sugar, pressing the Kisses), plus that familiar flavor older folks love.
- Freezer-friendly – Both the baked cookies and the dough freeze well, which means you can bake ahead for a stress-free Christmas week.
- Simple pantry ingredients – No specialty items or hard-to-find add-ins; just a straightforward peanut butter cookie recipe with a chocolate twist.
- Flexible for allergies and preferences – You can swap in gluten-free flour or a different chocolate candy, and I’ll walk you through those variations below.
- Reliable, repeatable results – This recipe has been tested multiple times at my very ordinary home oven temp, so you won’t be stuck with guesswork.
Ingredients for the Best Peanut Butter Blossoms
Here’s everything you’ll need for this Peanut Butter Blossoms Recipe. I’ll add a few notes and substitutions as we go, because real life doesn’t always mean a fully stocked pantry.
For the cookies
-
1 3/4 cups (210 g) all-purpose flour
Use regular unbleached all-purpose flour. If you’re using a kitchen scale, even better for consistent results. -
1 teaspoon baking soda
This helps the cookies puff slightly and gives them that classic crackled top. -
1/2 teaspoon fine salt
If you’re using salted butter, you can reduce this to a pinch. -
1/2 cup (1 stick / 113 g) unsalted butter, softened
Room temperature is key—soft but not greasy. If you only have salted, reduce the added salt a bit. -
1/2 cup (120 g) Creamy peanut butter
Use a standard shelf-stable brand like Jif or Skippy for classic texture. Natural peanut butter can work, but the cookies spread differently (I’ll note that in “Variations”). -
1/2 cup (100 g) granulated sugar
For sweetness and structure. -
1/2 cup (105 g) packed light brown sugar
Adds moisture and chew. Dark brown sugar works if that’s what you have. -
1 large egg, room temperature
Room-temp eggs blend more smoothly into the butter-sugar mixture. -
2 tablespoons milk
Any dairy milk works—whole milk adds a little extra richness, but 2% is fine. -
1 teaspoon pure vanilla extract
Try to use real vanilla, not imitation, for better flavor.
For rolling and topping
-
1/4–1/3 cup granulated sugar (for rolling)
This sugar coating gives that classic sparkle and slight crunch on the outside. -
About 40 Hershey’s Kisses, unwrapped
These are the stars of Hershey’s Kisses cookies. Unwrap them before you start baking so you’re not scrambling when the hot cookies come out of the oven.
You’ll probably get 36–40 cookies, depending on how big you make each one, so I like to have a few extra Kisses on hand—because someone always “taste-tests” them.

Step-by-Step Directions (With Practical Mom Tips)
You know what? Cookie baking doesn’t have to be fussy. Here’s a clear, simple way to make this Peanut Butter Blossoms Recipe so your cookies come out soft, evenly baked, and pretty.
1. Prep your tools and ingredients
Preheat your oven to 375°F (190°C) and line two baking sheets with parchment paper or silicone baking mats.
Let your butter and egg sit out until they’re at room temperature—this helps the dough mix evenly and prevents tough cookies.
2. Whisk the dry ingredients
In a medium bowl, whisk together:
- flour
- baking soda
- salt
Set this bowl aside. This quick step keeps the baking soda from clumping and helps your cookies rise evenly.
3. Cream the butter, peanut butter, and sugars
In a large mixing bowl (or the bowl of a stand mixer fitted with the paddle attachment), beat:
- softened butter
- peanut butter
- granulated sugar
- brown sugar
Beat on medium speed for 2–3 minutes, until the mixture is light, fluffy, and a little paler in color. This air gives your cookies a tender texture.
If you’re using a hand mixer, you may need an extra minute. Scrape down the sides of the bowl halfway through.
4. Add egg, milk, and vanilla
Add the egg, milk, and vanilla to the creamed mixture. Beat again on medium speed until smooth and fully combined, about 30–45 seconds.
If the mixture looks a bit curdled at first, keep going—it usually smooths out.
5. Add the dry ingredients
Turn the mixer to low and gradually add the flour mixture. Mix just until you no longer see streaks of flour.
You can finish the last few stirs by hand with a spatula to avoid overmixing.
The dough should be soft but not sticky. If it feels very sticky, you can chill it in the fridge for 15–20 minutes; this makes shaping the cookies easier and can help them hold their shape.
6. Shape and sugar-coat the dough balls
Pour your rolling sugar into a shallow bowl.
Use a small cookie scoop or a tablespoon to portion the dough into 1-inch balls (about 1 tablespoon each). Roll each portion gently between your palms to form a smooth ball, then roll it in sugar to coat it evenly.
Place the sugared dough balls on your prepared baking sheets, spacing them about 2 inches apart. They’ll spread a little as they bake.
7. Bake until puffed and crackled
Bake one sheet at a time on the center rack for 8–10 minutes, until the cookies are:
- puffed
- lightly golden on the bottom
- crackled on top
They will still look a bit soft in the center—that’s what you want for soft peanut butter blossom cookies. If they’re already browning around the edges, they’re likely overbaked.
Oven times can vary; in my slightly older gas oven, 9 minutes is the sweet spot.
8. Press in the Hershey’s Kisses
As soon as the cookies come out of the oven, gently press one unwrapped Hershey’s Kiss into the center of each hot cookie. The edges of the cookie will crack a bit more, creating that pretty “blossom” look.
Work fairly quickly so all the cookies get their chocolate while they’re still warm.
9. Cool completely
Let the cookies cool on the baking sheet for 5 minutes, then transfer them carefully to a wire rack to cool completely.
The chocolate Kisses will look shiny and a little soft at first; they’ll firm up as the cookies cool. If your kitchen is warm, you can slide the trays into the fridge for 10–15 minutes to help the chocolate set.
Servings & Timing (Because Schedules Are Real Life)
- Yield: About 36–40 cookies
- Prep Time: 20 minutes (a bit longer if kids are helping roll dough)
- Chill Time (optional): 15–20 minutes if dough is very soft
- Bake Time: 8–10 minutes per batch
- Total Time: About 45–60 minutes, depending on how many trays you bake at once
If you’re planning holiday baking, one batch of this Peanut Butter Blossoms Recipe plus one or two other classic holiday cookies will usually fill a medium cookie tin nicely.
Fun Variations on Peanut Butter Blossoms
Once you’ve got the base peanut butter cookie recipe down, you can play a little. Here are some easy twists that still keep that family-favorite, homemade peanut butter cookies vibe.
- Dark chocolate blossoms – Use dark chocolate Kisses instead of milk chocolate for a richer, less sweet cookie.
- Peanut butter cup blossoms – Swap the Kisses for mini peanut butter cups pressed into the center; super indulgent peanut butter and chocolate cookies.
- Gluten-free blossoms – Use a cup-for-cup gluten-free flour blend and chill the dough 30 minutes so the cookies hold their shape better.
- Sparkly holiday blossoms – Roll the dough in red and green sanding sugar instead of plain white sugar for a festive cookie recipe that pops on a tray.
- Nutty crunch blossoms – Stir 1/3 cup finely chopped peanuts into the dough for more texture and a “double peanut” flavor.
- Natural peanut butter version – Use natural peanut butter and add 1 extra tablespoon of flour; chill the dough so the cookies don’t spread too much.
How to Store & Freeze Peanut Butter Blossom Cookies
Cookie storage might not sound exciting, but it’s what keeps your hard work tasting fresh on day three (or day seven).
Room Temperature Storage
- Store completely cooled cookies in an airtight container at room temperature.
- They’ll stay soft and tasty for about 4–5 days. After that, they’re still good, just a little firmer.
- For the softest texture, place a small piece of bread or a slice of apple in the container; replace it every day or two to keep things fresh.
Freezing Baked Cookies
- Arrange fully cooled cookies in a single layer on a baking sheet and freeze until solid, about 1 hour.
- Transfer to a freezer-safe bag or container, with parchment between layers to protect the chocolate tops.
- Freeze for up to 2 months.
- Thaw at room temperature on a plate for 20–30 minutes. No reheating needed—though a quick 5–10 seconds in the microwave makes the chocolate a bit softer again.
Freezing Cookie Dough
You can also freeze this Peanut Butter Blossoms Recipe as dough so you can bake fresh cookies later:
- Roll the dough into sugar-coated balls as directed.
- Freeze in a single layer on a baking sheet until firm.
- Transfer to a freezer bag, label, and freeze up to 2 months.
Bake from frozen at 375°F, adding just 1–2 extra minutes to the baking time. Press the Kisses in as usual.
Notes from My Kitchen (Things I Learned the Hard Way)
- Don’t overbake. This is the number one reason peanut butter blossom cookies turn dry. Pull them out when they’re just set and lightly golden on the bottom.
- Measure the flour carefully. Too much flour = dense cookies. Spoon flour into the measuring cup and level it off with a knife, or use a scale if you have one.
- Use standard creamy peanut butter for the most reliable results. Natural peanut butter changes the texture; it can work, but the dough behaves differently.
- Unwrap your Kisses before baking. I know this sounds obvious, but the first time I made these with my kids, I figured I’d unwrap “while the cookies bake.” Let’s just say that last pan of cookies got their chocolate… a little late.
- Rotate pans if your oven has hot spots. Halfway through baking, you can spin the tray 180 degrees; this helps them bake more evenly.
- Chilling is flexible, not mandatory. If your dough feels firm and easy to roll, skip chilling. If it’s sticky and soft, a brief chill helps them keep that cute rounded shape.
FAQs About Peanut Butter Blossoms
1. Can I use natural peanut butter in this Peanut Butter Blossoms Recipe?
Yes, but expect a slightly different texture. Stir natural peanut butter very well, add 1 extra tablespoon of flour, and chill the dough for 30 minutes so the cookies don’t spread too much.
2. Why did my peanut butter blossom cookies turn out dry or crumbly?
They were most likely overbaked or had too much flour. Pull them as soon as the tops crack and the bottoms are lightly golden, and be sure you’re measuring flour correctly.
3. Do I have to roll the cookies in sugar?
Technically, no, but the sugar adds a nice crunch and that classic holiday cookie look. If you’re cutting back on sugar, you can skip it, but the texture on the outside will be softer.
4. My Hershey’s Kisses melted or lost their shape. What happened?
The oven temperature might be too high, or the cookies stayed on a hot sheet pan for too long. Bake at 375°F, press in the Kisses right away, then move the cookies to a cooling rack after about 5 minutes.
5. Can I make these peanut butter blossom cookies ahead for Christmas?
Absolutely. Bake and freeze them up to two months in advance, or freeze the dough balls and bake closer to the holiday. They’re a great make-ahead Christmas cookie recipe for busy weeks.
6. Can I use another candy instead of Hershey’s Kisses?
Yes! Mini peanut butter cups, chocolate stars, or even chocolate-covered caramels work. Just make sure they’re about the same size so they fit well in the center.
7. How do I keep my cookies soft for a cookie exchange?
Store them in an airtight container with a small piece of bread or apple slice, and don’t overbake them. Pack them gently so the Kisses don’t get crushed.
8. Is this recipe easy for kids to help with?
Very. Little hands are great at rolling dough balls and rolling them in sugar. Just handle the hot trays and pressing in the Kisses yourself if the kids are young.
Wrapping It Up (And Pouring the Coffee)
This Peanut Butter Blossoms Recipe brings together everything I love about baking: simple ingredients, cozy flavors, and a result that makes people light up when they see the plate coming toward them. You get soft peanut butter cookies, shiny chocolate centers, and that classic, old-fashioned cookie jar feeling with hardly any fuss.
If you make these peanut butter blossom cookies, I’d love to hear how they turned out—tell me if they made it to a cookie exchange, a school party, or just your nightly “one more cookie” moment. And if you’re building a whole holiday cookie lineup, try pairing these with chocolate crinkle cookies or sugar cookie cut-outs for a beautiful, festive tray.
Now go preheat that oven and make a batch. Your kitchen is about to smell amazing.
Peanut Butter Blossoms
Ingredients
- 1 3/4 cups all-purpose flour about 210 g; regular unbleached
- 1 teaspoon baking soda
- 1/2 teaspoon fine salt reduce to a pinch if using salted butter
- 1/2 cup unsalted butter 1 stick / 113 g, softened to room temperature
- 1/2 cup creamy peanut butter standard shelf‑stable (e.g., Jif or Skippy)
- 1/2 cup granulated sugar for the dough
- 1/2 cup light brown sugar about 105 g, packed; dark brown sugar also works
- 1 large egg at room temperature
- 2 tablespoons milk any dairy milk; whole or 2%
- 1 teaspoon pure vanilla extract
- 1/4-1/3 cup granulated sugar for rolling cookie dough balls
- 40 Hershey’s Kisses unwrapped; you’ll get about 36–40 cookies, so have a few extra
Instructions
- Preheat the oven to 375°F (190°C). Line two baking sheets with parchment paper or silicone baking mats. Let the butter and egg sit out until they reach room temperature so the dough mixes evenly.
- In a medium bowl, whisk together the flour, baking soda, and salt until well combined. Set aside.1 3/4 cups all-purpose flour, 1 teaspoon baking soda, 1/2 teaspoon fine salt
- In a large mixing bowl or stand mixer fitted with the paddle attachment, beat the softened butter, peanut butter, granulated sugar, and brown sugar on medium speed for 2–3 minutes, until light, fluffy, and slightly paler in color. Scrape down the sides of the bowl as needed.1/2 cup unsalted butter, 1/2 cup creamy peanut butter, 1/2 cup granulated sugar, 1/2 cup light brown sugar
- Add the egg, milk, and vanilla to the creamed mixture. Beat on medium speed until smooth and fully combined, about 30–45 seconds. If the mixture looks slightly curdled at first, keep mixing until it smooths out.1 large egg, 2 tablespoons milk, 1 teaspoon pure vanilla extract
- With the mixer on low speed, gradually add the flour mixture to the wet ingredients. Mix just until no dry streaks of flour remain. Finish the last few stirs by hand with a spatula to avoid overmixing. The dough should be soft but not sticky. If it is very sticky, chill it in the refrigerator for 15–20 minutes before shaping.1 3/4 cups all-purpose flour, 1 teaspoon baking soda, 1/2 teaspoon fine salt
- Pour the rolling sugar into a shallow bowl. Using a small cookie scoop or a tablespoon, portion the dough into 1‑inch balls (about 1 tablespoon each). Roll each portion between your palms to form a smooth ball, then roll it in the sugar to coat evenly. Place the sugared dough balls on the prepared baking sheets, spacing them about 2 inches apart.1/4-1/3 cup granulated sugar
- Bake one sheet at a time on the center oven rack for 8–10 minutes, until the cookies are puffed, lightly golden on the bottom, and crackled on top. The centers should still look slightly soft; they will firm up as they cool. Avoid overbaking to keep the cookies soft.
- As soon as the cookies come out of the oven, immediately press one unwrapped Hershey’s Kiss into the center of each hot cookie. The edges will crack a bit more, creating the classic blossom look. Work fairly quickly so all cookies get their chocolate while still warm.40 Hershey’s Kisses
- Let the cookies cool on the baking sheet for about 5 minutes, then carefully transfer them to a wire rack to cool completely. The Kisses will look shiny and soft at first and will firm up as the cookies cool. If your kitchen is warm, you can place the trays in the refrigerator for 10–15 minutes to help the chocolate set.