Would you like to save this?
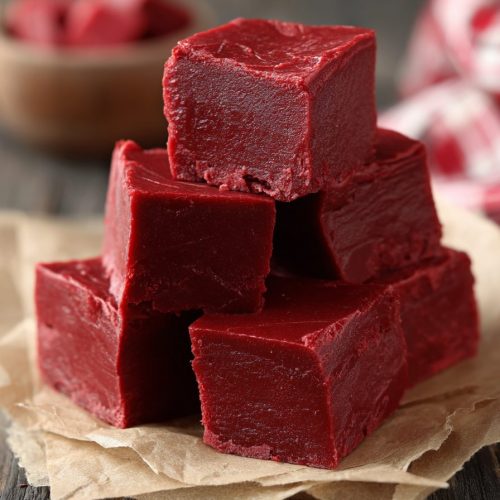
This Red Velvet Fudge Recipe is a no-bake, creamy, festive little square of joy—perfect for holidays, Valentine’s Day, and any time you’re craving a red velvet dessert without turning on the oven.
What Makes This Red Velvet Fudge Recipe So Special?
If you love red velvet cake with cream cheese frosting, this red velvet fudge recipe is like the candy version of that classic combo—smooth white chocolate, a hint of cocoa, and a rich cream-cheese-frosting-style swirl on top. It’s a gorgeous red velvet candy that looks fancy on a platter, but comes together in about 15 minutes of hands-on time.
I’m a 50-year-old mom who’s hosted more holiday parties, bake sales, and last-minute school events than I can count, and I’ll tell you—having a go-to easy fudge recipe that looks this impressive is a lifesaver. This is the festive fudge recipe I pull out for Christmas cookie trays, Valentine’s Day goodie bags, and those times when someone texts, “Can you bring a dessert?” and I’m still in my slippers.
From a health perspective, it’s still a treat, of course, but you’re getting rich flavor in a small bite. A little square goes a long way. And because it’s a no-bake homemade fudge recipe, you’re not fussing with eggs, cake layers, or frosting bags. Just melt, stir, pour, swirl, chill—and you’re done.
Search data shows that red velvet sweets spike around December and February every year, so if you’re here because you searched for a red velvet fudge recipe for the holidays or Valentine’s, you’re absolutely in the right place.
Why You’ll Love This Red Velvet Fudge Recipe
- No oven needed – This is a completely no-bake red velvet dessert that comes together on the stovetop or in the microwave.
- Quick prep – About 15 minutes of real work, then the fridge does the rest.
- Stunning color – That deep red cocoa fudge with a creamy white swirl looks beautiful on holiday and Valentine’s Day trays.
- Red velvet + cream cheese flavor – You get all the flavor of red velvet cake and cream cheese frosting in rich chocolate fudge candy form.
- Perfect for gifting – The pieces hold their shape well and pack nicely into tins, treat bags, and party boxes.
- Beginner-friendly – No candy thermometer, no tricky sugar stages—just melt and mix.
- Flexible flavor – You can tweak the cocoa, add sprinkles, or adjust the cream cheese layer to match your taste.
- Works for many occasions – Great as a holiday fudge recipe, Valentine’s Day fudge, teacher gifts, or just a “because it’s Tuesday” treat.
Ingredients for Red Velvet Fudge
This recipe has two layers: a red cocoa fudge base and a cream cheese frosting fudge swirl on top. Everything is simple and easy to find at a regular grocery store.
For the Red Velvet Fudge Layer
-
3 cups (18 oz / about 510 g) white chocolate chips
(Use a good-quality brand; cheaper chips sometimes melt grainy. Guittard, Ghirardelli, or Callebaut baking wafers work well.) -
1 can (14 oz / 396 g) sweetened condensed milk
(Not evaporated milk—they’re not interchangeable here.) -
2 tablespoons unsalted butter
(Adds extra richness and helps the fudge cut cleanly.) -
2–3 teaspoons unsweetened cocoa powder
(Just enough for that classic red velvet flavor. Dutch-process gives a deeper color, but regular works too.) -
1–1½ teaspoons red gel food coloring
(Gel gives a deeper, more classic red velvet color without thinning the fudge. Avoid liquid food dye if you can.) -
1 teaspoon pure vanilla extract
-
¼ teaspoon fine sea salt
(Balances all that sweetness so the fudge tastes rich instead of cloying.)
For the Cream Cheese Frosting Fudge Swirl
-
4 oz (113 g) full-fat cream cheese, softened to room temperature
(Block cream cheese works much better than the spreadable tub for fudge.) -
1 tablespoon unsalted butter, softened
-
1 cup (about 120 g) powdered sugar, sifted
(Sifting helps prevent little sugar lumps in the cream cheese layer.) -
1 cup (6 oz / 170 g) white chocolate chips, melted
(This helps the cream cheese swirl set like fudge instead of staying like soft frosting.) -
1 teaspoon pure vanilla extract
-
Pinch of salt
Optional Toppings
- White nonpareils or heart sprinkles (for a Valentine’s Day fudge look)
- Crushed red velvet cookies or sandwich cookies for extra texture
- A light dusting of cocoa powder before serving
You know what? This is also one of those recipes where you can use up the extra half-bag of white chocolate chips sitting in the pantry. Just weigh or measure, and you’re good to go.

Step-by-Step Directions
1. Prepare Your Pan
- Line an 8×8-inch (20×20 cm) square baking pan with parchment paper, letting it hang over the sides like little “handles.”
- This makes it much easier to lift the fudge out cleanly for cutting.
- Lightly mist the parchment with nonstick spray if your parchment tends to stick, though it’s usually not necessary.
2. Make the Red Velvet Fudge Base
-
In a medium saucepan, combine:
- 3 cups white chocolate chips
- 1 can sweetened condensed milk
- 2 tablespoons butter
-
Warm over low heat, stirring constantly with a rubber spatula or wooden spoon.
- The heat should stay low—if white chocolate gets too hot, it can seize and turn grainy.
- Stir until the mixture is mostly melted and smooth.
-
Turn off the heat and stir in the cocoa powder, vanilla, and salt.
- Start with 2 teaspoons of cocoa; if you want a more pronounced chocolate fudge candy flavor, you can add the extra teaspoon.
- Mix well so you don’t see streaks of cocoa.
-
Add the red gel food coloring a little at a time.
- Start with 1 teaspoon, stir, then add more until you get that classic red velvet color you love.
- Remember it will look slightly darker once it cools and sets.
-
Quickly pour the red velvet fudge layer into the prepared pan.
- Use your spatula to spread it into an even layer, smoothing the top.
- Tap the pan gently on the counter to pop any air bubbles.
3. Make the Cream Cheese Frosting Fudge Swirl
-
In a medium mixing bowl, beat the softened cream cheese and butter together with a hand mixer until very smooth and creamy.
- Scrape down the sides of the bowl as you go; cream cheese loves to cling.
-
Add the powdered sugar, about ¼ cup at a time, beating on low speed.
- This keeps it from puffing all over your kitchen (ask me how I know).
- Mix until smooth and no dry sugar remains.
-
Melt the white chocolate chips (1 cup) gently:
- Microwave in a heat-safe bowl at 50% power, 20–30 seconds at a time, stirring between each burst, until smooth.
- Or use a double boiler over barely simmering water.
-
Beat the melted white chocolate, vanilla, and a pinch of salt into the cream cheese mixture.
- Work fairly quickly; as the chocolate cools, the mixture will start to thicken into a fudge-like consistency.
- If it gets too thick to spread, you can microwave the bowl for just 5–8 seconds to soften it slightly.
4. Swirl and Chill
-
Drop spoonfuls of the cream cheese fudge mixture over the still-soft red velvet layer.
- You don’t have to cover it completely—little patches are fine.
-
Use a butter knife or a skewer to gently swirl the white layer into the red.
- Don’t over-swirl; a few figure-eight motions give that pretty marble pattern without muddying the colors.
-
If using, sprinkle decorative toppings (sprinkles, nonpareils, crushed cookies) over the top and press them in very lightly.
-
Cover the pan (foil or plastic wrap is fine) and chill in the refrigerator for at least 2–3 hours, or until fully firm.
- Overnight chilling gives the neatest slices.
5. Slice and Serve
-
Once firm, use the parchment handles to lift the fudge out of the pan and place it on a cutting board.
-
Cut into small squares using a sharp knife.
- For cleaner edges, warm the knife under hot water, dry it, slice, wipe, and repeat.
- I usually get about 36 bite-sized pieces (6×6 grid), but you can cut them larger for a bolder dessert bar.
-
Serve chilled or slightly cool, and enjoy your beautiful homemade red velvet fudge.
Servings & Timing
- Yield: About 36 small squares of fudge
- Prep Time: 15–20 minutes
- Chill Time: 2–3 hours (longer is fine—overnight works great)
- Total Time: About 2½–3 hours (mostly hands-off chilling)
This is one of those recipes that works especially well as a make-ahead holiday fudge recipe—prep in the morning, slice in the evening, and you’re ready for guests or gift boxes.
Creative Variations on Red Velvet Fudge
Once you’ve made this version, you can have fun customizing your red velvet sweets:
- Red Velvet Cheesecake Fudge: Add a few crushed chocolate sandwich cookies on top of the cream cheese swirl for a Cheesecake-vibe crunch.
- Valentine’s Day Fudge: Use heart-shaped sprinkles and cut the fudge into little hearts with a cookie cutter.
- Extra Chocolate Fudge Candy: Drizzle melted dark or milk chocolate over the chilled fudge and let it set for a “triple chocolate” look.
- Nutty Red Velvet Fudge: Fold ½ cup chopped pecans or walnuts into the red velvet layer before spreading it in the pan.
- Peppermint Holiday Fudge: Sprinkle crushed candy canes over the top for a Christmas-ready red velvet dessert.
- Gluten-Free Friendly: This recipe is naturally gluten-free as written—just double-check your sprinkles or cookie toppings if you add them.
Storage & Reheating (Well, Softening)
Because this red velvet fudge includes cream cheese, refrigeration is important.
-
Fridge:
- Store the fudge in an airtight container in the refrigerator for up to 7 days.
- Layer pieces with parchment or wax paper so they don’t stick together.
-
Freezer:
- Place cut pieces on a parchment-lined baking sheet and freeze until solid.
- Then move them to a freezer-safe bag or container.
- Fudge keeps well in the freezer for up to 2 months.
-
Thawing:
- Thaw in the refrigerator for several hours or overnight.
- For the best texture, don’t thaw at room temperature too long; the cream cheese layer can get a bit too soft.
-
Serving Temperature:
- I like to serve this fudge chilled but not ice-cold, so I pull it from the fridge about 10–15 minutes before serving.
- It’s still firm enough to hold, but the flavors open up nicely.
This also makes a wonderful make-ahead holiday dessert: you can freeze the batch, then just thaw the amount you need for your party platter.
Notes & Helpful Tips from My Kitchen
- Quality white chocolate matters: I tested this with a bargain brand and a higher-end brand. The better chocolate melted smoother and gave a creamier texture. If your fudge ever looks slightly oily when melted, keep stirring over very low heat and it should come together.
- Keep the heat low: White chocolate is fussier than dark chocolate. If you see it thickening or clumping while heating, pull it off the heat and stir vigorously—it’s usually just overheated.
- Gel food coloring wins: Liquid food coloring can thin the fudge and dull the color. Gel gives that classic red velvet tone with just a small amount.
- Use room-temperature cream cheese: If it’s too cold, you’ll get little tiny lumps that are hard to beat out, and your cream cheese frosting fudge won’t look as smooth.
- Chill fully before cutting: I know it’s tempting to cut early (trust me, I’ve done the “just one corner” thing), but a fully chilled fudge slices so much cleaner.
- Smaller squares, bigger satisfaction: Because this is a decadent fudge recipe, small pieces really are enough. That also makes it stretch further for parties and gift tins.
Honestly, after a few batches, you’ll probably start making this by feel. It’s that forgiving.
Frequently Asked Questions
1. Can I use milk or dark chocolate instead of white chocolate?
You can, but the flavor and color will change completely. White chocolate is what gives this its classic red velvet and cream cheese frosting fudge vibe; dark chocolate will turn it into more of a standard chocolate fudge.
2. Do I have to use red food coloring?
No, you don’t—without it you’ll have a light cocoa fudge that still tastes delicious, just not like traditional red velvet fudge. The color is mostly for that signature look.
3. My fudge didn’t set. What went wrong?
Most of the time, this happens if the ratios are off, the white chocolate was overheated, or extra liquid was added (like too much liquid food coloring). Chill it longer first; if it’s still soft, you can freeze it and serve as “fudge squares” straight from the freezer.
4. Can I make this red velvet fudge recipe without cream cheese?
Yes. You can skip the cream cheese swirl and just make the red velvet fudge layer. If you want a simple white swirl, reserve ½ cup of the melted white chocolate and drizzle it over the top, then swirl.
5. Is this safe to leave out at room temperature for a party?
Because of the cream cheese, I like to keep it chilled as much as possible. Serving it at room temperature for up to 2 hours is fine; after that, tuck it back into the fridge.
6. Can I double the recipe?
Absolutely. Double all the ingredients and use a 9×13-inch pan. The fudge will be slightly thicker, so give it more chilling time.
7. Can I make this as Valentine’s Day fudge gifts?
Yes, and it’s perfect for that. Chill well, cut into neat squares or hearts, and pack into small boxes or bags. Keep refrigerated until gifting, and let your recipient know to store leftovers in the fridge.
8. What’s the best way to cut neat squares for a dessert platter?
Use a long, sharp knife, run it under hot water, dry it, and slice straight down rather than “sawing.” Wipe the blade between cuts. It’s a small extra step that makes your homemade fudge recipe look bakery-worthy.
Conclusion: A Festive Fudge You’ll Make Again and Again
This Red Velvet Fudge Recipe brings together everything we love about red velvet dessert—velvety cocoa flavor, that signature red color, and a creamy, tangy cream cheese swirl—all in an easy, no-bake fudge candy. It’s beautiful on a party table, simple enough for a weekday project, and special enough for holidays, Valentine’s Day, and gift-giving.
If you try this red velvet fudge, I’d love to hear how it turned out for you—did you add sprinkles, nuts, or a fun twist? Leave a comment, share a photo, and if you’re in a fudge mood, you might also enjoy trying a classic white chocolate fudge or a peppermint holiday fudge next.
Red Velvet Fudge
Ingredients
- 3 cups white chocolate chips about 18 oz / 510 g; good-quality brand for best texture
- 1 can sweetened condensed milk 14 oz / 396 g; not evaporated milk
- 2 tablespoons unsalted butter
- 2-3 teaspoons unsweetened cocoa powder start with 2 teaspoons; Dutch-process or natural
- 1-1 1/2 teaspoons red gel food coloring add to desired shade; gel preferred over liquid
- 1 teaspoon pure vanilla extract
- 1/4 teaspoon fine sea salt
- 4 oz cream cheese 113 g; full-fat block cream cheese, softened to room temperature
- 1 tablespoon unsalted butter softened
- 1 cup powdered sugar about 120 g; sifted
- 1 cup white chocolate chips about 6 oz / 170 g; melted for cream cheese layer
- 1 teaspoon pure vanilla extract for cream cheese swirl
- salt pinch, for cream cheese swirl
- white nonpareils or heart sprinkles optional, for topping
- crushed red velvet or chocolate sandwich cookies optional, for topping
- cocoa powder optional, light dusting before serving
Instructions
- Line an 8×8-inch (20×20 cm) square baking pan with parchment paper, leaving overhang on two sides as handles. Lightly mist with nonstick spray if desired.
- In a medium saucepan, combine 3 cups white chocolate chips, 1 can (14 oz) sweetened condensed milk, and 2 tablespoons unsalted butter.3 cups white chocolate chips, 1 can sweetened condensed milk, 2 tablespoons unsalted butter
- Warm the mixture over low heat, stirring constantly, until the white chocolate is mostly melted and the mixture is smooth. Keep the heat low to prevent the white chocolate from seizing.3 cups white chocolate chips, 1 can sweetened condensed milk, 2 tablespoons unsalted butter
- Remove from heat and stir in 2–3 teaspoons unsweetened cocoa powder, 1 teaspoon vanilla extract, and 1/4 teaspoon fine sea salt until no cocoa streaks remain. Add 1–1 1/2 teaspoons red gel food coloring a little at a time, stirring until you reach your desired red velvet color.2-3 teaspoons unsweetened cocoa powder, 1 teaspoon pure vanilla extract, 1/4 teaspoon fine sea salt, 1-1 1/2 teaspoons red gel food coloring
- Quickly pour the red velvet fudge into the prepared pan. Spread into an even layer and gently tap the pan on the counter to release any air bubbles.
- In a medium mixing bowl, beat the softened cream cheese and 1 tablespoon unsalted butter with a hand mixer until very smooth and creamy, scraping down the sides of the bowl as needed.4 oz cream cheese, 1 tablespoon unsalted butter
- Gradually add 1 cup sifted powdered sugar, about 1/4 cup at a time, beating on low speed until fully incorporated and smooth.1 cup powdered sugar
- In a separate heat-safe bowl, gently melt 1 cup white chocolate chips in the microwave at 50% power in 20–30 second bursts, stirring between each, until smooth; or melt over a double boiler.1 cup white chocolate chips
- Beat the melted white chocolate, 1 teaspoon vanilla extract, and a pinch of salt into the cream cheese mixture until thick, smooth, and fudge-like. Work fairly quickly so it stays spreadable.1 cup white chocolate chips, 1 teaspoon pure vanilla extract, salt
- Drop spoonfuls of the cream cheese fudge mixture over the still-soft red velvet layer. Use a butter knife or skewer to gently swirl the white mixture into the red in a few figure-eight motions, being careful not to over-swirl.
- If desired, sprinkle white nonpareils, heart sprinkles, or crushed cookies over the top and press lightly. Cover the pan and refrigerate for at least 2–3 hours, or until fully firm (overnight for cleanest slices).white nonpareils or heart sprinkles, crushed red velvet or chocolate sandwich cookies
- Lift the chilled fudge from the pan using the parchment handles and place on a cutting board. Use a sharp knife (warmed under hot water and wiped dry, if desired) to cut into about 36 small squares. Serve chilled or slightly cool.