Would you like to save this?
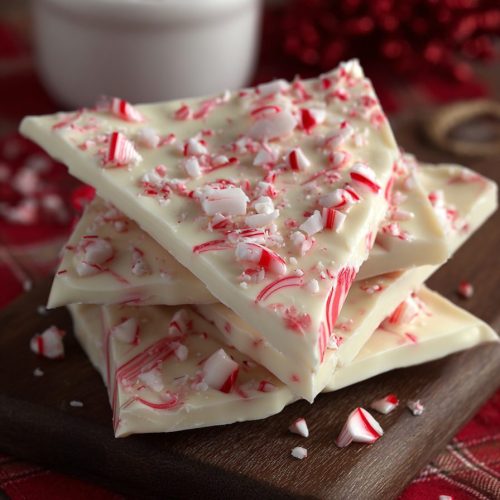
Candy Cane Bark Recipe
This Candy Cane Bark Recipe is a no-bake, ultra-festive Christmas treat with layers of dark and white chocolate, plenty of peppermint crunch, and just enough sparkle to make any holiday dessert tray feel special.
What Is Candy Cane Bark & Why This One’s Special
If you’ve never made candy cane bark (also called peppermint bark or festive chocolate bark), think of it as a thin, snappy slab of layered chocolate swirled with crushed candy canes. You break it into rustic pieces, pile it into tins, and watch it vanish faster than you can say “holiday baking recipe.”
What I love about this version is that it balances rich dark chocolate with creamy white chocolate, so it’s sweet but not cloying. There’s a little peppermint extract in the white chocolate layer, plus crushed candy canes on top for that classic Christmas candy crunch. It tastes like peppermint Hot Chocolate in crisp, chocolatey form.
As a 50‑year‑old mom who’s baked her way through more holiday seasons than I can count, I’ve learned this: people go wild for homemade candy bark. It’s an easy Christmas candy that looks impressive, travels well, and doesn’t require the oven—perfect when every rack is already full of cookies, pies, and that one casserole your brother insists on.
I like to make a big batch of this Candy Cane Bark Recipe the first weekend of December. Some goes into gift boxes for neighbors, some into tins for my grown kids, and a little container stays in the fridge “for visitors.” (Between you and me, my husband and I are the visitors most of the time.)

Why You’ll Love This Candy Cane Bark Recipe
- No oven needed—this is a true no-bake holiday candy.
- Uses simple pantry ingredients: chocolate, candy canes, and a little peppermint.
- Ready in about an hour including chilling time.
- Perfect for Christmas treats, cookie exchanges, and holiday dessert platters.
- Breaks into rustic pieces, so no fussing with perfect cuts.
- Easy to scale up for big batches of holiday treats and gift boxes.
- Naturally gluten-free if you choose gluten-free candy canes.
- Flexible: make it with dark, milk, or semi-sweet chocolate, or mix and match.
- Kid-friendly project—let them crush candy canes and sprinkle the topping.
- Stores well in the fridge or freezer, so you can make it ahead for busy days.
Ingredients For The Best Peppermint Candy Cane Bark
You don’t need anything fancy for this homemade candy bark, but the details matter. Here’s exactly what I use for a classic layered chocolate bark with peppermint.
For the dark chocolate layer:
- 12 oz (340 g) dark chocolate, chopped or chips
(60–70% cacao; you can use semi-sweet chocolate if you prefer it sweeter) - 1 tsp neutral oil, melted Butter, or coconut oil (optional, for extra shine)
For the white chocolate peppermint layer:
- 12 oz (340 g) good-quality white chocolate, chopped or chips
(look for cocoa butter in the ingredients; it melts more smoothly) - ½–1 tsp peppermint extract
(½ tsp for a gentle flavor, 1 tsp if you really love peppermint chocolate bark) - 1 tsp neutral oil or coconut oil (optional, for a smoother melt)
For the candy cane topping:
- ¾–1 cup crushed candy canes or peppermint candies
(about 6–8 regular-size candy canes) - 1 pinch flaky sea salt (optional, but lovely with dark chocolate)
A Few Ingredient Tips
-
Chocolate choice:
Use real chocolate bars or high-quality chips for the best snap. Cheaper “coating” chocolate often has added fats and won’t taste as rich. Ghirardelli and Guittard are two brands I reach for often in holiday baking. -
White chocolate warning:
True white chocolate is fussy if overheated. Melt it gently and stir often. If the bag says “white baking chips” and doesn’t list cocoa butter, it may not melt as smoothly—still usable, but keep a close eye on it. -
Candy canes:
Any peppermint candy works: mini candy canes, full-size candy canes, round peppermint candies. If you need a gluten-free Christmas dessert, just check the label and choose a brand that’s clearly gluten-free. -
Peppermint extract:
Make sure you’re using peppermint extract, not mint or spearmint. Peppermint is what gives classic Christmas candy that familiar flavor. -
Oil:
The oil is optional, but it gives the chocolate a little extra gloss and helps with smoother spreading. I usually use refined coconut oil so there’s no coconut flavor.
Step-By-Step Directions For Layered Candy Cane Bark
You’ll need a rimmed baking sheet (about 9×13 inches), parchment paper, a microwave-safe bowl or two, and a small spatula.
1. Prep Your Pan
-
Line a baking sheet with parchment paper.
Let the parchment hang over the sides a little so you can lift the bark out later. -
Decide how thick you want your bark.
For a thinner bark, spread closer to the edges of a 9×13-inch pan. For a thicker, chunkier bark, keep it closer to 9×9 or just use half the sheet.
2. Crush The Candy Canes
-
Place the candy canes in a zip-top bag.
Seal the bag, then place it on a folded kitchen towel. -
Gently crush them with a rolling pin or the bottom of a heavy saucepan.
You want a mix of small pieces and a little fine “peppermint dust.” That dust clings to the chocolate and adds lovely flavor.Tip: If you have little helpers around, this is the job they’ll fight over. Just remind them not to go full Hulk on the bag or you’ll have peppermint powder.
3. Melt The Dark Chocolate
-
Add the dark chocolate and 1 tsp oil (if using) to a microwave-safe bowl.
-
Microwave in 20–30 second bursts, stirring well after each, until just melted and smooth.
It usually takes about 1½–2 minutes total, but every microwave is different.- Aim to keep the chocolate below about 115°F (46°C) if you’re using a thermometer.
- If you prefer the stovetop, set a heatproof bowl over a pot with a few inches of barely simmering water and stir until melted.
4. Spread The Dark Chocolate Layer
-
Pour the melted dark chocolate onto the lined baking sheet.
-
Use an offset spatula or the back of a spoon to spread it into an even rectangle.
Try for about ¼ inch thick. It doesn’t have to be perfect—rustic is part of the charm of homemade Christmas treats. -
Gently tap the pan on the counter a few times.
This helps release air bubbles and smooths the surface. -
Transfer the pan to the fridge for about 10–15 minutes.
You want the chocolate just set but not rock-hard. If it’s too firm, the layers may separate when you break the bark.
5. Melt The White Chocolate & Add Peppermint
-
While the dark layer chills, melt the white chocolate with the oil (if using).
Again, use 20–30 second bursts in the microwave, stirring very well in between.- White chocolate usually melts best if you stop when a few small lumps remain, then stir until they finish melting from the residual heat.
- Try to keep it under about 110°F (43°C); it scorches more easily than dark chocolate.
-
Stir in the peppermint extract.
Start with ½ teaspoon, taste a tiny bit (careful, it’s warm), and add up to another ½ teaspoon if you want a stronger peppermint bark flavor.
6. Add The White Chocolate Layer
-
Remove the pan with the dark chocolate from the fridge.
Touch the surface—it should be mostly firm but still a tiny bit tacky. -
Pour the melted white chocolate over the dark chocolate layer.
-
Quickly spread it out with your spatula into an even layer.
Work gently so you don’t pull up the dark chocolate underneath.
If you’d like a marbled effect instead of neat layers, you can drizzle some white chocolate in lines and swirl with a toothpick—still very pretty on a Christmas dessert tray.
7. Top With Candy Canes
-
Immediately sprinkle the crushed candy canes evenly over the white chocolate.
Don’t wait—if the white chocolate sets, the candy won’t stick as well. -
If you like a salty-sweet holiday candy, add a light pinch of flaky sea salt on top.
It’s not traditional, but the contrast with the peppermint and sweetness is lovely. -
Gently press the candy pieces into the surface with clean hands.
You don’t need to push hard, just enough so they’re anchored in the chocolate.
8. Chill & Break Into Pieces
-
Refrigerate the bark for 30–40 minutes, or until completely set.
It should feel firm and solid when you touch the center. -
Lift the bark out of the pan by the parchment paper and place it on a cutting board.
-
Use your hands to break it into pieces, or use a large, sharp knife to cut it.
Roughly 2–3 inch pieces work well for gift tins and Christmas treats platters. -
Store in an airtight container (see detailed storage notes below) and enjoy!
Servings & Timing
- Yield: About 24–30 pieces, depending on how large you break them
- Prep Time: 15–20 minutes
- Chill Time: 40–45 minutes
- Total Time: About 1 hour
If you’re planning a big holiday baking day, you can start this Candy Cane Bark Recipe first, tuck it in the fridge, and then move on to cookies or fudge while it chills.
Easy Variations & Flavor Twists
Once you’ve made this classic peppermint candy bark, you can start playing. Here are some fun ideas my family loves:
-
Triple Chocolate Bark:
Use a mix of milk, dark, and white chocolate in irregular swirls instead of clean layers. -
Nutty Peppermint Bark:
Sprinkle toasted, finely chopped almonds or pistachios over the dark chocolate before adding the white layer. -
Hot Cocoa Bark:
Add mini marshmallows and tiny chocolate chips on top with the crushed candy canes—like a mug of hot cocoa in bark form. -
Mocha Peppermint Bark:
Stir 1–2 teaspoons of instant espresso powder into the dark chocolate for a coffee-kissed Christmas candy. -
Dairy-Free Candy Cane Bark:
Use dairy-free dark chocolate and a dairy-free white chocolate alternative for a holiday dessert that works for more guests. -
Cookie Crunch Bark:
Crush chocolate sandwich cookies and sprinkle them along with (or instead of) some of the candy canes.
How To Store, Freeze, And Make Ahead
One of the biggest perks of this Candy Cane Bark Recipe is how well it keeps. You can absolutely make this part of your “holiday candy prep” week.
Storing In The Fridge
- Place the broken bark pieces in an airtight container.
- If you live in a warm climate or keep your home cozy, store in the fridge for the best texture.
- It stays fresh for about 2 weeks.
I like to separate layers with parchment or wax paper so the pieces don’t stick together.
Storing At Room Temperature
- If your kitchen is cool and dry, you can keep the bark at room temp in a sealed container.
- Keep it away from the stove, dishwasher, or sunny windows—any heat will soften the chocolate and make the candy canes sticky.
- At a cool room temperature, it’s usually fine for 5–7 days.
Freezing Candy Cane Bark
Yes, you can freeze this peppermint bark:
- Place pieces in a freezer-safe container, again with parchment between layers.
- Freeze for up to 2 months.
To serve, you can eat it cold straight from the freezer (it will be extra snappy), or let it sit at room temperature for 10–15 minutes. Don’t thaw it uncovered in a very humid kitchen, or condensation may develop on the chocolate.
Make-Ahead Tips
- Make a big batch of bark on a quiet Sunday, freeze most of it, and refill your Christmas treat tins as needed.
- If you’re gifting, pack it up the day you plan to deliver, so it looks and tastes its best.
Recipe Notes From My Kitchen
A few little lessons from years of holiday baking and many test pans of bark:
-
Layer timing matters:
Let the dark chocolate set just enough. If it’s too soft, the white chocolate may swirl in more than you’d like. If it’s rock hard, the layers might separate when you break the bark. Slightly tacky is ideal. -
Go gentle on the peppermint extract:
It’s strong. Start with less, taste, and add more if needed. Too much and your beautiful holiday dessert starts to taste like toothpaste. -
Work fairly quickly with the white chocolate:
Once it starts to cool, it thickens and becomes harder to spread smoothly. Have your crushed candy canes ready before you melt it. -
Clean breaks vs. rustic chunks:
If you want cleaner lines, chill the bark very well and use a sharp chef’s knife warmed in hot water and wiped dry, then press straight down. -
About the “white chocolate bloom” issue:
If your bark develops faint white streaks or patches after a few days, that’s usually just cocoa butter coming to the surface. It’s safe and still tastes great—it just looks a little more homemade, which I don’t mind one bit. -
Noise warning:
Crushing candy canes is louder than you think. Maybe don’t start that step while someone’s on a work Zoom call—I learned that one the hard way.
FAQs About Candy Cane Bark Recipe
1. Why did my chocolate seize or get grainy?
It likely overheated or came in contact with water. Melt it slowly in short bursts and always use a dry bowl and spoon.
2. Can I use only white chocolate or only dark chocolate?
Yes. You can make a single-layer white chocolate bark or dark chocolate bark and still top it with crushed candy canes for a classic holiday treat.
3. My layers separated when I broke the bark—what happened?
Usually the bottom layer was fully hard before the top went on, or the pan warmed too much while you spread the second layer. Next time, add the white chocolate when the dark chocolate is just set but still slightly tacky.
4. How finely should I crush the candy canes?
Aim for a mix of small chunks and finer bits. Very large chunks can be too hard on the teeth, while super fine dust melts more quickly and can get sticky.
5. Can I use candy cane pieces that are a little sticky already?
Yes, as long as they still taste fresh. Stickier candies may bleed a little color into the white chocolate, but that can actually look fun and festive.
6. Is this recipe safe for kids with nut allergies?
The bark itself has no nuts, but be sure to choose chocolate and candy canes that are made in nut-free facilities if that’s a concern.
7. Can I mail this candy cane bark as a gift?
You can. Pack pieces snugly in a tin or box, use parchment between layers, and mail when temperatures are cool. In very warm regions, insulated packaging is helpful.
8. Can I reduce the sweetness?
Use darker chocolate (70% or higher) for the bottom layer and keep the white chocolate layer thinner, or use less candy cane topping for a less-sweet Christmas dessert.
Final Thoughts On This Festive Chocolate Bark
This Candy Cane Bark Recipe has become one of those non-negotiable Christmas traditions in my house—right alongside stringing lights and arguing (lovingly) about when it’s “too early” to play holiday music. It’s easy, festive, and makes the whole kitchen smell like a peppermint mocha.
If you try this peppermint chocolate bark, let me know how it goes and what chocolate combo you choose. Share your tweaks in the comments, and if you’re planning a whole tray of Christmas candy and holiday treats, pair this with a batch of fudge or simple sugar cookies for a beautiful, stress-friendly spread.
Candy Cane Bark
Ingredients
- 12 oz dark chocolate chopped or chips; 60–70% cacao, or semi-sweet if you prefer it sweeter
- 1 teaspoon neutral oil, melted butter, or coconut oil optional, for extra shine in dark chocolate
- 12 oz white chocolate good-quality, chopped or chips; look for cocoa butter in the ingredients
- 1/2–1 teaspoon peppermint extract 1/2 teaspoon for gentle flavor, up to 1 teaspoon for stronger peppermint
- 1 teaspoon neutral oil or coconut oil optional, for smoother melted white chocolate
- 3/4–1 cup crushed candy canes or peppermint candies about 6–8 regular-size candy canes, crushed
- pinch flaky sea salt optional, for sprinkling on top
Instructions
- Line a rimmed baking sheet (about 9×13 inches) with parchment paper, letting it overhang the sides so you can lift the bark out later. Decide how thick you want your bark: for thinner bark spread closer to the full 9×13; for thicker bark keep it closer to a 9×9 area on the sheet.
- Place the candy canes or peppermint candies in a zip-top bag and seal. Set the bag on a folded kitchen towel and gently crush with a rolling pin or the bottom of a heavy saucepan until you have a mix of small pieces and some fine peppermint “dust.” Set aside.3/4–1 cup crushed candy canes or peppermint candies
- Add the dark chocolate and 1 teaspoon oil (if using) to a microwave-safe bowl. Microwave in 20–30 second bursts, stirring well after each, until just melted and smooth, about 1 1/2–2 minutes total. Alternatively, melt in a heatproof bowl set over a pot of barely simmering water, stirring until smooth.12 oz dark chocolate, 1 teaspoon neutral oil, melted butter, or coconut oil
- Pour the melted dark chocolate onto the prepared baking sheet. Use an offset spatula or the back of a spoon to spread it into an even rectangle about 1/4 inch thick. Gently tap the pan on the counter a few times to release air bubbles. Refrigerate for 10–15 minutes, until just set but not rock-hard; the surface should be mostly firm but still very slightly tacky.12 oz dark chocolate
- While the dark chocolate chills, place the white chocolate and 1 teaspoon oil (if using) in a clean microwave-safe bowl. Microwave in 20–30 second bursts, stirring well between each, until mostly melted with a few small lumps remaining. Remove from the microwave and stir until completely smooth.12 oz white chocolate, 1 teaspoon neutral oil or coconut oil
- Stir 1/2 teaspoon peppermint extract into the melted white chocolate. Taste a tiny amount (careful, it’s warm) and add up to another 1/2 teaspoon, to taste, being careful not to overdo it.1/2–1 teaspoon peppermint extract
- Remove the pan with the dark chocolate from the fridge. Pour the melted white chocolate over the dark chocolate layer and quickly spread it into an even layer with a spatula, working gently so you don’t disturb the dark chocolate underneath. For a marbled effect instead of clean layers, drizzle the white chocolate in lines and swirl gently with a toothpick.12 oz white chocolate
- Immediately sprinkle the crushed candy canes evenly over the surface of the white chocolate before it sets. If using, add a light pinch of flaky sea salt over the top. Gently press the candy pieces into the chocolate with clean hands so they adhere.3/4–1 cup crushed candy canes or peppermint candies, pinch flaky sea salt
- Refrigerate the pan for 30–40 minutes, or until the bark is completely set and firm in the center. Lift the bark out of the pan using the parchment paper and place it on a cutting board. Break into roughly 2–3 inch pieces by hand, or use a large, sharp knife to cut if you prefer cleaner lines. Store in an airtight container.