Would you like to save this?
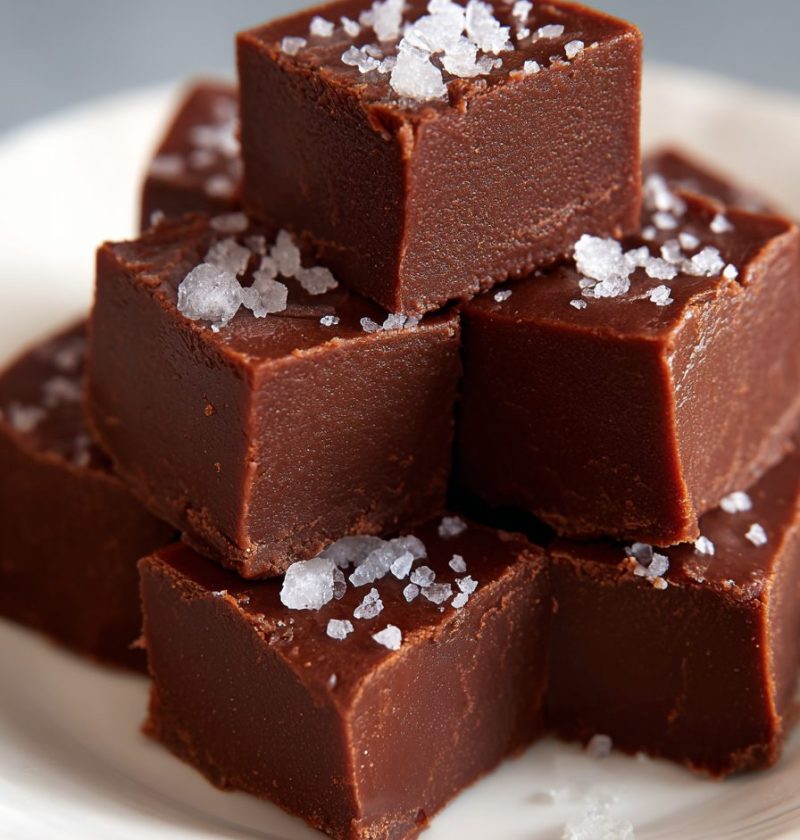
Easy 2-Ingredient Chocolate Fudge Recipe
If you’ve ever wished chocolate fudge could magically appear on your counter with almost no effort, this Easy 2-Ingredient Chocolate Fudge Recipe is your new secret weapon—no bake, no candy thermometer, just creamy, rich chocolate bliss in minutes.
What Makes This Easy 2-Ingredient Chocolate Fudge So Special?
This recipe is exactly what it sounds like: a simple fudge recipe that uses only two basic pantry ingredients—chocolate and sweetened condensed milk—to create a smooth, sliceable, old-fashioned-tasting fudge. It’s the kind of quick chocolate fudge that feels nostalgic, like something your mom or grandma might have made, but simplified for busy weeknights and hectic holidays.
I love this beginner fudge recipe for so many reasons. It’s perfect when you need a fast chocolate dessert for a potluck, an office treat tray, or that last-minute school bake sale someone forgot to mention. You warm the mixture (microwave or stovetop), stir, pour, chill, and you’re done. The hardest part is not cutting into it before it sets.
You can dress it up for Christmas with crushed Peppermint, make it a no bake chocolate fudge for Valentine’s Day with pretty sprinkles, or keep it plain and classic for any time you’re craving something sweet after dinner. It’s an easy homemade fudge that feels like a little gift to yourself.
And if you’re not super confident in the kitchen yet? This is the kind of 2 ingredient dessert that builds confidence. You get that “I made fudge!” moment without the drama of sugar stages, timers, and nonstop stirring.

Why You’ll Love This Easy 2-Ingredient Chocolate Fudge Recipe
You know what? Let me just spell out why this one’s a keeper:
- Only two main ingredients – You need chocolate and sweetened condensed milk, that’s it for the base.
- No oven, no stovetop drama – This can be a microwave chocolate fudge recipe, which means less fuss and fewer dishes.
- Beginner-friendly – No candy thermometer, no tricky stages, just melt, stir, and chill.
- Quick prep – About 10 minutes of hands-on time; the rest is chilling in the fridge while you do something more fun.
- Perfect for gifts – Pack in little treat boxes or bags; it holds its shape and travels well.
- Flexible flavors – Use milk, dark, or semi-sweet chocolate, or add simple mix-ins for fun variations.
- Naturally gluten-free – As long as your chocolate is gluten-free, this fudge works for most gluten-sensitive friends.
- Great make-ahead dessert – Keeps well in the fridge and freezer, so you can prep before busy holidays.
- Budget-friendly – Minimal ingredient fudge means you’re not buying a whole basket of specialty items.
- Crowd-pleasing – From kids to grandparents, everyone understands a square of chocolate fudge.
Ingredients for Easy 2-Ingredient Chocolate Fudge
Here’s exactly what you’ll need for this Easy 2-Ingredient Chocolate Fudge Recipe. I’ll give you the classic version plus a few smart swaps.
Base Recipe (2 Ingredients):
-
3 cups (about 540 g) chocolate chips
Use semi-sweet for a classic flavor. Brands like Ghirardelli, Guittard, or Nestlé work well.- Substitutions:
- Dark chocolate chips = richer, less sweet fudge
- Milk chocolate chips = sweeter, creamier fudge
- Vegan chocolate chips = dairy-free version
- Substitutions:
-
1 can (14 oz / 396 g) sweetened condensed milk
This is the key to that smooth, creamy texture.- Substitutions:
- Sweetened condensed coconut milk for a dairy-free or vegan fudge (it adds a slight coconut note that’s lovely)
- Substitutions:
Optional (But Highly Recommended) Add-Ins:
These don’t “break” the 2 ingredient chocolate fudge idea—they’re just extras if you want to tweak flavor:
- 1 teaspoon pure vanilla extract – Rounds out the chocolate flavor.
- 1/4 teaspoon fine sea salt – Makes the chocolate taste deeper and balances the sweetness.
- Toppings (optional):
- Chopped nuts (walnuts, pecans, almonds)
- Flaky sea salt
- Mini marshmallows
- Crushed peppermint candy
- Sprinkles
A few ingredient tips:
- Chocolate quality matters: Since this is a minimal ingredient fudge, your chocolate really shines. Use chips or chopped bars that you actually enjoy eating on their own.
- Don’t use evaporated milk: It has no sugar and a different texture. You specifically want sweetened condensed milk for this simple fudge recipe.
- Room temperature helps: If your sweetened condensed milk isn’t ice cold, it will mix more smoothly with the melted chocolate.
Step-by-Step Directions (Microwave & Stovetop Options)
This quick chocolate fudge is very forgiving, but here’s the method that works every time in my kitchen.
Prep Your Pan
-
Line an 8×8-inch (20×20 cm) pan with parchment paper.
Leave some overhang on two sides so you can lift the fudge out later like a sling. Lightly spray the parchment with cooking spray if you’re worried about sticking. -
Gather your tools.
Have a medium microwave-safe bowl (or saucepan), a rubber spatula, and your ingredients measured and ready. This recipe moves fast once the chocolate melts.
Microwave Method (Fastest)
-
Combine ingredients in a bowl.
Add the chocolate chips and sweetened condensed milk to a medium microwave-safe bowl. If using vanilla or salt, you can wait and stir those in after melting. -
Microwave in short bursts.
Heat on 50–60% power for 30 seconds. Stir well. Repeat in 20–30 second bursts, stirring after each one, until the chocolate is mostly melted and the mixture looks thick and glossy.- Tip: Stop when a few small lumps remain—they’ll melt as you stir. This helps prevent scorching.
-
Stir until smooth.
Once melted, stir in vanilla and salt (if using). Keep stirring until the mixture is completely smooth and uniform, almost like thick brownie batter.
Stovetop Method (Also Easy)
If you don’t like using the microwave:
-
Melt over low heat.
Add chocolate chips and sweetened condensed milk to a small heavy-bottomed saucepan. Warm over low heat, stirring constantly, until the chocolate is almost fully melted. Remove from heat and keep stirring until smooth. -
Add flavorings.
Stir in vanilla and salt, if using, until combined.
Pour, Smooth, and Chill
-
Pour fudge into the prepared pan.
Scrape the chocolate mixture into your lined pan. Use a spatula to spread it evenly into the corners. Gently tap the pan on the counter to smooth the top and pop any air bubbles. -
Add toppings (if desired).
While the fudge is still warm and soft, sprinkle on nuts, marshmallows, crushed peppermint, or flaky sea salt. Press them very lightly so they stick but don’t sink too far in. -
Chill until set.
Refrigerate for at least 2 hours, or until the fudge is firm enough to slice. If your fridge is very full or warm, it may take closer to 3 hours. -
Slice and serve.
Lift the fudge out using the parchment overhang. Place on a cutting board and use a sharp knife to cut into 25–36 small squares. Wipe the knife between cuts for clean edges.
Little tip from a woman who’s cut many pans of fudge: If the fudge is too hard right from the fridge, let it sit on the counter for 10–15 minutes before slicing. You’ll get neater pieces and less crumbling.
Servings & Timing
- Yield: About 25–36 squares of fudge (depending on how big you cut them)
- Prep Time: 10 minutes
- Chill Time: 2–3 hours
- Total Time: About 2 hours 15 minutes (most of that is hands-off)
This makes plenty for a hostess gift, a small party, or to tuck into lunchboxes all week long. If you need more, double the recipe and pour it into a 9×13-inch pan.
Fun Variations on This Simple Fudge Recipe
Once you’ve made this Easy 2-Ingredient Chocolate Fudge Recipe once or twice, you may want to play. Here are some simple ideas:
- Peanut Butter Swirl Fudge – Warm 1/3 cup creamy peanut butter and swirl it into the top of the fudge before chilling.
- Rocky Road Fudge – Fold in 1 cup mini marshmallows and 1/2 cup chopped nuts right before you pour the mixture into the pan.
- Peppermint Holiday Fudge – Stir in 1/2 teaspoon peppermint extract and sprinkle crushed candy canes over the top.
- Mocha Fudge – Dissolve 1 tablespoon instant espresso powder in the sweetened condensed milk before heating; it adds a subtle coffee bite.
- Salted Dark Chocolate Fudge – Use dark chocolate chips and finish with flaky sea salt for a more grown-up treat.
- Vegan Fudge – Use dairy-free chocolate chips and sweetened condensed coconut milk, then top with toasted coconut flakes.
These little twists turn one basic no bake chocolate fudge into a whole collection of easy chocolate fudge recipes you can rotate through the year.
How to Store, Freeze, and (If Needed) Soften Fudge
One of my favorite things about this fast chocolate dessert is how well it stores. You can make it well ahead and pull it out when guests arrive.
Room Temperature:
- In a cool kitchen, fudge can sit at room temperature for about 2–3 days.
- Store in an airtight container, layered with parchment or wax paper between layers so the pieces don’t stick.
Refrigerator:
- For longer storage, keep in the fridge for up to 2 weeks.
- Place in a tightly sealed container; fudge can pick up fridge odors if left uncovered.
- Let it sit at room temperature for 10–20 minutes before serving if you prefer softer fudge.
Freezer:
- Wrap the whole slab of fudge in parchment, then in foil, or place cut squares in a freezer-safe container.
- Freeze for up to 2–3 months.
- Thaw overnight in the fridge or on the counter for about an hour. It thaws pretty quickly since the pieces are small.
Reheating?
We don’t really “reheat” fudge, but if yours feels too firm from the fridge or freezer, just let it warm slightly on the counter. That’s all it needs to get back to its creamy, smooth texture.
Notes, Tips, and What I Learned Testing This Recipe
After more pans of fudge than I should probably admit, here are the little things that make this Easy 2-Ingredient Chocolate Fudge Recipe truly foolproof:
- Use gentle heat. High heat can scorch chocolate and make it grainy. Whether you use the microwave or the stovetop, go slower than you think you need.
- Stir, stir, stir. If the mixture looks a bit separated at first, keep stirring off the heat. Often it comes back together and turns glossy.
- Line your pan well. Parchment with an overhang makes removal so much easier. Don’t skip that step.
- Use smaller pieces. This fudge is rich. Cutting it into smaller squares gives everyone just enough without being overwhelming.
- Toppings are your friend. A sprinkle of flaky sea salt or a few chopped nuts on top makes it look fancy, even though you know it was a 2 ingredient dessert at heart.
- Adjust sweetness easily. If you like things less sweet, use dark chocolate chips. If you have a real sweet tooth, go with milk chocolate or a mix of milk and semi-sweet.
- Make it kid-friendly. Let kids press sprinkles, mini M&M’s, or mini marshmallows on top. It’s a great little job for small hands.
Honestly, this is one of those recipes I make when I want a win. It’s very forgiving, and it disappears every single time I take it to a gathering.
Frequently Asked Questions (FAQs)
1. Why didn’t my fudge set properly?
Most often, the fudge was a bit under-chilled, or the chocolate-to-condensed-milk ratio was off. Make sure you use a full 14 oz can of sweetened condensed milk and chill at least 2 hours.
2. Can I make this 2 ingredient chocolate fudge dairy-free?
Yes. Use dairy-free chocolate chips and sweetened condensed coconut milk, and you’ve got an easy vegan fudge that still tastes rich and creamy.
3. Can I use a different size pan?
You can. An 8×8 pan gives you thicker fudge; a 9×9 pan will make slightly thinner pieces. For a 9×13, double the recipe.
4. My fudge looks grainy—what happened?
The chocolate may have overheated. Next time use lower heat and stir more often. Sometimes you can rescue it by stirring in a teaspoon of neutral oil while it’s still warm.
5. Do I have to refrigerate this fudge?
For the best texture and freshness, yes, I recommend storing it in the fridge, especially in warm weather. You can bring it out 10–15 minutes before serving.
6. Can I use chocolate bars instead of chocolate chips?
Absolutely. Just chop the bars into small pieces so they melt quickly and evenly. Many bakers love using baking bars for an even smoother fudge.
7. Can I reduce the sweetened condensed milk to make it less sweet?
I don’t recommend reducing it; it affects both sweetness and texture. Instead, choose darker chocolate, which naturally tastes less sweet.
8. How far ahead can I make this for the holidays?
You can make this easy homemade fudge up to 2 weeks ahead and keep it in the fridge, or 2–3 months ahead and freeze it. That’s why it’s perfect for gift boxes and cookie trays.
Final Thoughts & A Friendly Nudge
This Easy 2-Ingredient Chocolate Fudge Recipe is one of those back-pocket recipes I think every busy cook deserves. It’s fast, forgiving, and flexible—no bake chocolate fudge that tastes like you fussed over a saucepan for hours, when really you just stirred a bowl and slid a pan into the fridge.
If you try this simple fudge recipe, I’d love to hear how it turns out for you—tell me what kind of chocolate you used, whether you added nuts or peppermint, or if you turned it into a 2 ingredient dessert night with the kids. And if you’re in a chocolate mood, you might also enjoy experimenting with other quick chocolate desserts, like microwave mug Cakes or peanut butter fudge with just a few more ingredients.
Now go grab that can of sweetened condensed milk hiding in your pantry and make yourself a batch—you’ve earned a square (or two).
Easy 2-Ingredient Chocolate Fudge
Ingredients
- 3 cups chocolate chips about 540 g; semi-sweet recommended, or use dark, milk, or vegan chocolate chips
- 1 can sweetened condensed milk 14 oz / 396 g; can use sweetened condensed coconut milk for dairy-free/vegan
- 1 teaspoon pure vanilla extract optional, for flavor
- 1/4 teaspoon fine sea salt optional, to enhance flavor
- chopped nuts optional topping; such as walnuts, pecans, or almonds
- flaky sea salt optional topping
- mini marshmallows optional topping
- crushed peppermint candy optional topping
- sprinkles optional topping
Instructions
- Line an 8x8-inch (20x20 cm) pan with parchment paper, leaving an overhang on two sides to create a sling. Lightly spray the parchment with cooking spray if desired to prevent sticking.
- Measure out the chocolate chips and sweetened condensed milk. Have a medium microwave-safe bowl (or a small heavy-bottomed saucepan), a rubber spatula, and your optional vanilla, salt, and toppings ready.
- Add the chocolate chips and sweetened condensed milk to a medium microwave-safe bowl. If using the microwave method, do not add vanilla or salt yet; they will be stirred in after melting.3 cups chocolate chips, 1 can sweetened condensed milk
- Microwave on 50–60% power for 30 seconds, then stir well. Continue to heat in 20–30 second bursts at 50–60% power, stirring after each burst, until the chocolate is mostly melted and the mixture looks thick and glossy. Stop while a few small lumps remain; they will melt as you stir.3 cups chocolate chips, 1 can sweetened condensed milk
- Remove the bowl from the microwave and stir vigorously until the mixture is completely smooth and uniform, like thick brownie batter. Stir in the vanilla extract and fine sea salt, if using.1 teaspoon pure vanilla extract, 1/4 teaspoon fine sea salt
- Alternatively, place the chocolate chips and sweetened condensed milk in a small heavy-bottomed saucepan. Warm over low heat, stirring constantly, until the chocolate is almost fully melted. Remove from the heat and continue stirring until smooth, then stir in vanilla and salt if using.3 cups chocolate chips, 1 can sweetened condensed milk, 1 teaspoon pure vanilla extract, 1/4 teaspoon fine sea salt
- Scrape the warm fudge mixture into the prepared pan. Use a spatula to spread it evenly into the corners. Gently tap the pan on the counter to smooth the top and release any air bubbles.
- While the fudge is still warm and soft, sprinkle chopped nuts, mini marshmallows, crushed peppermint, flaky sea salt, or sprinkles over the top. Press very lightly so they adhere without sinking too deeply.chopped nuts, flaky sea salt, mini marshmallows, crushed peppermint candy, sprinkles
- Refrigerate the pan for at least 2 hours, or until the fudge is firm enough to slice. In a very full or warm refrigerator, this may take up to 3 hours.
- Use the parchment overhang to lift the fudge slab out of the pan and place it on a cutting board. With a sharp knife, cut into 25–36 small squares, wiping the knife between cuts for clean edges. If the fudge is too hard straight from the fridge, let it sit at room temperature for 10–15 minutes before slicing.
- Store fudge in an airtight container. At cool room temperature, it keeps for 2–3 days; in the refrigerator, up to 2 weeks. For longer storage, freeze for 2–3 months, well-wrapped or in a freezer-safe container, and thaw in the fridge or at room temperature before serving.