Would you like to save this?
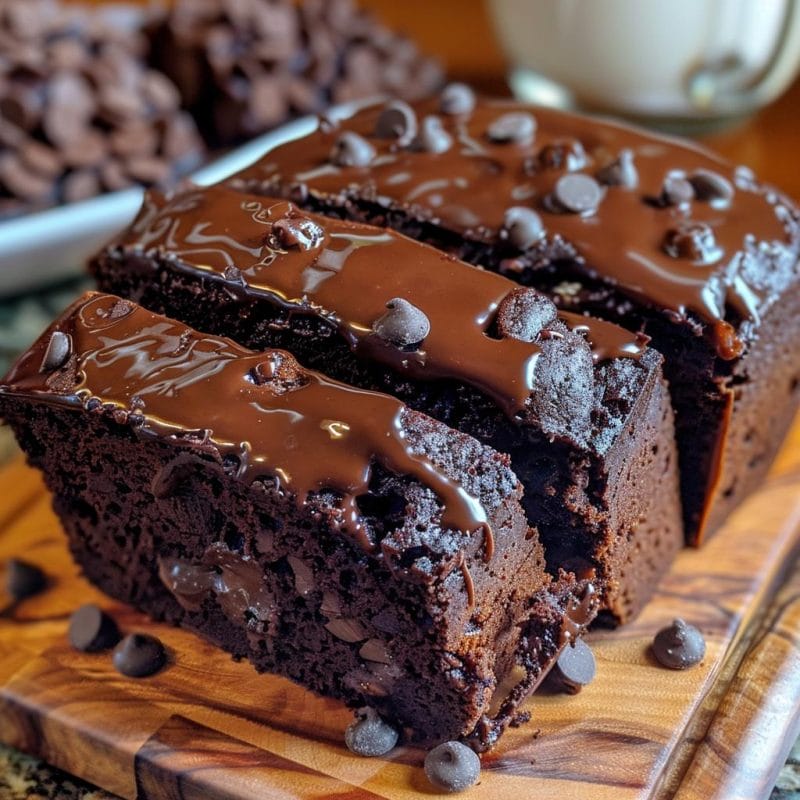
Rocky Road Brownies Recipe
If you love gooey chocolate, toasty nuts, and melty marshmallows all in one bite, this Rocky Road Brownies Recipe is going to be your new go-to dessert bar recipe for every party, potluck, and quiet night at home.
Meet Your New Favorite Rocky Road Brownies
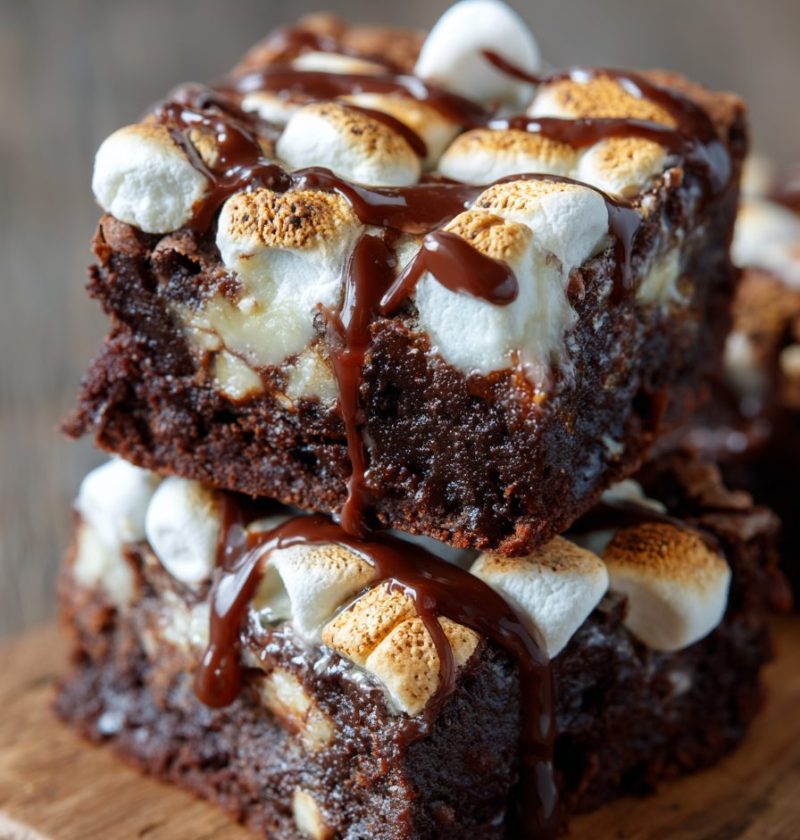
These rocky road brownies are rich, fudgy brownies topped with a layer of soft marshmallows, crunchy nuts, and extra chocolate. Think of them as chocolate marshmallow brownies that grew up, got a little dramatic, and decided to steal the whole dessert table.
I started making homemade rocky road brownies when my kids were in high school and always bringing “just one more friend” over after football games. A plain pan of brownies never lasted long, but these nutty chocolate brownies? Those stopped conversations mid-sentence.
This Rocky Road Brownies Recipe is:
- Thick and fudgy in the center
- Slightly chewy at the edges
- Loaded with gooey marshmallows
- Packed with crunchy nuts and chocolate chunks
They feel a little special and over-the-top, but they’re actually a very easy brownie recipe. No mixer, no fancy tools—just a couple of bowls, a whisk, and a pan.
You can serve them warm for a gooey brownie dessert with a scoop of vanilla ice cream, or let them cool all the way so the topping sets and they slice into tidy Bars. Well, relatively tidy. Rocky road is meant to be a little wild.
Why You’ll Love This Rocky Road Brownies Recipe
- Super fudgy texture – These aren’t cakey. They’re dense, rich, and chewy fudgy rocky road brownies.
- One-bowl base – The brownie batter uses simple pantry staples and comes together in one bowl.
- Gooey top, crisp edges – Soft marshmallows and melty chocolate over a brownie with slightly crisp edges…perfect texture contrast.
- Customizable mix-ins – Use your favorite nuts, swap the chocolate, or make them kid-friendly with colorful toppings.
- Crowd-pleasing dessert bar recipe – Great for potlucks, tailgates, bake sales, and holiday trays.
- Make-ahead friendly – These rocky road brownies set up even better after resting overnight.
- Freezer-friendly treat – You can freeze individual squares for late-night chocolate emergencies.
- Fun to bake with kids – Little hands love scattering marshmallows and nuts over the brownie base.
Ingredients for the Best Rocky Road Brownies
You don’t need anything fancy here—just good chocolate, real butter, and a few pantry staples. Here’s what you’ll need for this Rocky Road Brownies Recipe, plus a few handy substitution ideas.
For the Fudgy Brownie Base
-
1 cup (2 sticks / 226 g) unsalted butter
Use real butter, not margarine. Melted butter gives these brownies a dense, rich crumb. -
2 cups (400 g) granulated sugar
Regular white sugar helps create that shiny, crackly top. -
1/2 cup (100 g) light brown sugar, packed
Adds moisture and a slight caramel note. You can use all white sugar, but I love the depth from brown. -
4 large eggs, room temperature
Room temp eggs mix in more smoothly and help with a fudgy texture. -
2 teaspoons pure vanilla extract
Use real vanilla if you can; it makes a big difference in chocolate desserts. -
1 cup (120 g) all-purpose flour
Regular unbleached flour works best. Spoon and level it, don’t pack it. -
3/4 cup (75 g) unsweetened cocoa powder
Natural cocoa is fine; Dutch-processed also works and gives a deeper flavor. Use a brand you like (Ghirardelli, Hershey’s Special Dark, etc.). -
1/2 teaspoon baking powder
Just enough lift so the brownies aren’t heavy, but still fudgy. -
3/4 teaspoon fine sea salt
Balances the sweetness and makes the chocolate taste more “chocolaty.” -
1 cup (170 g) semi-sweet chocolate chips or chunks
Folded into the batter for pockets of melty chocolate. You can use dark chocolate if you like a less sweet brownie.
For the Rocky Road Topping
-
3 cups Mini marshmallows
Mini marshmallows melt and toast nicely. If you only have large ones, chop them into smaller pieces. -
1 cup (120 g) chopped nuts
Classic choices: walnuts, pecans, or almonds. Lightly toast them in a dry skillet for extra flavor if you have a minute. -
3/4 cup (130 g) semi-sweet or milk chocolate chips
These melt over the hot marshmallows, creating a slightly gooey, chocolatey top layer. -
1/3 cup (80 ml) heavy cream
Helps soften the chocolate topping so it’s sliceable and not rock-hard when cool. -
1 teaspoon vanilla extract
Rounds out the flavor of the topping. -
Pinch of salt
Just a pinch for balance—it keeps the topping from being cloyingly sweet.
Optional Add-Ins and Swaps
- Peanut butter chips instead of some chocolate chips for a chocolate-peanut rocky road.
- Gluten-free all-purpose flour blend (1:1 baking blend) for gluten-free rocky road brownies.
- Dark chocolate chips for a slightly more grown-up, less sweet bar.
- Sea salt flakes sprinkled on top right before serving for a sweet-salty finish.

Step-by-Step Directions (With Helpful Tips)
You’ll make these in two main parts: the fudgy brownie base and the gooey rocky road topping. Let me walk you through it.
1. Preheat and Prep
- Preheat your oven to 350°F (175°C).
- Line a 9×13-inch baking pan with parchment paper or lightly grease it with baking spray.
- I still spray under the parchment so it sticks to the pan and doesn’t slide around when you spread the batter.
2. Melt the Butter and Mix the Sugars
- Melt the butter in a medium saucepan over low heat, or use the microwave in 20–30 second bursts.
- Pour the melted butter into a large mixing bowl and whisk in the granulated sugar and brown sugar until the mixture looks thick and glossy.
- This step helps create that shiny top we all love on brownies.
3. Add Eggs and Vanilla
- Add the eggs one at a time, whisking well after each addition.
- Stir in the vanilla extract.
- The batter should be smooth and a little thick at this point. Don’t skip the whisking; it adds structure.
4. Add Dry Ingredients
- In a separate bowl, whisk together the flour, cocoa powder, baking powder, and salt.
- Breaking up any cocoa lumps now keeps you from overmixing later.
- Gently fold the dry ingredients into the wet mixture using a spatula.
- Fold just until you don’t see streaks of dry flour. Overmixing can make brownies tough.
5. Fold in Chocolate Chips
- Fold in 1 cup of chocolate chips or chunks.
- If your kitchen is warm, pop the bowl in the fridge for 5–10 minutes to slightly thicken the batter; it makes spreading easier.
6. Bake the Brownie Base
- Spread the batter evenly in your prepared 9×13 pan.
- Bake for 22–28 minutes, depending on your oven.
- You’re looking for the edges to be set and slightly pulling away from the pan, but the center should still look a little soft.
- A toothpick inserted 2 inches from the edge should come out with a few moist crumbs, not wet batter.
Don’t overbake here—remember, the brownies go back in the oven briefly with the topping.
7. Add the Marshmallows and Nuts
- When the brownies are almost done, pull the pan from the oven and quickly sprinkle the mini marshmallows evenly over the top.
- Scatter the chopped nuts on top of the marshmallows.
- Return the pan to the oven and bake for 3–5 more minutes, just until the marshmallows are puffed and starting to turn golden at the tips.
- Keep a close eye; marshmallows go from golden to burnt pretty quickly.
8. Make the Rocky Road Chocolate Topping
- While the marshmallows puff, combine 3/4 cup chocolate chips and the heavy cream in a microwave-safe bowl.
- Microwave in 20-second bursts, stirring each time, until smooth and shiny.
- Stir in the vanilla and a pinch of salt.
- If you prefer, you can do this in a small saucepan over very low heat on the stovetop.
9. Swirl on the Chocolate Topping
- Take the pan of brownies out. While the marshmallows are still hot and soft, drizzle the warm chocolate mixture over the top.
- Use a spoon to gently swirl it into the marshmallows and nuts—don’t spread too aggressively, or you’ll flatten all the puff.
- Think gentle zigzags rather than icing a cake.
10. Cool, Slice, and Serve
- Let the rocky road brownies cool in the pan on a wire rack for at least 1–2 hours.
- For cleaner slices, cool completely and even chill them for 30–60 minutes.
- Use the parchment to lift out the whole slab and slice into 20–24 Bars with a sharp knife.
- Wipe the knife between cuts for neat squares.
Serve slightly warm for a gooey brownie dessert, or at room temperature for sharper edges and a chewier bite.
Servings & Timing
- Yield: About 20–24 brownies, depending on how large you slice them
- Prep Time: 20 minutes
- Bake Time: 25–33 minutes
- Cooling Time: 1–2 hours (hands-off, but worth the wait)
- Total Time: About 2–2½ hours, including cooling
If you’re making these for a party, I suggest baking them earlier in the day or the night before so they have time to set up for easier slicing.
Fun Variations to Try
Once you’ve made this Rocky Road Brownies Recipe as written, you can start playing around a bit. Here are some of my favorite twists:
- Peanut Butter Rocky Road Brownies – Swirl 1/3 cup warmed peanut butter into the brownie batter before baking and use chopped peanuts on top.
- S’mores Rocky Road Brownies – Use half mini marshmallows and half mini marshmallow bits, then sprinkle crushed graham crackers over the topping.
- Mocha Rocky Road Brownies – Add 1 tablespoon instant espresso powder to the brownie batter for a deeper coffee-chocolate flavor.
- Salted Caramel Rocky Road Brownies – Drizzle warm salted caramel sauce over the baked brownies along with the chocolate topping.
- Nut-Free Rocky Road Brownies – Skip the nuts and add extra chocolate chips or mini M&M’s to keep the fun texture without the nuts.
- Holiday Rocky Road Brownies – Use red and green candy-coated chocolates at Christmas, or pastel candies for Easter, for a festive tray.
Storage & Reheating Tips
You know what? These brownies might actually taste better the next day. The flavors settle in, and the topping firms up just enough.
How to Store
-
Room Temperature:
Store fully cooled rocky road brownies in an airtight container at room temp for 2–3 days. Keep them in a single layer or with parchment between layers so the marshmallows don’t weld together. -
Refrigerator:
For longer storage, keep them in the fridge for up to 5–6 days. The texture will be a little firmer and chewier—some people actually prefer them this way.
Freezing Instructions
- To Freeze:
Wrap individual brownies in plastic wrap, then place in a freezer bag or freezer-safe container. Freeze for up to 2 months. - To Thaw:
Let them thaw at room temperature for 30–60 minutes, or in the fridge overnight.
If you like a slightly warm, gooey brownie, you can microwave a chilled or thawed square for 10–15 seconds—just enough to soften the chocolate and marshmallows again.
Make-Ahead Advice
- Bake the brownies a day before you need them and keep them covered on the counter once fully cooled.
- For parties, slice them the morning of the event and arrange them on a pretty platter; they hold their shape well.
Notes From My Kitchen (Little Things That Help)
-
Don’t overbake the brownie base.
If the center is fully firm when you first bake it, it’ll be too dry once you put it back in for the marshmallows. Slightly underdone is the sweet spot. -
Toasting the nuts adds a lot.
Toss them in a dry skillet for a few minutes over medium heat until fragrant. Let them cool before sprinkling over the marshmallows. It makes these nutty chocolate brownies smell amazing. -
Use parchment for stress-free removal.
I like to leave a little overhang on two sides so I can lift the whole slab out. It also saves your pan from stuck-on marshmallow. -
Wait for cleaner slices.
I know it’s hard, but letting them cool fully (even chilling them) before slicing gives you neat layers: brownie, marshmallow, rocky road topping. -
Use a hot knife.
Run your knife under hot water, wipe it dry, and slice. Repeat between cuts. It glides right through the marshmallows and chocolate. -
Adjust sweetness easily.
Use dark chocolate chips and reduce the sugar by 1/4 cup if you prefer desserts that are less sweet.
I tested this Rocky Road Brownies Recipe a few different ways, and the version you’re reading is the one my family kept going back to. My husband, who “doesn’t really like sweets,” somehow managed three squares in one night.
Frequently Asked Questions
1. Can I use a boxed brownie mix for this Rocky Road Brownies Recipe?
Yes, you can use your favorite boxed mix as the base; bake it in a 9×13 pan, then follow the rocky road topping steps starting with the marshmallows and nuts.
2. What nuts work best in rocky road brownies?
Walnuts, pecans, and almonds are all great; I personally love toasted pecans for their softer crunch and warm flavor.
3. Can I make these rocky road brownies without eggs?
You can try using a commercial egg replacer or a flax “egg” (1 tablespoon ground flax + 3 tablespoons water per egg), but the texture will be a bit denser and less shiny on top.
4. How do I keep the marshmallows from burning?
Only bake them for a few minutes—just until they puff and barely start to brown—and keep your oven rack in the middle, not right under the broiler.
5. My brownies came out cakey, not fudgy. What went wrong?
Most likely they were overbaked or you used too much flour; next time, measure the flour by spooning and leveling, and pull the pan from the oven while the center still looks slightly soft.
6. Can I leave out the nuts for allergies?
Absolutely—just skip the nuts and add more chocolate chips or even crushed pretzels for crunch if allergies allow.
7. How can I make these brownies more “grown up” and less sweet?
Use dark chocolate chips (60–70% cocoa), swap some of the sugar for a bit more cocoa, and sprinkle a little flaky sea salt on top before serving.
8. Are these rocky road brownies good for gifting?
Yes, once fully cooled and set, they pack beautifully in tins or gift boxes layered with parchment; they’re sturdy enough to travel but still soft and gooey when you bite in.
Conclusion: A Gooey Brownie Dessert Everyone Remembers
These homemade rocky road brownies are the kind of dessert that makes people pause, smile, and reach for a second piece. Thick, fudgy, loaded with chocolate, marshmallows, and nuts—they’re everything you want in a gooey brownie dessert bar recipe.
Give this Rocky Road Brownies Recipe a try the next time you need a dessert that feels extra special with very little fuss. When you bake them, let me know how they turned out in the comments, and if you enjoyed these, you might also like my classic fudgy brownies or peanut butter bar recipes for your next baking session.
Rocky Road Brownies
Ingredients
- 1 cup unsalted butter 2 sticks / 226 g, melted
- 2 cups granulated sugar 400 g
- 1/2 cup light brown sugar 100 g, packed
- 4 large eggs room temperature
- 2 teaspoons vanilla extract pure
- 1 cup all-purpose flour 120 g, spooned and leveled
- 3/4 cup unsweetened cocoa powder 75 g; natural or Dutch-process
- 1/2 teaspoon baking powder
- 3/4 teaspoon fine sea salt
- 1 cup semi-sweet chocolate chips or chunks, 170 g, folded into batter
- 3 cups mini marshmallows for topping; chop large marshmallows if needed
- 1 cup chopped nuts 120 g; walnuts, pecans, or almonds, toasted if desired
- 3/4 cup chocolate chips 130 g; semi-sweet or milk, for topping
- 1/3 cup heavy cream 80 ml
- 1 teaspoon vanilla extract for topping
- salt pinch, for topping
- nonstick spray or extra butter for greasing pan
- parchment paper for lining pan, optional but recommended
Instructions
- Preheat your oven to 350°F (175°C). Line a 9×13-inch baking pan with parchment paper, leaving an overhang for easy removal, or lightly grease the pan with baking spray or butter. You can spray under the parchment to help it stick and not slide around.nonstick spray or extra butter, parchment paper
- Melt the butter in a medium saucepan over low heat, or in the microwave in 20–30 second bursts until just melted. Pour the melted butter into a large mixing bowl and whisk in the granulated sugar and light brown sugar until the mixture looks thick and glossy.1 cup unsalted butter, 2 cups granulated sugar, 1/2 cup light brown sugar
- Add the eggs one at a time, whisking well after each addition until fully incorporated. Stir in the vanilla extract. The batter should be smooth and slightly thick.4 large eggs, 2 teaspoons vanilla extract
- In a separate bowl, whisk together the flour, cocoa powder, baking powder, and fine sea salt, breaking up any cocoa lumps.1 cup all-purpose flour, 3/4 cup unsweetened cocoa powder, 1/2 teaspoon baking powder, 3/4 teaspoon fine sea salt
- Gently fold the dry ingredients into the wet mixture using a spatula, mixing just until no streaks of dry flour remain. Avoid overmixing so the brownies stay fudgy.1 cup all-purpose flour, 3/4 cup unsweetened cocoa powder, 1/2 teaspoon baking powder, 3/4 teaspoon fine sea salt
- Fold in 1 cup of semi-sweet chocolate chips or chunks. If the batter feels very loose or your kitchen is warm, chill the bowl in the refrigerator for 5–10 minutes to slightly thicken it before spreading.1 cup semi-sweet chocolate chips
- Spread the brownie batter evenly in the prepared 9×13-inch pan. Bake for 22–28 minutes, or until the edges are set and just starting to pull away from the sides, while the center still looks slightly soft. A toothpick inserted about 2 inches from the edge should come out with a few moist crumbs, not wet batter.
- Remove the pan from the oven. Immediately sprinkle the mini marshmallows evenly over the hot brownie base, then scatter the chopped nuts on top. Return the pan to the oven and bake for 3–5 minutes, just until the marshmallows are puffed and starting to turn lightly golden at the tips. Watch closely so they don’t burn.3 cups mini marshmallows, 1 cup chopped nuts
- While the marshmallows puff in the oven, combine 3/4 cup chocolate chips and the heavy cream in a microwave-safe bowl. Microwave in 20-second bursts, stirring after each, until the mixture is smooth and shiny. Stir in the vanilla extract and a pinch of salt.3/4 cup chocolate chips, 1/3 cup heavy cream, 1 teaspoon vanilla extract, salt
- Take the brownies out of the oven. While the marshmallows are still hot and soft, drizzle the warm chocolate mixture over the top. Use a spoon to gently swirl it through the marshmallows and nuts in loose zigzags without pressing down too much so you don’t deflate the topping.3 cups mini marshmallows, 1 cup chopped nuts, 3/4 cup chocolate chips, 1/3 cup heavy cream, 1 teaspoon vanilla extract, salt
- Place the pan on a wire rack and let the rocky road brownies cool in the pan for at least 1–2 hours, until the topping is set. For the cleanest slices, cool completely and optionally chill for 30–60 minutes.
- Use the parchment overhang to lift the slab of brownies out of the pan. With a sharp knife, slice into 20–24 bars, wiping the knife clean between cuts for neat squares. Serve slightly warm for a gooey dessert, or at room temperature for firmer, chewier bars.