Would you like to save this?
These bite-sized treats are a no-bake, fun dessert that brings together cake, frosting, and chocolate for smiles all around.
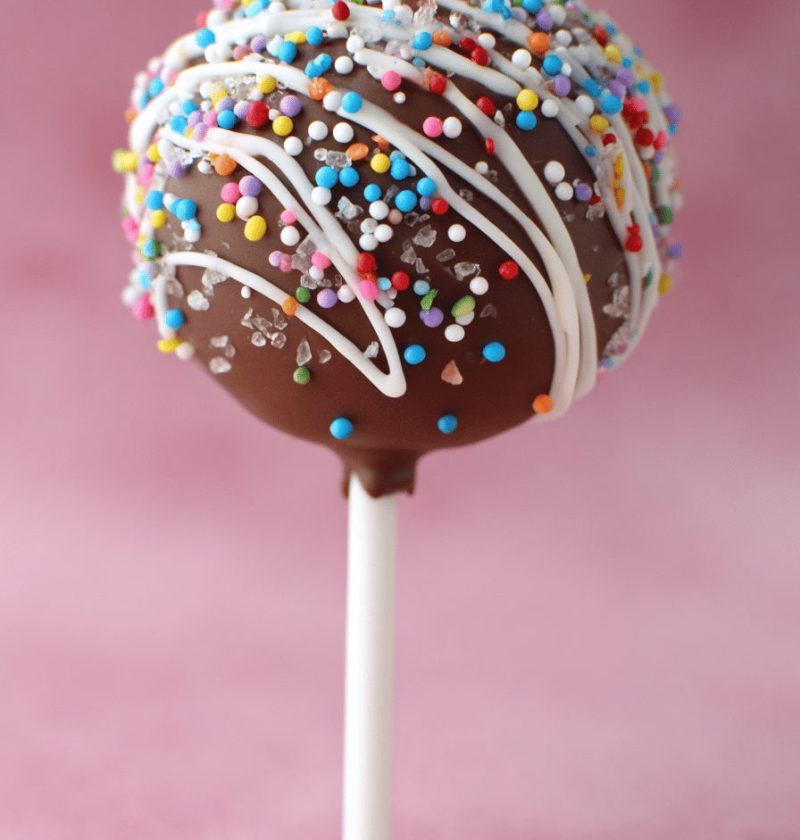
Cake pops are little spheres of cake crumbs mixed with frosting, dipped in melted chocolate or candy coating, then decorated with sprinkles, nuts, or drizzles—basically dessert on a stick. What’s unique about this Cake Pop Recipe is how easy it is: no oven needed, minimal hands-on time, and endless flavor combos from classic vanilla to rich chocolate. Personally, I whip these up on Saturday mornings when my grandkids are buzzing around, and they vanish faster than you can say “party favor.†Seasonal or everyday, these pops work for birthday celebrations, school events, or just an ordinary Tuesday when you need a sweet pick-me-up. They’re surprisingly healthier than regular cookies—if you use low-sugar chocolate and whole-grain cake—so you can indulge with a bit less guilt.
Why You’ll Love This Recipe (H2)
• No oven required—great for summer heat
• Ready in under an hour (including chill time)
• Kid-approved dessert for parties or after-school treats
• Customizable: vanilla, chocolate, or birthday-cake flavors
• Perfect for gift boxes, lunchboxes, or potlucks
• Uses pantry staples—no last-minute grocery runs
• Simple decorating: sprinkles, drizzles, or edible glitter
• Double the batch for sharing (or freezer stash!)
• Fun assembly: let the kids join the “baking†party
Ingredients (H2)
• 2 cups crumbled cake (store-bought or homemade; vanilla or chocolate)
• ¾ cup frosting (cream cheese or buttercream; see tips below)
• 8 oz (about 1½ cups) chocolate melts or candy coating (dark, milk, or white)
• 2 tablespoons coconut oil (helps coating flow smoothly)
• Sprinkles, chopped nuts, or shredded coconut for decoration
Substitutions & Tips:
– Cake: Swap boxed cake mix (baked per package) for homemade; try lemon or red velvet.
– Frosting: Use Greek yogurt blended with a touch of honey for a lighter twist.
– Chocolate: Ghirardelli or Wilton candy melts both work great; avoid chocolate chips—they seize up.
– Coconut oil: Refined or virgin; you can skip it if your coating melts fluidly on its own.
Directions
-
Crumble & Combine
In a large bowl, crumble cooled cake into fine crumbs. You want a sandy texture—no big chunks. Add frosting and stir gently until it looks like cookie dough. -
Shape the Pops
Scoop tablespoon-sized portions and roll into balls with lightly oiled hands (prevents sticking). Place on a parchment-lined tray. Pro tip: Freeze 10 minutes to firm up. -
Melt the Coating
In a microwave-safe bowl, combine chocolate melts and coconut oil. Heat in 20-second bursts, stirring each time, until silky smooth (be cautious—chocolate burns fast). -
Dip & Decorate
Holding each cake pop by its stick, dip into the warm coating. Tap off excess gently against the bowl edge. Before the chocolate sets, add sprinkles or drizzle contrasting color. -
Set & Serve
Stick the cake pops into a styrofoam block or a shallow box filled with rice to keep them upright. Chill 15–20 minutes until coating is firm. -
Enjoy the Fun
Arrange on a cake pop stand or wrap individually in cellophane with ribbon for party favors.
Servings & Timing (H2)
Yield: Makes 18–20 cake pops
Prep Time: 20 minutes
Chill/Rest Time: 40 minutes (including 10-minute cake pop freeze and 20-minute setting)
Total Time: About 1 hour
Variations (H2)
• Lemon-Blueberry: Fold ¼ cup finely chopped blueberries into your cake crumbs.
• Nutty Delight: Roll pops in crushed almonds or pistachios after dipping.
• Peanut Butter Surprise: Add 2 tablespoons creamy peanut butter to frosting.
• Red Velvet Marble: Swirl red velvet cake crumbs with white chocolate coating.
• Gluten-Free Twist: Use GF cake mix and certified GF chocolate.
• Seasonal Swaps: Use pumpkin pie spice in cake crumbs for autumn flair.
Storage & Reheating (H2)
Store in an airtight container in the fridge for up to 5 days (coating stays crisp). Freeze up to 1 month—thaw in the fridge for 2 hours before serving. No reheating needed, but let frozen pops sit 10 minutes at room temp so chocolate doesn’t crack. These also make a great make-ahead dessert for parties; just unwrap and display!
Notes (H2)
• Hands-on tip: If your mixture seems too wet, add a tablespoon of cake crumbs at a time until firm enough to roll.
• Testing note: I learned the hard way that frosting temperature matters—room-temp frosting blends more evenly than straight-from-the-fridge.
• Flavor boost: A pinch of sea salt in the chocolate coating amps up the taste.
• Decorating hack: Use a piping bag with a tiny hole for drizzle stripes that look effortlessly chic.
FAQs (H2)
Q: Can I use store-bought cake for this recipe?
A: Absolutely—you can use any store-bought sheet cake or even cake slices left from a celebration.
Q: How do I keep the pops from sliding off the stick?
A: Dip the stick tip (~½-inch) in coating before inserting into the cake ball; chill briefly to set.
Q: My chocolate seized—can I still use it?
A: If it turned grainy, add a teaspoon of coconut oil and gently reheat to smooth it out.
Q: What’s the best way to transport cake pops?
A: Lay them in a single layer in a shallow box, separated by parchment, or stand them in a styrofoam block inside a travel container.
Q: How do I prevent condensation when chilling?
A: Place pops in the fridge uncovered for 5–10 minutes, then wrap or cover—this helps avoid moisture buildup.
Q: Can I freeze uncoated cake balls?
A: Yes—freeze on a tray, then transfer to a bag; thaw and dip in chocolate when ready.
Q: Any tips for gluten-free or vegan versions?
A: Use gluten-free cake mix and dairy-free chocolate; swap frosting for coconut cream whipped with a bit of sweetener.
Q: Why are my cake pops too crumbly or too soft?
A: If crumbly, you need more frosting; if too soft, add extra crumbs. It’s a fine balance—start small.
Conclusion (H2)
These cake pops are a joyful blend of easy prep, delightful flavors, and playful decoration that suit any occasion—kids’ parties, grown-up gatherings, or an impromptu dessert craving. Give this Cake Pop Recipe a try, leave a comment to share your favorite variation, and don’t forget to explore my other fun dessert ideas for your next get-together!
Cake Pop Recipe
These bite-sized treats are a no-bake, fun dessert that brings together cake, frosting, and chocolate for smiles all around.
- 2 cups crumbled cake (store-bought or homemade; vanilla or chocolate)
- 3/4 cup frosting (cream cheese or buttercream; see tips below)
- 8 oz chocolate melts or candy coating (dark, milk, or white)
- 2 tbsp coconut oil (helps coating flow smoothly)
- sprinkles, chopped nuts, or shredded coconut (for decoration)
- In a large bowl, crumble cooled cake into fine crumbs. Add frosting and stir gently until it looks like cookie dough.
- Scoop tablespoon-sized portions and roll into balls. Place on a parchment-lined tray. Freeze to firm up.
- Combine chocolate melts and coconut oil in a microwave-safe bowl. Heat until smooth.
- Dip the cake pops into the warm coating. Add sprinkles or decorations before the chocolate sets.
- Chill until coating is firm. Serve and enjoy!
If your mixture seems too wet, add a tablespoon of cake crumbs at a time until firm enough to roll. Room temperature frosting blends more evenly than cold frosting.

