Would you like to save this?
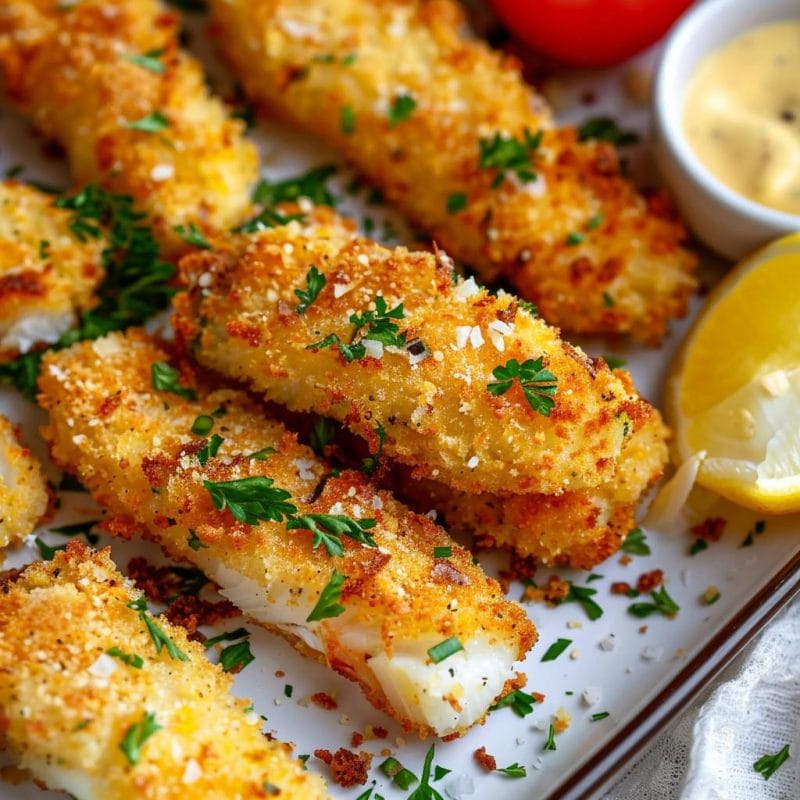
Few dishes evoke childhood memories as vividly as fish sticks. Whether they were served in the school cafeteria or enjoyed at home, these crispy, golden strips of fish are a nostalgic comfort food. However, the store-bought variety often leaves much to be desired, loaded with preservatives and lacking in real flavor. That’s why making baked fish sticks at home is a game-changer. Not only are they healthier, but they also taste infinitely better, thanks to fresh ingredients and a perfect blend of seasonings. This recipe for baked fish sticks brings a sophisticated twist to the classic, making them a hit with both kids and adults alike.
I remember the first time I made these baked fish sticks for my family. The aroma of Parmesan and spices filled the kitchen, creating an anticipatory buzz. As we sat down to eat, the crunch of the coating giving way to tender, flaky fish was pure bliss. These fish sticks quickly became a family favorite, requested often for weeknight dinners and special occasions alike.
Ingredients:
1 lb of firm white fish (like cod or tilapia), cut into 1-inch wide strips
1 cup of panko breadcrumbs
1/2 cup grated Parmesan cheese
1 teaspoon garlic powder
1 teaspoon paprika
1/2 teaspoon salt
1/4 teaspoon black pepper
2 large eggs
1/4 cup all-purpose flour
Cooking spray or olive oil, for greasing
Directions:
Preheat and Prepare:
Heat Your Oven: Begin by preheating your oven to 400°F (200°C). This temperature ensures that your fish sticks will cook evenly and develop a nice, crispy exterior.
Prepare the Baking Sheet: Line a baking sheet with parchment paper and lightly grease it with cooking spray or a drizzle of olive oil. This prevents the fish sticks from sticking and helps them achieve that desirable golden-brown color.
Mix Breadcrumbs:
Combine Dry Ingredients: In a shallow dish, combine the panko breadcrumbs, grated Parmesan cheese, garlic powder, paprika, salt, and black pepper. This seasoned mixture will form the crispy coating for the fish sticks. The panko provides an airy crunch, while the Parmesan adds a savory depth of flavor.
Prepare Eggs and Flour:
Beat the Eggs: Crack the eggs into a separate bowl and beat them until frothy. This egg wash will help the breadcrumb mixture adhere to the fish.
Set Up the Flour: Spread the flour on a plate. This will be the first step in the coating process, helping the egg wash stick to the fish.
Coat the Fish:
Dredge in Flour: Take each fish strip and coat it lightly in flour, tapping off any excess. This initial coating is essential for the subsequent layers to stick properly.
Dip in Egg: Next, dip the floured fish strip into the beaten eggs, ensuring it is fully covered.
Bread the Fish: Press the egg-coated fish strip into the breadcrumb mixture, covering it completely. Make sure each piece is well-coated on all sides with the seasoned breadcrumbs.
Bake:
Arrange on Baking Sheet: Place the breaded fish strips on the prepared baking sheet in a single layer, ensuring they do not touch each other. This spacing allows the heat to circulate evenly around each piece, promoting even cooking and crispiness.
Bake to Perfection: Bake the fish sticks in the preheated oven for 15-20 minutes, or until they are golden brown and the fish flakes easily with a fork. For optimal crispiness, flip the fish sticks halfway through the baking time. This helps both sides develop a nice crust.
Variations & Tips:
Add Extra Crunch:
Cornflakes Addition: For an even crunchier exterior, mix some crushed cornflakes into your breadcrumb mixture. This adds an extra layer of texture that is incredibly satisfying.
Go Gluten-Free:
Almond Meal Substitute: If you’re avoiding gluten, substitute the panko breadcrumbs with almond meal. This will give you a deliciously nutty flavor and a similar crunchy texture.
Season Creatively:
Spice It Up: Feel free to get creative with your seasonings. Add a dash of Old Bay seasoning for a zesty kick, or some dried dill for a fresh, herbaceous note.
Spicy Dip Option:
Fiery Twist: For those who love a bit of heat, mix a bit of Sriracha into your tartar sauce. This spicy dip pairs wonderfully with the savory fish sticks, adding an extra layer of flavor.
Watch the Oven:
Cooking Times May Vary: Keep an eye on your oven as cooking times can vary. This ensures your fish sticks come out perfectly crispy every time without becoming overcooked.
Conclusion:
These homemade baked fish sticks are more than just a meal; they’re a nostalgic experience reimagined for the modern palate. The combination of a crispy, flavorful coating and tender, flaky fish inside makes every bite a delight. The use of fresh ingredients and the ability to customize the seasoning means you can cater this dish to your family’s tastes, making it a versatile and beloved addition to your dinner repertoire.
Whether you serve these fish sticks with a side of tartar sauce, a fresh salad, or some steamed vegetables, they are sure to be a hit. Enjoy the process of making them as much as you enjoy eating them, knowing you’ve created a dish that’s both healthier and more delicious than its store-bought counterpart. Happy cooking!

