Would you like to save this?
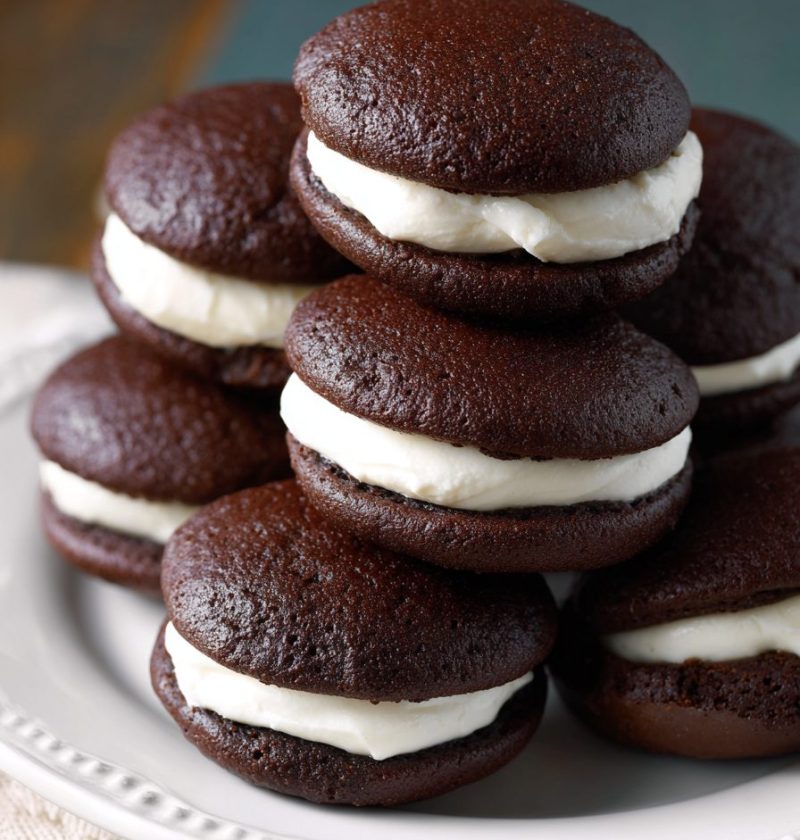
Whoopie Pies Recipe
A Cozy Chocolate Hug in Cookie Form
This Whoopie Pies Recipe gives you soft chocolate sandwich cakes filled with fluffy marshmallow cream—like a handheld cake that feels a little nostalgic and a lot special. These classic whoopie pies are perfect for bake sales, birthdays, holidays, or just a quiet afternoon cup of coffee when you need a treat that makes you smile.
You’ll get pillowy, soft chocolate cookies, a not-too-sweet marshmallow cream filling, and all the old-fashioned charm of traditional whoopie pies from scratch, with simple pantry ingredients and easy steps.

What Makes This Whoopie Pies Recipe So Special?
If you grew up in the Northeast, whoopie pies might remind you of church suppers, fall fairs, or that one bakery in town where the glass case always fogged up.
These chocolate whoopie pies are:
- Part cookie, part cake, part sandwich dessert
- Tender and moist, not dry or crumbly
- Filled with a fluffy marshmallow cream filling that doesn’t ooze out everywhere
- Just sweet enough, so you can usually manage “just one more”
I love making homemade whoopie pies during the cooler months—September through March is my personal “cookie sandwich season.” But honestly, they’re wonderful all year. I bring them to family reunions, school events back when my kids were little, and now I make them for my grandkids, who call them “cake burgers,” which makes me laugh every time.
From an SEO and recipe perspective, this is a very classic whoopie pies recipe: soft chocolate cookies baked as mounds, then sandwiched around a creamy filling. We’re using cocoa powder for rich chocolate flavor, but balancing it with buttermilk for tenderness. The filling is based on marshmallow crème for that nostalgic, bakery-style texture.
And while they look fancy, they’re much easier than most layer cakes. Think of them as chocolate sandwich cakes that just happen to fit nicely in your hand.
Why You’ll Love This Whoopie Pies Recipe
- Soft, cake-like texture – These aren’t dry cookies; they’re fluffy little chocolate cakes.
- Classic marshmallow cream filling – Uses marshmallow creme for a nostalgic, bakery-style center.
- Family-friendly and kid-approved – Great for lunch boxes, bake sales, and birthday tables.
- Easy, straightforward steps – No special skills; just mix, scoop, and bake.
- Make-ahead friendly – They actually taste even better the next day as the flavors settle.
- Freezer-friendly – Make a batch, freeze, and you’ve got a dessert on standby.
- Customizable – Change the filling flavor, add Sprinkles, or make seasonal twists.
- Perfect for sharing – They travel well for potlucks, holidays, and neighbor gifts.
Ingredients for Classic Whoopie Pies
Let’s walk through what you’ll need for both the soft chocolate cookies and the creamy filling. I’ll add notes and simple swaps as we go, because that’s how I talk my friends through recipes, too.
For the Soft Chocolate Cookies (Cakes)
- 2 cups (240 g) all-purpose flour
- Use regular all-purpose; no need for cake flour. Spoon and level for accuracy.
- ½ cup (45 g) unsweetened cocoa powder
- Natural cocoa (like Hershey’s) works well. Dutch-process gives deeper flavor, which I love.
- 1 teaspoon baking soda
- ½ teaspoon baking powder
- ½ teaspoon fine sea salt
- 1 cup (200 g) granulated sugar
- ½ cup (100 g) packed light brown sugar
- Brown sugar adds moisture and a hint of caramel depth.
- ½ cup (1 stick / 113 g) unsalted butter, softened
- Let it sit at room temperature until it’s slightly cool but easily pressed with a finger.
- 2 large eggs, at room temperature
- 1 teaspoon pure vanilla extract
- 1 cup (240 ml) buttermilk, at room temperature
- This is key for tender, old-fashioned whoopie pies.
- No buttermilk? Stir 1 tablespoon white vinegar or lemon juice into just under 1 cup of milk; rest 5 minutes.
For the Marshmallow Cream Filling
This is the heart of the whoopie pie: fluffy, sweet, and a little sticky in the best way.
- ¾ cup (170 g) unsalted butter, softened
- 1½ cups (180–200 g) powdered sugar, sifted
- Start with 1½ cups, then add a bit more if you like a firmer filling.
- 1 jar (7 oz / about 200 g) marshmallow creme or marshmallow fluff
- Jet-Puffed or Marshmallow Fluff are both solid choices.
- 1 teaspoon pure vanilla extract
- Pinch of fine salt
- Just a pinch keeps the filling from tasting flat.
Optional Add-Ons
These aren’t required, but they’re fun:
- Sprinkles or jimmies – Press into the edges of the filling.
- Mini chocolate chips – For the filling or edges.
- Coarse sea salt – A tiny sprinkle on the chocolate cookies before baking.
Step-by-Step Directions: Whoopie Pies Recipe
Take a breath, turn on a favorite playlist, and let’s make these classic whoopie pies from scratch.
1. Preheat and Prep Your Pans
- Preheat your oven to 350°F (175°C).
- Line 2 large baking sheets with parchment paper or silicone baking mats.
- Parchment helps the soft chocolate cookies release cleanly and keeps the bottoms tender.
2. Whisk the Dry Ingredients
- In a medium bowl, whisk together:
- Flour, cocoa powder, baking soda, baking powder, and salt.
- Whisk until you see no streaks of cocoa or flour—this keeps your batter even and prevents random dry pockets.
3. Cream the Butter and Sugars
- In a large mixing bowl (stand mixer or hand mixer), beat:
- Butter, granulated sugar, and brown sugar
on medium speed for 2–3 minutes, until light and slightly fluffy.
- Butter, granulated sugar, and brown sugar
- Scrape down the sides of the bowl to make sure everything mixes evenly.
- The mixture should look lighter in color; that means you’ve added some air, which helps give the cookies that soft, cake-like crumb.
4. Add Eggs and Vanilla
- Add the eggs one at a time, beating well after each addition.
- Mix in the vanilla extract.
- If the mixture looks a little curdled, don’t worry—once the dry ingredients and buttermilk go in, it will smooth out.
5. Alternate Dry Ingredients and Buttermilk
This part sounds fussy, but it helps you get a smooth, lump-free batter.
- On low speed, add about one-third of the dry ingredients to the butter mixture.
- Pour in half of the buttermilk and mix gently.
- Add another third of the dry ingredients, then the rest of the buttermilk.
- Finish with the last of the dry ingredients and mix just until combined.
- The batter will be thick but scoopable, almost like a soft brownie batter.
- Don’t over-mix; that can make the whoopie pies tough instead of tender.
6. Scoop the Batter
- Using a 1½-tablespoon cookie scoop or rounded tablespoon, drop mounds of batter onto the prepared baking sheets.
- Leave at least 2 inches of space between each; they’ll spread into little cakes.
- For more even, bakery-style rounds, you can lightly smooth the tops with a damp finger or the back of a spoon.
7. Bake the Soft Chocolate Cookies
- Bake, one sheet at a time, for 10–12 minutes, until:
- The tops look set and spring back lightly when touched.
- A toothpick inserted in the center of one comes out mostly clean (a few moist crumbs are fine).
- Let the cookies cool on the baking sheet for 5 minutes, then transfer to a wire rack to cool completely.
- Don’t rush this. If the cookies are even slightly warm, the marshmallow cream filling will melt and slide out.
8. Make the Marshmallow Cream Filling
While the cookies cool, we’ll make that dreamy whoopie pie filling.
- In a clean bowl, beat the softened butter on medium speed for 1–2 minutes, until smooth and creamy.
- Add the powdered sugar gradually, mixing on low so it doesn’t puff everywhere, then increasing speed to medium.
- Beat until light and fluffy, about 2–3 minutes.
- Add the marshmallow creme, vanilla, and a pinch of salt.
- Beat again until the whoopie pie filling is thick, smooth, and billowy.
- If it feels too soft, add another 2–4 tablespoons of powdered sugar and beat again.
- If it’s too stiff, you can soften it with 1–2 teaspoons of milk or cream.
9. Pair and Fill the Cookies
- Sort the cooled cookies into pairs of similar size—like matching socks fresh from the dryer.
- Flip half the cookies upside down; these will be your bottoms.
- Pipe or spoon about 1½–2 tablespoons of marshmallow cream filling onto each bottom cookie.
- A piping bag or zip-top bag with the corner snipped off makes this tidy and quick.
- Gently top each one with a second cookie, pressing just until the filling reaches the edges.
10. Add Decorative Touches (Optional but Fun)
- If you’re using sprinkles or mini chocolate chips, roll the filled edges of each whoopie pie through them while the filling is still soft.
Now you’ve got a tray of old-fashioned whoopie pies that look like they walked right out of a bakery case.
Servings & Timing
- Yield: About 18 whoopie pies (36 cookies sandwiched)
- Prep Time: 25 minutes
- Baking Time: 10–12 minutes per batch (about 20–24 minutes total)
- Cooling Time: 30–40 minutes
- Assembly Time: 15–20 minutes
- Total Time: Around 1 hour 30 minutes, mostly hands-off while cookies cool
If you’re baking with kids or grandkids helping, you can safely add another 15–20 minutes for giggles and “quality control tastes.”
Variations: Fun Twists on Classic Whoopie Pies
Once you’ve made the original version, it’s natural to start playing. Here are some easy flavor ideas:
- Chocolate Peppermint Whoopie Pies – Add ½ teaspoon peppermint extract to the filling and roll the edges in crushed candy canes for the holidays.
- Peanut Butter Filling – Beat ½ cup creamy peanut butter into the filling and reduce the marshmallow creme slightly for a thicker, nutty middle.
- Salted Caramel Whoopie Pies – Swirl 2–3 tablespoons of thick caramel sauce into the filling and sprinkle a touch of flaky salt on the cookies before baking.
- Mocha Chocolate Whoopie Pies – Add 1 tablespoon instant espresso powder to the cookie batter to deepen the chocolate flavor.
- Red Velvet Whoopie Pies – Use less cocoa (about 3 tablespoons) and add red food coloring to the batter; keep the same marshmallow cream filling.
- Mini Whoopie Pies – Scoop smaller 1-tablespoon mounds for bite-sized sandwich cookies, perfect for party trays.
How to Store, Freeze, and Make Ahead
Homemade whoopie pies are surprisingly sturdy, which is part of why I love them as a sandwich cookie dessert for gatherings.
Room Temperature
- Store filled whoopie pies in an airtight container at cool room temperature for up to 1 day.
- If your kitchen runs warm or it’s summertime, I recommend the fridge instead.
Refrigerator
- Keep them in a single layer in an airtight container, or separate layers with parchment paper.
- They’ll stay fresh in the fridge for 3–4 days.
- Let them sit at room temperature for 15–20 minutes before serving so the filling softens a bit.
Freezer
- Wrap each whoopie pie individually in plastic wrap, then place them in a freezer bag or container.
- Freeze for up to 2 months.
- Thaw at room temperature for about 1 hour, or overnight in the fridge.
Make-Ahead Tips
- Cookies only: Bake the soft chocolate cookies, cool completely, then store in an airtight container at room temperature for 2 days, or freeze for up to 2 months.
- Filling: Make the marshmallow cream filling up to 2 days ahead, store in the fridge, and let it sit out for 20–30 minutes before beating briefly to fluff it back up.
- You can assemble the full whoopie pies the day before serving; the cookies actually become even more tender as they rest with the filling.
Notes from My Kitchen (A Few Hard-Earned Tips)
- Measure carefully. Too much flour or cocoa will make the cookies dry. Spoon flour into the cup and level with a knife instead of scooping straight from the bag.
- Room temperature ingredients matter. Using room temp eggs, butter, and buttermilk helps everything blend smoothly and makes a softer batter.
- Don’t overbake. The difference between soft chocolate whoopie pies and dry ones is often just 1–2 minutes. Pull them as soon as the tops look set and spring back.
- Let them cool fully. I know, waiting is not fun. But warm cookies + creamy filling = a slippery mess.
- Adjust the filling sweetness. If you prefer less sweet desserts, start with 1¼ cups powdered sugar and taste before adding more. The cocoa in the cookies balances the sweetness, but you can still tweak it.
- Uniform size helps with pairing. A cookie scoop is your friend here. If you’re scooping by hand, try to keep each mound the same size so your sandwich cookies line up neatly.
Honestly, the first time I made whoopie pies as a young mom, half my “sandwiches” looked like lopsided little moons. Still delicious. Over the years, I’ve learned that appearance improves with practice—but the flavor was wonderful from the very beginning.
FAQs About Baking Whoopie Pies
1. Why are my whoopie pies flat instead of puffy?
They may have too much butter or not enough flour, or the batter might have been overmixed. Chilling the scooped batter for 10–15 minutes before baking can also help them hold their shape.
2. Can I use a boxed cake mix to make whoopie pies?
You can, but the texture will be lighter and more cake-like. This from-scratch whoopie pies recipe gives you a sturdier, more classic result that’s easier to sandwich.
3. My filling is too runny—what can I do?
Beat in extra powdered sugar, a few tablespoons at a time, until it thickens. Make sure your butter isn’t overly soft or melted, which can cause a loose filling.
4. Can I make these whoopie pies without marshmallow creme?
Yes. You can make a simple vanilla buttercream filling instead or use cream cheese frosting, though it will taste a little different than traditional whoopie pies.
5. How do I keep the whoopie pies from sticking to the pan?
Always line your baking sheets with parchment or a silicone mat. The cookies are soft and cake-like, so they need that barrier to release cleanly.
6. Can I make these gluten-free?
A good 1:1 gluten-free baking flour usually works well; just prepare for the cookies to be a bit more delicate. Let them cool completely before moving or filling them.
7. Are whoopie pies more like cookies or cakes?
They’re really in-between: soft chocolate cookies that eat like mini cakes, with frosting on the inside instead of on top. That’s part of their charm.
8. Do I need a mixer to make this recipe?
A hand mixer or stand mixer makes life easier for both the batter and the marshmallow filling, but you can do it by hand with some elbow grease and a good whisk or wooden spoon.
Wrapping It Up: A Sweet Little Handheld Treat
This Whoopie Pies Recipe gives you everything you love about an old-fashioned dessert: tender chocolate sandwich cakes, a fluffy marshmallow cream filling, and a treat that feels special without being fussy. Whether you’re baking for a birthday, a potluck, or a cozy evening at home, these homemade whoopie pies bring that just-right mix of comfort and fun.
If you try this recipe, tell me how it went—did you stick with the classic version, or play with one of the variations? Leave a comment, share a photo, or bookmark this for your next baking day. And if you’re in the mood for more nostalgic desserts, this is a great starting point for a whole weekend of baking.

Whoopie Pies
Ingredients
- 2 cups all-purpose flour 240 g; spooned and leveled
- 1/2 cup unsweetened cocoa powder 45 g; natural or Dutch-process
- 1 teaspoon baking soda
- 1/2 teaspoon baking powder
- 1/2 teaspoon fine sea salt
- 1 cup granulated sugar 200 g
- 1/2 cup light brown sugar 100 g; packed
- 1/2 cup unsalted butter 113 g; softened
- 2 large eggs room temperature
- 1 teaspoon vanilla extract
- 1 cup buttermilk 240 ml; room temperature
- 3/4 cup unsalted butter 170 g; softened, for filling
- 1 1/2 cups powdered sugar 180–200 g; sifted, for filling
- 7 oz marshmallow creme about 200 g; or marshmallow fluff
- 1 teaspoon vanilla extract for filling
- pinch fine salt for filling
- sprinkles or jimmies optional, for decorating edges
- mini chocolate chips optional, for decorating edges
- coarse sea salt optional, a light sprinkle on cookies before baking
Instructions
- Preheat the oven to 350°F (175°C). Line 2 large baking sheets with parchment paper or silicone baking mats to prevent sticking and keep the cookie bottoms tender.
- In a medium bowl, whisk together the flour, cocoa powder, baking soda, baking powder, and fine sea salt until evenly combined with no visible streaks of flour or cocoa.2 cups all-purpose flour, 1/2 cup unsweetened cocoa powder, 1 teaspoon baking soda, 1/2 teaspoon baking powder, 1/2 teaspoon fine sea salt
- In a large mixing bowl using a hand mixer or stand mixer, beat the softened butter, granulated sugar, and light brown sugar on medium speed for 2–3 minutes, until lighter in color and slightly fluffy. Scrape down the sides of the bowl as needed.1 cup granulated sugar, 1/2 cup light brown sugar, 1/2 cup unsalted butter
- Beat in the eggs one at a time, mixing well after each addition. Add the vanilla extract and mix until combined. The mixture may look slightly curdled; it will smooth out once the dry ingredients and buttermilk are added.2 large eggs, 1 teaspoon vanilla extract
- On low speed, add about one-third of the dry ingredient mixture to the butter mixture and mix just until combined. Pour in half of the buttermilk and mix gently. Add another third of the dry ingredients, then the remaining buttermilk. Finish with the last third of the dry ingredients, mixing just until a thick, scoopable batter forms. Do not overmix.2 cups all-purpose flour, 1/2 cup unsweetened cocoa powder, 1 teaspoon baking soda, 1/2 teaspoon baking powder, 1/2 teaspoon fine sea salt, 1 cup buttermilk
- Using a 1 1/2-tablespoon cookie scoop or rounded tablespoon, drop mounds of batter onto the prepared baking sheets, leaving at least 2 inches between each mound to allow for spreading. For more even rounds, lightly smooth the tops with a damp finger or the back of a spoon. If desired, lightly sprinkle the tops with coarse sea salt.coarse sea salt
- Bake one sheet at a time for 10–12 minutes, or until the tops look set and spring back lightly when touched and a toothpick inserted into the center comes out mostly clean. Let the cookies cool on the baking sheet for 5 minutes, then transfer to a wire rack to cool completely before filling.
- While the cookies cool, prepare the marshmallow cream filling. In a clean bowl, beat the softened butter for the filling on medium speed for 1–2 minutes, until smooth and creamy.3/4 cup unsalted butter
- Gradually add the powdered sugar to the butter, mixing on low speed at first to avoid dusting, then increasing to medium. Beat for 2–3 minutes until light and fluffy.1 1/2 cups powdered sugar
- Add the marshmallow creme, vanilla extract, and a pinch of fine salt to the bowl. Beat until the filling is thick, smooth, and billowy. If the filling is too soft, beat in an additional 2–4 tablespoons of powdered sugar. If it is too stiff, add 1–2 teaspoons of milk or cream to loosen slightly.7 oz marshmallow creme, 1 teaspoon vanilla extract, pinch fine salt
- Once the cookies are completely cool, sort them into pairs of similar size. Flip half of the cookies upside down to be the bottoms. Pipe or spoon about 1 1/2–2 tablespoons of marshmallow filling onto each bottom cookie, then gently press a second cookie on top until the filling just reaches the edges.
- If desired, roll the exposed filling edges of each assembled whoopie pie in sprinkles or mini chocolate chips while the filling is still soft so they adhere.sprinkles or jimmies, mini chocolate chips
- Serve immediately, or place the whoopie pies in a single layer in an airtight container. For the best texture, let them rest for a few hours or overnight so the cookies soften slightly from the filling.
Notes
STORAGE: Store in an airtight container at cool room temperature for up to 1 day, or in the refrigerator for 3–4 days. Let refrigerated whoopie pies sit at room temperature for 15–20 minutes before serving. For longer storage, wrap each whoopie pie individually and freeze for up to 2 months; thaw at room temperature for about 1 hour or overnight in the fridge.
MAKE-AHEAD: Bake cookies up to 2 days ahead and store airtight at room temperature, or freeze for up to 2 months. Filling can be made up to 2 days ahead and refrigerated; bring to room temperature and re-beat before using. Fully assembled whoopie pies can be made the day before serving and often taste even better the next day.
TIPS: Measure flour and cocoa carefully (spoon and level) to avoid dry cookies. Use room-temperature butter, eggs, and buttermilk for a smoother batter. Do not overbake; pull the cookies as soon as the tops are set and spring back lightly. Cool cookies completely before filling to prevent melting and sliding. For more evenly sized sandwiches, use a cookie scoop.
VARIATIONS: Add 1/2 teaspoon peppermint extract to the filling and roll edges in crushed candy canes for Chocolate Peppermint Whoopie Pies. Beat 1/2 cup creamy peanut butter into the filling for a peanut butter version. Swirl 2–3 tablespoons thick caramel sauce into the filling and sprinkle flaky salt on the cookies before baking for Salted Caramel Whoopie Pies. Add 1 tablespoon instant espresso powder to the batter for mocha flavor, or reduce cocoa to about 3 tablespoons and tint the batter red for Red Velvet Whoopie Pies.