Would you like to save this?
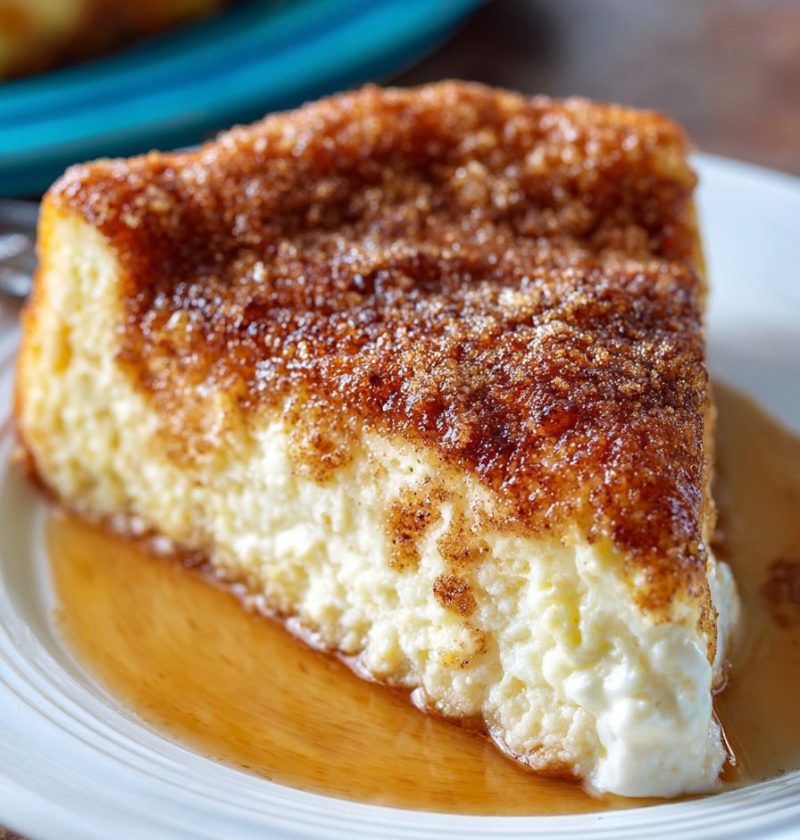
Sopapilla Cheesecake Recipe
If you love creamy cheesecake and warm cinnamon sugar pastries, this Sopapilla Cheesecake Recipe is about to become your new go-to dessert for potlucks, holidays, and “just because” days.
What Is Sopapilla Cheesecake (And Why Everyone Asks For The Recipe)
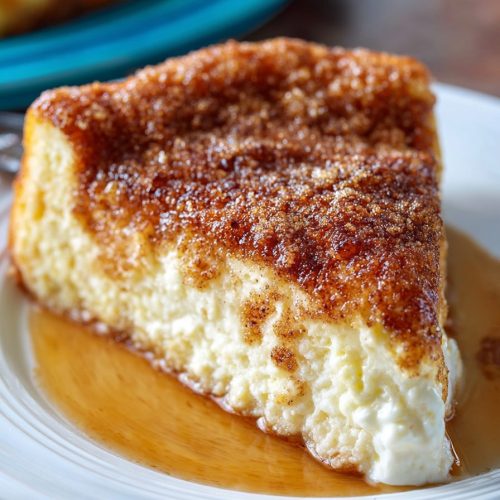
Sopapilla cheesecake is a layered cheesecake pastry that tastes like a cozy mashup of classic baked cheesecake bars and the cinnamon sugar sopapillas you’ll find at many Mexican restaurants.
Instead of a traditional graham cracker crust, we use buttery crescent roll dough as the base and top layers. In the middle? A sweet cream cheese filling that bakes up smooth and rich. Then we finish it with a generous cinnamon sugar topping and melted butter so the whole pan smells like a bakery.
I started making this Sopapilla Cheesecake Recipe years ago for my kids’ school events and church potlucks. It’s one of those easy dessert recipes that never comes home in the pan—someone is always scraping the corners “just to even it out.” It’s budget-friendly, uses simple ingredients, and doesn’t require any fancy cheesecake skills.
It’s not exactly health food, but it is a comforting family dessert favorite. You can lighten it up a bit with low-fat cream cheese and less sugar, or you can just embrace it fully as a celebration dessert. I usually save it for weekends, holidays, or when I want something that feels like a hug in dessert form.
Why You’ll Love This Sopapilla Cheesecake Recipe
- Ridiculously easy: Uses refrigerated crescent roll dough—no homemade pastry, no stress.
- Potluck-perfect: Baked cheesecake bars cut neatly and travel well in the same pan.
- Crowd-pleaser: Kids and adults both go back for seconds… and sometimes thirds.
- Make-ahead friendly: Tastes even better after it chills and the flavors settle.
- Simple ingredients: Everything is easy to find at any basic U.S. grocery store.
- Minimal equipment: No water bath, no springform pans—just a 9×13 baking dish.
- Flexible sweetness: Easy to adjust the sugar and cinnamon to your taste.
- Great warm or cold: Enjoy it slightly warm like a pastry, or chilled like classic cheesecake.
Ingredients For Sopapilla Cheesecake
Here’s what you’ll need for this cinnamon dessert recipe. I’ll include a few notes and easy substitutions as we go.
For the buttery crescent crust and top layer:
- 2 cans (8 oz each) refrigerated crescent roll dough
- You can use the seamless crescent dough sheets if you can find them—less pinching of seams.
- Regular crescent rolls work just fine; just press the perforations together.
For the sweet cream cheese filling:
- 2 packages (8 oz each) cream cheese, softened
- Full-fat gives the creamiest texture.
- Neufchâtel (⅓ less fat cream cheese) also works and still tastes rich.
- 1 cup granulated sugar
- You can reduce to ¾ cup if you prefer a less sweet cheesecake filling.
- 1 large egg
- Helps the filling set nicely into baked cheesecake bars instead of staying too loose.
- 1 ½ teaspoons pure vanilla extract
- Use real vanilla if you can; it really deepens the flavor.
For the cinnamon sugar topping:
- ½ cup (1 stick) unsalted butter, melted
- Salted butter is fine; just reduce or skip any added salt in the recipe.
- ½ cup granulated sugar
- You can use a mix of white and light brown sugar for deeper caramel notes.
- 2 teaspoons ground cinnamon
- Feel free to bump it up to 2 ½ teaspoons if you love a stronger cinnamon flavor.
- Pinch of kosher salt (optional)
- Just a pinch balances the sweetness and makes the cinnamon pop.
Optional finishing touches:
- Honey, for drizzling (mimics classic sopapillas served with honey)
- Powdered sugar, for dusting
- Whipped cream or vanilla ice cream, for serving
Ingredient Tips:
- Make sure your cream cheese is room temperature—set it out 30–60 minutes before baking so it blends smooth and doesn’t stay lumpy.
- Give your crescent roll dough a few minutes out of the fridge too; slightly softened dough is easier to press into the pan without tearing.
- Use a glass or ceramic 9×13 pan if you have one; it browns a bit more gently than dark metal.
Directions: Step-By-Step To The Dreamiest Cinnamon Cheesecake Bars
-
Preheat and prep your pan
Preheat your oven to 350°F (175°C). Lightly grease a 9×13-inch baking dish with cooking spray or a thin layer of butter. This helps keep the buttery crescent crust from sticking and makes serving much easier. -
Lay down the bottom crescent roll dough
Open one can of crescent roll dough. Unroll it and gently press it into the bottom of the pan.- If using regular crescents, pinch together the seams so you get one even sheet.
- Try to push it slightly up the sides of the pan, like a shallow crust, to hold the filling.
-
Beat the cream cheese filling
In a large mixing bowl, add the softened cream cheese and 1 cup sugar. Beat with a hand mixer (or in a stand mixer with the paddle) until smooth and creamy—about 2–3 minutes.
Add the egg and vanilla extract, then beat again until fully combined.- Scrape down the bowl once or twice; cream cheese likes to stick to the sides.
-
Spread the sweet cream cheese layer
Pour or spoon the cream cheese filling over the crescent crust and spread it evenly with a spatula. You want it smooth and level—this helps the top crescent layer bake evenly without sinking. -
Add the top crescent roll dough
Open the second can of crescent roll dough and gently unroll it.- If you’re using the regular triangles, assemble them on a piece of parchment first, pinch the seams together, then lift that sheet and place it over the cream cheese layer.
- Try to cover the filling completely. A few small gaps are okay; they usually seal a bit as it bakes.
-
Mix the cinnamon sugar topping
In a small bowl, stir together ½ cup granulated sugar and 2 teaspoons ground cinnamon (plus a pinch of salt, if using). This is the cinnamon sugar topping that creates that classic sopapilla vibe. -
Brush with butter and sprinkle generously
Pour or brush the melted butter evenly over the top crescent dough. Don’t worry if it looks like a lot; it seeps into the dough and helps create that crispy, caramelized top.
Then sprinkle the cinnamon sugar mixture evenly over the buttered dough. Make sure you reach all the corners—those edges are always everyone’s favorite. -
Bake until golden and set
Bake in the preheated oven for 25–30 minutes, or until the top is puffed, golden brown, and the cinnamon sugar has formed a slightly crackly, glossy crust.- You might see a little bubbling around the edges from the butter and sugar. That’s good.
- Give the pan a gentle jiggle; the center should be mostly set (a very slight wobble is fine).
-
Cool, then chill (if you can wait!)
Set the pan on a wire rack and let it cool to room temperature, about 45–60 minutes.
For the cleanest slices and a more classic cheesecake texture, refrigerate for at least 2 hours, or even overnight.
If you like it warm and a bit gooey, you can cut into it sooner, just know the pieces will be softer and less tidy. -
Slice and serve
Slice into squares or rectangles—anywhere from 12 to 20 pieces, depending on how big you want them.
Drizzle with honey, dust with powdered sugar, or serve plain. They’re lovely just as they are, but a little vanilla ice cream on top never hurt anybody.
Servings & Timing
- Yield: About 16 servings (cut 4 x 4 in a 9×13 pan; adjust as needed)
- Prep Time: 15–20 minutes
- Bake Time: 25–30 minutes
- Cooling/Chill Time: 1–2 hours (longer if chilling fully)
- Total Time: About 1 hour 45 minutes (mostly hands-off after baking)
If you’re taking this as a potluck dessert idea, I like to bake it the night before, chill overnight, and cut it right before serving.
Variations: Fun Twists On Sopapilla Cheesecake
You know what? Once you’ve made the classic version, it’s hard not to start playing around. Here are a few ideas:
- Apple Cinnamon Sopapilla Cheesecake: Add a thin layer of canned apple pie filling over the cream cheese before adding the top crescent dough.
- Pumpkin Sopapilla Cheesecake: Whisk ½ cup pumpkin puree and 1 teaspoon pumpkin pie spice into the cream cheese mixture for a cozy fall version.
- Chocolate Chip Twist: Fold ½–¾ cup mini chocolate chips into the cream cheese filling for a kid-friendly, chocolatey surprise.
- Spiced Mexican-Inspired Version: Add a pinch of ground nutmeg and a tiny bit of cayenne or chili powder to the cinnamon sugar topping for subtle warmth.
- Lighter Version: Use reduced-fat cream cheese, cut the sugar in the filling to ¾ cup, and reduce the butter on top to 6 tablespoons.
- Nutty Crunch: Sprinkle ½ cup chopped pecans or walnuts over the cinnamon sugar before baking for a crunchy topping.
Storage & Reheating Tips
One of the reasons this becomes a family dessert favorite fast? It stores really well.
-
Refrigerator:
- Store leftover sopapilla cheesecake bars in an airtight container (or cover the baking dish tightly) in the fridge for up to 4–5 days.
- The cinnamon sugar top might soften slightly over time, but the flavor stays wonderful.
-
Freezer:
- Cut into bars, place them on a parchment-lined baking sheet, and freeze until firm.
- Transfer to a freezer-safe bag or container, separating layers with parchment.
- Freeze for up to 2 months. Thaw overnight in the fridge.
-
Reheating:
- Enjoy cold, straight from the fridge for a firmer cheesecake texture.
- For a warm, pastry-like feel, microwave a bar for 10–15 seconds or warm in a 300°F oven for 5–8 minutes.
- If reheating from frozen, thaw first for best texture.
-
Make-Ahead:
- This is an excellent make-ahead party dessert bar. You can bake it a day or two ahead, chill, then slice right before serving.
- If you want the top extra crisp for a special occasion, keep it cold and bring it out shortly before serving, rather than letting it sit at room temperature for hours.
Notes From My Kitchen: What I’ve Learned
- Don’t rush the cream cheese softening. Cold cream cheese doesn’t blend well and will give you lumpy filling; a quick 10 seconds in the microwave (on low power, in short bursts) can help if you’re behind schedule.
- Watch the bake time carefully. Every oven runs a little different. Start checking around 23–24 minutes. If the top is browning too quickly, you can tent it loosely with foil for the last few minutes.
- Chill if you want neat squares. If you’re serving this Sopapilla Cheesecake Recipe at a party where presentation matters, plan for chill time. Warm bars taste amazing but can look a bit rustic.
- Don’t skimp on the cinnamon sugar. The contrast between the slightly tangy cream cheese filling and the sweet, cinnamon sugar topping is what makes this a real Mexican dessert restaurant-style experience.
- Cut smaller pieces than you think. These are rich. People can always come back for seconds (and they usually do).
When I was testing this for a holiday spread, I tried one pan with less butter on top and one with the full amount. My family unanimously voted for the full-butter version—“crustier top, more flavor, more fun,” as my son put it—so that’s what you’re getting here.
FAQs About Sopapilla Cheesecake
1. Can I make this Sopapilla Cheesecake Recipe without crescent roll dough?
You can use puff pastry or even homemade pie crust, but the texture changes. Crescent roll dough gives the most classic, pillowy pastry feel for this recipe.
2. Do I have to use the egg in the filling?
The egg helps the cream cheese filling set like baked cheesecake bars. You can leave it out, but the center will be softer and more like a thick cream cheese spread.
3. Can I reduce the sugar?
Yes. You can reduce the sugar in the filling to ¾ cup and the topping sugar to ⅓ cup; it’ll be less sweet but still very good, especially if you’re not a fan of very sweet desserts.
4. How can I prevent the bottom crust from getting soggy?
Make sure the pan is fully preheated with the oven and bake until the center is set. Overfilling the pan or underbaking can make the bottom stay too soft.
5. Can I serve this warm?
Absolutely. Many people love it just slightly warm, about 20–30 minutes after baking, when it’s still soft and the cinnamon sugar is extra fragrant. For cleaner slices, let it chill.
6. How do I know when it’s done baking?
The top should be golden brown, the edges slightly bubbly from the butter and sugar, and the center mostly set with just a light wobble when you shake the pan gently.
7. Is this a traditional Mexican dessert?
It’s more of a Tex-Mex or Americanized twist on sopapillas. Classic sopapillas are deep-fried pastry pillows usually served with honey, and this is a baked cheesecake bar that borrows those flavors.
8. Can I double this recipe?
For a big crowd, you can bake two separate 9×13 pans. A single extra-large pan can get tricky to bake evenly, so I usually stick with multiple pans.
Wrapping Up: Your New Go-To Dessert Bar
This Sopapilla Cheesecake Recipe brings together a buttery crescent crust, a silky cream cheese filling, and that irresistible cinnamon sugar topping. It’s easy enough for a weeknight, special enough for holidays, and dependable enough for every potluck sign-up sheet that lands on your kitchen counter.
If you give this recipe a try, let me know how it turned out—did your family love it, too? Drop a comment with your tweaks or favorite toppings, and if you’re in the mood for more easy dessert recipes, you might enjoy exploring other baked cheesecake bars, cinnamon dessert recipes, or simple party dessert bars next.
Sopapilla Cheesecake
Ingredients
- 2 cans (8 oz each) refrigerated crescent roll dough seamless dough sheets preferred; or pinch perforations together
- 16 oz cream cheese softened; full-fat or Neufchâtel
- 1 cup granulated sugar for filling; can reduce to 3/4 cup if desired
- 1 large egg
- 1 1/2 teaspoons pure vanilla extract
- 1/2 cup unsalted butter melted; salted butter ok, reduce added salt
- 1/2 cup granulated sugar for cinnamon sugar topping
- 2 teaspoons ground cinnamon add up to 2 1/2 teaspoons for stronger flavor
- kosher salt pinch, optional, for topping
- honey optional, for drizzling when serving
- powdered sugar optional, for dusting when serving
- whipped cream or vanilla ice cream optional, for serving
Instructions
- Preheat your oven to 350°F (175°C). Lightly grease a 9x13-inch baking dish with cooking spray or a thin layer of butter to prevent sticking and make serving easier.
- Open one can of crescent roll dough. Unroll it and gently press it into the bottom of the prepared pan. If using regular crescents, pinch the seams together to form one even sheet and press slightly up the sides to create a shallow crust.2 cans (8 oz each) refrigerated crescent roll dough
- In a large mixing bowl, combine the softened cream cheese and 1 cup granulated sugar. Beat with a hand mixer or stand mixer until smooth and creamy, about 2–3 minutes. Add the egg and vanilla extract and beat again until fully combined, scraping down the sides of the bowl as needed.16 oz cream cheese, 1 cup granulated sugar, 1 large egg, 1 1/2 teaspoons pure vanilla extract
- Pour or spoon the cream cheese filling over the crescent crust and spread it evenly with a spatula, smoothing the top so it is level.
- Open the second can of crescent roll dough and unroll it. If using regular triangles, assemble them on parchment, pinch seams together to form a sheet, then carefully place over the cream cheese layer. Cover the filling as completely as possible.2 cans (8 oz each) refrigerated crescent roll dough
- In a small bowl, stir together 1/2 cup granulated sugar, 2 teaspoons ground cinnamon, and a pinch of kosher salt if using, until well combined.1/2 cup granulated sugar, 2 teaspoons ground cinnamon, kosher salt
- Pour or brush the melted butter evenly over the top crescent dough. Sprinkle the cinnamon sugar mixture evenly over the buttered surface, making sure to reach all the edges and corners.1/2 cup unsalted butter
- Bake in the preheated oven for 25–30 minutes, or until the top is puffed and golden brown, the cinnamon sugar forms a slightly crackly crust, and the edges are bubbly. The center should be mostly set with just a slight wobble when gently jiggled.
- Set the pan on a wire rack and let cool to room temperature, about 45–60 minutes. For the cleanest slices and a classic cheesecake texture, refrigerate for at least 2 hours or overnight. For softer, gooier bars, you can cut them sooner, knowing the slices will be less tidy.
- Slice into 12–20 bars, depending on desired size. Serve plain or drizzle with honey, dust with powdered sugar, and/or top with whipped cream or vanilla ice cream as desired.honey, powdered sugar, whipped cream or vanilla ice cream