Would you like to save this?
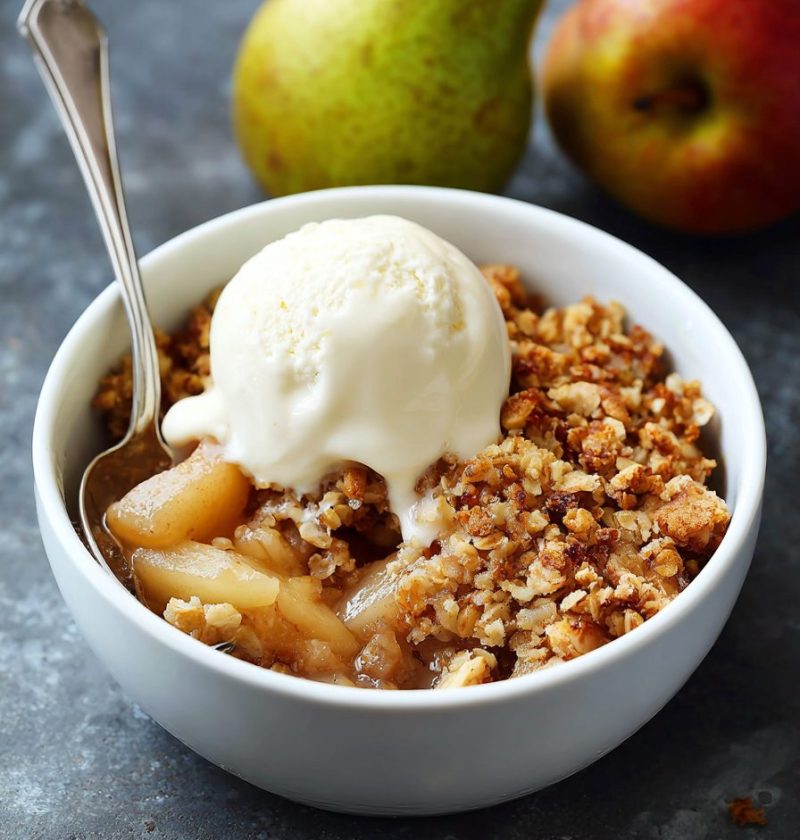
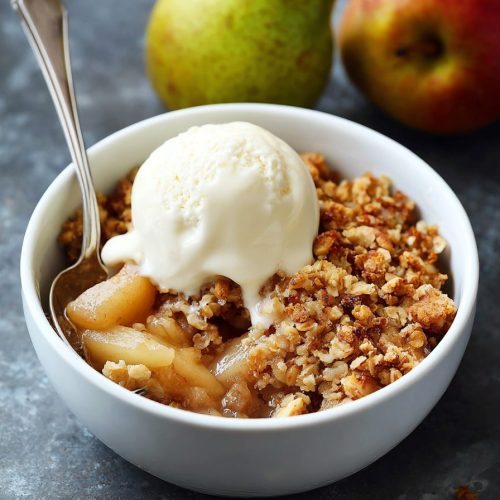
Pear Crisp Recipe
This cozy Pear Crisp Recipe is a simple, crowd-pleasing baked pear dessert with soft, cinnamon-kissed fruit and a buttery crumb topping that makes the whole house smell like fall.
Meet Your New Favorite Fall Dessert
If you love apple crisp but want something a little more mellow and elegant, this Pear Crisp Recipe is for you. It’s a classic fruit crumble dessert, made with juicy ripe pears, warm spices, and an oat-studded topping that bakes up golden and crisp in the oven.
Pears don’t always get the spotlight the way apples and pumpkins do, but they’re perfect for an easy pear crisp. They’re naturally Sweet, they bake up tender without turning mushy when you choose the right variety, and they pair beautifully with cinnamon, nutmeg, and a touch of vanilla. This pear oat crisp feels special enough for a holiday table but simple enough for a Tuesday night.
From a health angle, this homemade pear dessert leans a little lighter than many fall dessert recipes. You get fiber from the pears and oats, you can control the sugar, and there’s no heavy frosting or fussy layers—just real ingredients baked together until bubbly and fragrant.
Personally, I like to make this pear cinnamon crisp on cool weekends when the weather finally turns, usually around late September here in the States. I’ll put the crisp in the oven right before dinner, and by the time we’re clearing plates, dessert is ready. If you grew up with fruit crisps on the holidays like I did, this is that same nostalgic comfort, just with pears getting their moment to shine.
Why You’ll Love This Pear Crisp Recipe
- Simple ingredients, big payoff – pantry basics like oats, flour, butter, and sugar turn into the most comforting oven baked crisp.
- Perfect fall dessert recipe – warm spices, juicy pears, and that cozy aroma make it ideal for chilly evenings and holidays.
- Beginner-friendly – no pastry skills, no electric mixer, no fuss; if you can stir and slice, you can make this.
- Flexible sweetness – easy to cut back the sugar or use less-sweet pears if you like a more natural, fruit-forward flavor.
- Make-ahead friendly – assemble the fruit filling and topping ahead, then bake fresh when you’re ready.
- Great for feeding a crowd – this fruit crumble dessert scales up easily for potlucks, Friendsgiving, or family dinners.
- Cozy but not heavy – it satisfies a dessert craving without feeling like you need a nap afterward.
- Delicious warm or cold – straight from the fridge the next day with a spoon? Completely acceptable.
Ingredients for the Best Pear Crisp Recipe
Let’s walk through what you’ll need to make this easy pear crisp. I’ll add little notes so you know how to choose and swap ingredients.
For the Pear Filling
- 6–7 medium ripe pears (about 2 ½–3 pounds), peeled, cored, and sliced
- Use Bartlett, Bosc, or Anjou; they should be ripe but still a bit firm when pressed near the stem.
- 2 tablespoons lemon juice
- Helps balance the sweetness and keeps the pears from browning.
- ¼ cup granulated sugar
- You can use coconut sugar or light brown sugar if you like a deeper flavor.
- 1 teaspoon ground cinnamon
- The star spice in this pear cinnamon crisp; feel free to add a pinch more if you love cinnamon.
- ¼ teaspoon ground nutmeg
- Adds a warm, almost nutty note—freshly grated is lovely if you have it.
- 1 teaspoon vanilla extract
- Rounds out the flavor of the fruit.
- 2 tablespoons all-purpose flour
- Helps thicken the juices so your baked pear dessert is saucy but not soupy.
- Pinch of salt
- Just a tiny bit brings everything into balance.
For the Buttery Crumb Topping
- ¾ cup old-fashioned rolled oats
- For that classic pear oat crisp texture; avoid instant oats, which get mushy.
- ¾ cup all-purpose flour
- You can swap up to half for whole wheat flour if you want more nuttiness.
- ½ cup packed light brown sugar
- Dark brown sugar also works and adds more molasses flavor.
- ½ teaspoon ground cinnamon
- A little in the topping echoes the flavors in the filling.
- ¼ teaspoon salt
- Keeps the topping from tasting flat.
- ½ cup (1 stick) cold unsalted butter, cut into small cubes
- Cold butter is key for a crisp, crumbly topping. If you only have salted butter, just reduce the added salt a bit.
- 2–3 tablespoons chopped nuts (optional) – walnuts or pecans
- Add crunch and a toasty flavor—great if you like texture.
If you’re dairy-free, you can use a good vegan butter stick for the topping. For gluten-free, use a 1:1 gluten-free flour blend and make sure your oats are certified gluten-free.

Step-by-Step Directions
You’ll see how easy it is—this is the kind of oven baked crisp you can almost make on autopilot once you’ve done it a couple of times.
-
Preheat the oven and prep your dish.
Preheat your oven to 350°F (175°C). Lightly butter or spray a 9×9-inch baking dish (or a similar 2-quart casserole). Greasing the pan helps keep the fruit from sticking and makes cleanup simpler. -
Prep the pears.
Peel the pears, then cut them into quarters, remove the cores, and slice into roughly ½-inch thick pieces. They don’t need to be perfect—just aim for similar thickness so they cook evenly. If you’re a slower peeler like I am these days, you can toss the slices in a little lemon juice as you go to keep them from browning. -
Make the pear filling.
In a large bowl, combine the sliced pears, 2 tablespoons lemon juice, ¼ cup sugar, 1 teaspoon cinnamon, ¼ teaspoon nutmeg, 1 teaspoon vanilla, 2 tablespoons flour, and a pinch of salt. Gently toss until all the slices are coated and there are no visible dry pockets of flour. The pears should look glossy and lightly dusted with spices. -
Transfer filling to the baking dish.
Pour the pear mixture into your prepared dish and spread it out into an even layer. Try to tuck most of the slices down so they’re mostly flat; this helps the topping sit nicely without slipping off. -
Mix the dry topping ingredients.
In a medium bowl, stir together ¾ cup oats, ¾ cup flour, ½ cup brown sugar, ½ teaspoon cinnamon, and ¼ teaspoon salt. If you’re using nuts, add them here. You want everything well combined before you add the butter. -
Cut in the butter.
Add the cold, cubed butter to the topping mixture. Using a pastry cutter, a fork, or clean fingers, work the butter into the dry ingredients until you have pea-sized crumbs and some sandy bits. It should look a little shaggy and clumpy. If it feels too sticky or warm, pop the bowl in the fridge for 5–10 minutes—keeping the butter cool makes for a crispier, more crumbly top. -
Top the pears.
Sprinkle the crumb mixture evenly over the pears. Don’t pack it down; you want some peaks and valleys so it bakes up extra crisp and golden. It’s okay if a little fruit peeks through. -
Bake until golden and bubbly.
Place the baking dish on the middle rack and bake for 35–45 minutes, until the topping is golden brown and you can see the pear juices bubbling up around the edges. Your kitchen should smell like a cozy bakery at this point. -
Let it rest.
This part is hard, but let the pear crisp rest for at least 15–20 minutes before serving. The juices will thicken as it cools a bit, which gives you nicer scoops instead of a runny mess. -
Serve and enjoy.
Serve warm with vanilla ice cream, lightly sweetened whipped cream, or even a little Greek yogurt if you’re going for a breakfast-style treat. Honestly, it’s lovely just on its own too.
Servings & Timing
- Yield: About 6–8 servings
- Prep Time: 20 minutes (a bit quicker if you’re speedy with a peeler)
- Cook Time: 35–45 minutes
- Total Time: About 1 hour, including a short rest before serving
This Pear Crisp Recipe is especially handy when you want a dessert you can assemble while something else is in the oven—like a roast chicken or a pan of vegetables. It slips right in when dinner comes out.
Fun Variations to Try
If you like to play with your fruit crisp recipes, here are some easy twists:
- Pear-Apple Crisp: Use half pears and half apples for a classic fruit crumble dessert that feels familiar but a little new.
- Ginger Pear Crisp: Add 1–2 teaspoons of finely grated fresh ginger or ½ teaspoon ground ginger to the filling for a gentle kick.
- Maple Walnut Pear Crisp: Swap half the brown sugar in the topping with pure maple syrup and add extra walnuts for a deeper, cozy flavor.
- Gluten-Free Pear Crisp: Use a 1:1 gluten-free flour blend and certified gluten-free oats; everything else stays the same.
- Lower-Sugar Pear Crisp: Cut the sugar in the filling to 2 tablespoons and the topping to ⅓ cup, especially if your pears are very sweet.
- Cranberry Pear Crisp: Stir ½–1 cup fresh or frozen cranberries into the pears for pops of color and tart flavor—great for Thanksgiving.
Storage & Reheating Tips
This easy pear crisp keeps very well, which makes it great for make-ahead entertaining or for those of us who appreciate dessert for breakfast.
- Room Temperature: Let the crisp cool completely, then cover it loosely and keep it at room temperature for up to 1 day.
- Refrigerator: For longer storage, cover tightly and refrigerate for up to 4 days. The topping will soften a bit over time but will still taste wonderful.
- Freezer: You can freeze baked pear crisp. Cool it completely, wrap well (first in plastic wrap, then foil, or use a freezer-safe container), and freeze for up to 2 months.
Reheating:
- For best texture, reheat in a 350°F oven for about 15–20 minutes until warmed through and the topping has crisped back up.
- Individual portions can be reheated in the microwave for 30–60 seconds; it won’t be quite as crisp, but it’s still very good, especially with a scoop of ice cream.
Make-Ahead Idea:
Assemble the filling and topping separately, keep both covered in the fridge for up to 24 hours, then sprinkle on the topping and bake just before serving. If the dish goes straight from fridge to oven, add 5–10 extra minutes of bake time.
Notes from My Kitchen
- Choosing pears: Slightly firm pears work best. If they’re very soft, they can turn too mushy. If yours are very ripe, cut the slices a bit thicker and shorten the bake time by a few minutes.
- Thickness of slices: I’ve tested everything from thin slices to chunky wedges. Around ½ inch is that happy middle where the fruit gets tender but holds its shape.
- Spice balance: My family likes this pear crisp recipe on the lighter side with spices. If you’re a huge cinnamon fan, bump it up to 1 ½ teaspoons in the filling or add a pinch of cloves.
- Butter temperature: Cold butter really matters. If your kitchen runs warm (mine does when the oven’s been on all afternoon), cut the butter and stick it back in the fridge while you get the dry ingredients ready.
- Pan size flexibility: A 9×9-inch pan gives a nice balance of fruit and topping. You can use an 8×8-inch pan for a thicker crisp—just add a few extra minutes in the oven and check that the center is bubbling.
- Serving for brunch: This may sound funny, but served slightly warm with plain Greek yogurt, this baked pear dessert honestly passes as a lovely brunch dish. You know what? Sometimes that little bit of sweetness is exactly what a slow weekend morning needs.
FAQs About Pear Crisp
Can I leave the peels on the pears?
Yes, you can. The texture will be a bit more rustic, and some varieties have tougher skins than others, but it still works. Just wash and dry the pears well.
What kind of pears are best for pear crisp?
Bartlett, Anjou, and Bosc pears are all great choices. They hold their shape when baked and have nice flavor for a homemade pear dessert.
Why is my pear crisp watery?
Usually it’s because there wasn’t enough thickener or it didn’t cool long enough. Make sure you add the flour to the filling and let the crisp rest 15–20 minutes after baking so the juices can set.
Can I make this recipe without oats?
Yes. Just replace the oats with an equal amount of flour, so you get more of a classic crumble topping. It’ll still have that buttery crumb topping you’re looking for.
How do I know when the crisp is done?
Look for a golden brown topping and bubbling juices around the edges. If the top is browning too fast, loosely tent with foil and keep baking until the filling is bubbly.
Can I cut the recipe in half?
Absolutely. Use a smaller baking dish (like a loaf pan or an 8×5-inch dish) and check for doneness a bit earlier, around 25–30 minutes.
Is this pear crisp very sweet?
It’s pleasantly sweet but not over-the-top. If your pears are very ripe, you can reduce the sugar in the filling by a tablespoon or two.
Can I use canned pears?
You can in a pinch, but drain them very well and skip most of the sugar in the filling. Fresh pears give a better texture and flavor, especially in a pear oat crisp like this.
Wrapping It Up
This Pear Crisp Recipe brings together everything I love about fall desserts: tender fruit, warm spices, and a crunchy, buttery crumb topping that feels like a hug in a baking dish. It’s simple enough for a weeknight, yet special enough to share at Thanksgiving or any holiday table.
If you make this easy pear crisp, I’d love to hear how it turned out—tell me what kind of pears you used, or what fun twist you tried. And if you’re craving more cozy fruit desserts, try a classic apple crisp or a cranberry crumble next; they all play so nicely together on a dessert spread.
Pear Crisp
Ingredients
- 6-7 medium pears about 2 1/2–3 pounds, peeled, cored, and sliced; Bartlett, Bosc, or Anjou
- 2 tablespoons lemon juice
- 1/4 cup granulated sugar or coconut sugar or light brown sugar
- 1 teaspoon ground cinnamon
- 1/4 teaspoon ground nutmeg
- 1 teaspoon vanilla extract
- 2 tablespoons all-purpose flour
- salt pinch, for filling
- 3/4 cup old-fashioned rolled oats not instant oats
- 3/4 cup all-purpose flour
- 1/2 cup light brown sugar packed; dark brown sugar also works
- 1/2 teaspoon ground cinnamon for topping
- 1/4 teaspoon salt for topping
- 1/2 cup unsalted butter 1 stick, cold, cut into small cubes
- 2-3 tablespoons chopped nuts optional; walnuts or pecans
- vanilla ice cream, whipped cream, or Greek yogurt optional, for serving
Instructions
- Preheat your oven to 350°F (175°C). Lightly butter or spray a 9x9-inch baking dish (or a similar 2-quart casserole) to prevent sticking and make cleanup easier.
- Peel the pears, cut them into quarters, remove the cores, and slice into roughly 1/2-inch thick pieces. Aim for similar thickness so they cook evenly. If needed, toss slices in a little lemon juice as you go to prevent browning.
- In a large bowl, combine the sliced pears, 2 tablespoons lemon juice, 1/4 cup sugar, 1 teaspoon cinnamon, 1/4 teaspoon nutmeg, 1 teaspoon vanilla, 2 tablespoons flour, and a pinch of salt. Gently toss until all the slices are evenly coated and no dry flour remains.
- Pour the pear mixture into the prepared baking dish and spread it into an even layer. Tuck most of the slices down so they lie fairly flat, which helps the topping sit evenly without slipping off.
- In a medium bowl, stir together 3/4 cup oats, 3/4 cup flour, 1/2 cup packed brown sugar, 1/2 teaspoon cinnamon, and 1/4 teaspoon salt. If using nuts, add 2–3 tablespoons chopped walnuts or pecans and mix to combine.
- Add the cold, cubed butter to the topping mixture. Using a pastry cutter, fork, or your fingers, work the butter into the dry ingredients until you have pea-sized crumbs with some sandy bits. The mixture should look shaggy and clumpy. If it gets too warm or sticky, chill it in the fridge for 5–10 minutes.
- Sprinkle the crumb topping evenly over the pears without packing it down. Leave some peaks and valleys and a bit of fruit showing through so the topping bakes up extra crisp and golden.
- Place the baking dish on the middle rack and bake for 35–45 minutes, or until the topping is golden brown and the pear juices are bubbling around the edges.
- Remove the pear crisp from the oven and let it rest for at least 15–20 minutes. This allows the juices to thicken so the crisp scoops more cleanly and isn’t runny.
- Serve the pear crisp warm, on its own or with vanilla ice cream, lightly sweetened whipped cream, or Greek yogurt for a breakfast-style treat.