Would you like to save this?
Microwave Fudge Recipe
Short & Sweet Intro
This Microwave Fudge Recipe makes rich, chocolatey, homemade fudge in minutes—no oven, no candy thermometer, and absolutely perfect for last‑minute holidays, bake sales, or “I just need chocolate right now” moments.
What Makes This Microwave Fudge Recipe So Special?
If you’ve ever stood at the stove stirring a bubbling pot of fudge, praying it doesn’t scorch or turn grainy, this easy microwave fudge is going to feel like a small miracle.
We’re talking about a simple Fudge Recipe that uses just a handful of pantry ingredients—chocolate chips, sweetened condensed milk, and a bit of butter—to create a smooth, creamy, chocolate microwave fudge that sets beautifully in the fridge. It’s a no bake fudge, fast enough for a weeknight treat but still special enough for Christmas cookie platters and homemade gift boxes.
I started making this exact microwave Fudge Recipe when my kids were little and patience was in very short supply. Waiting for traditional stovetop fudge to reach “soft ball stage” with a candy thermometer? Not happening with toddlers tugging at my leg. This quick microwave fudge became my go‑to “peace offering” dessert—perfect for snow days, birthday parties, and frankly, stressful Tuesdays.
Is it healthy? Well, let’s be honest: this is a dessert, not a salad. But I do like that it’s a homemade fudge recipe with recognizable ingredients—no weird shelf‑stable frosting tubs or mystery coatings. You can choose higher‑quality dark chocolate, add nuts for a bit of protein, or slice it into small squares for sensible portions.
And because it’s such an easy chocolate fudge, kids, teens, and brand‑new cooks can help without much stress. If you can stir and press buttons on a microwave, you can make this.
Why You’ll Love This Microwave Fudge
Let me explain why this one stays in my recipe box—and why it’s one of my most reliable quick dessert recipes:
- No oven needed – This is a true microwave dessert recipe; keep the kitchen cool and the work minimal.
- Ready in about 10 minutes (plus chilling) – Actual hands‑on work is fast; the fridge does the rest.
- Beginner‑friendly – No candy thermometer, no tricky stages, no worrying about crystals.
- 3–ingredient fudge base – Chocolate chips, sweetened condensed milk, and butter—everything else is optional.
- Perfect for gifting – Cuts into neat squares that stack beautifully in cookie tins and holiday boxes.
- Customizable – Add nuts, sea salt, peppermint, peanut butter, or swirl in white chocolate for endless variations.
- Naturally gluten‑free – As long as you use gluten‑free add‑ins, it works for many guests.
- Great make‑ahead dessert – Keeps well in the fridge or freezer, so you can prep days (or weeks) before you need it.
- Kid‑approved project – Safe, quick, and fun for kids or grandkids to help with.
- Reliable texture – Smooth, creamy, sliceable fudge every time when you follow the simple steps.
Ingredients for Easy Microwave Fudge
This easy microwave fudge recipe is built on a classic condensed milk fudge formula. You can keep it to a 3 ingredient fudge or dress it up—your call.
Base Fudge Ingredients
-
3 cups (18 oz / 510 g) semi‑sweet chocolate chips
Use good‑quality chips (like Ghirardelli or Guittard) for best flavor. You can swap up to half for dark chocolate chips if you like a slightly less sweet fudge. -
1 can (14 oz / 396 g) sweetened condensed milk
This is the key for that smooth, creamy, no‑fail texture. Don’t use evaporated milk—they’re not the same. -
3 tablespoons unsalted butter, cut into pieces
Butter improves flavor and helps the fudge set with a soft, fudge‑shop texture. If you only have salted butter, you can use it and reduce added salt. -
1 teaspoon pure vanilla extract
Technically optional, but it rounds out the chocolate flavor beautifully. I recommend real vanilla, not imitation. -
¼ teaspoon fine sea salt
Just enough to balance sweetness. If you’re using salted butter, you can reduce this to a pinch.
Optional Mix‑Ins & Toppings
These are all optional, but here are my favorites:
-
½–1 cup chopped nuts (walnuts, pecans, or almonds)
Toast them lightly for extra flavor—about 5–7 minutes at 350°F—then cool before adding. -
2–3 tablespoons mini chocolate chips or white chocolate chips
Sprinkle on top for a pretty finish. -
1–2 tablespoons crushed peppermint candies
Perfect for a holiday microwave fudge recipe. -
Flaky sea salt
A pinch on top of each square turns this into gourmet‑looking chocolate microwave fudge. -
1 teaspoon espresso powder
Intensifies the chocolate flavor without making it taste like coffee (unless you want it to).
If you’re dairy‑sensitive, you can make a variation with dairy‑free chocolate chips and coconut condensed milk—see the Variations section for details.

Step‑by‑Step Directions (So Simple, It Feels Like Cheating)
Follow these steps and you’ll have easy homemade fudge cooling on your counter in no time.
-
Prepare your pan.
Line an 8×8‑inch (20×20 cm) pan with parchment paper or aluminum foil, leaving some overhang on two sides to form “handles.” Lightly grease the parchment or foil with butter or nonstick spray for easier removal. This step makes cutting and cleanup so much easier—don’t skip it. -
Measure and prep your ingredients.
In a microwave‑safe bowl (a medium glass or ceramic bowl works well), add the chocolate chips, sweetened condensed milk, and butter pieces. Have your vanilla and salt measured and ready nearby, because you’ll stir them in quickly while the mixture is warm. -
Microwave in short bursts.
Microwave the chocolate mixture on medium power (50–70%) for 60 seconds. Remove the bowl and stir well. It may still look quite chunky—that’s okay. Return it to the microwave and heat in 20–30 second intervals, stirring after each burst, until the chocolate is mostly melted and the mixture looks thick and glossy.
Tip: Don’t rush this with full power; gentler heat helps prevent scorching and graininess. -
Finish melting by stirring.
Once the chocolate is about 80–90% melted, stop microwaving and keep stirring. The residual heat will finish melting the remaining bits. This is the same trick we use for tempering chocolate—it keeps things smooth and silky. -
Add vanilla, salt, and any mix‑ins.
Working quickly while the mixture is still warm and spreadable, stir in the vanilla extract and salt until well combined. If you’re adding nuts, espresso powder, or other mix‑ins, fold them in gently now.
If the mixture seems too stiff to stir comfortably, pop it back into the microwave for 10–15 seconds and stir again. -
Spread into the prepared pan.
Scrape the fudge mixture into your lined pan. Use a silicone spatula or the back of a spoon to spread it evenly, pressing it into the corners. It will be thick; just nudge it into place. For a smoother top, you can lightly tap the pan on the counter a few times. -
Add toppings (if using).
While the fudge is still soft on top, sprinkle with extra chocolate chips, chopped nuts, crushed peppermint, or flaky sea salt. Gently press the toppings into the surface so they adhere as the fudge cools. -
Chill until firm.
Transfer the pan to the refrigerator and chill for at least 2 hours, or until the fudge is firm enough to slice. If you’re in a big hurry, you can use the freezer and check it after about 45–60 minutes, but don’t forget it in there—very cold fudge can be harder to cut neatly. -
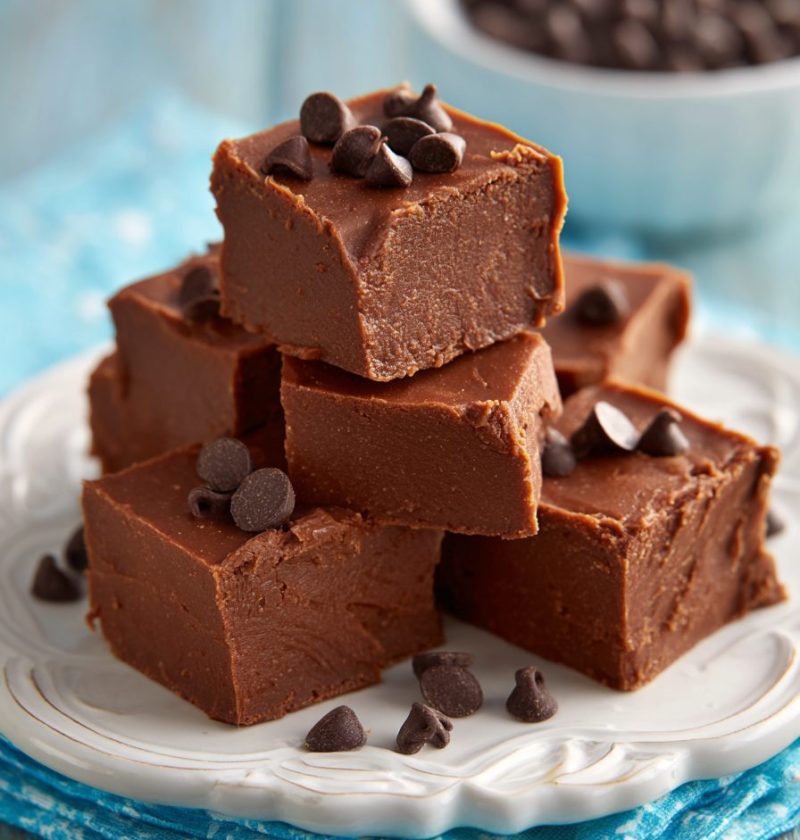
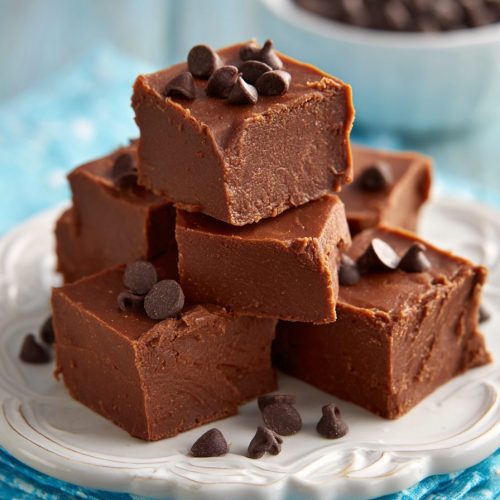
Slice and serve.
Use the parchment “handles” to lift the block of fudge out of the pan and onto a cutting board. With a sharp knife, cut into small squares—anywhere from 1‑inch to 1½‑inch pieces, depending on how generous you’re feeling. Wipe the knife with a warm, damp cloth between cuts for cleaner edges. -
Enjoy and share (or hide a few pieces).
Serve your easy microwave fudge at room temperature for the creamiest texture. It makes a lovely addition to dessert trays, lunchbox treats, or a little afternoon “coffee and something sweet” moment just for you.
Servings & Timing
- Yield: About 36 small squares (1‑inch pieces), or 25–30 slightly larger pieces
- Prep Time: 10 minutes
- Chill Time: 2 hours
- Total Time: About 2 hours 10 minutes
Realistically, you’ll only spend about 10 minutes actually making this quick microwave fudge—the rest is hands‑off chilling time, which is perfect for wrapping gifts, doing dishes, or putting your feet up with a book.
Fun Variations on This Easy Microwave Fudge
Once you’ve made the basic chocolate version, it’s hard not to start playing. Here are some ideas to turn this into your own signature homemade fudge recipe:
- Rocky Road Microwave Fudge – Stir in 1 cup mini marshmallows and ½ cup chopped toasted almonds or peanuts before spreading in the pan.
- Peanut Butter Swirl Fudge – Melt ¼ cup creamy peanut butter and drizzle it over the top of the warm fudge; use a knife to swirl it in.
- Peppermint Bark Fudge – Use half semi‑sweet, half white chocolate chips, then top with crushed peppermint candies for a festive holiday fudge.
- Salted Dark Chocolate Fudge – Use dark chocolate chips, add 1 teaspoon espresso powder, and finish with a generous sprinkle of flaky sea salt.
- Dairy‑Free Coconut Fudge – Use dairy‑free chocolate chips and a can of coconut sweetened condensed milk, then add ½ teaspoon coconut extract and a sprinkle of toasted coconut on top.
- Nutty Walnut Fudge – Fold in a full cup of toasted, chopped walnuts for an old‑fashioned fudge feel.
You can mix and match these ideas—peppermint with dark chocolate, peanut butter with sea salt—until you land on your family’s favorite combo.
Storage & Make‑Ahead Tips
One of my favorite things about this easy homemade fudge is how well it stores. It’s a planner’s dream dessert.
Room Temperature (Short‑Term):
- Store fudge in an airtight container at cool room temperature for up to 3 days.
- Separate layers with parchment or wax paper so the pieces don’t stick together.
- This works best in a cooler house; in a very warm kitchen, the fridge is safer.
Refrigerator:
- Keep the fudge in an airtight container in the fridge for 2–3 weeks.
- It will firm up a bit in the refrigerator, so let it sit at room temperature for 10–15 minutes before serving for a creamier bite.
Freezer:
- For longer storage, freeze in a freezer‑safe container or tightly wrapped in foil plus a zip‑top bag for up to 3 months.
- Thaw in the fridge overnight or on the counter for about 30–45 minutes before serving.
- You can also freeze it already cut into squares; just separate layers with parchment.
Make‑Ahead Advice:
- This quick dessert recipe is perfect for holiday prep: make a few batches in different flavors, freeze them, and thaw as needed for parties or gift boxes.
- If you’re gifting, pack the fudge in small boxes or tins lined with parchment paper; it travels well as long as it isn’t left in a hot car.
Notes, Tips & Little Lessons Learned
After making this easy microwave fudge more times than I can count, here are a few things I’ve learned:
-
Quality chocolate makes a difference.
The chocolate is the star here. Using better‑quality chocolate chips gives you a smoother texture and deeper flavor. You don’t need fancy imported bars—but the mid‑range brands are worth it. -
Don’t overheat the chocolate.
Overheating is the quickest way to grainy, dull fudge. That’s why I always microwave at medium power and finish melting by stirring. -
Humidity and temperature matter a little.
On hot, muggy summer days, the fudge can be a bit softer at room temp. Just keep it in the fridge until closer to serving time. -
Slice small.
This chocolate microwave fudge is rich. Smaller squares look pretty on a tray and let everyone go back for seconds without feeling overwhelmed. -
Add a little texture.
Even if you don’t love nuts, consider a small amount of chopped toasted nuts, crushed cookies, or crispy cereal mixed in. The contrast makes each bite more interesting. -
Write flavor notes on gift boxes.
If you make multiple variations, a tiny label like “Dark chocolate sea salt fudge” feels thoughtful and helps guests with allergies or preferences.
You know what? Sometimes I also stash a few pieces in the back of the freezer in a nondescript container. Future me always appreciates past me for that.
FAQs About Microwave Fudge
1. Why is my microwave fudge grainy instead of smooth?
Grainy fudge usually means the chocolate overheated or the mixture wasn’t stirred enough. Next time, use medium power in the microwave, heat in short bursts, and stop as soon as it’s mostly melted—then stir until smooth.
2. Can I use evaporated milk instead of sweetened condensed milk?
No, evaporated milk won’t work in this easy microwave fudge recipe. Sweetened condensed milk is thicker and sweet, and it’s what gives this condensed milk fudge its creamy, stable texture.
3. How long does microwave fudge take to set?
In the refrigerator, it usually takes about 2 hours to set firmly enough to cut. In the freezer, it may be ready in 45–60 minutes, but check that it’s firm, not icy.
4. My fudge didn’t set—what went wrong?
Most of the time, it just needs more chilling time. If it’s still very soft after several hours, you might have used the wrong kind of milk, not enough chocolate, or a low‑fat substitute. You can try re‑melting it gently and stirring in a bit more melted chocolate.
5. Can I make this microwave fudge without butter?
Yes, you can leave out the butter; the fudge will still set. It may be slightly firmer and a little less rich, but the sweetened condensed milk and chocolate do most of the work.
6. Is this a true 3 ingredient fudge?
The base is a 3 ingredient fudge—chocolate chips, sweetened condensed milk, and butter. Vanilla, salt, and any mix‑ins are technically extras, though I really recommend at least a pinch of salt and a splash of vanilla for flavor.
7. Can I double this recipe?
You can, but use a 9×13‑inch pan and a large microwave‑safe bowl, and stir very well. You may need a bit more chilling time since the fudge layer will be thicker.
8. What’s the best chocolate for this homemade fudge recipe?
Semi‑sweet chocolate chips give a classic flavor that most people love. For grown‑up tastes, mix in some dark chocolate chips; for kids, a blend of milk and semi‑sweet can be fun. Just make sure whatever you use melts smoothly.
Final Thoughts (And a Little Nudge to Try It)
This Microwave Fudge Recipe is one of those timeless, simple fudge recipes that feels like a little magic trick—rich, creamy, chocolatey squares made with almost no effort, no oven, and hardly any cleanup. It’s a quick microwave fudge that works for busy weeknights, holiday platters, school parties, and those “I promised I’d bring dessert” moments we all have.
If you make this easy microwave fudge, I’d love to hear how it turned out and what fun twists you tried—peppermint, peanut butter, nuts, or something wild and creative. Leave a comment, share a photo, or save this recipe for your next no bake fudge craving. And if you enjoy quick dessert recipes like this, you might also like exploring other easy homemade treats in your kitchen—once you see how simple fudge can be, it opens the door to all kinds of sweet little traditions.
Microwave Fudge
Ingredients
- 3 cups semi-sweet chocolate chips about 18 oz / 510 g; use good-quality chips; you can swap up to half for dark chocolate chips
- 14 oz can sweetened condensed milk about 396 g; do not substitute evaporated milk
- 3 tablespoons unsalted butter cut into pieces; you may use salted butter and reduce added salt
- 1 teaspoon pure vanilla extract recommended for best flavor
- 1/4 teaspoon fine sea salt reduce to a pinch if using salted butter
- 1/2-1 cup chopped nuts walnuts, pecans, or almonds; toasted and cooled; optional, mix-in
- 2-3 tablespoons mini chocolate chips or white chocolate chips optional, for sprinkling on top
- 1-2 tablespoons crushed peppermint candies optional, topping, great for holidays
- flaky sea salt optional, for sprinkling on top
- 1 teaspoon espresso powder optional; intensifies chocolate flavor
Instructions
- Line an 8x8-inch (20x20 cm) pan with parchment paper or aluminum foil, leaving overhang on two sides to form handles. Lightly grease the parchment or foil with butter or nonstick spray for easier removal.
- In a medium microwave-safe bowl, add the semi-sweet chocolate chips, sweetened condensed milk, and butter pieces. Have the vanilla and salt measured and ready nearby.3 cups semi-sweet chocolate chips, 14 oz can sweetened condensed milk, 3 tablespoons unsalted butter
- Microwave the chocolate mixture on medium power (50–70%) for 60 seconds. Remove the bowl and stir well. Return to the microwave and heat in 20–30 second intervals, stirring after each burst, until the chocolate is mostly melted and the mixture is thick and glossy. Avoid using full power to prevent scorching.3 cups semi-sweet chocolate chips, 14 oz can sweetened condensed milk, 3 tablespoons unsalted butter
- When the chocolate is about 80–90% melted, stop microwaving and continue stirring until completely smooth; the residual heat will finish melting any remaining bits.3 cups semi-sweet chocolate chips, 14 oz can sweetened condensed milk, 3 tablespoons unsalted butter
- While the mixture is still warm and spreadable, stir in the vanilla extract and fine sea salt until well combined. If using espresso powder or chopped nuts, fold them in now. If the mixture becomes too stiff to stir, microwave for an additional 10–15 seconds and stir again.1 teaspoon pure vanilla extract, 1/4 teaspoon fine sea salt, 1/2-1 cup chopped nuts, 1 teaspoon espresso powder
- Scrape the fudge mixture into the prepared pan. Use a silicone spatula or the back of a spoon to spread it evenly and press it into the corners. Tap the pan gently on the counter a few times to help smooth the top.
- While the fudge is still soft on top, sprinkle with mini chocolate chips or white chocolate chips, crushed peppermint candies, chopped nuts, or flaky sea salt, if desired. Gently press the toppings into the surface so they adhere.1/2-1 cup chopped nuts, 2-3 tablespoons mini chocolate chips or white chocolate chips, 1-2 tablespoons crushed peppermint candies, flaky sea salt
- Transfer the pan to the refrigerator and chill for at least 2 hours, or until the fudge is firm enough to slice. For a faster set, place in the freezer and begin checking after 45–60 minutes, making sure it is firm but not icy.
- Use the parchment or foil handles to lift the fudge from the pan onto a cutting board. With a sharp knife, cut into small squares, about 1 to 1½ inches each. Wipe the knife with a warm, damp cloth between cuts for clean edges.
- Serve the microwave fudge at room temperature for the creamiest texture. Enjoy as part of dessert trays, gift boxes, or as a quick sweet treat.