Would you like to save this?
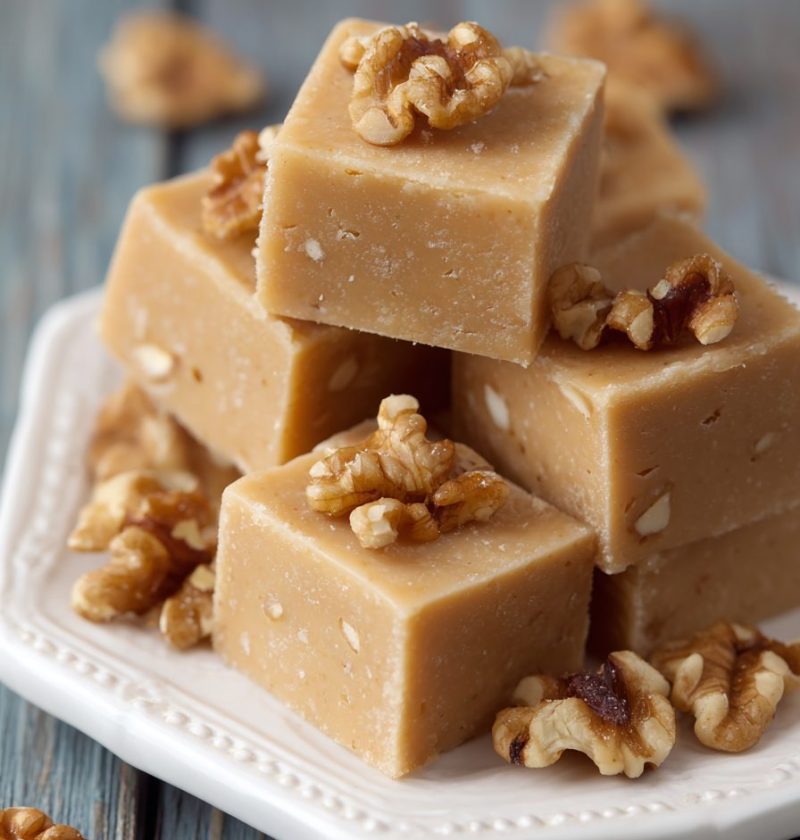
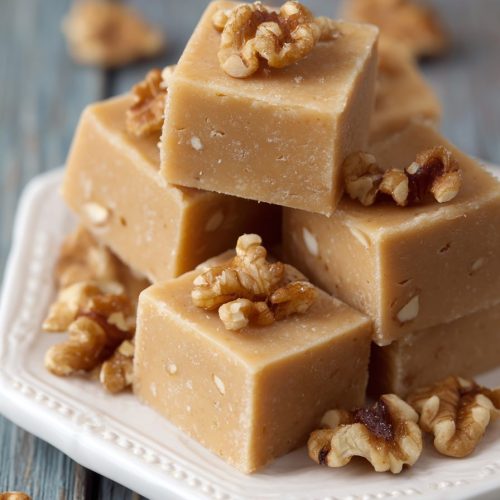
Maple Walnut Fudge Recipe
This Maple Walnut Fudge Recipe makes the kind of creamy, rich, old-fashioned maple fudge that tastes like it came straight from a little New England candy shop—loaded with toasty walnuts and real maple flavor, no oven needed.
If you’ve been craving a classic maple walnut fudge that’s simple, reliable, and special enough for the holidays (but easy enough for a Tuesday), this maple fudge recipe is going to be your new go‑to.
Meet Your New Favorite Maple Walnut Fudge
I grew up with Christmas tins full of fudge on the counter, and the maple walnut always disappeared first. This Maple Walnut Fudge Recipe is my modern nod to those old-fashioned maple fudge squares—still made on the stovetop, still cooked to soft-ball stage, but with a few practical tricks so you don’t end up with grainy sugar bricks.
What makes this homemade maple fudge special is the focus on real maple syrup, not just flavoring. We pair pure maple syrup with brown sugar and heavy cream, then cook it gently until it thickens and turns silky. Fold in a generous handful of toasted walnuts, and you’ve got a creamy maple walnut fudge that tastes like cozy sweater weather.
I pull out this recipe for:
- Thanksgiving dessert boards
- Christmas cookie trays
- Teacher and neighbor gifts
- Or when I just want one small, sweet square after dinner with a cup of decaf
It’s a classic maple walnut fudge that leans nostalgic but still feels right at home next to your charcuterie board and oat milk lattes. And because I’m 50 and my patience for fussy candy is… limited, I tested this several times to make sure it’s as foolproof as possible.
Why You’ll Love This Maple Walnut Fudge Recipe
- No oven needed – This is a true stovetop, no-bake maple fudge recipe.
- Pure maple flavor – Uses real maple syrup, not just extract, for deep, authentic maple taste.
- Creamy, not crumbly – Proper cooking temperature and cooling give you fudge that slices cleanly but melts on your tongue.
- Great for gifting – Maple walnut fudge travels well and looks beautiful in treat boxes and tins.
- Simple ingredients – Mostly pantry staples plus good maple syrup and walnuts.
- Old-fashioned, but not fussy – Classic technique with clear, step-by-step directions and modern shortcuts.
- Easy to customize – Add chocolate, bourbon, pecans, or sea salt without changing the base recipe.
- Make-ahead friendly – Keeps nicely for days, and you can freeze it for future cravings.
Ingredients for Classic Maple Walnut Fudge
You don’t need much to make rich maple walnut fudge at home, but quality matters—especially your maple syrup and nuts.

Fudge Base
-
2 cups (400 g) packed light brown sugar
- Adds a caramel note that plays beautifully with maple. Dark brown sugar works, but the flavor will be deeper and slightly less “maple-forward.”
-
1 cup (240 ml) pure maple syrup
- Use real maple syrup (Grade A amber or dark) rather than pancake syrup. This is the backbone of your maple syrup fudge recipe.
-
1 cup (240 ml) heavy cream
- Full-fat cream makes the fudge silky. Half-and-half will work in a pinch but results will be a bit less rich.
-
2 tablespoons (28 g) unsalted butter, plus extra for greasing the pan
- Butter adds flavor and helps with that creamy, smooth texture. If you only have salted butter, reduce the added salt slightly.
-
1 tablespoon light corn syrup (optional but recommended)
- Helps prevent the sugar from crystallizing. It doesn’t make the fudge “corn-syrupy;” it just improves texture.
-
1/4 teaspoon fine sea salt
- Balances the sweetness and brightens the maple flavor.
-
1 teaspoon pure vanilla extract
- Rounds out the maple notes and adds warmth.
Walnuts & Add-Ins
-
1 1/2 cups (about 150 g) chopped walnuts, toasted
- Toast the walnuts in a dry skillet or a 325°F (165°C) oven for 6–8 minutes until fragrant. This small step gives your homemade walnut fudge a deep, nutty crunch.
-
Optional: 1/4–1/2 teaspoon maple extract
- For an extra punch of maple if your syrup is on the milder side. Use sparingly—too much can taste artificial.
Tools That Help
Not ingredients, but these make a big difference:
- 8-inch (20 cm) square baking pan
- Parchment paper or foil (for easy removal)
- Medium to large heavy-bottomed saucepan (3-quart works well)
- Candy thermometer (digital or clip-on)
- Sturdy wooden spoon or heat-proof spatula
If you’ve never used a candy thermometer before, don’t stress. Think of it like training wheels for fudge—it gives you data so you don’t have to guess.
Step-by-Step Directions for Maple Walnut Fudge
Follow these steps and you’ll get creamy, classic maple walnut fudge without guesswork.
1. Prepare the Pan
- Grease and line the pan.
- Lightly butter an 8-inch square pan. Line it with parchment paper, letting some hang over the edges to create “handles.” Butter the parchment as well.
- This makes it easy to lift out the fudge later for neat slicing.
2. Toast the Walnuts
- Toast and chop the walnuts.
- Add walnuts to a dry skillet over medium-low heat. Toast 5–7 minutes, stirring now and then, until they smell nutty and you see a little browning.
- Let them cool, then roughly chop. Set aside. Toasting really elevates the flavor of your creamy maple walnut fudge.
3. Combine the Sugar, Maple, and Cream
- Add ingredients to the saucepan.
- In a heavy-bottomed saucepan, combine brown sugar, maple syrup, heavy cream, corn syrup (if using), and salt.
- Stir gently over medium heat until the sugar dissolves and the mixture looks uniform.
4. Bring to a Gentle Boil
- Cook to soft-ball stage (236°F / 113°C).
- Once the sugar is dissolved, attach your candy thermometer to the side of the pan (make sure it’s not touching the bottom).
- Bring the mixture to a gentle boil over medium heat without stirring. This helps prevent sugar crystals from forming.
- Cook until the temperature reaches **236°F (113°C)**—this is soft-ball stage. It may take 10–15 minutes. The mixture will thicken slightly and bubble steadily.
Tip: If you don’t have a thermometer, you can use the classic “soft-ball test”: drop a small spoonful of syrup into a cup of cold water. It should form a soft, squishy ball you can flatten between your fingers.
5. Add Butter and Cool
-
Remove from heat and add butter (and vanilla).
- Take the pan off the heat. Add the butter and vanilla (and maple extract if using), but don’t stir yet. Let the butter sit on top.
-
Cool without stirring.
- Let the mixture cool at room temperature to about 110°F (43°C).
- If you don’t want to fuss with a thermometer, this usually takes about 20–30 minutes. The surface will look slightly dull and a bit thicker.
- This cooling step is key for avoiding grainy fudge.
6. Beat the Fudge
- Beat until thick and matte.
- Once cooled, start stirring the mixture firmly with a wooden spoon or spatula. Stir, stir, stir.
- You’ll see it gradually change from glossy to matte and much thicker—like thick frosting or Peanut Butter.
- This can take 5–10 minutes, so this is where I usually hand the spoon to a teenager if one is wandering through the kitchen.
Sensory cue: When the fudge holds its shape and starts to lose shine, and your arm is just about done complaining, you’re there.
7. Add Walnuts and Finish
-
Fold in walnuts.
- Quickly stir in the chopped toasted walnuts, mixing evenly through the maple fudge base.
- If the fudge starts to get too stiff while you’re folding, don’t panic—just press it firmly into the pan. It will still set fine.
-
Spread in the prepared pan.
- Immediately scrape the mixture into your lined pan. Press it into an even layer with a buttered spatula or the back of a buttered spoon.
- Smooth the top as best you can. A few rustic swirls are part of the homemade charm.
8. Let It Set and Slice
-
Cool completely.
- Let the fudge sit at room temperature until firm, 2–3 hours. For faster setting, you can chill it in the fridge for about 1–1 1/2 hours.
-
Slice into squares.
- Lift the fudge out of the pan using the parchment handles. Place on a cutting board.
- Use a sharp knife to cut into 1‑inch squares (or larger if you like generous pieces). Wipe the knife between cuts for clean edges.
Now you’ve got a tray of rich maple walnut fudge ready for gifting, nibbling, or hiding in the back of the fridge behind the vegetables. (No judgment.)
Servings & Timing
- Yield: About 36 small squares (1‑inch pieces)
- Prep Time: 15 minutes (plus 5–7 minutes to toast walnuts)
- Cook Time: 15–20 minutes
- Cooling / Setting Time: 2–3 hours at room temperature (or 1–1 1/2 hours in the fridge)
- Total Time: About 3 hours, most of it hands-off
This Maple Walnut Fudge Recipe is perfect as a make-ahead project—cook once, enjoy for days.
Easy Variations on This Maple Walnut Fudge Recipe
Once you’ve made this classic version, you can play a bit. Here are some of my favorite twists:
- Maple Pecan Fudge: Swap the walnuts for toasted pecans for a softer, buttery crunch.
- Salted Maple Walnut Fudge: Sprinkle flaky sea salt (like Maldon) on top right after you spread the fudge in the pan.
- Chocolate-Swirled Maple Fudge: Melt 1/2 cup semi-sweet chocolate chips and swirl through the top of the fudge before it sets for a marbled look.
- Bourbon Maple Walnut Fudge: Stir in 1–2 tablespoons of bourbon with the vanilla for a grown-up, cozy flavor.
- Cranberry Maple Nut Fudge: Fold in 1/3 cup dried cranberries along with the walnuts for a pretty, sweet-tart pop.
- Dairy-Free Maple Nut Fudge: Use full-fat coconut milk instead of heavy cream and vegan butter; the flavor will be a little different but still lovely.
How to Store, Freeze, and Serve Your Fudge
You know how some desserts are fussy about storage? This one is blessedly low-maintenance.
Fridge Storage
- Room Temperature:
- In a cool, dry kitchen, you can store maple walnut fudge in an airtight container at room temperature for 3–4 days.
- Refrigerator:
- For longer storage, layer fudge squares between sheets of parchment or wax paper in an airtight container.
- Store in the fridge for up to 2 weeks. The texture will be firm when cold but softens slightly as it warms.
Freezer Storage
-
Freeze for later:
- Arrange the squares on a baking sheet and freeze until solid, then transfer to a freezer bag or airtight container.
- Properly wrapped, your homemade maple fudge will keep in the freezer for up to 2–3 months.
-
Thawing:
- Thaw in the fridge overnight or let sit at room temperature for 20–30 minutes.
- There’s no reheating needed—just bring it back to a nice, cool room temp so the texture turns creamy again.
Make-Ahead Tips
- You can make this Maple Walnut Fudge Recipe 3–5 days before an event and store it in the fridge.
- Slice just before serving or gifting for the cleanest edges.
- For holiday boxes, wrap a few squares together in parchment or candy cups so they don’t stick.
Notes & Real-Life Tips from My Kitchen
- Use good maple syrup. This seems obvious, but it’s worth saying. The better the maple syrup, the better the fudge. I like Grade A amber or dark for stronger flavor.
- Don’t stir once it boils. After the sugar dissolves and the mixture starts bubbling, resist the urge to stir. Stirring can cause sugar crystals that lead to grainy fudge.
- Scrape carefully. When you pour the cooked fudge into a bowl or pan to cool, avoid scraping the crystallized bits from the sides of the pan; those can also make the texture sandy.
- Be patient with cooling. I know it’s tempting to speed things up, but letting the mixture cool to around 110°F before beating is what gives that creamy, old-fashioned maple fudge texture.
- Use your senses. Candy thermometers are helpful, but also watch the texture and shine. Over time, you’ll recognize the look of “ready” fudge even without the numbers.
- Humidity can matter. On very humid days, fudge may take a bit longer to set and can be slightly softer. It’s still delicious—just keep it chilled.
I tested this recipe on a rainy fall day, a dry winter morning, and an “I forgot we needed dessert tonight” weekday evening, and it behaved well every time with these steps.
Frequently Asked Questions About Maple Walnut Fudge
1. Can I make this Maple Walnut Fudge Recipe without a candy thermometer?
Yes. Use the soft-ball test: drop a little of the hot syrup into a cup of cold water; if it forms a soft, flexible ball that flattens when pressed, it’s ready. A thermometer just makes it easier.
2. My fudge turned out grainy. What went wrong?
Grainy fudge usually comes from sugar crystals—this can happen if you stir while it’s boiling, if sugar splashes up and crystallizes on the sides, or if you stir before it cools. Next time, avoid stirring once it starts to boil and let it cool longer before beating.
3. Can I use dark brown sugar instead of light brown?
You can. Dark brown sugar will make the fudge deeper and more molasses-forward, which is lovely, but the maple flavor will be a bit more subtle behind that richness.
4. Do I have to toast the walnuts?
You don’t have to, but I strongly recommend it. Toasting intensifies the nutty flavor and keeps the walnuts from tasting flat inside the creamy fudge.
5. Can I double this recipe?
Yes, but use a larger, heavy pot (5–6 quart) because the mixture will bubble up as it boils. Also keep in mind that larger batches can take a little longer to cool before beating.
6. How do I cut neat squares for gift boxes?
Chill the fudge first, then use a long, sharp knife. Wipe the blade with a warm, damp cloth between cuts. A metal bench scraper also works nicely for clean, straight lines.
7. Can I make this without nuts?
Absolutely. Just leave out the walnuts and you’ll have a smooth, classic maple fudge. You can stir in mini marshmallows, crisp Rice cereal, or nothing at all.
8. Is this Maple Walnut Fudge Recipe gluten-free?
Yes, it generally is, as long as your ingredients (especially the vanilla and any add-ins) are certified gluten-free. Always double-check labels if you’re serving someone with celiac disease or a strong sensitivity.
Wrapping It Up (and Maybe Wrapping a Few Gift Boxes Too)
This Maple Walnut Fudge Recipe gives you everything you want in a homemade maple fudge: real maple flavor, creamy texture, toasty walnuts, and a method that feels classic but not stressful. It’s festive enough for Thanksgiving and Christmas, but simple enough to make whenever the craving hits.
If you try this recipe, let me know how it turns out—leave a comment, tell me if you made any fun twists, or share it with a maple-loving friend. And if you’re building a whole dessert tray, pair this with a simple chocolate fudge or a pan of brownies for a little “fudge flight” that will make everyone at the table very happy.
Maple Walnut Fudge
Ingredients
- 2 cups light brown sugar packed (400 g); dark brown sugar can be used for a deeper flavor
- 1 cup pure maple syrup Grade A amber or dark; not pancake syrup
- 1 cup heavy cream full-fat
- 1 tablespoon light corn syrup optional but recommended; helps prevent crystallization
- 1/4 teaspoon fine sea salt
- 2 tablespoons unsalted butter plus extra for greasing the pan
- 1 teaspoon vanilla extract pure
- 1 1/2 cups walnuts chopped and toasted (about 150 g)
- 1/4–1/2 teaspoon maple extract optional; for stronger maple flavor, use sparingly
- 1 sheet parchment paper or foil, for lining the pan
Instructions
- Lightly butter an 8-inch (20 cm) square baking pan. Line it with parchment paper, leaving an overhang on two sides to form handles. Butter the parchment as well for easy removal and clean slicing.
- Add the walnuts to a dry skillet over medium-low heat. Toast for 5–7 minutes, stirring occasionally, until fragrant and lightly browned. Let cool, then roughly chop and set aside.
- In a medium to large heavy-bottomed saucepan, combine the packed light brown sugar, pure maple syrup, heavy cream, light corn syrup (if using), and fine sea salt. Stir gently over medium heat until the sugar dissolves and the mixture looks smooth and uniform.
- Attach a candy thermometer to the side of the pan, making sure the tip does not touch the bottom. Bring the mixture to a gentle boil over medium heat without stirring. Continue boiling without stirring until the temperature reaches 236°F (113°C), the soft-ball stage, about 10–15 minutes. The mixture will thicken slightly and bubble steadily.
- Remove the pan from the heat. Add the unsalted butter, vanilla extract, and maple extract (if using) on top of the hot mixture, but do not stir. Let the mixture cool undisturbed at room temperature until it reaches about 110°F (43°C), 20–30 minutes. The surface will look slightly dull and thicker; this cooling step helps prevent grainy fudge.
- Once cooled, beat the mixture vigorously with a sturdy wooden spoon or heatproof spatula. Continue stirring until the fudge thickens and changes from glossy to matte, resembling thick frosting or peanut butter, 5–10 minutes. It should hold its shape when stirred.
- Quickly fold the chopped toasted walnuts into the fudge until evenly distributed. Immediately scrape the mixture into the prepared pan and press into an even layer with a buttered spatula or the back of a buttered spoon, smoothing the top as desired.
- Let the fudge cool at room temperature until firm, 2–3 hours, or chill in the refrigerator for 1–1 1/2 hours to speed setting. Use the parchment handles to lift the fudge from the pan and transfer to a cutting board. Cut into about 36 1-inch squares with a sharp knife, wiping the blade between cuts for clean edges.
- Serve immediately or transfer the fudge squares to an airtight container. Store at room temperature for up to 3–4 days in a cool, dry place, or refrigerate for up to 2 weeks. For longer storage, freeze for 2–3 months and thaw before serving.
Notes
Timing: Prep 15–20 minutes (including 5–7 minutes to toast walnuts), cook 15–20 minutes, plus 2–3 hours cooling/setting (mostly hands-off).
Storage: Store in an airtight container at room temperature for 3–4 days, or refrigerated for up to 2 weeks. For longer storage, freeze the squares on a baking sheet until solid, then transfer to a freezer bag or container; keep frozen for up to 2–3 months.
Texture tips: Do not stir once the mixture comes to a boil, and let it cool to about 110°F before beating to avoid grainy fudge. Avoid scraping crystallized bits from the sides of the pan into the fudge.
Variations: Swap walnuts for toasted pecans; sprinkle flaky sea salt on top for salted maple fudge; swirl melted chocolate on top before setting; add 1–2 tablespoons bourbon with the vanilla; or fold in dried cranberries with the nuts. Omit nuts entirely for smooth maple fudge.