Would you like to save this?
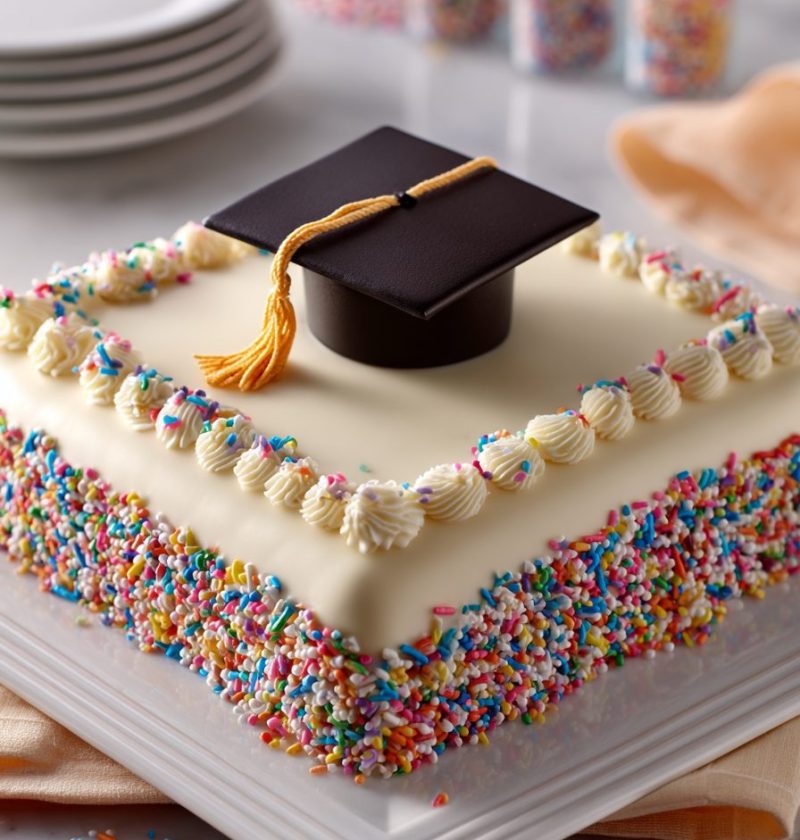
Graduation Sheet Cake Recipe
If you need a festive, foolproof dessert that feeds a crowd and still feels homemade, this Graduation Sheet Cake Recipe is the one to keep on repeat. It’s soft, moist, easy to decorate, and perfect for turning a school celebration into a sweet memory.
A celebratory cake that’s big on flavor and easy on stress
A good graduation sheet cake does a lot of heavy lifting at a party. It needs to look special, slice neatly, serve a crowd, and taste like the kind of dessert people go back for “just a tiny sliver” of three times. That’s exactly what this recipe does.
This is a classic homemade sheet cake with a tender crumb, rich buttery flavor, and a fluffy frosting that spreads like a dream. You can make it as a vanilla sheet cake or turn it into a chocolate sheet cake with one simple variation. And because it’s baked in a sheet pan, it’s far less fussy than stacked layer cakes. No leaning towers, no complicated crumb coats, no pastry-school pressure.
I love serving this as a graduation party cake because it’s practical and sentimental all at once. After years of spring graduations, family cookouts, and school award nights, I can tell you this kind of celebration sheet cake is the one that disappears first. It travels well, decorates beautifully in school colors, and gives you plenty of room for a sweet message on top—something simple like “Congrats, Grad!” or the year in bold frosting.
There’s also a little strategy here, and I think busy home bakers appreciate that. Sheet cakes are among the most searched party desserts around graduation season because they’re cost-effective, dependable, and easy to serve to large groups. If you’re feeding 20 to 30 people, a large batch cake like this usually makes more sense than cupcakes or a layer cake. More servings, less fuss. That’s my kind of math.
Why you’ll love this recipe
- Feeds a crowd without a lot of extra work
- Bakes evenly in one pan for easy slicing
- Perfect for customizing in school colors
- Works as either a vanilla or chocolate version
- Soft, moist crumb that stays tender for days
- Frosting spreads beautifully and pipes well too
- Great make-ahead party dessert recipe
- Easy enough for beginner bakers
- Budget-friendly for big family celebrations
- A cheerful graduation dessert idea that looks impressive on the table
Ingredients you’ll need
For the cake:
- 3 cups all-purpose flour, spooned and leveled
- 2 1/2 teaspoons baking powder
- 1/2 teaspoon baking soda
- 1 teaspoon fine salt
- 1 cup unsalted butter, softened (2 sticks)
- 2 cups granulated sugar
- 4 large eggs, room temperature
- 1 tablespoon pure vanilla extract
- 1 cup sour cream, room temperature (full-fat gives the best texture; plain Greek yogurt works too)
- 1 cup whole milk, room temperature
For the vanilla buttercream frosting:
- 1 1/2 cups unsalted butter, softened (3 sticks)
- 5 to 6 cups powdered sugar, sifted if lumpy
- 3 tablespoons heavy cream or whole milk
- 2 teaspoons pure vanilla extract
- 1/8 teaspoon salt
- Gel food coloring, as needed for school colors (AmeriColor and Wilton both work well)
Optional decorations:
- Sprinkles in school colors
- Mini chocolate candies
- Piped borders or rosettes
- Fondant graduation caps
- Fresh berries for a more polished look
A few ingredient notes from my own kitchen: use room-temperature dairy and eggs if you can. It really does help the batter come together smoothly, and the cake bakes up with a more even crumb. Also, if you want a richer flavor for a frosted sheet cake, don’t skip the sour cream. That little extra tang makes a big difference.

Directions
-
Prep your pan and oven.
Preheat your oven to 350°F. Grease a 12×18-inch sheet pan, then line the bottom with parchment paper if you want extra insurance for easy lifting and cleanup. Honestly, parchment is one of those little things that saves a lot of aggravation later. -
Mix the dry ingredients.
In a medium bowl, whisk together the flour, baking powder, baking soda, and salt. Set it aside. This quick step helps everything distribute evenly, so you don’t get random salty bites or uneven rise. -
Cream the butter and sugar.
In a large mixing bowl, beat the softened butter and granulated sugar with a hand mixer or stand mixer for 3 to 4 minutes, until light and fluffy. Don’t rush this part. This is where you build structure and tenderness. -
Add the eggs and vanilla.
Beat in the eggs one at a time, mixing well after each addition. Stir in the vanilla extract. If the mixture looks slightly curdled, that’s okay—it usually smooths out once the dry ingredients go in. -
Add sour cream, then alternate dry ingredients and milk.
Mix in the sour cream until just combined. Then add the dry ingredients in three additions, alternating with the milk in two additions. Start and end with the dry mixture. Mix on low speed and stop as soon as the batter is smooth. Overmixing can make a sheet cake a little tough, and nobody wants that. -
Spread and bake.
Pour the batter into the prepared pan and smooth the top with an offset spatula. Bake for 22 to 28 minutes, or until the top springs back lightly and a toothpick inserted in the center comes out with a few moist crumbs. Ovens can be a bit dramatic, so start checking early. -
Cool the cake completely.
Let the cake cool in the pan on a wire rack. If you frost too soon, the buttercream will melt and slide around—and while that still tastes good, it won’t exactly say “party-ready.” -
Make the buttercream.
Beat the softened butter until creamy, about 2 minutes. Add 5 cups of powdered sugar, the cream, vanilla, and salt, then beat until fluffy. If needed, add more powdered sugar for a thicker frosting or a splash more cream for a softer one. You’re aiming for spreadable, not stiff as drywall. -
Frost and decorate.
Spread the frosting evenly over the cooled cake. Tint portions of frosting with gel food coloring if you want to pipe borders, stars, or lettering in school colors. Add sprinkles, candies, or a piped “Congrats” message. This is where your Graduation Cake idea comes to life. -
Slice and serve.
Cut into squares or rectangles, depending on your serving style. For neater slices, chill the cake for 20 to 30 minutes before cutting. A warm knife wiped clean between slices helps too.
Servings & timing
- Yield: 24 to 30 servings, depending on slice size
- Prep Time: 25 minutes
- Bake Time: 22 to 28 minutes
- Cooling Time: 1 hour
- Total Time: About 2 hours from start to finish
If you’re planning a big school party or backyard celebration, this graduation cake dessert fits nicely into a make-ahead timeline. Bake it the day before, frost it the next morning, and you’re in great shape.
Variations to keep things fun
- Chocolate version: Replace 1/2 cup of the flour with unsweetened cocoa powder for a simple chocolate sheet cake.
- Almond celebration cake: Add 1/2 teaspoon almond extract to the batter and frosting for a bakery-style flavor.
- Confetti cake: Fold 1/2 cup rainbow sprinkles into the batter for a playful school celebration cake.
- Berry-topped cake: Add sliced strawberries or blueberries on top right before serving for a fresher finish.
- Lemon vanilla twist: Add 1 tablespoon fresh lemon zest to the batter for a bright spring flavor.
- Gluten-free version: Use a trusted 1:1 gluten-free baking flour blend and check for doneness a few minutes early.
Storage & reheating
Store the cake tightly covered at room temperature for up to 2 days, or in the refrigerator for up to 5 days. If your kitchen runs warm, I’d go ahead and refrigerate it, especially if the cake is heavily frosted.
For freezing, wrap unfrosted cake tightly in plastic wrap and foil, then freeze for up to 2 months. Thaw overnight in the refrigerator before frosting. You can also freeze frosted slices in airtight containers, though the decorations may lose a bit of their crisp look.
This cake is excellent for making ahead. Bake the cake layer one day ahead, cool it completely, and keep it covered. Frost and decorate the next day for the freshest presentation. That’s usually how I handle a busy graduation party cake schedule, especially when there are sandwiches, fruit trays, and a dozen other things demanding counter space.
Notes from my kitchen
Use an offset spatula if you have one—it makes frosting a sheet cake so much easier. A simple bench scraper can also help smooth the top if you like a cleaner bakery-style finish.
If you want the cake extra moist, measure the flour carefully. Too much flour is one of the most common reasons a sheet Cake Recipe turns out dry. Spoon it into the measuring cup and level it off rather than scooping straight from the bag.
I also learned, after more than one rushed party morning, that bold gel colors work better than liquid food coloring. Liquid coloring can thin your frosting, while gel keeps the texture nice and fluffy.
And one more thing: if you’re writing on the cake, practice on parchment first. It sounds fussy, but it saves you from that moment where “Congrats” suddenly runs out of room halfway across the cake. Ask me how I know.
FAQs
Can I make this Graduation Sheet Cake Recipe ahead of time?
Yes. Bake the cake a day ahead, let it cool completely, and keep it covered. Frost it the next day for the best texture and appearance.
What size pan should I use?
A 12×18-inch sheet pan works best for this recipe. If you use a smaller pan, the cake will be thicker and may need more baking time.
Can I turn this into cupcakes?
Yes, you can. Fill cupcake liners about two-thirds full and start checking for doneness around 18 to 20 minutes.
How do I keep the cake moist?
Use room-temperature ingredients, measure flour carefully, and avoid overbaking. Sour cream also helps keep this easy sheet cake tender for days.
Can I use store-bought frosting?
You can, especially if you’re short on time. But homemade buttercream gives this graduation dessert idea a fresher flavor and smoother finish.
What’s the best way to decorate a graduation cake?
Keep it simple with school colors, sprinkles, piped borders, and a short message. For a more themed look, add candy diplomas or fondant caps.
Can I make it chocolate instead of vanilla?
Absolutely. Swap out 1/2 cup of flour for cocoa powder to create a soft chocolate sheet cake version.
How many people does this serve?
It serves 24 to 30 people, depending on slice size. That makes it a very handy large batch cake for parties, potlucks, and open-house style events.
A sweet finish for a big milestone
This Graduation Sheet Cake Recipe is simple, reliable, festive, and perfect for feeding a happy crowd. Whether you make it as a vanilla sheet cake, a chocolate version, or decorate it in bold school colors, it’s the kind of celebration sheet cake that feels special without stressing you out.
If you try it, I’d love to hear how you decorated it for your graduate. Leave a comment, share your favorite school-color combo, or save this recipe for your next graduation party cake or family celebration.