Would you like to save this?
Graduation Cupcakes Recipe
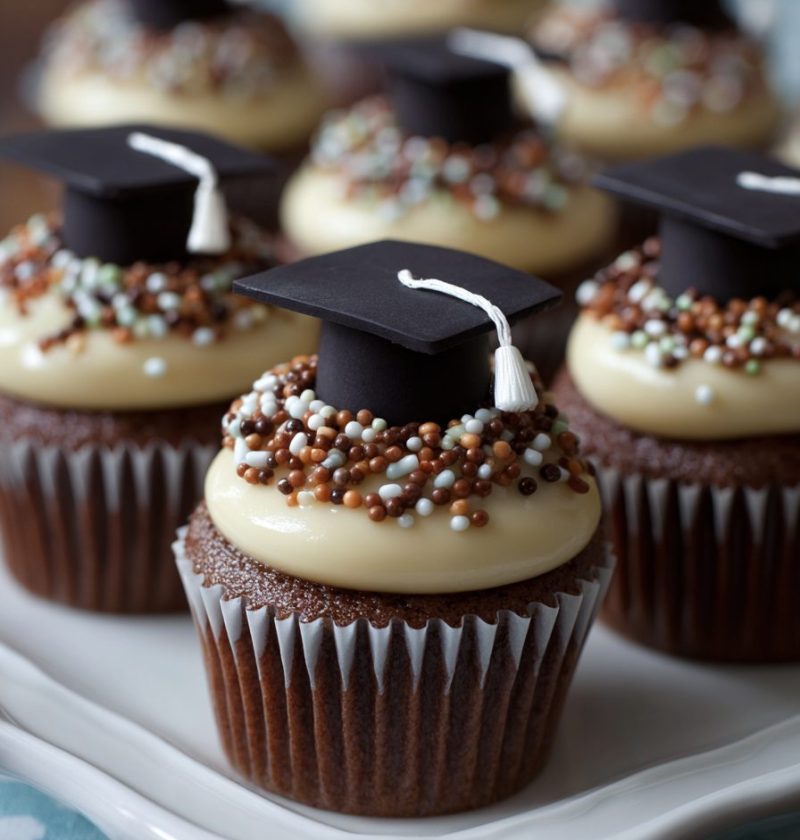
If you need a festive, foolproof Graduation Cupcakes Recipe that looks bakery-pretty but feels totally doable at home, these charming cupcakes are it. They’re soft, celebratory, easy to decorate, and perfect for graduation parties, dessert tables, and sweet little moments that deserve a round of applause.
A Sweet Way to Celebrate the Big Day
There’s something so heartwarming about a tray of homemade graduation cupcakes sitting on the counter while family and friends gather around, snapping photos and telling stories about how fast the years flew by. I’ve made these for high school graduations, college parties, and even a nursing school pinning celebration, and every single time they disappear faster than you’d think. That’s always the sign of a good graduation dessert, isn’t it?
This graduation cupcake recipe starts with a tender vanilla cupcake base, though I’ll also share chocolate options because, let’s be honest, some folks are firmly on Team Chocolate. What makes these graduation party cupcakes so special is the decoration: simple frosting swirls, sprinkles in school colors, and adorable graduation cap toppers made with easy-to-find candies and cookies. They look festive and polished, but you don’t need professional piping skills or a pastry degree. Thank goodness.
And while these are definitely a celebration treat, they’re also practical. The recipe is make-ahead friendly, easy to scale, and versatile enough for different school colors, themes, and flavor preferences. If you’re planning a party menu, this is one of those party dessert ideas that checks all the boxes—cute, portable, and easy to serve.
Why You’ll Love This Recipe
- Perfect for graduation parties, dessert tables, and gift boxes
- Easy to customize with school colors and themed decorations
- Uses simple pantry staples you may already have on hand
- Soft, fluffy cupcakes with a reliable homemade texture
- Works beautifully as vanilla cupcakes or chocolate cupcakes
- Make-ahead friendly for less party-day stress
- Kid-friendly to decorate if you want a family baking moment
- Looks impressive without complicated techniques
- Great for large gatherings and easy to double
- Turns into adorable graduation cap cupcakes with minimal effort
Ingredients
For the vanilla cupcakes:
- 1 1/2 cups all-purpose flour
- 1 1/2 teaspoons baking powder
- 1/4 teaspoon fine salt
- 1/2 cup unsalted butter, softened
- 1 cup granulated sugar
- 2 large eggs, room temperature
- 2 teaspoons pure vanilla extract
- 1/2 cup whole milk, room temperature
For the chocolate buttercream:
- 1 cup unsalted butter, softened
- 3 1/2 cups powdered sugar, sifted
- 1/2 cup unsweetened cocoa powder
- 3 to 4 tablespoons whole milk or heavy cream
- 1 teaspoon vanilla extract
- Pinch of salt
For decorating:
- 24 mini peanut butter cups or chocolate squares
- 24 chocolate wafer cookies or square chocolate-covered graham crackers
- 1 tube black decorating gel or melted chocolate
- Candy pearls or mini candies for tassels
- Sprinkles in school colors
- Optional: gold sanding sugar, edible glitter, or letter toppers
Substitution notes:
- Use a 1:1 gluten-free baking flour if needed; King Arthur and Bob’s Red Mill both work well in cupcakes.
- Swap whole milk for buttermilk if you want a slightly softer crumb.
- If peanut allergies are a concern, skip the peanut butter cups and use flat chocolate candies or marshmallows for the cap base.
- Want a quicker version? A high-quality boxed cupcake recipe base can be used, then dress it up with homemade frosting and toppings. No shame in that game.
Ingredient tips:
- Room-temperature eggs, milk, and butter help the batter mix more evenly.
- Use good vanilla extract here because the flavor really comes through.
- Sift the cocoa and powdered sugar for smoother frosting—less fuss later.

How to Make Graduation Cupcakes
-
Prep the oven and pan.
Preheat your oven to 350°F. Line a 12-cup muffin pan with cupcake liners; you’ll likely need 2 batches or 2 pans for 24 cupcakes. If you’re matching school colors, now’s the time to use themed liners. It’s a small touch, but it makes these celebration cupcakes feel extra special. -
Mix the dry ingredients.
In a medium bowl, whisk together the flour, baking powder, and salt. This helps distribute the leavening evenly so your homemade cupcakes rise nicely and don’t bake up lopsided. -
Cream the butter and sugar.
In a large mixing bowl, beat the softened butter and sugar for 2 to 3 minutes until light and fluffy. Don’t rush this step. It’s one of those little baking habits that makes a big difference in texture. -
Add the eggs and vanilla.
Beat in the eggs one at a time, then stir in the vanilla extract. If the mixture looks a tiny bit curdled, don’t worry. Once the flour goes in, it will smooth out. -
Finish the batter.
Add half the dry ingredients, then the milk, then the remaining dry ingredients. Mix just until combined. Overmixing is the enemy of tender cupcakes, so stop when you no longer see streaks of flour. -
Fill and bake.
Divide the batter evenly among the liners, filling each about two-thirds full. Bake for 18 to 20 minutes, or until the tops spring back lightly and a toothpick comes out clean. Let the cupcakes rest in the pan for 5 minutes, then transfer them to a cooling rack. -
Make the chocolate buttercream.
Beat the butter until creamy. Add the powdered sugar and cocoa powder gradually, then mix in the vanilla, salt, and 3 tablespoons of milk. Beat until fluffy. If it feels too thick, add another tablespoon of milk. You want it soft enough to pipe, but not so loose that it slides around. -
Frost the cooled cupcakes.
Once the cupcakes are fully cool, frost them with a piping bag fitted with a large star tip, or simply spread the frosting with an offset spatula. A generous swirl gives that classic bakery look and leaves room for the topper. -
Make the graduation caps.
Attach a mini peanut butter cup or chocolate square to the center of a chocolate wafer cookie using a dab of decorating gel or melted chocolate. Let it set for a minute or two. Add a candy pearl or sprinkle tassel on top with a little extra gel. They’re surprisingly cute—almost too cute to eat. Almost. -
Decorate and serve.
Place one graduation cap topper on each cupcake. Finish with sprinkles in school colors, a dusting of sanding sugar, or a tiny icing detail if you’re feeling creative. Set them out on a platter and watch everyone smile.
Servings & Timing
- Yield: 24 cupcakes
- Prep Time: 30 minutes
- Bake Time: 18 to 20 minutes
- Cooling & Decorating Time: 35 minutes
- Total Time: About 1 hour 25 minutes
For party planning, this timing works well if you bake the cupcakes the night before and decorate them the next day.
Variations to Make Them Your Own
- Chocolate version: Replace the vanilla cupcake base with your favorite chocolate cupcake batter for rich, classic chocolate cupcakes.
- School spirit cupcakes: Tint vanilla buttercream with school colors and top with matching sprinkles.
- Confetti style: Fold rainbow sprinkles into the batter for a funfetti-style festive cupcake center.
- Lemon vanilla twist: Add 1 tablespoon lemon zest to the batter for a bright, springy flavor.
- Mini cupcake version: Make bite-sized graduation celebration treats for larger dessert tables.
- Filled cupcakes: Add a spoonful of chocolate ganache or vanilla pudding to the center for a bakery-style surprise.
Storage & Reheating
Store the finished cupcakes in an airtight container at room temperature for up to 2 days, or in the refrigerator for up to 4 days. If your kitchen runs warm—as mine certainly does in late May—refrigeration is the safer bet.
For the best texture, let chilled cupcakes sit at room temperature for 20 to 30 minutes before serving. Cold buttercream is firm, and cupcakes taste better when they’ve had a chance to soften slightly.
To freeze, place unfrosted cupcakes in a freezer-safe container for up to 2 months. Thaw overnight in the fridge or on the counter for a couple of hours before frosting. You can also make the frosting ahead and refrigerate it for up to 3 days; just re-whip before using.
Make-ahead advice:
- Bake cupcakes 1 day ahead
- Make frosting 2 to 3 days ahead
- Assemble graduation cap toppers 1 day ahead
- Fully decorate a few hours before serving for the freshest look
Notes From My Kitchen
I tested this recipe a few different ways, and here’s what stood out. Whole milk gave the cupcakes a softer, richer crumb than reduced-fat milk. Not dramatic, but noticeable. Also, I found that a medium frosting swirl holds the graduation cap cupcakes better than an extra-tall swirl. Tall swirls look pretty, sure, but they can tilt under the weight of the topper.
If you’re serving these outdoors, keep them out of direct sun. Buttercream starts to soften quickly, especially on warm spring afternoons. If that’s your setup, a shaded dessert table or a short refrigerator break before serving helps a lot.
And one more thing—don’t stress over making every topper identical. A few little quirks actually make them look homemade in the nicest possible way. That’s part of the charm.
FAQs
Can I use a boxed cake mix for this graduation cupcake recipe?
Yes, absolutely. If you’re short on time, use a boxed mix for the cupcakes and make the frosting and decorations from scratch for that homemade feel.
What’s the best frosting for graduation party cupcakes?
Chocolate buttercream works beautifully because it complements both vanilla and chocolate cupcakes, and it pairs well with the graduation cap decorations.
Can I make these cupcakes a day ahead?
Yes. Bake the cupcakes the day before, then frost and decorate the next day, or decorate them fully a few hours before the party.
How do I keep the graduation cap toppers from sliding off?
Use a stable frosting swirl and press the topper on gently. If your frosting is very soft, chill the cupcakes for 10 to 15 minutes first.
Can I make mini graduation cupcakes instead of regular size?
You can. Bake mini cupcakes for about 10 to 12 minutes and use smaller candy pieces for the topper so the proportions look right.
What are the best colors for decorated cupcakes at a graduation party?
School colors are always a hit, but black, gold, silver, and white also make elegant graduation themed dessert options.
Can I make these nut-free?
Yes. Replace the mini peanut butter cups with nut-free chocolates, marshmallows, or flat candy pieces for the cap base.
Which flavor is more popular for graduation celebration treats—vanilla or chocolate?
Vanilla tends to be the most crowd-friendly choice, but a mixed tray of vanilla cupcakes and chocolate cupcakes usually gets the best response at parties.
Conclusion
This Graduation Cupcakes Recipe is cheerful, dependable, and exactly the kind of dessert that makes a milestone feel even sweeter. With soft homemade cupcakes, creamy frosting, and easy cap toppers, they’re a lovely choice for any graduation gathering, big or small.
If you make these, I’d love to hear how they turned out for you. Leave a comment with your school colors, your favorite decoration twist, or the flavor you chose—and if you’re planning the full menu, be sure to check out more graduation dessert and party dessert ideas for your celebration table.