Would you like to save this?
Dutch Oven Camping Recipe: A Cozy One-Pot Meal for the Campfire
There’s nothing quite like a hearty Dutch Oven Camping Recipe bubbling away over a campfire—simple ingredients, big flavor, and a whole lot of memory-making around the picnic table.
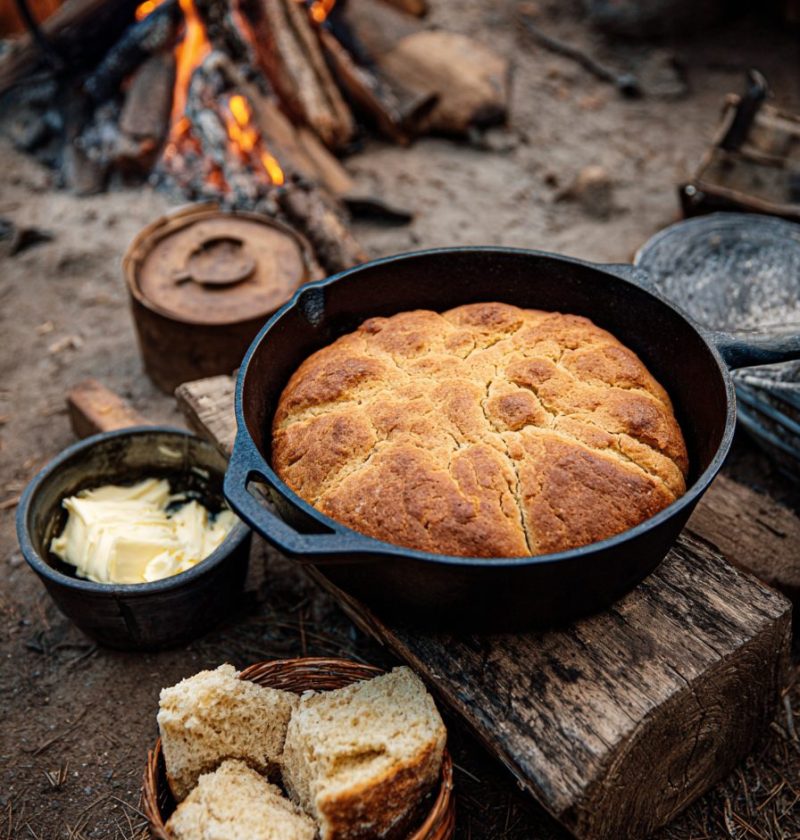
I’ve been camping with my family for over 30 years—tents, pop-up campers, hand-me-down RVs, you name it. Through all those summers and chilly fall weekends, one thing has stayed the same: my trusty cast iron Dutch oven and our tradition of a big, comforting campfire meal on the first night. This particular camping Dutch oven recipe is a one-pot, stick-to-your-ribs chicken, veggie, and potato stew that works just as well at a state park in Colorado as it does in your backyard fire pit on a Wednesday.
It’s simple, flexible, and forgiving—exactly what you want when you’re cooking outdoors with a headlamp on and kids asking, “Is dinner ready yet?” every five minutes. And because it’s a full one pot camping meal, cleanup is easy, so you can get back to stargazing and s’mores.
What Makes This Dutch Oven Camping Recipe So Special?
This Dutch Oven Camping Recipe is a rustic chicken and vegetable campfire stew made in a cast iron Dutch oven right over hot coals. Think tender chicken thighs, buttery potatoes, carrots, onions, garlic, and herbs simmered together in a flavorful broth until everything is soft, saucy, and perfect for soaking up with crusty bread.
It’s one of those outdoor Dutch oven cooking recipes that feels timeless—like something your grandparents might’ve made on a fishing trip, but with a few modern touches to keep it lighter and a bit healthier. We’re not using any canned cream soups here (nothing wrong with them, just not this time); instead, we build flavor with aromatics, herbs, and a splash of broth and cream at the end if you want it richer.
Why do I reach for this recipe again and again when we go camping?
- It uses affordable, sturdy ingredients that travel well.
- It works for gluten-free eaters with one small tweak.
- It’s family-friendly and picky-eater approved.
- It reheats beautifully over the fire the next day.
Honestly, this is the kind of campfire dutch oven meal I pull out for our first cool-weather camp of the season. When the nights start getting crisp in September or October, this hits the spot in a way hot dogs just can’t.
Why You’ll Love This Recipe
You know what? Sometimes you just want camping food that tastes like you actually tried—but doesn’t ask much of you. Here’s why this Dutch Oven Camping Recipe is so beloved around here:
- Truly one pot – Protein, veggies, and potatoes all cook in the same Dutch oven; hardly any dishes.
- Campfire or grill friendly – Works over charcoal, wood coals, or even on a camp stove if you don’t feel like managing a fire.
- Simple ingredients – Uses pantry basics like potatoes, carrots, onions, and broth—great for last-minute camping trips.
- Flexible and forgiving – Swap veggies, use different herbs, or make it dairy-free; it still turns out great.
- Perfect for family camping – Mild flavors, cozy texture, and a “stew” vibe that kids and grown-ups usually love.
- Meal prep friendly – You can pre-chop almost everything at home and toss it together at the campsite.
- Feeds a crowd – Scales easily for 6–8 people; just use a bigger cast iron dutch oven.
- Budget-friendly – Chicken thighs, root veggies, and broth give you a hearty meal without breaking the bank.
- Reliable outdoor dutch oven cooking – Designed with camping variables in mind: uneven heat, changing temperatures, and distracted cooks.
Ingredients for Your Dutch Oven Camping Recipe
This recipe serves about 4–6 people, depending on how hungry your campers are and whether you serve it with bread or salad.
You can absolutely prep all the chopping at home and stash everything in labeled zip-top bags in your cooler. That’s my favorite trick for dutch oven camp cooking when we roll into camp later in the day and I don’t want to start from zero.
Main Ingredients
- 2 tablespoons olive oil (or vegetable oil, avocado oil—whatever you like for high heat)
- 2–2½ pounds boneless, skinless chicken thighs, cut into large chunks
(Thighs stay juicy with campfire cooking; you can use chicken breasts, but watch they don’t overcook.) - 1½ teaspoons kosher salt, divided
(Use less if you’re using table salt; it’s “saltier.”) - ½ teaspoon freshly ground black pepper
- 1 large yellow onion, chopped (about 1½ cups)
(White onion works if that’s what you have.) - 3 cloves garlic, minced
(Jarred minced garlic is fine for camping—just keep it cold.) - 4 medium carrots, peeled and chopped into ½-inch pieces
- 1½ pounds baby potatoes, halved
(Yukon Gold, red, or any waxy potato that holds shape well.) - 2 stalks celery, sliced
(Adds lovely flavor—skip if you really dislike it.) - 1 teaspoon dried thyme
(Or 2 teaspoons fresh, chopped.) - 1 teaspoon dried rosemary, crushed between your fingers
(Helps release the oils and flavor.) - 1 teaspoon smoked paprika
(Adds a subtle smoky flavor that plays nicely with the campfire.) - 3 cups low-sodium chicken broth
(I like Better Than Bouillon paste for camping—saves cooler space.) - 1 tablespoon Worcestershire sauce
(Adds depth; use gluten-free if needed.) - 1 bay leaf (optional but lovely)
Finishing Touches (Optional but Recommended)
- ¼–½ cup heavy cream or half-and-half
(Makes it more like a creamy stew. Skip for dairy-free.) - 2 tablespoons butter
(Stirred in at the end for richness and shine.) - 2 tablespoons fresh parsley, chopped, for garnish
(Adds color and freshness at the picnic table.)
Simple Substitutions & Tweaks
- Dairy-free: Skip the cream and butter; add a splash of extra broth if it seems too thick.
- Gluten-free: Most ingredients are naturally gluten-free; just make sure your Worcestershire and broth are certified gluten-free.
- Vegetarian version: Swap chicken for drained canned chickpeas or white beans and use vegetable broth; reduce cook time a bit so veggies stay tender but not mushy.
- Low-sodium: Use low-sodium broth and season gradually, tasting near the end.
Directions: How to Cook This Dutch Oven Camping Recipe Over the Fire
You can cook this on a grill, camp stove, or over campfire dutch oven coals. I’ll describe the campfire/charcoal method first, then give a quick note for stove-top.
Before you start, set your cast iron dutch oven (5–7 quart) near the fire so it warms slightly. Not screaming hot, just gently warmed—it helps prevent sticking.
1. Get Your Coals Ready
Arrange a good bed of hot coals—either charcoal briquettes or wood coals that have burned down to glowing embers.
You’ll want:
- A layer of coals under the Dutch oven
- Another batch of coals ready to place on the lid
Think medium heat: if you can hold your hand near the coals for 3–4 seconds, that’s about right.
2. Season the Chicken
In a large bowl (or directly in a gallon zip-top bag at home), toss:
- Chicken chunks
- About 1 teaspoon salt
- Black pepper
You can add a sprinkle of smoked paprika here too if you’d like more flavor on the chicken itself.
3. Sear the Chicken
- Add the oil to the warmed Dutch oven and place it over the bed of coals. Let the oil get hot—you should see a light shimmer.
- Add the chicken in a single-ish layer. Don’t fuss too much; camp cooking is casual.
- Brown for about 3–4 minutes per side, just until you see some color. You’re not fully cooking it yet.
- Remove the chicken to a bowl or plate. It’s fine if it’s a little undercooked at this stage; it’ll finish in the stew.
If the bottom is getting too dark, move a few coals away. Outdoor heat control is part science, part patience.
4. Sauté the Aromatics
- In the same pot, add the chopped onion and a pinch of salt. Stir and cook for 3–5 minutes, until softened and starting to turn golden at the edges.
- Stir in the garlic and cook another 30 seconds–1 minute, just until fragrant (don’t let it burn).
If things are sticking, add a splash of broth and scrape up those brown bits—that’s flavor.
5. Add Veggies, Herbs, and Seasoning
Stir in:
- Carrots
- Potatoes
- Celery
- Thyme
- Rosemary
- Smoked paprika
- Remaining ½ teaspoon salt
Toss to coat the veggies in the onion, garlic, and herbs. This step builds big flavor for your camping dutch oven recipe.
6. Add Liquids and Chicken
Pour in:
- Chicken broth
- Worcestershire sauce
Give it a good stir, then nestle the browned chicken (and any juices) back into the pot. Add the bay leaf.
You want the broth to mostly cover the vegetables and chicken; if it seems too dry, add up to ½ cup extra water or broth.
7. Simmer Over Coals
- Cover the Dutch oven with its lid.
- Move some hot coals on top of the lid—this gives you gentle all-around heat, like an outdoor oven.
- Let the stew simmer for about 30–40 minutes, rotating the Dutch oven every 10–15 minutes so it cooks evenly.
You should see gentle bubbling when you lift the lid, not a roaring boil. If it’s too vigorous, remove some coals from the bottom or top.
You’ll know it’s ready when:
- Potatoes are fork-tender
- Carrots are soft but not falling apart
- Chicken is cooked through and very tender
8. Finish with Cream and Butter (Optional but Lovely)
Once everything’s tender:
- Remove the Dutch oven from most of the coals so it doesn’t keep boiling hard.
- Stir in the heavy cream (start with ¼ cup and add more if you like it creamier).
- Add the butter and stir until melted.
Taste and adjust seasoning—this is important. Outdoors, our taste buds sometimes need a touch more salt.
9. Garnish and Serve
Sprinkle chopped parsley over the top just before serving.
We love this ladled into deep camping bowls with:
- Crusty bread or baguette slices
- A simple green salad (bagged salad works great at a campsite)
- Or just on its own around the fire, sleeves rolled down against the evening chill
Servings & Timing
- Yield: Serves 4–6 people
- Prep Time: 20 minutes (faster if you pre-chop at home)
- Cook Time: 35–45 minutes over coals
- Total Time: About 1 hour
Quick Note for Stove or Grill
- Camp stove or home stove: Follow the same steps over medium heat, then cover and simmer gently for 25–30 minutes.
- Gas or charcoal grill: Place the Dutch oven over indirect medium heat with the lid on, stirring occasionally until everything is tender.
Variations: Make This Dutch Oven Camping Recipe Your Own
This is where the fun starts. Outdoor dutch oven camp cooking is so flexible, and this base recipe makes a great canvas:
- Sausage & Potato Version – Swap the chicken for sliced smoked sausage or kielbasa and reduce cook time slightly.
- Southwest Style – Add a can of drained black beans, a can of fire-roasted tomatoes, 1 teaspoon chili powder, and ½ teaspoon cumin.
- Creamy Mushroom Twist – Add 8 ounces sliced mushrooms with the onions and finish with extra cream for a richer stew.
- Lemon Herb Light Version – Skip the cream and butter, and add the zest and juice of 1 lemon plus extra fresh herbs at the end.
- Veggie-Packed Camp Stew – Toss in green beans, peas, or corn during the last 10 minutes of cooking so they stay bright.
- Cold-Weather Comfort – Stir in ½ cup grated sharp cheddar at the very end for an ultra-comforting, cheesy finish.
Storage & Reheating (Yes, Even at a Campsite)
One of my favorite things about this family camping recipe is how good the leftovers are. The flavors deepen overnight.
Storing
- At the campsite:
- Let the stew cool slightly, then store leftovers in a tightly sealed container in your cooler with plenty of ice. Use within 1–2 days.
- At home:
- Store in an airtight container in the fridge for up to 4 days.
- You can freeze it for up to 2–3 months (skip the cream if you know you’ll freeze; add it when reheating).
Reheating
- Campfire or camp stove:
- Add a splash of broth or water, then reheat gently over medium-low heat, stirring often to prevent scorching.
- At home:
- Warm on the stovetop over medium-low or in the microwave in 1–2 minute bursts, stirring between.
Make-Ahead Tips
- Pre-chop all veggies and freeze in a large zip-top bag.
- Season and freeze the chicken at home; it’ll help keep your cooler cold on the drive.
- Bring bouillon paste instead of boxed broth to save space and weight.
Notes from the Campfire: What I’ve Learned
After making this kind of outdoor dutch oven cooking recipe more times than I can count, here are a few little lessons:
- Don’t fear the coals, just respect them. It’s easier to add heat than to rescue scorched food; start with fewer coals and increase if needed.
- Cut veggies evenly. Potatoes and carrots about the same size cook more predictably, especially outdoors.
- Taste at the end. Campfire food sometimes needs an extra pinch of salt or herbs because the smoky air sort of “thickens” the flavors.
- Bring a thick towel or leather gloves. Dutch oven handles get seriously hot, and I’ve sacrificed more than one dishtowel to the cause.
- Give it a few minutes to rest. Just like at home, letting the stew sit off the heat for 5 minutes allows the flavors to settle and the sauce to thicken slightly.
And maybe the most important note? Don’t stress. Camping meals are as much about the experience as the recipe. If the bottom gets a bit too brown, call it “extra rustic” and pass the bread.
FAQs About This Dutch Oven Camping Recipe
1. Can I use a different meat instead of chicken?
Yes—smoked sausage, pork shoulder (cut small), or even beef stew meat work well, but beef and pork may need a bit more cooking time until tender.
2. What size Dutch oven should I use?
A 5–7 quart cast iron dutch oven is ideal for 4–6 people; if you’re cooking for a bigger crew, use a larger pot or make a double batch in two Dutch ovens.
3. Can I make this recipe without a campfire?
Absolutely—you can cook it on a gas grill, camp stove, or regular kitchen stove; just keep the heat to a gentle simmer.
4. How do I keep food from burning on the bottom?
Use moderate heat (not raging flames), stir occasionally, and make sure there’s enough broth; if it starts to stick, move the pot off the hottest coals and add a splash of liquid.
5. Is this an easy camping recipe for beginners?
Yes, it’s very beginner-friendly; the steps are simple, and the stew is forgiving if your timing or heat is slightly off.
6. Can I add pasta or rice to this?
You can, but add them near the end; small pasta shapes or parboiled rice can be stirred in for the last 10–15 minutes with extra broth so they don’t soak up everything and dry the stew.
7. How long can I leave leftovers out at the campsite?
Try not to leave cooked food out for more than 1–2 hours; cool it down and get it back into the cooler as soon as it’s no longer steaming hot.
8. Do I need to season my cast iron before making this?
If your Dutch oven is already well-seasoned, you’re good; if it’s new, give it a light coat of oil and a slow heat-up at home before your trip to build that nonstick layer.
Wrapping It Up: A Campfire Classic You’ll Make Again
This Dutch Oven Camping Recipe really checks all the boxes: cozy, hearty, customizable, and perfect for sharing around a fire after a long day outside. It leans on simple ingredients, classic rustic campfire cooking technique, and a little patience with the coals—and rewards you with a meal that feels like a hug in a bowl.
If you give this camping dutch oven recipe a try on your next trip, I’d love to hear how it went—did you tweak the veggies, make it creamier, add sausage? Leave a comment, share your campfire stories, or explore more of my easy camping recipes next. Happy camping, and save me a seat by the fire.
Dutch Oven Campfire Chicken, Potato, and Vegetable Stew
Ingredients
- 2 tablespoons olive oil or vegetable or avocado oil, for high heat
- 2-2.5 pounds boneless skinless chicken thighs cut into large chunks
- 1.5 teaspoons kosher salt divided; use a bit less if using table salt
- 0.5 teaspoon black pepper freshly ground
- 1 large yellow onion chopped, about 1½ cups; white onion is fine
- 3 cloves garlic minced; jarred minced garlic is fine if kept cold
- 4 medium carrots peeled and chopped into ½-inch pieces
- 1.5 pounds baby potatoes halved; Yukon Gold, red, or other waxy potatoes
- 2 stalks celery sliced; can be omitted if desired
- 1 teaspoon dried thyme or 2 teaspoons fresh, chopped
- 1 teaspoon dried rosemary crushed between fingers to release oils
- 1 teaspoon smoked paprika adds subtle smoky flavor
- 3 cups low-sodium chicken broth bouillon paste and water works well for camping
- 1 tablespoon Worcestershire sauce use gluten-free if needed
- 1 bay leaf optional but adds nice flavor
- 0.25-0.5 cup heavy cream or half-and-half optional; for a creamier stew, skip for dairy-free
- 2 tablespoons butter stirred in at the end for richness
- 2 tablespoons fresh parsley chopped, for garnish
- extra broth or water up to ½ cup, if stew looks too dry
Instructions
- Place a 5–7 quart cast iron Dutch oven near the campfire or heat source so it gently warms. Prepare a medium bed of hot coals or embers: a layer under the Dutch oven and a separate batch ready for the lid. Aim for medium heat—if you can hold your hand near the coals for 3–4 seconds, it’s about right.
- In a large bowl or zip-top bag, combine the chicken thigh chunks with about 1 teaspoon of the kosher salt and all of the black pepper. Toss to coat evenly. You can add a pinch of smoked paprika here for extra flavor if you like.2-2.5 pounds boneless skinless chicken thighs, 1.5 teaspoons kosher salt, 0.5 teaspoon black pepper, 1 teaspoon smoked paprika
- Add the olive oil to the warmed Dutch oven and set it over the bed of coals. When the oil is hot and shimmering, add the seasoned chicken in a fairly even layer. Brown for about 3–4 minutes per side until you see good color, but do not cook through completely. Transfer the browned chicken to a bowl or plate and set aside. If the bottom of the pot is getting too dark, pull a few coals away to reduce the heat.2 tablespoons olive oil, 2-2.5 pounds boneless skinless chicken thighs
- In the same pot, add the chopped onion along with a pinch of the remaining salt. Cook, stirring occasionally, for 3–5 minutes until the onion softens and begins to turn golden at the edges. Stir in the minced garlic and cook for 30 seconds to 1 minute, just until fragrant. If anything starts to stick, add a splash of broth and scrape up the browned bits from the bottom.1 large yellow onion, 3 cloves garlic, 1.5 teaspoons kosher salt, 3 cups low-sodium chicken broth
- Stir the carrots, baby potatoes, and celery into the onion and garlic mixture. Add the thyme, rosemary, smoked paprika, and the remaining salt. Toss well so the vegetables are coated in the aromatics and seasonings. This step builds deep flavor for the stew.4 medium carrots, 1.5 pounds baby potatoes, 2 stalks celery, 1 teaspoon dried thyme, 1 teaspoon dried rosemary, 1 teaspoon smoked paprika, 1.5 teaspoons kosher salt
- Pour in the chicken broth and Worcestershire sauce, stirring to combine. Return the browned chicken and any accumulated juices to the pot, nestling the pieces down into the liquid and vegetables. Add the bay leaf. The broth should mostly cover the chicken and vegetables; if it looks too dry, add up to ½ cup of extra broth or water.2-2.5 pounds boneless skinless chicken thighs, 3 cups low-sodium chicken broth, 1 tablespoon Worcestershire sauce, 1 bay leaf, extra broth or water
- Cover the Dutch oven with its lid. Arrange hot coals on top of the lid to create gentle all-around heat. Let the stew simmer for 30–40 minutes, rotating the Dutch oven every 10–15 minutes for even cooking. You want a gentle simmer, not a hard boil; if it’s bubbling too vigorously, remove some coals from under or on top. The stew is done when the potatoes are fork-tender, the carrots are soft but not falling apart, and the chicken is cooked through and tender.
- When everything is tender, move the Dutch oven off most of the coals to reduce the heat. Stir in ¼ cup of heavy cream or half-and-half, adding up to ½ cup total if you prefer a creamier stew. Add the butter and stir until melted and incorporated. Taste and adjust seasoning with additional salt or pepper if needed—food often needs a touch more seasoning outdoors.0.25-0.5 cup heavy cream or half-and-half, 2 tablespoons butter, 1.5 teaspoons kosher salt, 0.5 teaspoon black pepper
- Remove the bay leaf. Let the stew rest off the heat for about 5 minutes to thicken slightly. Sprinkle with chopped fresh parsley just before serving. Ladle into bowls and serve hot on its own or with crusty bread and a simple green salad alongside.1 bay leaf, 2 tablespoons fresh parsley
- To cook on a camp stove or home stove, follow the same steps over medium heat. After adding the liquids and chicken, cover and simmer gently for 25–30 minutes until vegetables and chicken are tender. For a gas or charcoal grill, place the Dutch oven over indirect medium heat with the lid on, stirring occasionally until everything is cooked through.