Would you like to save this?
I remember the first time I made these treats; it was a rainy afternoon, and my siblings and I were looking for something fun to do indoors. We rummaged through the pantry and decided to experiment with our favorite ingredients. The result was these irresistible cups that quickly became a family favorite. They are perfect for any occasion, from family gatherings to school bake sales, or simply as a treat to enjoy while watching a movie. The best part? They are so easy to make that even kids can get involved in the process.
Let’s dive into the recipe and discover how you can create these delightful Chocolate Peanut Butter Rice Krispie Cups in your own kitchen.
Ingredients
3 cups of Rice Krispies cereal
1 1/2 cups of chocolate chips (vegan chocolate chips also work!)
1 cup of chunky peanut butter
6 tablespoons of honey
1/8 teaspoon of salt
Instructions
Step 1: Prepare Your Muffin Tin
Start by lining a muffin tin with paper or silicone liners. This step ensures that the cups do not stick to the tin, making them easier to handle and serving them much more convenient.
Step 2: Melt the Peanut Butter Mixture
In a medium saucepan over low heat, gently melt 1 cup of chunky peanut butter along with 6 tablespoons of honey and 1/8 teaspoon of salt. Stir continuously until the mixture is smooth and well combined. This process should take about 3-5 minutes. Be careful not to overheat the mixture to avoid burning the honey or the peanut butter.
Step 3: Combine with Rice Krispies
Once the peanut butter mixture is smooth, remove the saucepan from the heat. Immediately stir in 3 cups of Rice Krispies cereal. Mix thoroughly to ensure each piece of cereal is nicely coated with the peanut butter mixture. This will form the base of your cups, providing a delicious, crunchy foundation.
Step 4: Form the Cups
Spoon the peanut butter and Rice Krispies mixture into the prepared muffin tin. Use the back of a spoon or your fingers to press the mixture down gently, forming the shape of cups. Make sure to pack the mixture firmly so that the cups hold their shape once set. This step might get a bit sticky, but it’s crucial for creating the perfect cup shape.
Step 5: Melt the Chocolate
In a separate saucepan, melt 1 1/2 cups of chocolate chips over low heat. Stir continuously until the chocolate is completely smooth and melted. You can also melt the chocolate in a microwave by heating it in 30-second intervals, stirring in between until fully melted. If you’re using vegan chocolate chips, this step works just the same.
Step 6: Fill the Cups with Chocolate
Carefully spoon the melted chocolate over each of the Rice Krispie bases in the muffin tin. Fill them up to the top, ensuring an even layer of chocolate on each cup. The chocolate will create a delicious, smooth topping that contrasts beautifully with the crunchy base.
Step 7: Chill to Set
Place the muffin tin in the refrigerator and chill for at least 1 hour. This allows the chocolate to set and the cups to firm up. If you’re in a hurry, you can place the tin in the freezer for about 30 minutes to speed up the process. Ensure the cups are fully set before removing them from the liners.
Step 8: Serve and Enjoy
Once the chocolate has set and the cups are firm, remove them from the muffin tin and peel off the liners. Your Chocolate Peanut Butter Rice Krispie Cups are now ready to be enjoyed! Store any leftovers in an airtight container in the refrigerator to keep them fresh and crisp.
Variations and Substitutions
This recipe is highly adaptable, allowing you to make several variations to suit different tastes and dietary needs:
Nut-Free Option: Replace peanut butter with sunflower seed butter or any other nut-free spread to make the recipe safe for those with nut allergies.
Sweetener Substitution: Use maple syrup or agave nectar instead of honey for a slightly different flavor and to make the recipe vegan.
Chocolate Variety: Try using dark chocolate, white chocolate, or even a combination of chocolates for a unique twist.
Add-Ins: Mix in some chopped nuts, dried fruit, or mini marshmallows into the Rice Krispies mixture for added texture and flavor.
Flavor Boost: Add a teaspoon of vanilla extract to the peanut butter mixture for an extra layer of flavor.
Conclusion
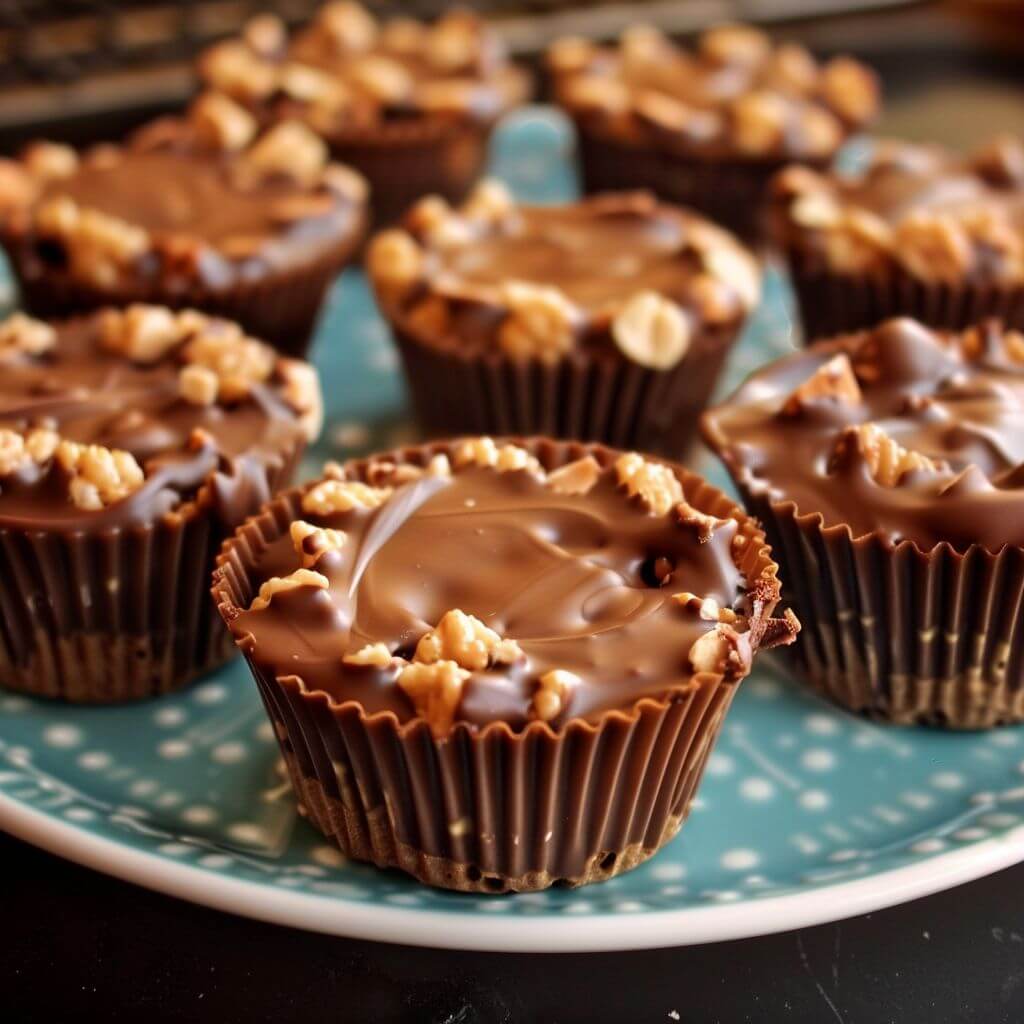
These Chocolate Peanut Butter Rice Krispie Cups are a delightful treat that brings together the beloved flavors of chocolate and peanut butter with the fun, crunchy texture of Rice Krispies. They are incredibly easy to make, requiring no baking and minimal preparation time, which makes them perfect for a quick dessert or a fun project with kids. The versatility of the recipe allows for numerous variations, ensuring that you can customize the cups to your liking or dietary requirements.
Not only are these cups delicious, but they also offer a bit of nostalgia and comfort, reminding many of us of our favorite childhood snacks. The combination of creamy, gooey peanut butter, rich chocolate, and crispy cereal creates a symphony of textures and flavors that is sure to satisfy any sweet tooth.
So why not give this recipe a try? Whether you’re looking to impress at a party, treat your family to a special dessert, or simply indulge in a bit of self-care with a homemade treat, these Chocolate Peanut Butter Rice Krispie Cups are sure to bring joy and satisfaction. Enjoy the process of making them, and most importantly, savor every delicious bite!
Chocolate Peanut Butter Rice Krispie Cups
Chocolate Peanut Butter Rice Krispie Cups combine the classic flavors of chocolate and peanut butter with the satisfying crunch of Rice Krispies. These no-bake treats are easy to make and perfect for any occasion, offering a delightful mix of sweet, salty, and crispy in every bite.
- 3 cups Rice Krispies cereal
- 1 ½ cups chocolate chips (vegan chocolate chips also work)
- 1 cup chunky peanut butter
- 6 tablespoons honey
- â…› teaspoon salt
- Prepare Your Muffin Tin: Line a muffin tin with paper or silicone liners for easy removal of the cups.
- Melt the Peanut Butter Mixture: In a medium saucepan over low heat, melt 1 cup of chunky peanut butter, 6 tablespoons of honey, and â…› teaspoon of salt. Stir continuously until smooth and well combined, about 3-5 minutes.
- Combine with Rice Krispies: Remove the saucepan from heat and stir in 3 cups of Rice Krispies cereal. Mix thoroughly until all cereal is coated with the peanut butter mixture.
- Form the Cups: Spoon the peanut butter and Rice Krispies mixture into the prepared muffin tin, pressing down gently to form cup shapes. Ensure the mixture is packed firmly to hold its shape.
- Melt the Chocolate: In a separate saucepan, melt 1 ½ cups of chocolate chips over low heat, stirring continuously until smooth. Alternatively, melt the chocolate in the microwave in 30-second intervals, stirring between each interval.
- Fill the Cups with Chocolate: Spoon the melted chocolate over each Rice Krispie base in the muffin tin, filling to the top.
- Chill to Set: Place the muffin tin in the refrigerator and chill for at least 1 hour, or in the freezer for 30 minutes, until the chocolate is set and the cups are firm.
- Serve and Enjoy: Once set, remove the cups from the muffin tin and peel off the liners. Store any leftovers in an airtight container in the refrigerator.
For a nut-free version, substitute peanut butter with sunflower seed butter.

Chocolate Peanut Butter Rice Krispie Cups
Ingredients
- 3 cups Rice Krispies cereal
- 1 ½ cups chocolate chips vegan chocolate chips also work
- 1 cup chunky peanut butter
- 6 tablespoons honey
- ⅛ teaspoon salt
Instructions
- Prepare Your Muffin Tin: Line a muffin tin with paper or silicone liners for easy removal of the cups.
- Melt the Peanut Butter Mixture: In a medium saucepan over low heat, melt 1 cup of chunky peanut butter, 6 tablespoons of honey, and ⅛ teaspoon of salt. Stir continuously until smooth and well combined, about 3-5 minutes.
- Combine with Rice Krispies: Remove the saucepan from heat and stir in 3 cups of Rice Krispies cereal. Mix thoroughly until all cereal is coated with the peanut butter mixture.
- Form the Cups: Spoon the peanut butter and Rice Krispies mixture into the prepared muffin tin, pressing down gently to form cup shapes. Ensure the mixture is packed firmly to hold its shape.
- Melt the Chocolate: In a separate saucepan, melt 1 ½ cups of chocolate chips over low heat, stirring continuously until smooth. Alternatively, melt the chocolate in the microwave in 30-second intervals, stirring between each interval.
- Fill the Cups with Chocolate: Spoon the melted chocolate over each Rice Krispie base in the muffin tin, filling to the top.
- Chill to Set: Place the muffin tin in the refrigerator and chill for at least 1 hour, or in the freezer for 30 minutes, until the chocolate is set and the cups are firm.
- Serve and Enjoy: Once set, remove the cups from the muffin tin and peel off the liners. Store any leftovers in an airtight container in the refrigerator.

