Would you like to save this?
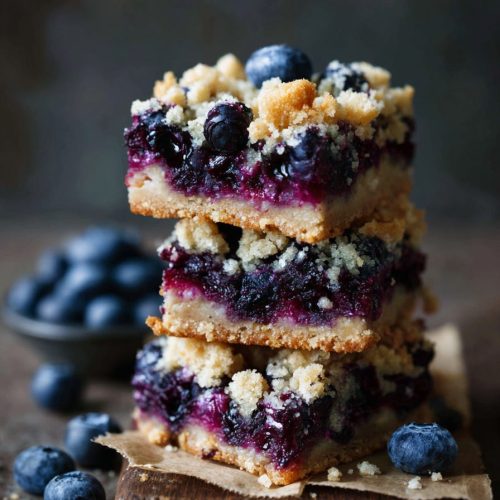
Blueberry Crumb Bars Recipe
This Blueberry Crumb Bars Recipe gives you buttery crumb crust, juicy blueberries, and a golden oat crumble on top—all in one easy, slice-and-serve dessert bar.
A Cozy Blueberry Bar Dessert for Any Season
These blueberry crumb bars are everything I love about a summer blueberry pie, but baked in a simple pan and cut into neat little squares. Think of them as a cross between a blueberry Cookie bar and a blueberry shortbread base, with a jammy center and a crisp, buttery crumb topping.
I started making these years ago when my kids were little and I didn’t have the patience for rolling pie crust. One pan, one base that doubles as the topping, and a juicy layer of fresh blueberries in the middle—done. These homemade blueberry bars have been my go-to “bring a dessert” recipe ever since: church potlucks, Fourth of July picnics, block parties, and every summer barbecue in between.
They’re especially lovely during peak blueberry season, when fresh berries are cheaper and sweeter. But you know what? This blueberry crumb bar recipe works beautifully with frozen berries too, so you can enjoy a fresh blueberry dessert feel even in February.
Nutritionally, blueberries bring in a bit of fiber and antioxidants (always a nice bonus in a treat), and the oats in the crumble add a touch of hearty texture. Are these health food? No. Are they comforting, sharable, and satisfying? Absolutely.
Let me explain why this pan of blueberry crumb squares might become your new “house dessert.”
Why You’ll Love This Blueberry Crumb Bars Recipe
- Easy, no-fuss layers – One dough serves as both the blueberry shortbread base and the crumb topping, so you’re not juggling three different mixtures.
- Works with fresh or frozen berries – Use fresh blueberries in summer or frozen when they’re out of season; both give you a juicy blueberry bar dessert.
- Perfect make-ahead treat – These bars cut better once they cool, and the flavor gets even better the next day.
- Crowd-friendly and portable – Great for potlucks, picnics, school events, bake sales, or a “drop it off on the porch” treat for neighbors.
- Freezer-friendly – Homemade blueberry bars freeze well, so you can bake once and enjoy blueberry crumb squares later.
- Simple pantry ingredients – Butter, flour, oats, sugar, berries—nothing fancy or hard to track down.
- Easily adaptable – Use mixed berries for a berry crumb bar recipe, add lemon, or tweak the sweetness to your taste.
- Texture heaven – Buttery crumb crust, soft jammy center, and a crisp, golden blueberry oat crumble on top.
Ingredients You’ll Need
You don’t need anything fancy here—just a few pantry staples and plenty of blueberries.
For the buttery crumb crust & blueberry shortbread base:
- 2 cups (250 g) all-purpose flour – Spoon and level so it’s not packed; too much flour makes the crust dry.
- 1 cup (200 g) granulated sugar – Regular white sugar keeps the bars sweet and crisp.
- 1/2 teaspoon baking powder – Gives the crumb a lightness so it’s not dense.
- 1/4 teaspoon fine sea salt – Balances the sweetness; table salt works too, just use a scant 1/4 teaspoon.
- 1 cup (2 sticks / 226 g) unsalted butter, cold and cubed – Cold butter is key for a crumbly, shortbread-style base.
- 1 large egg – Helps bind the crumbs for a sturdy base that doesn’t fall apart.
- 1 teaspoon pure vanilla extract – Adds a cozy, bakery-style flavor.
For the blueberry filling:
- 3 cups (about 450–500 g) blueberries – Fresh or frozen; if using frozen, don’t thaw.
- 1/2 cup (100 g) granulated sugar – Adjust up or down depending on how sweet your berries are.
- 2 tablespoons cornstarch – Thickens the juices into a blueberry jam–like layer.
- 1 tablespoon lemon juice – Brightens the flavor and balances the sweetness.
- 1 teaspoon lemon zest (optional but lovely) – Adds a gentle citrus aroma and “fresh” flavor.
For the blueberry crumb topping (added texture):
Technically, this is just part of the base dough, but a few extras make the topping special:
- 1/2 cup (50 g) old-fashioned rolled oats – Stirred into part of the crumb for a rustic blueberry oat crumble.
- 2 tablespoons brown sugar (light or dark) – Adds caramel notes and deeper flavor to the crumb topping.
- 1/4 teaspoon ground cinnamon (optional) – Gives a cozy, bakery-style warmth.
If you prefer a smoother blueberry crumb topping without oats, you can skip the oats and cinnamon and just use the plain crumb mixture for top and bottom.

Ingredient Tips & Substitutions
- Flour: A 1:1 gluten-free baking flour blend usually works well if you need gluten-free blueberry crumb bars—just choose a blend meant for baking.
- Butter: Salted butter is fine; reduce the added salt slightly. I usually still add a pinch because it sharpens the flavor.
- Sugar: You can replace up to half the white sugar in the crust with light brown sugar for a slightly chewier texture.
- Blueberries: You can use a mix of berries (blueberries, raspberries, blackberries) for a mixed summer blueberry bars vibe; keep the total amount the same.
- Cornstarch: Arrowroot starch or tapioca starch can stand in, though the filling may look a bit different.
Step-by-Step Directions
These blueberry crumb squares come together in three simple parts: make the crumb mixture, mix the berries, then assemble and bake.
1. Preheat and prep your pan
Preheat your oven to 350°F (175°C). Grease a 9×13-inch baking pan with butter or nonstick spray, then line it with parchment paper, leaving some overhang for easy lifting later. Grease the parchment lightly too.
2. Mix the dry ingredients for the base
In a large bowl, whisk together the flour, sugar, baking powder, and salt. Make sure everything is well combined so the flavor and leavening are even throughout the crust and crumb.
3. Cut in the cold butter
Add the cold, cubed butter to the dry ingredients. Using a pastry cutter, two knives, or your fingertips, cut the butter into the flour mixture until it looks like coarse crumbs—some pieces the size of peas, some smaller. You want that classic crumb texture, not a smooth dough.
4. Add egg and vanilla
Lightly beat the egg with the vanilla, then drizzle it over the crumb mixture. Toss with a fork until the mixture is moistened and clumpy. It should still be crumbly, but you should be able to press it together and have it hold.
5. Set aside the topping portion
Measure out about 1 1/2 cups of this crumb mixture and place it in a separate bowl—this will become your blueberry crumb topping. To that smaller bowl, add the rolled oats, brown sugar, and cinnamon (if using). Stir gently. This little extra step gives your topping that pretty golden, textured finish.
6. Press the base into the pan
Pour the remaining larger portion of crumb mixture into your prepared pan. Use your hands or the bottom of a measuring cup to press it firmly and evenly across the bottom. Try to get into the corners so the blueberry filling doesn’t run underneath.
7. Mix the blueberry filling
In a medium bowl, gently stir together the blueberries, sugar, cornstarch, lemon juice, and lemon zest. If you’re using frozen berries, work quickly so they don’t start to thaw and bleed too much color. The berries should be lightly coated and glossy.
8. Layer the blueberries over the base
Scatter the blueberry filling evenly over the pressed crust. Try to get good coverage so every bar has a nice juicy blueberry center, but don’t stress if there are small gaps—that jammy filling spreads as it bakes.
9. Add the crumb topping
Sprinkle the oat-enriched crumb mixture evenly over the berries. Some larger clumps and some smaller crumbs give the classic blueberry crumb bars look. Don’t pack it down; just let it sit on top.
10. Bake until golden and bubbly
Bake on the middle rack for 40–45 minutes, or until:
- The top is light golden brown.
- You see the blueberry filling bubbling around the edges and maybe in a few spots in the center.
If your oven runs hot, begin checking around 35 minutes. If the top browns too fast before the filling bubbles, tent loosely with foil.
11. Cool completely before cutting
This part is important. Let the pan cool on a wire rack for at least 2–3 hours. The filling thickens and sets as it cools; cutting too soon gives you messy, collapsing bars. Once cool, use the parchment overhang to lift the whole slab out and cut into squares or rectangles.
Servings & Timing
- Yield: About 16–20 blueberry crumb bars, depending on how large you cut them
- Prep Time: 20–25 minutes
- Bake Time: 40–45 minutes
- Cool Time: At least 2 hours (longer is even better for clean slices)
- Total Time: About 3 hours, most of it hands-off
I know that cool time feels long, but it’s what gives you those neat, bakery-style blueberry crumb squares instead of a pile of delicious blueberry rubble.
Variations on These Blueberry Crumb Squares
If you’re like me, once you love a base recipe, you start tinkering. Here are some fun twists that work well:
- Lemon-Blueberry Crumb Bars: Add an extra tablespoon of lemon zest to the filling and a teaspoon of lemon zest to the crust for a brighter flavor.
- Mixed Berry Crumb Bars: Replace half the blueberries with raspberries, blackberries, or chopped strawberries for a mixed berry crumb bar recipe.
- Cinnamon Sugar Top: Sprinkle an extra tablespoon of cinnamon sugar over the topping before baking for a bakery-style finish.
- Almond Blueberry Bars: Stir 1/2 teaspoon almond extract into the crust mixture and sprinkle sliced almonds over the crumb topping before baking.
- Gluten-Free Blueberry Bars: Use a cup-for-cup gluten-free flour blend and make sure your oats are certified gluten-free.
- Blueberry Jam Bars: Spread 1–1 1/4 cups of good-quality blueberry jam over the base (instead of fresh berries) for a quick blueberry jam bars version when you’re short on fruit.
Storage, Freezing & Make-Ahead Tips
One reason I love this blueberry crumb bar recipe is how well it behaves a day or two later.
Room temperature:
- Once fully cooled, you can keep the bars at room temperature for up to 2 days, covered tightly.
- If your kitchen is very warm or humid, I prefer the fridge after the first day.
Refrigerator:
- Store cut bars in an airtight container, layered with parchment if needed, for up to 5 days.
- The crumb topping may soften a bit after a couple of days, but the flavor stays great.
Freezer:
- For longer storage, freeze the bars. Place cut bars on a baking sheet and freeze until solid, then transfer to a freezer bag or airtight container.
- They keep well for up to 2–3 months.
- To serve, thaw in the fridge overnight or on the counter for 30–60 minutes. They taste great chilled too.
Make-ahead:
- You can bake these a day ahead for parties or gatherings. The bars slice cleaner on day two, and the flavors meld nicely.
- If you’re really planning ahead, you can assemble the crust and topping a few hours earlier, keep them in the fridge, then add the blueberry filling and bake closer to serving time.
Notes From My Kitchen
- Pan choice matters: A metal 9×13 pan tends to brown the crust and topping more evenly than glass. If you use glass, you may need a few extra minutes of baking, but watch closely.
- Juicy berries aren’t a problem: If your blueberries are very juicy (especially after a heavy rain or if they’re very ripe), you can add an extra teaspoon of cornstarch. Don’t overdo it, or the filling can get gummy.
- Sugar tweaks: If you prefer a less sweet, more “fruit-forward” bar, reduce the sugar in the filling to 1/3 cup and the crust sugar to 3/4 cup. I wouldn’t go much lower or the texture may suffer.
- Clean cuts: For neat slices, chill the fully cooled bars in the fridge for 1–2 hours, then cut with a sharp knife, wiping between cuts. I do this when I want them to look pretty for a party tray.
- Serving ideas: These blueberry bar desserts are lovely on their own, but I’ve also served them slightly warmed with a scoop of vanilla ice cream or a dollop of whipped cream. Instant “fancy dessert.”
- Scaling the recipe: For a smaller batch, you can halve all ingredients and bake in an 8×8-inch pan. Start checking for doneness around 30–35 minutes.
You know what? I’ve tested this recipe with a few different oven brands over the years—mine, my sister’s in Texas, my daughter’s tiny college apartment oven—and the bars are pretty forgiving. If they look golden on top and the filling is bubbling, you’re in good shape.
FAQs About Blueberry Crumb Bars Recipe
Can I use frozen blueberries for this Blueberry Crumb Bars Recipe?
Yes, frozen blueberries work very well; use them straight from the freezer and add them to the filling without thawing so they don’t leak too much liquid.
How do I know when the blueberry crumb bars are done baking?
The blueberry crumb topping should be light golden brown, and you should see the blueberry filling bubbling around the edges; that bubbling is a sign the cornstarch has activated and thickened the juices.
My bars seem too soft in the center—did I do something wrong?
Most of the time, they just need more baking or more cooling time. If the center is very soft and wet, bake a bit longer; if it’s just tender, let them cool fully and they’ll firm up.
Can I make these blueberry crumb bars dairy-free?
Yes—use a good-quality vegan butter stick (not spread) in place of regular butter; keep everything else the same and watch the baking time since some plant butters brown faster.
Can I cut the sugar for a healthier version?
You can reduce the sugar slightly in both the crust and filling, but keep some sugar in each for texture and structure. If you cut too much, the crust may turn tough and the filling may not set nicely.
What’s the difference between these and blueberry pie bars?
Blueberry pie bars often have a softer, more cake-like base, while these blueberry crumb squares lean more toward a buttery shortbread and crunchy crumble on top.
Can I use other fruits besides blueberries?
Yes, this base recipe works well with raspberries, blackberries, diced peaches, or a mixed berry blend; keep the fruit amount the same and adjust sugar a bit if your fruit is very tart or very sweet.
Do these travel well for potlucks or picnics?
They’re excellent travel treats. Chill them first, cut into bars, and pack them in a lidded container with parchment between layers so they don’t stick.
Final Thoughts
These blueberry crumb bars are the kind of dessert that feels right at home on a picnic blanket, a holiday dessert table, or a quiet Sunday afternoon with a cup of coffee. They bring together a buttery crumb crust, jammy berries, and a golden oat topping in one pan-friendly, sharable treat.
Give this Blueberry Crumb Bars Recipe a try the next time you spot a good deal on blueberries—or when that craving for a fresh blueberry dessert hits. When you do, I’d love to hear how it went for you: share your tweaks, tag your photos, or compare notes with other bakers. And if you enjoy these, you might also like exploring other crumb bar recipes, like Strawberry or mixed berry versions, using this same cozy base.
Blueberry Crumb Bars
Ingredients
- 2 cups all-purpose flour about 250 g; spoon and level so it’s not packed
- 1 cup granulated sugar about 200 g, for crust and base
- 1/2 teaspoon baking powder
- 1/4 teaspoon fine sea salt or a scant 1/4 teaspoon table salt
- 1 cup unsalted butter cold and cubed; 2 sticks / about 226 g
- 1 large egg lightly beaten
- 1 teaspoon pure vanilla extract
- 3 cups blueberries about 450–500 g; fresh or frozen (do not thaw if frozen)
- 1/2 cup granulated sugar about 100 g, for blueberry filling
- 2 tablespoons cornstarch for thickening the blueberry juices
- 1 tablespoon lemon juice freshly squeezed, if possible
- 1 teaspoon lemon zest optional but recommended
- 1/2 cup old-fashioned rolled oats about 50 g; for the crumb topping
- 2 tablespoons brown sugar light or dark; for crumb topping
- 1/4 teaspoon ground cinnamon optional; for crumb topping
Instructions
- Preheat your oven to 350°F (175°C). Grease a 9×13-inch baking pan with butter or nonstick spray, then line it with parchment paper, leaving some overhang on the long sides for easy lifting. Lightly grease the parchment as well.
- In a large bowl, whisk together the all-purpose flour, 1 cup granulated sugar, baking powder, and fine sea salt until evenly combined.2 cups all-purpose flour, 1 cup granulated sugar, 1/2 teaspoon baking powder, 1/4 teaspoon fine sea salt
- Add the cold, cubed unsalted butter to the dry ingredients. Using a pastry cutter, two knives, or your fingertips, cut the butter into the flour mixture until it resembles coarse crumbs with some pea-sized pieces.1 cup unsalted butter
- In a small bowl, lightly beat the egg with the vanilla extract. Drizzle this over the crumb mixture and toss with a fork until the crumbs are moistened and clumpy. The mixture should still be crumbly but hold together when pressed.1 large egg, 1 teaspoon pure vanilla extract
- Measure out about 1 1/2 cups of the crumb mixture and transfer it to a separate bowl. This will be the topping. Add the rolled oats, brown sugar, and ground cinnamon (if using) to this bowl and stir gently to combine.1/2 cup old-fashioned rolled oats, 2 tablespoons brown sugar, 1/4 teaspoon ground cinnamon
- Pour the remaining larger portion of crumb mixture into the prepared baking pan. Using your hands or the bottom of a measuring cup, press it firmly and evenly into the bottom of the pan, making sure to reach the corners so the blueberry filling won’t seep underneath.
- In a medium bowl, gently combine the blueberries, 1/2 cup granulated sugar, cornstarch, lemon juice, and lemon zest (if using) until the berries are evenly coated and glossy. If using frozen blueberries, work quickly and do not thaw them first.3 cups blueberries, 1/2 cup granulated sugar, 2 tablespoons cornstarch, 1 tablespoon lemon juice, 1 teaspoon lemon zest
- Scatter the blueberry filling evenly over the pressed crust, spreading the berries out so each bar will have a generous blueberry layer.
- Sprinkle the oat-enriched crumb topping evenly over the blueberries. Leave it loose and crumbly rather than pressing it down; a mix of larger clumps and smaller crumbs gives the best texture.
- Bake on the middle rack for 40–45 minutes, or until the top is light golden brown and the blueberry filling is bubbling around the edges and in a few spots toward the center. If the topping is browning too quickly, tent the pan loosely with foil.
- Place the pan on a wire rack and let the bars cool completely for at least 2–3 hours so the filling can set. Once fully cooled, use the parchment overhang to lift the slab from the pan and cut into 16–20 bars. For extra neat slices, chill the cooled bars in the refrigerator for 1–2 hours before cutting.