Would you like to save this?
Banana Pudding Poke Cake Recipe
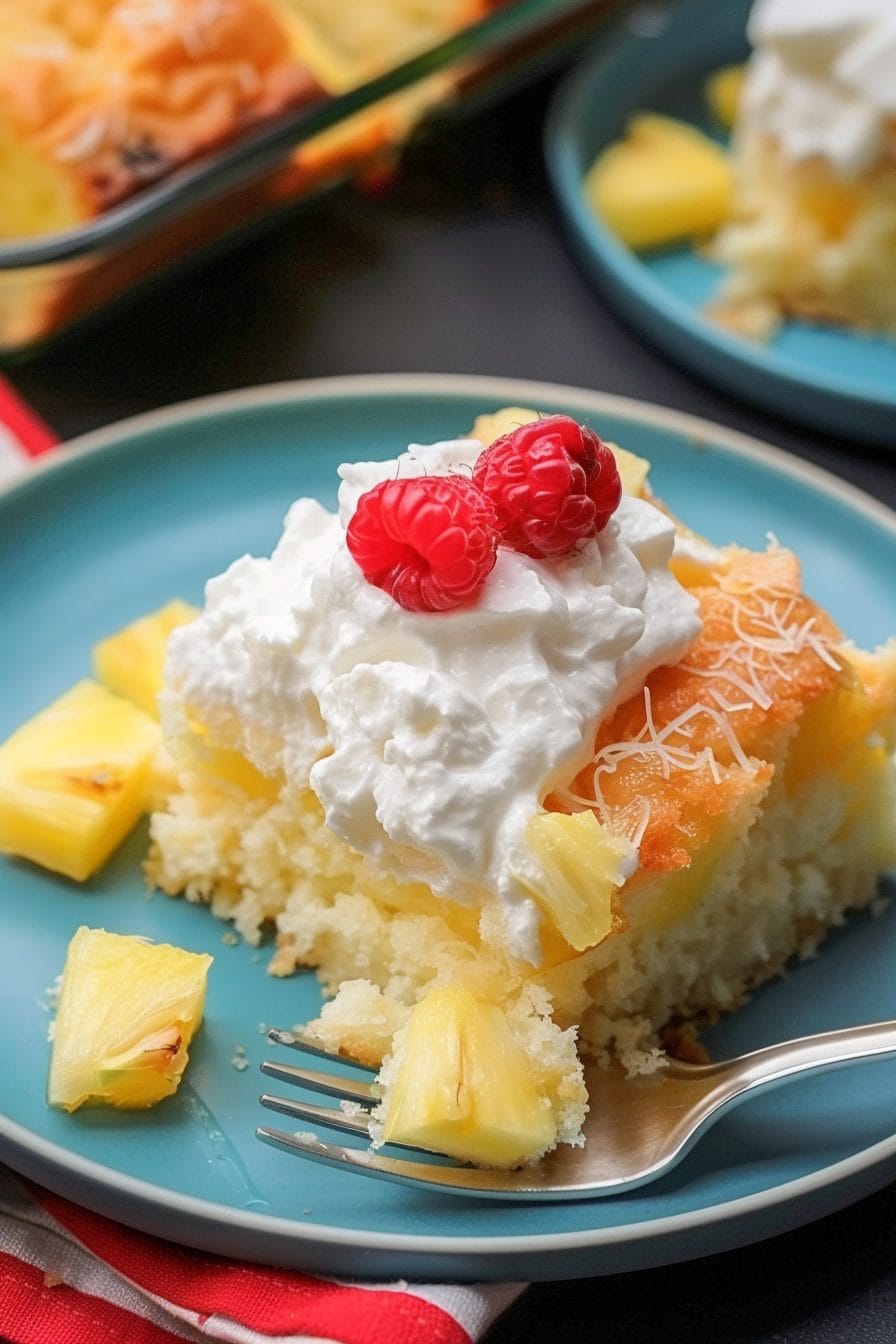
If you love classic southern banana pudding and you love an easy poke cake, this Banana Pudding Poke Cake Recipe is the creamy, crowd-pleasing dessert you’ve been looking for—layers of moist banana cake, silky banana pudding filling, vanilla wafers, and fluffy whipped topping in one pan.
This banana pudding poke cake brings together everything I grew up with at church potlucks here in the States: a box cake mix, instant pudding, plenty of sliced bananas, and a big scoop of Cool Whip on top. It’s a family-friendly dessert that feels nostalgic and comforting, but it’s also simple enough for a busy weeknight or make-ahead potluck dessert recipe. And if you’re trying to stretch your time and your budget, this easy poke Cake Recipe checks both boxes without making you pull out every bowl in your kitchen.
Full Recipe Introduction
Let me explain what you’re getting with this Banana Pudding Poke Cake Recipe.
Imagine a soft, moist banana poke cake baked in a 9×13 pan. While it’s still warm, you poke deep holes through the cake and pour over creamy banana pudding, so it sinks into every nook and cranny. Then you layer on fresh bananas, a cloud of whipped topping, and a crunchy vanilla wafer crust or topping. Every bite tastes like classic banana pudding and tender cake had a very delicious baby.
Banana pudding itself is a southern banana dessert staple—vanilla wafers, bananas, pudding, and whipped topping. My spin turns it into a layered banana cake that slices beautifully, travels well, and tastes even better on day two. That makes it perfect for holidays, cookouts, game days, baby showers, or honestly, Tuesday nights when you just want something sweet in the fridge.
Is it healthy? Well, it’s still dessert—but there are a few ways it can lean lighter: using skim or 2% milk, sugar-free pudding mix, or reduced-fat whipped topping. The bananas add natural sweetness and potassium, and because it’s rich and creamy, a small square usually satisfies that craving.
You know what I love most? This recipe is incredibly forgiving. Boxed cake mix dessert recipes are consistently some of the most searched for online, especially around Easter, Mother’s Day, and Christmas. Poke cakes are right up there too, because they’re almost impossible to mess up. If you’re newer to baking, this is one of those “win on your first try” cakes.
It’s also a great make ahead banana cake. I often bake the cake in the morning, pour on the banana pudding filling in the afternoon, and then finish with whipped topping before bed. By the next day, it slices like a dream and the flavors have settled in so nicely.
Here’s what it looks like when it all comes together:

Why You’ll Love This Banana Pudding Poke Cake Recipe
- Super easy, minimal effort – Uses a boxed cake mix and instant pudding, so it’s very beginner-friendly.
- Moist and creamy every time – Poking the cake lets the banana pudding soak in for a consistently moist banana cake layer.
- Perfect potluck dessert recipe – Bakes in a 9×13 pan and feeds a crowd; great for parties, church, or office gatherings.
- Make-ahead friendly – Actually tastes better after chilling; ideal when you don’t want to be baking last minute.
- Family-friendly dessert – Kids love the banana pudding cake flavor and adults get all the nostalgic southern vibes.
- Customizable – Easy to turn into a lighter, richer, or more decadent version with simple tweaks.
- Cheap pantry ingredients – Cake mix, pudding mix, vanilla wafers, and bananas—nothing fancy or hard to find.
- Beautiful layers – That layered banana cake effect with pudding and whipped topping looks impressive when sliced.
- Versatile for seasons – Great for spring and summer potlucks, but cozy enough for holiday gatherings too.
Ingredients for Banana Pudding Poke Cake
Here’s everything you need for this creamy banana pudding cake. I’ll share a few substitution tips as we go, since I know we don’t always have every brand or item on hand.
For the Cake Layer
- 1 box yellow cake mix (about 15.25 oz; white or butter cake mix also works)
- Ingredients listed on your cake mix box
- Usually: 3 large eggs
- 1/2 cup vegetable oil (can use melted butter for richer flavor)
- 1 cup water (I like to use whole or 2% milk instead for a more tender, moist banana cake)
Tip: If you want more banana flavor baked in, you can mix in 1 mashed ripe banana to the batter and reduce the water or milk by 1/4 cup.
Optional Vanilla Wafer Crust (or Topping Base)
If you want a true vanilla wafer crust to support the cake, add this layer. If not, just sprinkle wafers on top later.
- 2 cups finely crushed vanilla wafers (about 60–70 wafers; Nilla Wafers are classic)
- 4 tablespoons unsalted butter, melted
- 2 tablespoons granulated sugar (optional, for extra crunch and sweetness)
For the Banana Pudding Filling
- 2 boxes instant banana pudding mix (3.4 oz each – you can use 1 banana + 1 vanilla if banana is too strong)
- 4 cups very cold milk
- Whole or 2% milk makes the creamiest pudding and helps it set thicker.
- 3–4 medium ripe bananas, sliced (look for bright yellow with just a few brown specks)
Tip: Cold milk is key. If the milk is warm, the pudding won’t thicken properly and your poke cake can turn soupy.
For the Whipped Topping Layer
- 1 container (8 oz) frozen whipped topping, thawed (Cool Whip or store brand)
- Or about 3 cups lightly sweetened homemade whipped cream
- 1–1 1/2 cups crushed vanilla wafers, for garnish
- Extra banana slices, for serving (optional; add right before serving so they don’t brown)
Step-by-Step Directions
This Banana Pudding Poke Cake Recipe comes together in a few simple stages: bake, poke, pour, chill, top. Take your time on the first run, and you’ll see how easy it really is.
1. Preheat and Prep the Pan
- Preheat your oven to 350°F (175°C).
- Lightly grease a 9×13-inch baking pan with nonstick spray or a thin coating of butter.
- If you’re worried about sticking, you can also line the bottom with parchment paper, but it’s not usually necessary.
2. Make the Vanilla Wafer Crust (Optional but Delicious)
- In a medium bowl, mix 2 cups crushed vanilla wafers, melted butter, and sugar (if using) until the crumbs are evenly coated and look like wet sand.
- Press the mixture firmly into the bottom of your prepared pan using the bottom of a measuring cup or clean hands.
- Bake the crust for 8 minutes, then set it aside to cool for about 5 minutes while you mix the cake batter.
- This quick bake helps the vanilla wafer crust hold together and adds a wonderful toasty flavor.
If you’d rather skip the crust, you can just sprinkle some crushed wafers between the pudding and whipped topping later. It still gives that classic banana pudding crunch.
3. Prepare the Cake Batter
- In a large mixing bowl, prepare the yellow cake mix according to the package directions, using the eggs, oil, and water (or milk) as listed.
- For a more “bakery-style” moist banana cake, you can swap the water for milk and add an extra egg yolk.
- Beat on medium speed for 2 minutes, scraping down the sides of the bowl so everything mixes evenly.
- Pour the batter gently over the cooled vanilla wafer crust (or directly into the greased pan if you skipped the crust). Spread evenly with a spatula.
4. Bake the Cake
- Bake the cake at 350°F (175°C) for 25–30 minutes, or until the top is golden and a toothpick inserted in the center comes out clean or with a few moist crumbs.
- Set the pan on a cooling rack and let the cake cool for about 10–15 minutes. You want it warm but not piping hot when you poke the holes.
If the cake is too hot when you add the pudding, it can make the pudding runny. Warm is perfect; steaming is too hot.
5. Poke the Cake
- Use the handle of a wooden spoon, a thick straw, or something of similar size to poke holes all over the cake, about 1 inch apart.
- Poke almost all the way down to the bottom, especially if you used a vanilla wafer crust—you want the banana pudding filling to seep into the cake and just kiss that crust.
Don’t be shy with the pokes. Too few holes and the pudding won’t distribute well. Too many and the cake can get overly soggy. A nice even grid works well.
6. Mix the Banana Pudding
- In a large bowl, whisk together the instant banana pudding mix and cold milk for about 2 minutes, until thickened but still pourable.
- Instant pudding starts to thicken fast, so work steadily.
- Let the pudding sit for 1–2 minutes until it’s about the consistency of a thick custard—still fluid enough to pour, but not watery.
7. Pour Pudding Over the Cake
- Slowly pour the banana pudding over the entire surface of the warm cake, aiming to fill the holes first.
- Use a spatula to gently push pudding into the holes and spread it out in an even layer on top.
- You should see the pudding sinking into the cake; that’s what makes this a true banana poke cake.
8. Add the Banana Layer
- Arrange the sliced bananas evenly over the top of the pudding layer.
- You can overlap them slightly; just aim for a banana slice in every bite.
- If your kitchen is warm, place the pan in the fridge for about 15–20 minutes so the pudding starts to set before you add the whipped topping.
9. Chill, Then Add Whipped Topping
- Once the pudding has firmed up a bit, spread the thawed whipped topping in an even layer over the bananas.
- Sprinkle crushed vanilla wafers generously over the whipped topping for texture and that classic banana pudding cake look.
10. Chill Fully Before Serving
- Cover the pan with plastic wrap or a lid and refrigerate for at least 4 hours, or overnight for best results.
- This resting time lets the banana pudding filling sink in, the cake relax, and the flavors blend together.
- Slice into squares and serve chilled. For a pretty finish, you can add a fresh banana slice and a little extra crushed wafer to each serving right before bringing it to the table.
Servings & Timing
- Yield: About 12–16 servings (depending on how big you cut the squares)
- Prep Time: 20 minutes
- Bake Time: 25–30 minutes
- Chill Time: Minimum 4 hours (overnight is ideal)
- Total Time: About 4 hours 50 minutes, most of it hands-off chilling time
This makes a fantastic make-ahead banana cake. I often bake and assemble in the afternoon, chill overnight, and slice the next day for stress-free entertaining.
Fun Variations and Flavor Twists
If you’re like me, once you find a good base recipe, you start playing with it. Here are a few ways to customize this banana pudding poke cake:
- Chocolate Banana Pudding Poke Cake – Use a chocolate cake mix and chocolate pudding instead of banana for a chocolate-covered banana vibe.
- Caramel Banana Version – Drizzle caramel sauce over the warm cake before adding the pudding, or swirl dulce de leche into the pudding.
- Peanut Butter Banana Poke Cake – Whisk 1/3 cup creamy peanut butter into the pudding, or drizzle melted peanut butter over the cooled cake before pudding.
- Lighter Creamy Banana Dessert – Use sugar-free pudding mix, fat-free or light whipped topping, and 1% milk for a lower-calorie version.
- From-Scratch Layered Banana Cake – Use your favorite homemade banana cake recipe in the same 9×13 pan, and then follow the poke and pudding steps.
- Mini Trifle Cups – Bake the cake, then cube it and layer with pudding, bananas, and whipped topping in clear cups for individual desserts.
How to Store, Freeze, and Make Ahead
Because this is a creamy, dairy-based dessert with fresh fruit, storage matters. Here’s how to keep your banana pudding poke cake in good shape.
Refrigerator Storage
- Cover the pan tightly with plastic wrap, foil, or a tight-fitting lid.
- Store in the refrigerator for up to 3 days.
- The vanilla wafers will soften over time, giving that classic old-fashioned banana pudding texture.
Note: The bananas may start to brown a bit after day 2. It’ll still taste great, but for company, I like to serve it within 24–36 hours.
Freezer Storage
This one is a little tricky. Because of the pudding and bananas, freezing isn’t ideal, but here’s what you can do:
- If you must freeze, do it before adding fresh bananas on top.
- Wrap the pan well (plastic wrap + foil) and freeze for up to 1 month.
- Thaw overnight in the refrigerator, then add fresh sliced bananas and extra wafers just before serving.
The texture may be slightly softer after freezing, but it’s still a tasty whipped topping cake dessert.
Make-Ahead Tips
- You can bake the cake and poke it 1 day ahead, keep it covered at room temperature, and then add pudding and toppings the next day.
- For the best flavor and texture, assemble the full cake (including pudding and whipped topping) at least 4–8 hours before serving.
- Add any decorative banana slices on top right before serving to keep them fresh-looking.
Recipe Notes from My Kitchen
- Ripe but firm bananas are best. If they’re too soft and spotty, they’ll taste great but can turn mushy in the cake; bright yellow with a few brown freckles is ideal.
- Yellow cake mix vs. white cake mix. Yellow cake gives a richer, almost buttery flavor that pairs beautifully with banana pudding. White cake is a little lighter and lets the banana shine more. Both work.
- Pudding thickness matters. If you like a firmer, more structured creamy banana dessert, use slightly less milk—about 3 1/2 cups instead of 4.
- Don’t over-poke. Poking too many holes can make the cake collapse or get overly wet in spots; a neat grid about an inch apart is your sweet spot.
- Sweetness balance. Between the cake, pudding, and whipped topping, this is a sweet dessert. If you’re sensitive to that, you can use one banana pudding and one vanilla pudding, and skip the extra sugar in the vanilla wafer crust.
- Serving for a crowd. For big potlucks, I slice this banana poke cake into smaller squares and set out a bowl of extra crushed wafers so people can sprinkle more on top if they’d like some extra crunch.
Honestly, after testing this several times, the biggest “aha” moment for me was how much better it tastes the next day once everything has settled. So if you can, give it that overnight chill.
Frequently Asked Questions
Can I use homemade pudding instead of instant?
Yes, you can use homemade banana or vanilla pudding, as long as it’s fairly thick and cooled slightly before pouring; just be sure it’s still pourable so it seeps into the cake.
Can I use cook-and-serve pudding mix?
You can, but you’ll need to cook it according to the package directions, let it cool just a bit, and then pour it over the cake while it’s still warm and fluid.
My cake turned out soggy—what happened?
Most likely, the pudding was too thin (too much milk or not set enough) or the cake was still very hot; next time, let the cake cool 10–15 minutes and thicken the pudding a bit more before pouring.
How do I keep the bananas from turning brown?
Use fresh, just-sliced bananas and lightly brush them with lemon juice or pineapple juice; also, add any decorative banana slices on top right before serving.
Can I use a different cake flavor?
Absolutely—white, butter, French vanilla, or even spice cake will work, but yellow cake and banana pudding are the most classic combination for that southern banana dessert feel.
Can I halve this recipe?
Yes, bake half the batter in an 8×8 or 9×9 pan, use 1 box of pudding and 2 cups milk, and adjust the banana and topping amounts by roughly half.
Can I make this without Cool Whip?
You can use freshly whipped cream (whip heavy cream with a bit of powdered sugar and vanilla), but it’s best served within 24 hours since real whipped cream doesn’t hold as long as stabilized whipped topping.
How far ahead can I make this Banana Pudding Poke Cake Recipe?
It’s best within 24 hours of assembling, but you can make it up to 2 days ahead; just know the bananas may brown slightly and the vanilla wafers will be quite soft by then.
Conclusion
This Banana Pudding Poke Cake Recipe brings together everything comforting about a traditional banana pudding and everything easy about a boxed cake mix dessert. It’s moist, creamy, layered, and just fancy enough to impress, without asking you to spend all day in the kitchen.
If you try this banana pudding poke cake, I’d love to hear how it went—tell me in the comments who you shared it with and which variation you tried. And if you’re hooked on easy poke cake recipes now, you might also enjoy a chocolate poke cake or a strawberry shortcake poke cake next.

Banana Pudding Poke Cake
Ingredients
- 1 box yellow cake mix about 15.25 oz; white or butter cake mix also works
- 3 large eggs or as listed on cake mix box
- 1/2 cup vegetable oil or melted butter for richer flavor; or as listed on cake mix box
- 1 cup water or milk use whole or 2% milk instead of water for a more tender, moist cake; or as listed on cake mix box
- 1 medium ripe banana optional, mashed and mixed into batter; reduce water or milk by 1/4 cup if adding
- 2 cups vanilla wafers finely crushed, about 60–70 wafers, for optional crust
- 4 tablespoons unsalted butter melted, for optional vanilla wafer crust
- 2 tablespoons granulated sugar optional, for vanilla wafer crust
- 2 boxes instant banana pudding mix 3.4 oz each; you can use 1 banana + 1 vanilla pudding box if banana flavor is too strong
- 4 cups cold milk whole or 2% sets the pudding best; use 3 1/2 cups for a firmer set if desired
- 3-4 medium ripe bananas sliced; bright yellow with a few brown specks
- 1 container frozen whipped topping 8 oz, thawed (Cool Whip or similar) or about 3 cups lightly sweetened homemade whipped cream
- 1-1 1/2 cups vanilla wafers crushed, for topping
- extra banana slices optional, for serving; add right before serving to prevent browning
Instructions
- Preheat your oven to 350°F (175°C). Lightly grease a 9x13-inch baking pan with nonstick spray or a thin coating of butter. For extra insurance against sticking, you can line the bottom with parchment paper, but it’s usually not necessary.
- In a medium bowl, combine the finely crushed vanilla wafers (2 cups), melted butter, and granulated sugar (if using). Mix until the crumbs are evenly coated and resemble wet sand. Press the mixture firmly into the bottom of the prepared pan using the bottom of a measuring cup or your hands. Bake for 8 minutes, then set aside to cool for about 5 minutes while you mix the cake batter.2 cups vanilla wafers, 4 tablespoons unsalted butter, 2 tablespoons granulated sugar
- In a large mixing bowl, prepare the yellow cake mix according to the package directions, using the eggs, oil, and water (or milk) as listed. For a richer, more bakery-style cake, you can swap the water for milk and add an extra egg yolk if desired. If you want extra banana flavor, mix in 1 mashed ripe banana and reduce the water or milk by 1/4 cup. Beat the batter on medium speed for about 2 minutes, scraping down the sides of the bowl so everything mixes evenly.1 box yellow cake mix, 3 large eggs, 1/2 cup vegetable oil, 1 cup water or milk, 1 medium ripe banana
- Pour the cake batter gently over the cooled vanilla wafer crust (or directly into the greased pan if you skipped the crust). Spread it into an even layer with a spatula. Bake at 350°F (175°C) for 25–30 minutes, or until the top is golden and a toothpick inserted in the center comes out clean or with a few moist crumbs. Place the pan on a cooling rack and let the cake cool for about 10–15 minutes. The cake should be warm but not piping hot when you poke the holes.
- Using the handle of a wooden spoon, a thick straw, or a similar tool, poke holes all over the warm cake, spacing them about 1 inch apart. Poke almost all the way down to the bottom of the pan, especially if you used a vanilla wafer crust—you want the pudding to seep into the cake and reach the crust layer.
- In a large bowl, whisk together the instant banana pudding mix and cold milk for about 2 minutes, until the mixture thickens but is still pourable. Let it sit for 1–2 minutes until it reaches the consistency of a thick custard—fluid enough to pour into the holes but not watery.2 boxes instant banana pudding mix, 4 cups cold milk
- Slowly pour the pudding evenly over the surface of the warm, poked cake, aiming to fill the holes first. Use a spatula to gently push the pudding into the holes and spread any remaining pudding into an even layer over the top. You should see some pudding sinking down into the cake—that’s what creates the classic poke cake texture.
- Arrange the sliced bananas in an even layer over the pudding. Overlap them slightly if needed—aim for a bit of banana in every bite. If your kitchen is warm, place the pan in the refrigerator for 15–20 minutes so the pudding can begin to set before you add the whipped topping.3-4 medium ripe bananas
- Once the pudding has firmed up slightly, spread the thawed whipped topping in an even layer over the banana slices. Sprinkle the crushed vanilla wafers (for topping) generously over the whipped topping for added texture and that classic banana pudding look.1 container frozen whipped topping, 1-1 1/2 cups vanilla wafers
- Cover the pan tightly with plastic wrap or a lid and refrigerate for at least 4 hours, or overnight for best flavor and texture. When ready to serve, slice the cake into squares and serve chilled. If desired, garnish each serving with extra banana slices and a pinch of crushed wafers just before serving to keep the bananas from browning.extra banana slices
Notes
Freezing: For best results, freeze before adding the fresh banana slices on top. Wrap tightly in plastic wrap and foil and freeze for up to 1 month. Thaw overnight in the refrigerator, then add fresh banana slices and extra wafers before serving.
Tips: Use very cold milk for the pudding so it sets properly. If you prefer a firmer pudding layer, reduce the milk to about 3 1/2 cups total. Don’t over-poke the cake—a grid of holes about 1 inch apart is ideal. Yellow cake mix gives a richer flavor, while white cake mix lets the banana flavor stand out more.
Variations: Try chocolate cake and chocolate pudding for a chocolate-banana version; drizzle caramel over the warm cake before adding pudding for a caramel twist; or whisk 1/3 cup creamy peanut butter into the pudding for a peanut butter banana poke cake.