Would you like to save this?
Ingredients:
For the crust:
16 whole Oreo cookies, finely ground in a food processor
3 tablespoons melted butter
For the filling:
16 oz (2-8 oz packages) cream cheese
1/2 cup sugar
2 eggs
1 1/3 cups sour cream
3 tablespoons Bailey’s Irish Cream
1 teaspoon vanilla extract
6 ounces semi-sweet chocolate, melted and cooled slightly
For the ganache glaze:
4 ounces bittersweet chocolate, coarsely chopped
1/2 cup heavy cream
2 teaspoons light corn syrup
Instructions:
1. Prepare the Crust
Preheat your oven to 350°F (175°C).
In a bowl, combine the finely ground Oreo cookies and melted butter. Mix until the crumbs are evenly coated.
Spoon the mixture into 24 mini cheesecake cups. Press the crumbs firmly into the bottom of each cup to form a flat crust. A small cup or container can be useful for this task.
Partially bake the crusts for 10 minutes. Remove from the oven and set aside to cool slightly.
2. Make the Cheesecake Filling
In a large bowl, use a handheld or stand mixer to beat the cream cheese and sugar together until the mixture is light and fluffy.
Add the eggs one at a time, beating well after each addition.
Stir in the sour cream, Bailey’s Irish Cream, and vanilla extract until well combined.
Divide the batter into two portions. Pour or spoon the first portion into the cheesecake cups, filling each cup a little less than halfway.
Add the melted and slightly cooled semi-sweet chocolate to the remaining batter. Mix until fully incorporated.
Fill the cups with the chocolate batter, ensuring each cup is about three-quarters full.
3. Bake the Cheesecakes
Bake the cheesecakes in the preheated oven for 25-28 minutes, or until the centers are set.
Remove the cheesecakes from the oven and place them on a wire rack to cool.
4. Prepare the Ganache Glaze
While the cheesecakes are cooling, make the ganache glaze. In a heatproof bowl, combine the coarsely chopped bittersweet chocolate and light corn syrup.
In a small saucepan, heat the heavy cream over medium heat until it just begins to simmer.
Pour the hot cream over the chocolate mixture. Let it sit for a minute to melt the chocolate, then stir until smooth and glossy.
Allow the ganache to cool slightly before using.
5. Assemble the Cheesecakes
Once the cheesecakes have cooled completely, use a plastic knife to loosen the edges and remove them from the pan by pushing up on the removable bottoms.
Arrange the cheesecakes on a piece of waxed paper.
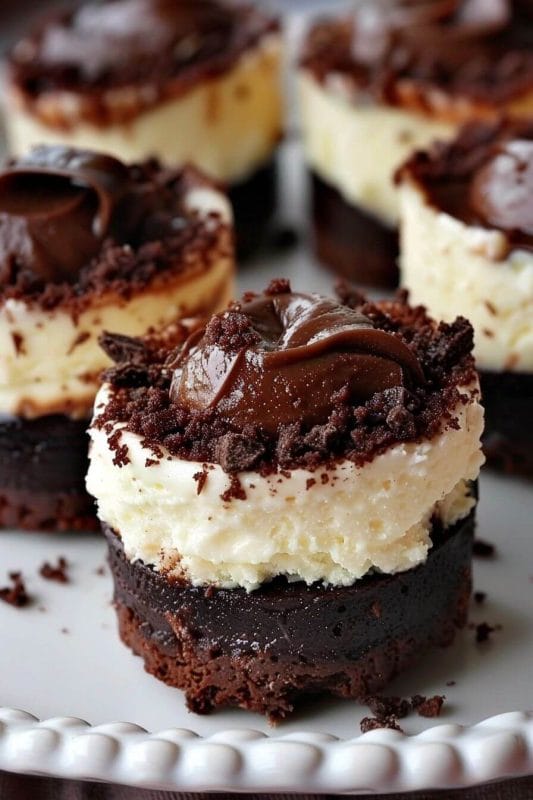
Spoon or pour the ganache glaze over the top of each cheesecake, allowing it to drip down the sides for a beautiful finish.
Variations and Substitutions:
Gluten-Free Option: Use gluten-free chocolate sandwich cookies instead of Oreos for the crust.
Alcohol-Free Version: Substitute Bailey’s Irish Cream with an equal amount of heavy cream and add a teaspoon of coffee extract for a rich flavor.
Different Flavors: Swap Bailey’s for other flavored liqueurs like Kahlua or Amaretto for a unique twist.
Toppings: Garnish with chocolate shavings, a dollop of whipped cream, or a sprinkle of crushed nuts for added texture and flavor.
Why This Recipe is Appealing:
The allure of these Mini Bailey’s Chocolate Cheesecakes lies in their perfect blend of flavors and textures. The crunchy Oreo crust provides a delightful contrast to the creamy cheesecake filling, while the Bailey’s adds a hint of sophistication. The semi-sweet chocolate enhances the richness, making each bite a decadent experience. Topping it all off, the smooth ganache glaze adds a professional touch that elevates the presentation.
Making these mini cheesecakes is not just about creating a delicious dessert; it’s about the joy of the process. From grinding the Oreos to melting the chocolate, each step is a sensory pleasure. These mini cheesecakes are perfect for sharing, making them ideal for gatherings and celebrations. Yet, they are also small enough to enjoy as an individual treat, making any day special.
Whether you follow the recipe to the letter or make your own adjustments, these Mini Bailey’s Chocolate Cheesecakes are sure to become a favorite in your baking repertoire. Their rich, indulgent flavor, combined with the ease of making them, makes this recipe a go-to for both novice and experienced bakers. Enjoy the process, savor the results, and share the joy with those you love.

