Would you like to save this?
Graduation Cake Recipe
If you’re looking for a Graduation Cake Recipe that feels festive, looks bakery-style, and still works for a home baker, this is the one I come back to again and again—a moist, fluffy layer cake with creamy buttercream frosting and simple decorations that make any graduation party feel extra special.
A Celebration Cake That Feels Personal
There’s something so sweet about a graduation cake. It’s not just dessert—it’s the centerpiece of the table, the thing everyone gathers around for photos, candles, and that proud little pause before the first slice comes out. This graduation Cake Recipe is designed for exactly that moment.
I like to make this as a classic vanilla layer cake with rich buttercream frosting, because vanilla is a real crowd-pleaser and pairs beautifully with all sorts of fillings and decorations. But I’ll also share a few easy ways to turn it into a chocolate cake, Sheet Cake, round cake, or even a graduation cap cake if you’re feeling creative. That’s the beauty of a good celebration cake—it can be elegant, playful, or somewhere right in the middle.
What makes this recipe special is the texture. It bakes up moist and fluffy, with a tender crumb that stays lovely even if you make it a day ahead. And for busy families planning a graduation party dessert table, that matters. A lot. You already have enough on your plate—sandwich trays, fruit platters, drinks in coolers, folding chairs in the backyard—so your party cake should be reliable.
I’ve made versions of this cake for high school graduations, college celebrations, and even one nursing school pinning ceremony where the proud mama cried before the frosting was finished. That’s the kind of cake this is: homemade, heartfelt, and worthy of a milestone.
Why You’ll Love This Recipe
- It makes a beautiful special occasion cake without tricky bakery-level techniques.
- The cake layers bake up moist, fluffy, and tender every time.
- You can make it as a round cake or a sheet cake.
- The flavor is classic and crowd-friendly—perfect for mixed-age parties.
- It works with buttercream frosting or cream cheese frosting.
- The decorating is simple, but it still looks polished and festive.
- It’s easy to customize with school colors, fondant decorations, or a diploma topper.
- You can prep parts ahead, which is a lifesaver for graduation week.
- It slices cleanly, travels well, and serves a crowd.
- It feels homemade and warm, but looks like a custom cake from a bakery case.
Ingredients
For the vanilla cake layers:
- 3 cups all-purpose flour
- 2 1/2 teaspoons baking powder
- 1/2 teaspoon baking soda
- 1 teaspoon fine salt
- 1 cup unsalted butter, softened
- 2 cups granulated sugar
- 4 large eggs, room temperature
- 1 tablespoon pure vanilla extract
- 1 cup sour cream, room temperature
- 1 cup whole milk, room temperature
For the buttercream frosting:
- 1 1/2 cups unsalted butter, softened
- 6 cups powdered sugar, sifted
- 4 to 5 tablespoons heavy cream or whole milk
- 2 teaspoons pure vanilla extract
- 1/4 teaspoon salt
For decorating:
- Gel food coloring in school colors
- 1/2 cup chocolate candy melts or black fondant (for a graduation cap decoration, optional)
- 1/4 cup white fondant (for a diploma cake accent, optional)
- Sprinkles, edible glitter, or piped borders as desired
A few helpful ingredient notes:
- Use room temperature dairy and eggs. It helps the batter mix smoothly and creates a more even crumb.
- Sour cream gives this homemade cake its soft, moist texture. Plain full-fat Greek yogurt works in a pinch.
- Gel food coloring is better than liquid for bold school colors because it won’t thin your frosting.
- If you prefer a tangier frosting for a graduation dessert, swap the buttercream for cream cheese frosting.
- Good vanilla makes a difference here. I often use Nielsen-Massey or McCormick Pure Vanilla when I want that warm bakery-style flavor.

Directions
-
Prep your pans and oven.
Preheat your oven to 350°F. Grease and line two 9-inch round cake pans with parchment paper. If you’re making a sheet cake, use a greased 9×13-inch pan instead. A little parchment on the bottom is a small step, but it saves you a world of trouble later. -
Mix the dry ingredients.
In a medium bowl, whisk together the flour, baking powder, baking soda, and salt. This helps everything distribute evenly so you don’t get odd pockets in the crumb. -
Cream the butter and sugar.
In a large mixing bowl, beat the softened butter and granulated sugar with a hand mixer or stand mixer for 3 to 4 minutes, until the mixture looks pale and fluffy. Don’t rush this part. It builds the structure of your layer cake. -
Add the eggs and vanilla.
Beat in the eggs one at a time, then mix in the vanilla extract. If the batter looks a little curdled, that’s okay. Once the flour goes in, it usually smooths right out. -
Add sour cream and dry ingredients in turns.
Mix in the sour cream. Then add the dry ingredients in three additions, alternating with the milk, beginning and ending with the dry ingredients. Mix on low speed and stop as soon as the batter is combined. Overmixing can make a cake dense, and nobody wants that for a festive cake. -
Bake the cake.
Divide the batter evenly between the pans and smooth the tops. Bake for 28 to 32 minutes for round layers, or 32 to 38 minutes for a sheet cake. The tops should spring back lightly when touched, and a toothpick inserted in the center should come out with a few moist crumbs. -
Cool completely.
Let the cakes cool in the pans for 10 minutes, then turn them out onto wire racks to cool fully. Warm cake and frosting are not friends. I’ve tested that one the hard way more than once. -
Make the buttercream frosting.
Beat the softened butter until creamy, about 2 minutes. Gradually add the powdered sugar, then mix in 4 tablespoons of cream, vanilla, and salt. Beat until fluffy, about 3 more minutes. If needed, add the last tablespoon of cream for a softer, spreadable texture. -
Level and fill the cake.
If necessary, trim the domed tops with a serrated knife. Place one cake layer on your serving plate or cake stand, spread a generous layer of buttercream on top, then add the second layer. For a bakery style cake look, use an offset spatula and turntable if you have one—but a butter knife works fine too. -
Crumb coat and chill.
Spread a thin layer of frosting all over the cake to trap loose crumbs. Chill for 20 minutes. This little pause makes the final coat much neater and easier. -
Finish frosting and decorate.
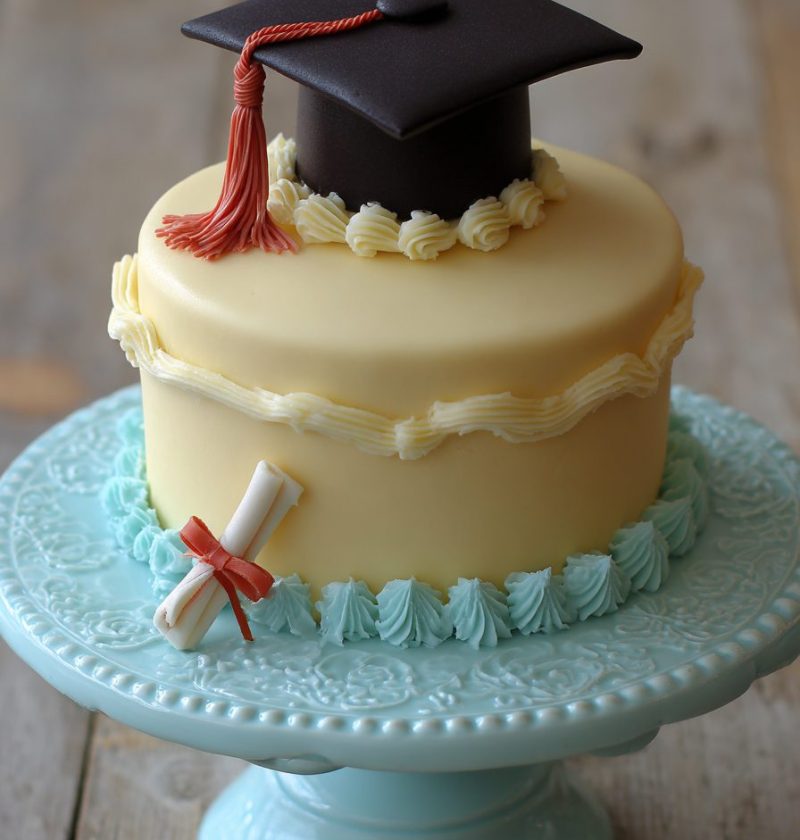
Add the final coat of buttercream and smooth it as much or as little as you like. Tint some frosting in school colors for borders, swirls, or piped rosettes. Add fondant decorations, a graduation cap cake topper, or a rolled fondant diploma tied with a thin strip of licorice or ribbon for a fun finishing touch. -
Slice and serve.
Let the frosted cake sit at room temperature for about 20 to 30 minutes before serving if it has been chilled. That brings back the soft texture and richer flavor.
Servings & Timing
- Yield: 12 to 16 slices
- Prep Time: 35 minutes
- Bake Time: 30 minutes
- Chill/Rest Time: 20 minutes
- Total Time: About 1 hour 25 minutes
If you decorate more elaborately, give yourself another 20 to 30 minutes. Worth it? Usually, yes.
Variations
- Chocolate Graduation Cake: Replace 1/2 cup flour with 1/2 cup unsweetened cocoa powder and add 2 extra tablespoons milk for a rich chocolate cake version.
- Cream Cheese Frosting: Use a cream cheese frosting if you want a slightly tangy finish that pairs beautifully with vanilla cake.
- Sheet Cake Shortcut: Bake the batter in a 9×13-inch pan for an easy Cake Recipe that’s perfect for feeding a crowd.
- Lemon Celebration Cake: Add 1 tablespoon lemon zest to the batter for a bright, springy flavor that feels wonderful at May and June parties.
- Confetti Party Cake: Fold 1/2 cup rainbow jimmies into the batter for a playful graduation party dessert.
- Berry-Filled Layer Cake: Spread a thin layer of strawberry or raspberry preserves between the layers for fresh fruit flavor and a pretty surprise inside.
Storage & Reheating
Store the finished cake covered at room temperature for up to 1 day, or in the refrigerator for up to 4 days. If your kitchen runs warm, I’d refrigerate it, especially with detailed cake decorating.
For longer storage, freeze unfrosted cake layers wrapped tightly in plastic wrap and foil for up to 2 months. Thaw overnight in the refrigerator, then bring to room temperature before frosting.
You can also freeze a fully frosted cake, though simple designs hold up better than delicate fondant decorations. Let it thaw in the refrigerator overnight, then rest on the counter for 30 to 60 minutes before serving.
For make-ahead planning, bake the layers one day ahead and frost the next day. Honestly, that’s often my favorite way to do it. Less stress, better focus, prettier cake.
Notes
This recipe was tested a few different ways, and here’s what stood out. Sour cream gave the best balance of moisture and structure. Yogurt worked too, but the crumb came out slightly tighter. Cake flour made the texture extra soft, yes, but all-purpose flour gave a sturdier result for stacking and decorating, which matters for a custom cake look.
If you want sharp, smooth sides, chill the cake after the crumb coat and again after the final coat. If you want a softer, more homemade finish, don’t fuss too much. A celebratory cake doesn’t need to be perfect to be beautiful.
One more thing—don’t overbake. Pull the layers as soon as they test done. A minute or two can make the difference between a moist cake and a dry one, especially in lighter vanilla cake recipes.
And if you’re decorating with school colors, make a little extra frosting. You’ll almost always need more than you think for borders, lettering, and fixing those tiny “oops” spots.
FAQs
Can I make this graduation cake recipe as cupcakes?
Yes. This batter makes about 24 cupcakes, and they usually bake in 18 to 22 minutes at 350°F.
What’s the best frosting for a graduation cake?
Buttercream frosting is the easiest for decorating and piping, while cream cheese frosting gives a softer, tangier flavor. For warm-weather parties, buttercream is more stable.
Can I use a box cake mix instead?
You can, especially if you’re short on time, but this homemade cake has a richer flavor and fluffier texture that really stands out for a special occasion cake.
How do I make a graduation cap cake decoration?
Use a chocolate square or fondant-covered board for the top, then place it over a frosted cupcake or a small mound of cake. Add a candy or licorice tassel for the tassel detail.
Can I color the cake layers to match school colors?
Yes, though I’d keep the color light for the best texture. Gel color works best and won’t add too much extra liquid.
Why did my cake turn out dense?
Usually it’s from overmixing, cold ingredients, or too much flour. Spoon and level your flour instead of scooping straight from the bag.
Can I make this in a sheet pan for a bigger party?
Yes. A sheet cake version works beautifully for serving a crowd and makes decorating with school logos or messages even easier.
How far ahead can I decorate the cake?
You can fully decorate it 1 day ahead. Store it covered in the fridge, then bring it closer to room temperature before serving for the best flavor and texture.
Conclusion
This Graduation Cake Recipe is festive, dependable, and easy to customize, whether you want a simple vanilla layer cake or a more elegant bakery-style graduation dessert. It’s moist, fluffy, and made for milestone moments that deserve something a little extra special.
If you bake it, I’d love to hear how it turned out. Leave a comment, share your school-color decorating ideas, or save this recipe for your next celebration cake, party cake, or special occasion dessert.